
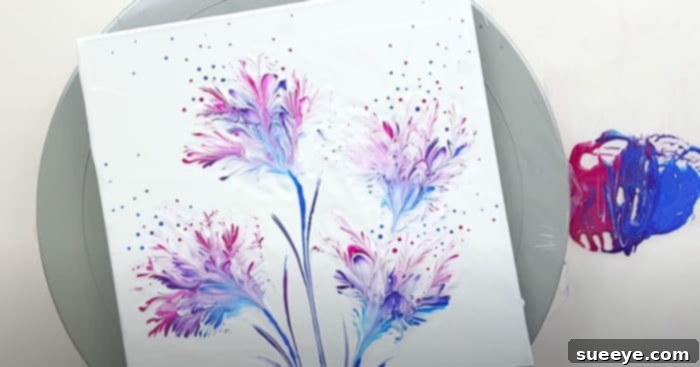
Create Stunning & Unique Steel Wool Flower Paintings for Your Home Decor
Are you searching for a creative yet incredibly simple way to refresh your living space without breaking the bank? Look no further! This ingenious steel wool flower painting tutorial offers an exceptional solution, allowing you to craft breathtaking, customizable artwork in just a short amount of time. Inspired by the brilliant techniques shared by Designer Gemma77, this project transforms ordinary materials into a unique masterpiece that will undoubtedly capture attention. Whether you’re an experienced artist or picking up a paintbrush for the very first time, you’ll be amazed at how easily you can create vibrant, textured flowers that reflect your personal style.
The beauty of this DIY project lies in its remarkable simplicity and vast potential for personalization. From the moment you select your color palette to the final details, every step is an opportunity to infuse your creation with your unique aesthetic. Imagine a cluster of soft yellow and white blossoms perfectly complementing a minimalist theme, or perhaps a bold array of pink, blue, and purple flowers adding a vibrant pop of color to a lively room. The choice is entirely yours! This technique is not only satisfying but also incredibly versatile, making it possible to produce multiple pieces for an eye-catching floral collage, adding an artistic touch to any wall in your home.
Why Choose Steel Wool Flower Painting for Your Next DIY Project?
In a world of mass-produced decor, creating your own art offers a distinct sense of accomplishment and a personal touch that store-bought items simply cannot replicate. Steel wool flower painting stands out for several compelling reasons, making it an ideal choice for crafters of all skill levels:
- Unmatched Affordability: You don’t need expensive art supplies to achieve professional-looking results. The materials required are readily available and budget-friendly, often found in your home or at a local hardware store, making this an ideal project for anyone looking to decorate on a shoestring budget.
- Beginner-Friendly Technique: If you’ve ever felt intimidated by painting or believe you lack artistic talent, this is the perfect starting point. The unique application method using steel wool simplifies the process of forming petals, yielding beautiful, organic textures without requiring advanced drawing or traditional painting skills. It’s truly a technique anyone can master.
- Rapid Creation Time: In today’s fast-paced world, finding time for elaborate DIY projects can be challenging. This tutorial allows you to create a complete piece of art relatively quickly, offering instant gratification and a tangible reward for your efforts. You can complete a stunning piece in just an afternoon!
- Limitless Customization: From selecting specific paint colors to deciding on the size and arrangement of your flowers, every element of this project can be tailored to match your existing home decor, a particular room’s aesthetic, or even a specific mood you wish to evoke. Create monochromatic schemes or vibrant explosions of color – the possibilities are endless.
- Unique Textured Finish: The unexpected use of steel wool imparts a distinctive, captivating texture to your flowers. This adds depth, dimension, and a tactile quality that sets this artwork apart from traditional brush paintings. The resulting pieces are visually engaging and offer a modern twist on classic floral motifs.
This project is more than just painting; it’s an opportunity to unwind, express your creativity, and ultimately, adorn your home with art that holds personal significance. It’s a wonderful way to bring nature-inspired beauty indoors, regardless of the season, and create conversation-starting decor.
Essential Materials for Your Steel Wool Flower Painting Project:
Gathering your materials is the first exciting step in bringing your floral vision to life. You’ll be surprised at how few items you need for such a stunning outcome, making this project accessible and affordable. Here’s a comprehensive list to ensure you have everything ready:
- Canvas: The foundation of your artwork. Stretched canvases are widely available in various sizes and are perfect for single pieces or a series. For an even more economical option, canvas boards or pre-primed wood panels can also be used, especially for practice or smaller works. Choose a size that suits your space – a small 8×10 for a desk accent, or a larger 16×20 for a wall centerpiece.
- Acrylic Paints: These are highly recommended for this project due to their versatility, quick drying time, vibrant colors, and easy clean-up with water. Select a range of colors for your flowers (e.g., various shades of pink, purple, blue, or sunny yellows and oranges). Don’t forget a base color (often white or a light neutral) and essential green for your stems and leaves.
- Fine-Grade Steel Wool: This is the secret ingredient that gives these paintings their unique texture! Opt for a finer grade (such as #0000 or #000) as it will create softer, more delicate, and intricate petal textures. Coarser grades might be too harsh. You can usually find this in hardware stores, art supply shops, or even online.
- Paint Brush (Optional, but recommended for base coat) or Paint Knife: While the steel wool handles the flowers, a broader, flat paintbrush is ideal for applying an even and smooth base coat across your canvas. A small detail brush might also be useful for any tiny touch-ups or adding delicate flower centers later, though it’s not strictly necessary.
- Spoon: An ordinary kitchen spoon becomes an extraordinary tool for creating graceful stems and leaves. Any standard dessert or teaspoon will work perfectly; its curved edge provides unique artistic possibilities.
- Palette or Plate: Something to hold and mix your paints on. An old ceramic plate, a plastic lid, a disposable palette, or even a simple piece of cardboard will suffice.
- Water Container: Essential for rinsing brushes and, if needed, slightly thinning your acrylic paints to achieve desired consistency.
- Paper Towels or Rags: Always have these on hand for cleaning up spills, wiping brushes, and dabbing excess paint from your steel wool, ensuring crisp color application.
Having all your materials organized and within reach before you begin will ensure a smooth, enjoyable, and mess-free creative process.
Step-by-Step Guide to Your Steel Wool Flower Painting:
Now that you have all your supplies ready, let’s dive into the fascinating process of transforming a blank canvas into a blooming garden. Follow these straightforward steps to unleash your inner artist and create a truly unique piece.
Step One: Laying the Foundation – The Base Coat
Begin by preparing your canvas with a solid, even layer of paint. Designer Gemma77, in her inspiring tutorial, skillfully uses white paint for this initial step, which is an excellent choice. A white base provides a pristine backdrop that allows your chosen flower colors to truly pop and radiate vibrancy. However, don’t feel limited! You could also opt for a very light pastel shade – a soft sky blue, a muted sage green, or a pale cream – to create a different atmospheric effect and complement your flower colors. Using a wider paintbrush, apply the paint smoothly and evenly across the entire surface of your canvas, ensuring full and opaque coverage. The key here is to apply a consistent coat that is still wet when you move on to the next step. This crucial wet-on-wet technique is essential for achieving the unique blending and textured effects when applying your flower colors with steel wool.
Step Two: Crafting Exquisite Petals with Steel Wool
This is where the magic truly happens and your flowers begin to bloom! While your base coat is still wet and pliable, you will begin forming your flowers using the steel wool. Start by preparing your chosen paint colors on your palette. For a beautiful “ombre” or gradient effect within your petals, arrange two or three complementary or analogous colors side by side on your palette – for instance, a light pink next to a darker rose, or a soft yellow beside a warm orange. Gently dip a small, loose piece of your fine-grade steel wool into these paints, allowing it to pick up both hues simultaneously. This careful loading will be key to creating those wonderfully blended and multi-tonal petals.
With your loaded steel wool, gently press it onto the wet canvas in the desired location for your flower. Then, using a slow, deliberate rotating downward motion, create the petals of your flower. The rotating action, combined with slight pressure, will naturally splay the steel wool fibers, leaving behind organic, textured petal shapes. Experiment with the amount of paint and pressure; lighter touches create delicate, airy petals, while slightly more pressure can produce fuller, more pronounced blooms. You can layer colors subtly by re-dipping and rotating in the same area or create distinct petals by moving to a new spot. Don’t be afraid to create flowers of varying sizes, overlapping them slightly, and positioning them dynamically to add depth and dynamism to your composition.
Image showcasing the steel wool flower painting technique, inspired by Designer Gemma77’s tutorial, demonstrating the unique texture of the petals.
Step Three: Adding Natural Stems and Leaves with a Spoon
Once your beautiful steel wool flowers are taking shape and you’re happy with their appearance, it’s time to ground them with elegant stems and delicate leaves. This is where your humble kitchen spoon transforms into an artistic tool, offering an unexpected yet effective way to add these organic elements. Dip the convex side of your spoon into green paint (or a color that complements your flowers, perhaps a darker shade from your palette for a cohesive look). Then, starting from the bottom center of a flower, press the spoon gently onto the canvas and draw it downwards towards the bottom edge of your canvas in a smooth, fluid motion. The natural curve of the spoon will help create organic, varied stem lines, much like real plant stalks. You can vary the pressure to create thicker or thinner stems, adding visual interest and a natural feel to your composition.
But the spoon’s utility doesn’t end there! You can also use its edge or tip to create charming small leaves branching off the stems. A quick, gentle dab or a short, curved stroke will form these lovely accents, bringing more life to your floral scene. Additionally, the spoon can be used to softly smooth out the very bottom edges of your flowers where they meet the stems, creating a seamless transition and a more polished, natural finish. This unique application method adds an unexpected tactile element and an artistic flair to your finished piece, proving that remarkable art doesn’t always require traditional art tools.
Detail image demonstrating the spoon technique for painting flower stems and leaves, as shown in Designer Gemma77’s video, highlighting the organic lines created.
Step Four: Refining and Finishing Touches
Once your main elements – the vibrant flowers and graceful stems – are in place, take a step back and assess your artwork from a distance. This is the moment for any final refinements or personal embellishments. You might use a small detail brush to add tiny dots of contrasting color to the center of your flowers, simulating stamens or pollen, for an added touch of realism. You could also use it to enhance any specific petal edges or to add more subtle veins to your leaves if desired. Allow your masterpiece to dry completely – acrylic paints usually dry to the touch within a relatively short time (30 minutes to a few hours), but for full curing and durability, it’s best to wait 24-48 hours before handling extensively.
For added longevity and to protect your beautiful artwork from dust, dirt, and UV light, consider applying a clear acrylic varnish. You can choose between a matte, satin, or glossy finish, depending on the look you prefer for your piece. A matte varnish will preserve the raw, textured feel, while a glossy finish can enhance the depth and vibrancy of your colors, giving it a more polished appearance. This protective layer will not only preserve your hard work but can also make cleaning easier in the long run.
Beyond the Canvas: Displaying Your Steel Wool Masterpiece
Congratulations, you’ve created a beautiful and truly unique piece of art! Now, it’s time to proudly display your steel wool flower painting and let it enhance your home decor. Here are a few ideas to inspire you:
- Gallery Wall Creation: If you’ve created multiple canvases using this technique, arrange them together in a thoughtfully curated gallery wall. Varying the sizes, frame styles, and color schemes of your individual pieces can create a dynamic and engaging display that tells a cohesive artistic story.
- Focal Point: A single, larger canvas created with the steel wool technique can serve as a stunning focal point above a mantelpiece, in a hallway, or brightening up a quiet corner of a living room or bedroom. Its unique texture will draw the eye.
- Thoughtful Gift: Handmade art makes an incredibly personal and cherished gift for birthdays, housewarmings, holidays, or just to show appreciation. Your friends and family will surely appreciate the effort, creativity, and love you poured into creating something so unique.
- Integrated Decor: Think about how your painting integrates with existing decor. A vibrant piece can energize a neutral room, while softer tones can complement a serene, calming aesthetic. Consider framing your finished piece to elevate its presence.
- Experiment with Surfaces: While canvas is traditional, this technique can be adapted to other surfaces like properly primed wood panels, thick watercolor paper, or even fabric (using fabric paints). Just ensure your chosen paints are suitable for the material.
Embrace Your Inner Artist with Steel Wool Flower Painting
This steel wool flower painting technique is a testament to the idea that art doesn’t have to be complicated, expensive, or require years of training to be truly impactful and beautiful. It offers a refreshing break from conventional methods, empowering anyone to create stunning, textured floral designs with surprising ease. Whether you’re looking for a new creative hobby, a unique and heartfelt gift, or just a beautiful addition to your home decor that reflects your personal touch, this project ticks all the boxes. So, gather your simple materials, unleash your imagination, and get ready to create a garden of artistic wonders on canvas. We encourage you to explore different color combinations, experiment with flower sizes and arrangements, and truly make this project your own. Share your beautiful creations and inspire others to discover the joy and simplicity of steel wool painting!