
Crafting Charm: How to Create Adorable DIY Clay Pot Highland Cows and Horses
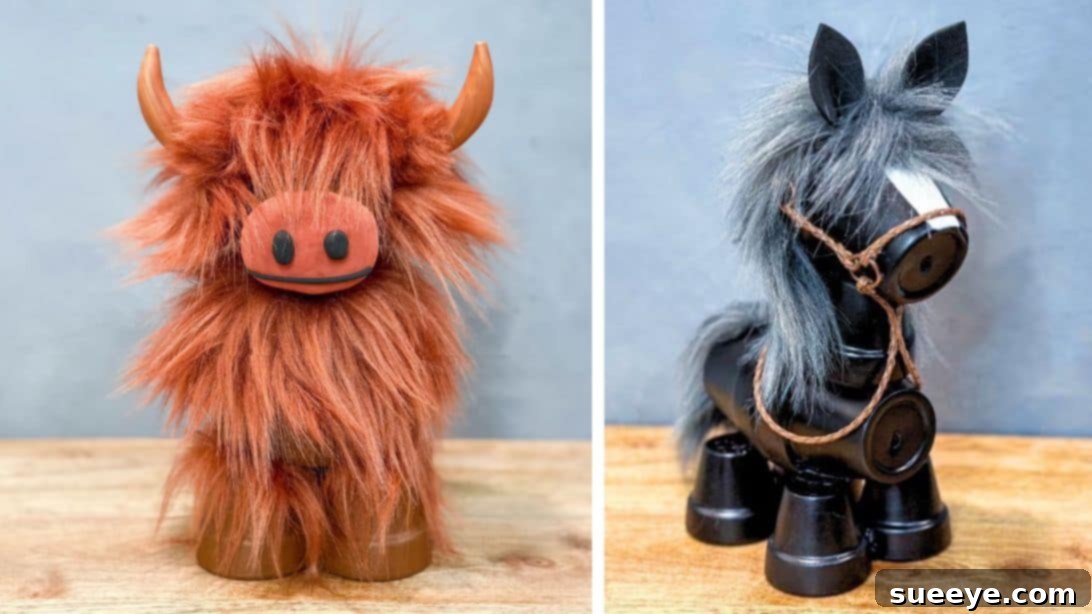
Are you searching for a delightful and rewarding craft project to infuse character into your home or garden? Look no further! We’ve stumbled upon an exceptionally charming idea that transforms simple terra cotta pots into irresistibly cute highland cows and majestic horses. Inspired by the creative genius of Patti J. Good’s YouTube tutorial, this DIY endeavor is not only incredibly satisfying but also yields charming decorative pieces that are perfect for almost any setting. Whether you’re looking to adorn your garden with whimsical farm animals, add a touch of rustic charm to your indoor spaces, or even craft unique, heartfelt gifts, these clay pot creations are a fantastic choice. They’re surprisingly easy to assemble, require readily available materials, and offer endless possibilities for personalization. Let’s dive into the world of creative crafting and bring these adorable critters to life!
Why Choose Terra Cotta Pots for Your DIY Animals?
Terra cotta pots are a popular choice for crafters for many excellent reasons. Their natural, earthy aesthetic provides a wonderful base for animal figures, lending a rustic and authentic feel to your creations. They are affordable, widely available at most garden centers and craft stores, and surprisingly durable, especially when properly assembled and optionally sealed. Their versatile conical and cylindrical shapes make them incredibly adaptable for building various animal body parts, from sturdy bases and legs to rounded heads and bodies. Moreover, working with pots offers a unique structural challenge that often results in robust and stable decorative pieces, making them ideal for both indoor and outdoor display. This project beautifully showcases how ordinary gardening supplies can be repurposed into extraordinary decorative art, adding a touch of handmade whimsy to any environment.
Gathering Your Crafting Essentials: Materials for Your Clay Pot Masterpiece
Before you embark on this exciting crafting journey, it’s essential to gather all your materials. Having everything at hand will ensure a smooth and enjoyable creative process, minimizing interruptions. Here’s a comprehensive list of what you’ll need, along with a few tips to help you choose the right supplies:
- Small Terra Cotta Pots: You’ll need four of these per animal to serve as the legs. Look for pots that are uniform in size to ensure your animal stands evenly.
- Medium Terra Cotta Pots: Essential for the main body and head components. Typically, two per animal will suffice. Choose pots that complement the size of your small pots.
- Faux Fur: This is the key ingredient for giving your highland cow its distinctive shaggy coat and your horse its flowing mane and tail. Select a color that suits your vision – browns, creams, grays, or even black work wonderfully. Opt for fur with a good pile and soft texture for the most realistic and appealing finish.
- Loctite Power Grab (or similar strong construction adhesive): This heavy-duty adhesive is crucial for securely bonding the terra cotta pots together. It provides a permanent, weather-resistant hold, ensuring the structural integrity of your animal.
- Oven Bake Clay: Ideal for sculpting durable, detailed features like the cow’s horns or other specific facial elements. It bakes hard in a conventional oven and holds its shape beautifully, allowing for fine detailing.
- Air Dry Clay: A good alternative or supplement for smaller details that don’t require oven baking, or if you prefer a no-bake option. It’s easy to work with and dries firm, perfect for noses or mouths.
- Spray Paint (Matte Black Recommended): Provides a uniform and durable base coat for your pots, helping the subsequent acrylic paints and fur stand out. Matte black offers a classic, rustic, and sophisticated look. Always use spray paint in a well-ventilated area and follow safety instructions.
- Acrylic Paint (Pumpkin and Burnt Umber Recommended): These colors are perfect for adding warmth and natural tones, especially for shading, detailing eyes, or adding texture. Feel free to experiment with other acrylic colors to match your home decor or personal preference.
- Paintbrush: A variety of sizes will be helpful – a larger brush for base coating and smaller, finer brushes for intricate detail work on clay features.
- Pencil: Useful for marking cutting lines on the back of the fur fabric or sketching out your clay designs before sculpting.
- E6000 Adhesive: A strong, multi-purpose adhesive that works exceptionally well for bonding fur, clay features, and other embellishments to the painted terra cotta surfaces.
- Hot Glue Gun and Glue Sticks: Excellent for quick, temporary holds and for attaching faux fur pieces swiftly. While strong construction adhesive provides the ultimate bond for the pot structure, hot glue is fantastic for the decorative, non-load-bearing elements, offering instant adhesion.
Crafting Your Adorable Highland Cow: A Step-by-Step Guide
The highland cow, with its shaggy fringe, gentle eyes, and impressive horns, is a truly iconic and beloved animal. Recreating its charm in miniature form with terra cotta pots is a delightful and rewarding process. Follow these detailed steps to build your very own:
Step 1: Assembling the Structure and Applying the Base Coat
Begin by constructing the foundational body of your highland cow. Take four small terra cotta pots, which will serve as the legs. Carefully apply a generous amount of your strong construction adhesive (such as Loctite Power Grab) to the rims of two pots, then firmly press them together, ensuring they are perfectly aligned. Repeat this process for the other pair of small pots, creating two sets of ‘double legs.’ Once these are dry enough to handle, apply adhesive to the bottom of each pair and attach them to the base of one of your medium terra cotta pots, which will form the cow’s main body. Position this medium pot facing down, ensuring the ‘legs’ are evenly spaced and stable. Allow this initial assembly to dry completely, ideally overnight, to ensure maximum bond strength and stability.
Next, take your remaining medium-sized pot, which will become the head. Once the body structure is fully dry, apply construction adhesive to the rim of the ‘body’ pot and securely attach the ‘head’ pot on top, positioning it sideways. This orientation creates a more natural animal posture. Again, allow this connection to cure fully. Once the entire structure is robust and dry, it’s time to prime the surface. In a well-ventilated area, apply an even coat of matte black spray paint to the entire terra cotta structure. This base coat will give your cow a consistent, rustic finish and prepare the surface for additional detailing. Let the paint dry thoroughly according to the manufacturer’s instructions before proceeding.
While waiting for the paint to dry, you can begin sculpting the cow’s distinctive horns. Using your oven-bake clay, shape two realistic horns. Pay close attention to their natural curve, texture, and tapering tips. Refer to images of highland cow horns for accurate inspiration. Once shaped, bake them according to the clay manufacturer’s instructions until they are hard and durable. Allow them to cool completely.
Step 2: Adding the Luxurious Faux Fur Coat and Ears
The faux fur is what truly brings your highland cow to life, giving it its iconic shaggy appearance. Begin by cutting small pieces of fur for the ‘hair’ around the face and a partial ‘mane.’ When cutting faux fur, always remember to cut only the fabric backing with a craft knife or sharp scissors, avoiding cutting the fur fibers themselves. This technique helps maintain the natural flow and shaggy appearance of the fur. Apply a thin line of E6000 adhesive or hot glue around the upper edges of the small ‘leg’ pots and carefully attach small strips of fur, allowing them to hang slightly. Gently brush the fur downwards to blend it seamlessly and cover the pot rims.
Next, cut a larger piece of faux fur that will wrap around the ‘neck’ area and extend down the back of the ‘body’ pot. Apply adhesive to the pot surface and firmly press the fur into place, ensuring good coverage and a seamless transition. Take another piece of fur for the iconic ‘fringe’ or ‘hair’ that will fall over the cow’s face. This piece should be shaped to cover the top portion of the ‘head’ pot, creating the characteristic peek-a-boo look. You’ll also need two smaller, rounded pieces of fur for the ears. Set these aside for assembly in a later step.
Step 3: Sculpting and Attaching Facial Features
Now it’s time to give your cow its adorable expression. Take your small, rounded fur pieces designated for the ears. Apply a small dab of E6000 adhesive to the center of each piece, then fold them slightly and gently press the edges together to form a more defined, three-dimensional ear shape. You can trim them slightly with sharp scissors to achieve a nice, rounded, ear-like contour.
For the mouth and nose area, use your air-dry clay (or more oven-bake clay, if preferred). Shape a small, elongated oval or rounded rectangle for the snout, ensuring it proportionally fits the ‘head’ pot. Then, take a tiny piece of black clay or use black acrylic paint to form the nostrils and a gentle smile line for the mouth, adding character. Adhere these sculpted clay features to the front of the ‘head’ pot using a combination of E6000 adhesive for a strong, lasting bond and a bit of hot glue for immediate hold while the E6000 cures. Finally, take your baked clay horns and securely attach them to the top-sides of the ‘head’ pot, just behind where the fringe will eventually lay. Again, use both adhesives to ensure they are firmly and permanently in place.
Step 4: The Final Flourishes – Bringing It All Together
With all the components ready, it’s time for the final assembly of the head and the finishing touches. Carefully attach the shaped fur ears to the sides of the ‘head’ pot, positioning them just behind where the main facial fringe will fall. Next, take the larger piece of faux fur you prepared for the iconic ‘fringe’ and adhere it to the top-front of the ‘head,’ allowing the fur to hang down naturally over the face. Ensure it’s centered and covers the forehead area well, giving your cow its characteristic shaggy look.
Now, firmly attach the sculpted clay mouth and nose piece to the front of the face, beneath the fringe, using both E6000 and hot glue for a secure bond. Once these main features are in place, take a moment to inspect your cow. You might find small empty spots or gaps in the fur coverage, particularly where the head meets the body or around the face. Use smaller scraps of faux fur, trimming them as needed, and hot glue them into these areas to create a full, seamless, and fluffy appearance. For the ultimate finishing touch, cut a larger, rounded piece of faux fur and adhere it to the very back of the ‘head’ pot and neck area, creating a fuller, more complete look for your cow’s head and neck. Your charming terra cotta pot highland cow is now complete and ready to bring joy!
Expanding Your Herd: Crafting a Clay Pot Horse
While the original video tutorial by Patti J. Good provides specific instructions for the horse (and we highly recommend watching it for detailed visuals!), the fundamental principles you’ve learned from crafting the cow can be wonderfully adapted to create a majestic clay pot horse. The structural base will be very similar, utilizing four small pots for legs and two medium pots for the body and head, assembled in the same manner with strong construction adhesive.
For the horse, you will skip the horns entirely. Instead, focus on shaping more defined, upright ears. These can be crafted from either faux fur (cut into a more triangular, pointed horse ear shape) or air-dry clay. The biggest aesthetic differences will be the mane and tail. Instead of a shaggy fringe across the face, you’ll want to create a flowing mane down the ‘neck’ of the horse. This can be achieved using longer strips of faux fur, cut to resemble horse hair, or even strands of yarn if you prefer a different texture, securely glued along the top of the ‘neck’ pot. A beautiful, long tail can be fashioned from several pieces of longer faux fur or braided yarn, securely attached to the back of the ‘body’ pot.
For the face, sculpt a more elongated snout from air-dry clay, characteristic of a horse. Add subtle nostrils and possibly paint realistic, gentle eyes with your acrylic paints. The elegant simplicity of the terra cotta pots combined with thoughtfully applied fur and clay features will allow you to capture the grace and spirit of a horse. Don’t hesitate to experiment with different shades of fur (black, brown, white, or even spotted patterns) to create a diverse stable of equine companions, each with its unique personality. The possibilities for customization are endless, making each horse a unique work of art.
Tips for Personalization and Care
These DIY clay pot animals are fantastic canvases for your creativity, allowing you to infuse your personal style into each piece. Here are some ideas to make your creations truly unique and ensure they last:
- Color Variations: Don’t feel limited to matte black. Experiment with different base coat colors like terra cotta red, earthy browns, vibrant greens, or even whimsical pastels to match your decor. The faux fur also comes in various shades – imagine a snowy white highland cow or a dappled horse!
- Accessorize with Flair: Add miniature bells, colorful ribbons, small fabric flowers, or even tiny scarves around their necks or ears for extra charm and personality. Tiny spectacles or miniature hats could give them a quirky, anthropomorphic appeal.
- Detailed Eye Expressions: While the tutorial focuses on simple features, you could paint more detailed eyes using small brushes and acrylic paints to convey different expressions. Alternatively, glue on appropriate-sized craft eyes or even googly eyes for a more playful, cartoonish look.
- Durability for Outdoors: If planning to place your charming animals outdoors, especially in areas exposed to rain or direct sunlight, it is highly recommended to apply a clear, waterproof sealant. Choose a matte or glossy sealant suitable for outdoor use over the entire finished piece (after all adhesives and paints have fully cured for at least 24-48 hours). This will protect the paint and clay from the elements and extend their lifespan.
- Cleaning and Maintenance: For routine cleaning and dust removal, a soft, dry brush or a can of compressed air works well. Avoid harsh chemical cleaners or excessive moisture, especially if the piece has not been sealed, to prevent damage to the paint and adhesives.
A Delightful Addition to Any Space
The beauty and versatility of these handmade clay pot animals lie in their ability to enhance almost any setting. They make exceptional garden art, peeking out from behind vibrant flower beds, adorning a sunny patio, or greeting guests by the entryway. Indoors, they can become charming shelf decor, unique centerpieces for a rustic-themed event, or playful additions to a child’s room or nursery. Beyond personal enjoyment, these adorable creations also make thoughtful, handcrafted gifts for animal lovers, farmers, crafters, or anyone who appreciates a touch of rustic whimsy and handmade charm. And if you’re feeling entrepreneurial, they can be fantastic items to sell at local craft fairs, farmers’ markets, or online marketplaces, showcasing your unique talent and creativity to a wider audience.
Conclusion: Unleash Your Inner Crafter!
Crafting these adorable DIY clay pot highland cows and horses is more than just a project; it’s an opportunity to engage your creativity, learn new techniques, and produce something truly special and heartwarming. We hope this comprehensive guide, inspired by Patti J. Good’s wonderful tutorial, empowers you to start your own terra cotta animal adventure. Don’t be afraid to experiment with colors, textures, and accessories; personalize your creations to reflect your unique style. Most importantly, have fun with the process and enjoy the satisfaction of bringing these charming farm animals to life with your own hands. Once you’ve completed your first charming creature, you’ll likely be inspired to create a whole herd! Happy crafting!
All image credit belongs to Patti J. Good via YouTube. Follow and subscribe to her channel for more amazing DIY inspiration!