
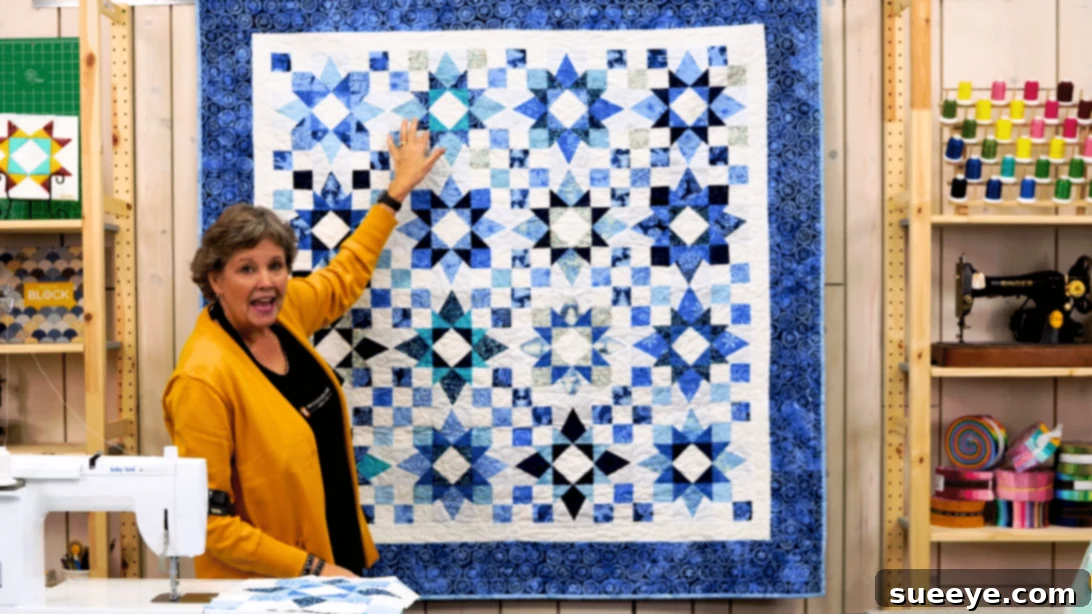
Embark on a heartwarming journey into the world of quilting with the delightful “Winter Star” Quilt. Whether you’re a seasoned quilter looking for a quick and satisfying project or a complete beginner eager to learn a new skill, this tutorial is tailor-made for you. Presented by the renowned Missouri Star Quilt Company on YouTube, this project offers a perfect blend of simplicity and elegance, promising a beautiful, star-studded creation that will bring warmth and charm to any setting. Imagine snuggling under your own handmade quilt, a testament to your creativity and craftsmanship, perfect for those chilly winter evenings or as a thoughtful gift.
Quilting is more than just sewing fabric; it’s an art form that combines precision, patience, and passion, resulting in a timeless piece of textile art. The “Winter Star” Quilt is an excellent starting point for anyone new to the craft, providing clear, step-by-step instructions that demystify the process. Experienced quilters will appreciate its straightforward design, making it an ideal project for using up fabric scraps or creating multiple quilts in a shorter timeframe. This guide will walk you through everything you need to know, from gathering your materials to piecing together each intricate block, ensuring a rewarding and enjoyable experience from start to finish. Get ready to transform simple squares of fabric into a stunning heirloom!
Why the “Winter Star” Quilt is Perfect for You
The “Winter Star” Quilt stands out as an exceptional project for several compelling reasons. Its design is both classic and versatile, featuring a striking star motif that evokes a sense of wonder and comfort. This timeless appeal means your quilt will remain a cherished item for years to come, seamlessly fitting into various home decors. For beginners, the pattern is designed to build confidence, introducing fundamental quilting techniques such as accurate cutting, precise piecing, and effective pressing without overwhelming complexity. You’ll master essential skills like creating half-square triangles and assembling block units, all while watching your fabric come alive.
Experienced quilters, on the other hand, will find the “Winter Star” Quilt a refreshing opportunity for creative expression. Its structure allows for endless customization through fabric choices – from vibrant holiday themes to sophisticated monochromatic schemes, or even a scrappy, eclectic look. It’s a fantastic pattern for practicing chain piecing to maximize efficiency or experimenting with different quilting motifs on the finished top. Moreover, the sense of accomplishment that comes with completing a beautiful, handmade quilt is unparalleled, making this project a truly fulfilling endeavor for quilters of all levels. The clear instructions from Missouri Star ensure that every step is understandable, making your quilting journey smooth and enjoyable.
RELATED: Explore More Winter Quilt Ideas with Our Easy Winter Solstice Quilt Tutorial
Essential Materials for Your Winter Star Quilt
Before diving into the exciting world of fabric and stitches, it’s crucial to gather all your necessary materials. Having everything prepared beforehand ensures a smooth and uninterrupted quilting process. The beauty of the “Winter Star” Quilt lies in its adaptability, allowing you to choose fabrics that truly reflect your personal style and the desired aesthetic of your finished piece. For a classic winter look, consider blues, whites, and silvers. For a festive touch, reds and greens can be incorporated. Alternatively, embrace a modern vibe with bold, contrasting colors or subtle, harmonious tones. Remember, the quality of your materials will significantly impact the final look and feel of your quilt.
- 10″ Print Squares (Charm Packs or Fat Quarters): These will form the main design elements of your star blocks. Choosing a variety of prints within a cohesive color palette will add depth and visual interest.
- 10″ Background Squares: These squares provide the canvas for your star design, making the patterned fabrics pop. A neutral solid or a subtle blender fabric works best here.
- Inner Border Fabric: This fabric frames your quilt top and can either complement or contrast with your main blocks, defining the central design.
- Binding Fabric: Essential for finishing the edges of your quilt, providing durability and a polished look. Often, this fabric is chosen to tie all the colors of the quilt together.
- Backing Fabric: The fabric for the back of your quilt. This can be a solid, a large print, or even pieced from coordinating fabrics. Ensure it’s large enough to extend beyond the quilt top on all sides.
- Quilt Batting: The soft, insulating layer sandwiched between your quilt top and backing. Choose a batting type (cotton, polyester, blend) that suits your desired warmth and drape.
- Marking Pen, Pencil, or Chalk: For drawing lines on fabric, especially for diagonal stitching lines.
- Quilter’s Ruler: A clear, gridded ruler is indispensable for accurate measuring and cutting.
- Scissors or Rotary Cutter and a Cutting Mat: A rotary cutter significantly speeds up cutting and improves precision. Always use it with a self-healing cutting mat for safety and to protect your surfaces.
- Fabric Pins or Clips: To hold fabric layers together securely before stitching.
- Needle and Thread: High-quality thread that matches or blends with your fabrics is crucial for durable seams.
- Iron and Ironing Board: For pressing seams open or to one side, ensuring flat, crisp blocks and a professional finish.
- Sewing Machine: A reliable sewing machine is your best friend for piecing quilt blocks efficiently.
- Winter Star Quilt Pattern: Don’t forget to download the official pattern! It provides precise cutting dimensions and block layouts. Click here to download the pattern from Missouri Star.
How to Make a “Winter Star” Quilt: Step-by-Step Guide
Before you begin sewing, remember that precision is key in quilting. A consistent 1/4-inch seam allowance throughout your project will ensure your blocks fit together perfectly. Take your time with cutting and pressing, as these steps lay the foundation for a beautifully finished quilt. Refer to the official pattern for exact measurements and block layouts as you progress.
Step 1: Constructing Your First Star Block Units
Begin by carefully cutting all your fabrics according to the detailed instructions provided in your downloadable pattern. Accuracy at this stage is paramount for well-aligned quilt blocks. Take one of your smaller background squares and place it precisely at the center of your work area. Now, select two print squares and position them on opposite diagonal corners of the central background square. Ensure that the right sides of the fabrics are facing each other. This is a crucial step for achieving clean seams and the desired visual effect. Once aligned, stitch diagonally across each of the print squares. After stitching, carefully trim off the excess fabric, leaving a 1/4-inch seam allowance. Then, press the fabric open, revealing crisp corners. Repeat these exact steps for the remaining two corners of the central background square to complete your initial block unit. This technique is often referred to as “snowballing corners” and forms the foundational points of your star.
Step 2: Creating Dynamic Half-Square Triangle Units (HSTs)
Next, we’ll create the versatile half-square triangle (HST) units that add movement and dimension to your quilt. Take a 5-inch print square and a 5-inch background square. Place them together, with their right sides facing. Using your marking tool, draw a diagonal line from one corner to the opposite corner. Stitch a scant 1/4-inch seam on both sides of this drawn line. Once stitched, cut along the drawn diagonal line, separating the two stitched pieces. You now have two HSTs! Press the seams towards the darker fabric to minimize bulk and create a smoother finish. Now, make another set of these HST units. Once you have several HSTs, lay two of them together, ensuring their right sides are facing and that the fabric colors are opposite from each other (e.g., a print side facing a background side). Stitch them down both sides, then cut them in half across the seams, and press them open. This method creates smaller, combined HST units that will be used to form parts of your star points or connecting elements within your blocks.
Step 3: Assembling Complex Block Units
For the next phase of your quilt block construction, you’ll combine larger elements to form more intricate units. Begin by placing a large print square at the center of your workspace. Carefully align background strips along two opposite sides of this central print square, referring to the video tutorial for precise placement and orientation. Stitch these background strips securely to the print square. Once stitched, press the fabric open and trim any excess fabric to ensure a clean, straight edge. Repeat this process for the other two opposite sides of the central print square, creating a framed effect. To add star points to these units, take a dark square and place it at a corner of the print side, ensuring right sides are together. Sew diagonally across this square, then trim the excess fabric and press it open. Repeat this step for another corner, effectively “snowballing” the corners of your larger print square to create sharp, defined star points within your block unit. The careful alignment and pressing at each stage are vital for a professional-looking result.
Step 4: Quilt Assembly, Borders, and Finishing Touches
With all your individual block units created, it’s time for the exciting part: assembling your quilt top! Continue making more pieces of each quilt block type until you have the required number as specified in the pattern. Once all your blocks are ready, arrange them meticulously on a design wall or a large flat surface. This step allows you to visualize the entire quilt top and make any necessary adjustments to the layout, ensuring your stars are perfectly aligned and your colors flow harmoniously. Refer to your pattern as your ultimate guide for the exact block arrangement. Begin stitching your block units together, working row by row. Use a consistent 1/4-inch seam allowance and press your seams as you go, either open or to one side, depending on what minimizes bulk and creates the flattest finish. Once all rows are sewn together, stitch the rows to each other to form the complete quilt top. Next, add the inner border, which frames the central design and provides visual separation. After the quilt top is complete, create your “quilt sandwich” by layering the backing fabric (wrong side up), the batting, and then your quilt top (right side up). Baste these layers together using pins or basting spray. Now, it’s time to quilt! You can machine quilt, hand quilt, or send it to a longarmer. Choose a quilting design that complements your star pattern, such as stippling, straight lines, or a custom motif. Finally, trim the excess batting and backing, and add the binding fabric around the perimeter of the quilt. The binding not only finishes the edges beautifully but also adds durability. Give your finished quilt a final press, and admire your stunning creation!
Tips for Success and Customizing Your Winter Star Quilt
Achieving a beautiful quilt goes beyond just following instructions; it’s about embracing the process and adding your personal touch. Here are some extra tips to enhance your “Winter Star” Quilt experience:
- Fabric Selection Matters: While the pattern provides a guide, feel free to experiment with fabric choices. For a traditional winter feel, use blues, whites, and metallics. For a modern twist, try geometric prints, bright solids, or even subtle low-volume prints. Consider the contrast between your main prints and background fabrics to ensure your star design truly shines.
- Precision is Key: In quilting, a small error in cutting or stitching can compound over many blocks. Always use a sharp rotary blade, a non-slip ruler, and a cutting mat. When sewing, maintain a consistent 1/4-inch seam allowance. Using a quarter-inch foot on your sewing machine can be incredibly helpful.
- Pressing vs. Ironing: Remember to “press” your seams, not “iron” them. Pressing involves lifting and placing the iron down, which prevents stretching and distorting your fabric. Ironing, on the other hand, involves gliding the iron back and forth, which can warp your quilt blocks.
- Chain Piecing for Efficiency: To save time, consider chain piecing. This technique involves sewing multiple units in a continuous chain without cutting your thread between each piece. It’s especially useful when making many identical units like HSTs.
- Auditioning Your Layout: Before sewing blocks together, lay them out on a design wall or a clean floor. Step back and look at the arrangement from a distance. This allows you to spot any unintended patterns or areas that need adjustment before they’re permanently sewn.
- Quilting Designs: The quilting itself adds texture and completes your quilt. For beginners, simple straight lines or a basic stipple pattern are great choices. More experienced quilters might explore free-motion quilting, custom motifs, or even hand quilting for a classic feel.
- Care and Maintenance: Once your beautiful quilt is finished, proper care will ensure its longevity. Most cotton quilts can be gently machine washed on a delicate cycle with cold water and mild detergent, then tumble dried on low or air-dried flat.
- Personalize it: Consider adding a label to the back of your quilt with the date, your name, and perhaps the name of the recipient if it’s a gift. This turns your quilt into a truly personal heirloom.
By keeping these tips in mind, you’re not just making a quilt; you’re creating a cherished piece of art that tells a story and brings comfort. Enjoy every stitch of your quilting adventure!
*All image credit belongs to Missouri Star Quilt Company via YouTube. Follow and subscribe to their channel for more inspiring quilting tutorials and patterns!
Your Quilting Journey Awaits!
Congratulations on taking the first step towards creating your very own “Winter Star” Quilt! This project is a fantastic opportunity to unleash your creativity, hone your sewing skills, and produce something truly beautiful and functional. The joy of wrapping yourself or a loved one in a quilt made with your own hands is an experience unlike any other. Whether you’re crafting it for warmth, decor, or as a heartfelt gift, this quilt is sure to become a treasured item. Don’t hesitate to refer back to the Missouri Star tutorial on YouTube whenever you need a visual guide or a bit of encouragement. Happy quilting, and may your “Winter Star” shine brightly!