
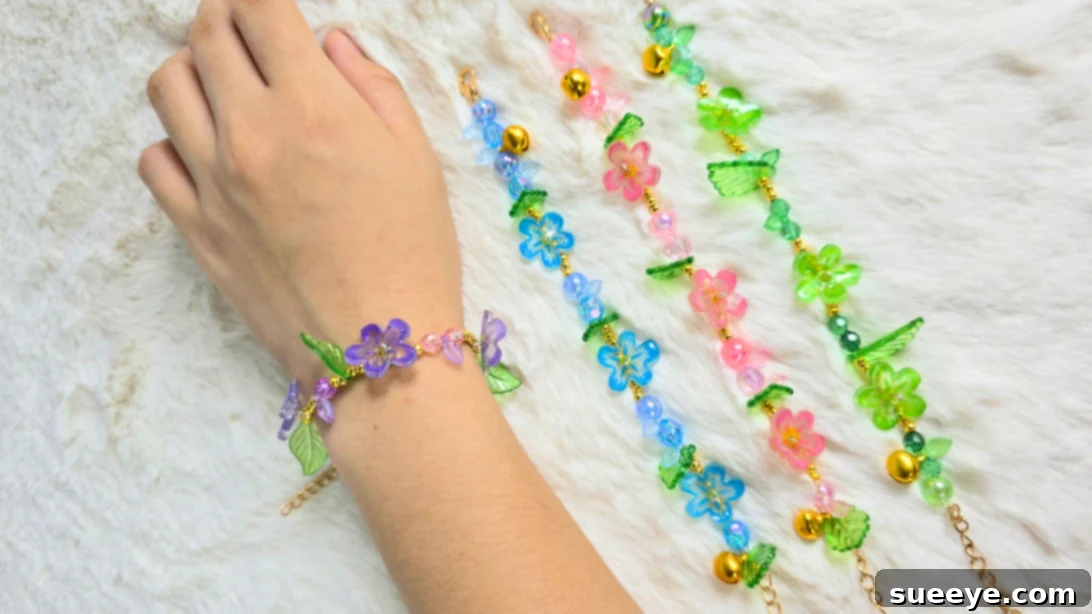
In the vibrant world of DIY crafts, few endeavors offer as much personal satisfaction and creative freedom as jewelry making. For many years, beadwork has been a cherished creative outlet, allowing for endless possibilities in design and expression. Bracelets, in particular, stand out as an exceptionally engaging project. Imagine working with a single collection of beads, yet consistently bringing to life entirely distinct and captivating designs by simply exploring innovative techniques. This constant evolution in crafting is what makes the journey so rewarding, pushing boundaries and revealing new dimensions of artistic potential.
My own crafting journey recently took an exciting turn with the discovery of a material that has fundamentally transformed my approach to bracelet making: shrink plastic, more commonly known as Shrinky Dink. Before this revelation, the world of shrink plastic was entirely unknown to me, and I can’t help but wish I had encountered it much sooner. Reflecting on my earlier days, particularly when I was immersed in creating props and costumes for school productions, this remarkable material would have been an absolute game-changer, saving countless hours and immense effort. Shrinky Dink is incredibly user-friendly, remarkably versatile, and perhaps its most compelling feature is its transformation: once subjected to heat, it shrinks into a sturdy, durable form, making it an ideal medium for crafting exquisite and long-lasting jewelry pieces.
Crafting delicate, vibrant flowers from shrink plastic for a DIY Shrinky Dink bracelet has undoubtedly been one of my most cherished and successful craft projects to date. The finished bracelet possesses an enchanting, almost magical allure, often leaving observers incredulous that it’s a handmade creation. The artistry is so subtle and refined that when people finally realize it’s a DIY piece, their initial surprise quickly turns into genuine curiosity, eager to learn the secrets behind the meticulously crafted flowers. This reaction is a testament to the transformative power of shrink plastic and the intricate beauty it helps to achieve, making each piece a unique conversation starter and a source of creative pride.
Naturally, like many venturing into a new craft, my initial attempts with Shrinky Dink were not without their challenges and minor mishaps. I encountered several common pitfalls that beginners often face, from uneven shrinking to unexpected color shifts. However, every single mistake proved to be an invaluable learning opportunity, a stepping stone on the path to mastery. Through a process of diligent trial and error, I steadily uncovered the most effective techniques and best practices for working with this fascinating material. It’s precisely this journey of discovery and refinement that inspires me to share this comprehensive tutorial with you today. My aim is to equip you with the knowledge and insights needed to bypass those common frustrations and confidently create your very own stunning shrink plastic flower bracelet, achieving beautiful results right from your very first attempt.
The beauty of handmade jewelry lies in its unique character and the personal touch infused into every detail. A Shrinky Dink flower bracelet offers not just a fashionable accessory, but a wearable piece of art that reflects your creativity and passion. Whether you’re a seasoned crafter looking for your next exciting project or a newcomer eager to explore the wonders of DIY, this tutorial promises to guide you through each step with clarity and ease. You’ll learn how to transform simple sheets of shrink plastic into charming floral embellishments that will be the focal point of your personalized bracelet. Get ready to embark on a crafting adventure that results in a beautiful, bespoke accessory you’ll be thrilled to showcase and share with others.
RELATED: Easy Beaded Flower Bracelet
Prepare to unlock your creative potential and dive into the captivating world of shrink plastic. This detailed guide will walk you through all the necessary steps, from initial design to final assembly, ensuring a rewarding and enjoyable crafting experience. Scroll down for the comprehensive, step-by-step instructions and discover how to meticulously craft a DIY Shrinky Dink bracelet adorned with enchanting flowers and beads – a truly unique accessory that you’ll be incredibly proud to wear and eagerly share with everyone around you!
How to Make a Shrinky Dink Flower Bracelet: A Step-by-Step Guide
Creating your own Shrinky Dink flower bracelet is a journey of artistic expression and satisfying craftsmanship. This tutorial breaks down the process into manageable steps, making it accessible for crafters of all skill levels. Pay close attention to each instruction, and you’ll soon be admiring your very own custom-made floral jewelry. Let’s begin transforming simple shrink plastic into dazzling wearable art.
-
Step 1: Draw and Outline the Flower Design on Shrink Plastic

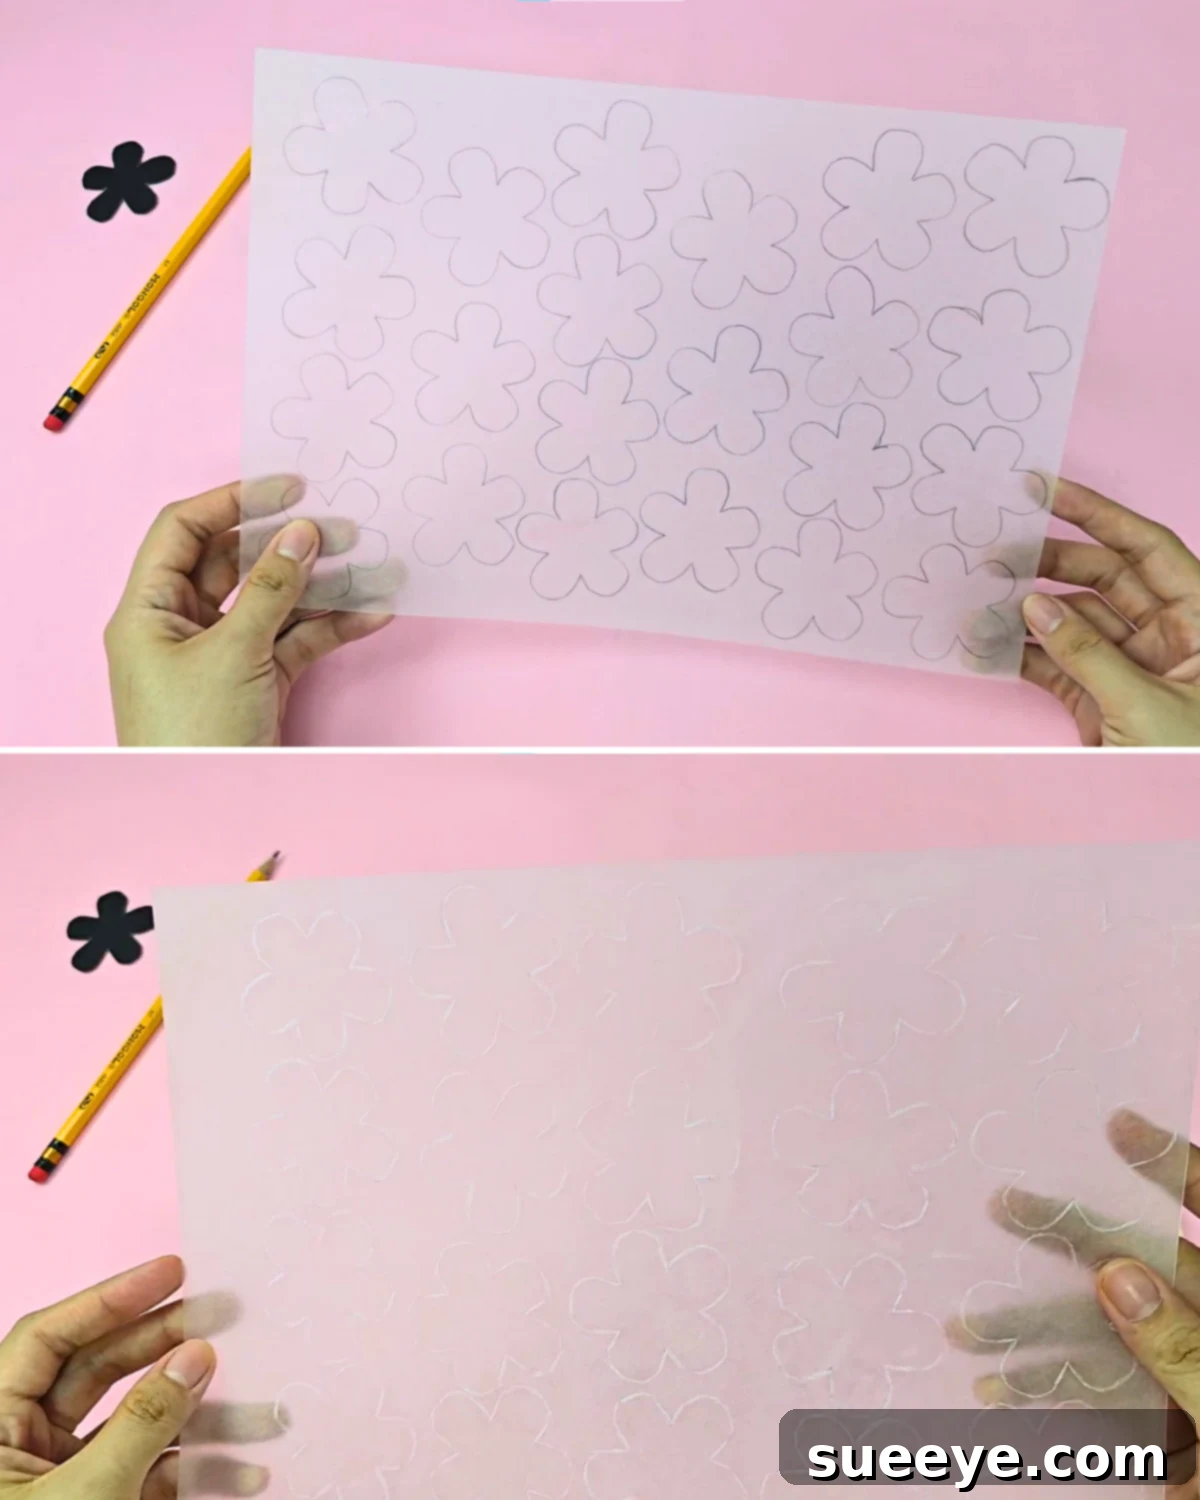
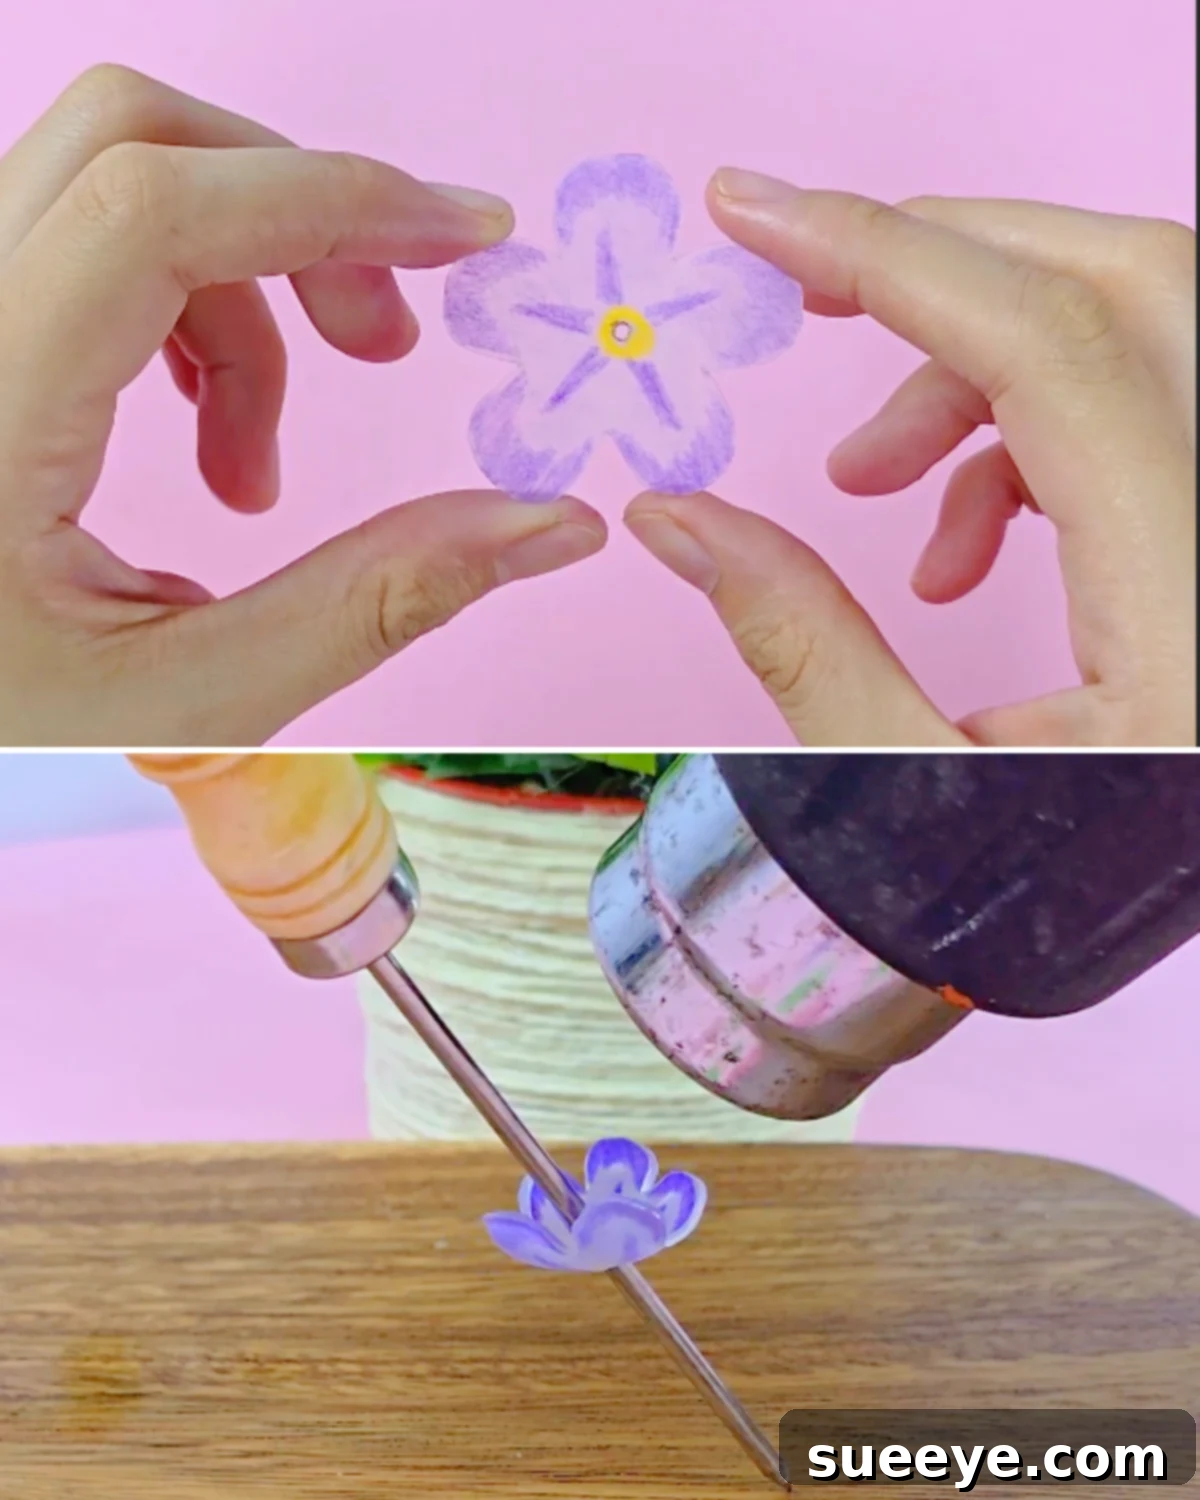
Begin by selecting the rough, frosted side of your shrink plastic sheet. This textured surface is ideal for holding colored pencils and chalk. With a pencil, carefully draw your desired flower design. You can opt for simple five-petal blooms, intricate layered blossoms, or abstract floral shapes – let your imagination guide you. For precise, consistent outlines, gently scrape along the drawn lines using a sharp craft knife or an X-Acto knife. This technique creates a slightly raised edge, which will become more defined and crisp after shrinking. If uniformity is key, especially for multiple flowers, consider creating a reusable cardboard template. Simply trace your template onto the shrink plastic for perfectly matched flower sizes, ensuring a harmonious look for your finished bracelet. Remember, the initial size of your drawing will significantly reduce, so always start bigger than your intended final piece. -
Step 2: Adding a Subtle Hint of Color with Chalk
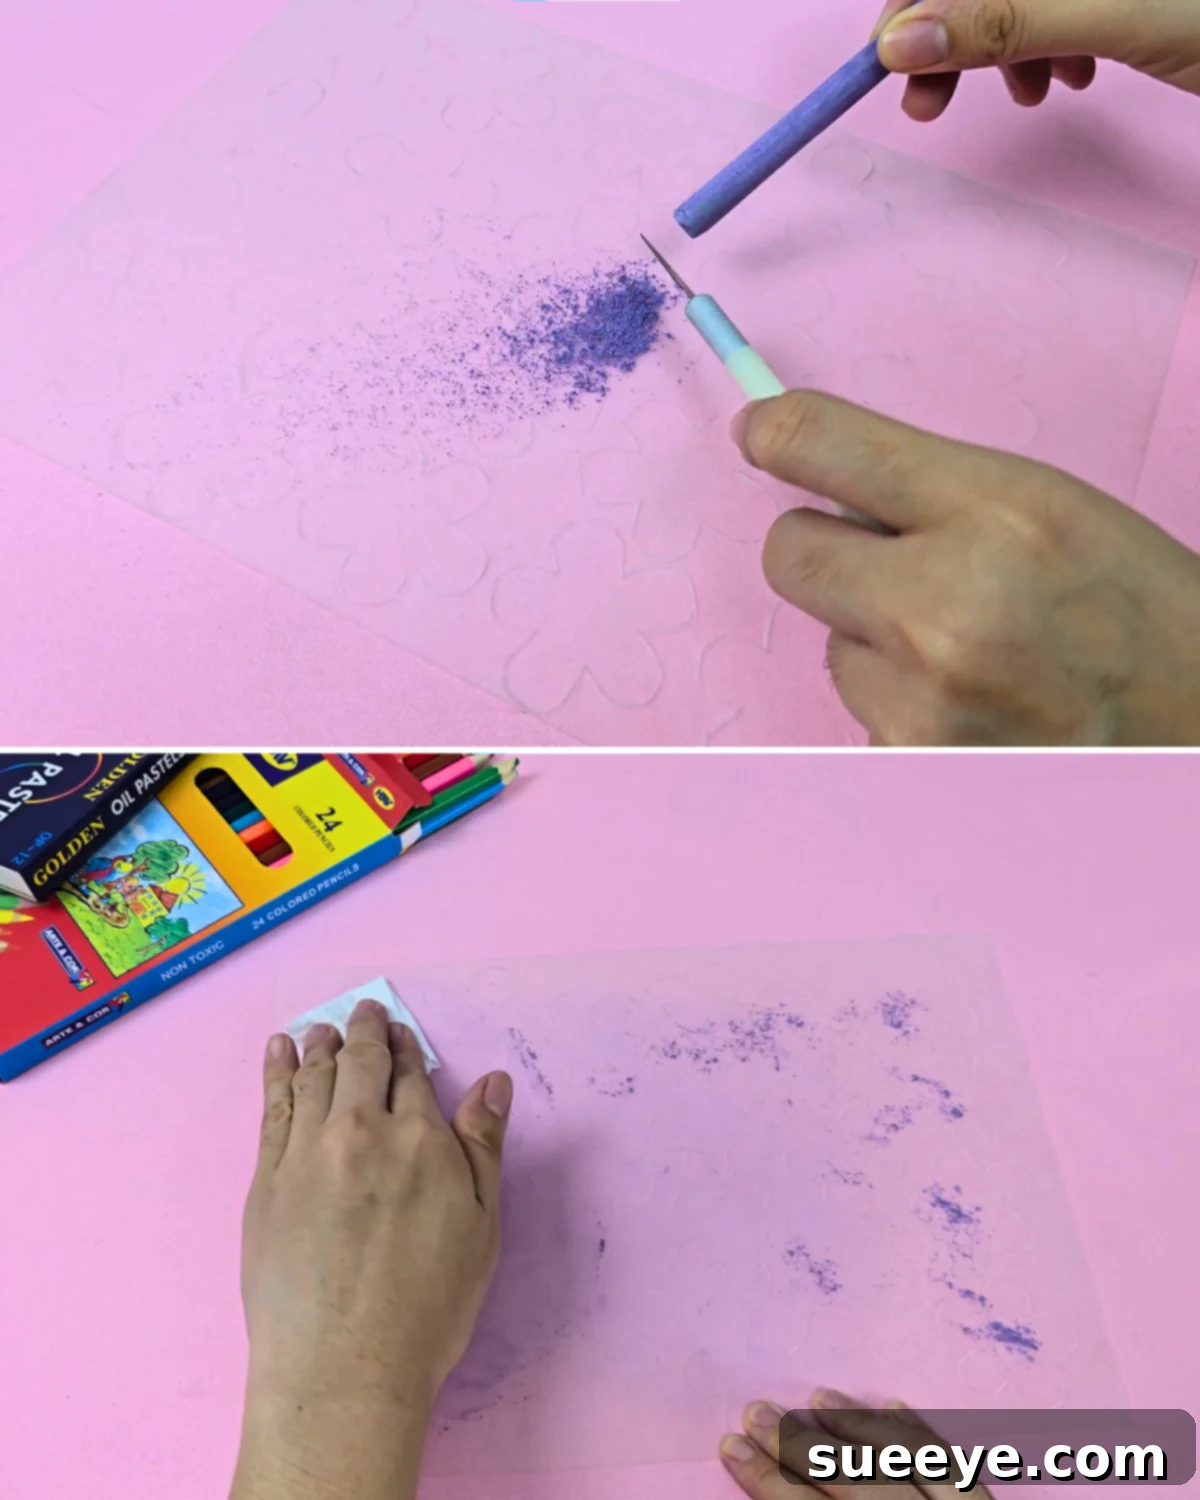
Once your flower designs are outlined, it’s time to introduce a foundational layer of color using chalk. Take a piece of chalk in your chosen base color – pastel shades often work beautifully for a natural look – and lightly scrape it over the rough surface of the shrink plastic, ensuring the entire flower shape is covered. Don’t worry about achieving a perfectly opaque layer at this stage; a light application is sufficient. Next, take a soft napkin and gently rub the chalk across the surface. This action helps to spread the chalk evenly, softening the color and blending it seamlessly. The result will be a subtle, natural-looking tint that forms the perfect canvas for subsequent detailing, giving your flowers a delicate, almost ethereal appearance after shrinking. -
Step 3: Add Intricate Details for Depth and Dimension
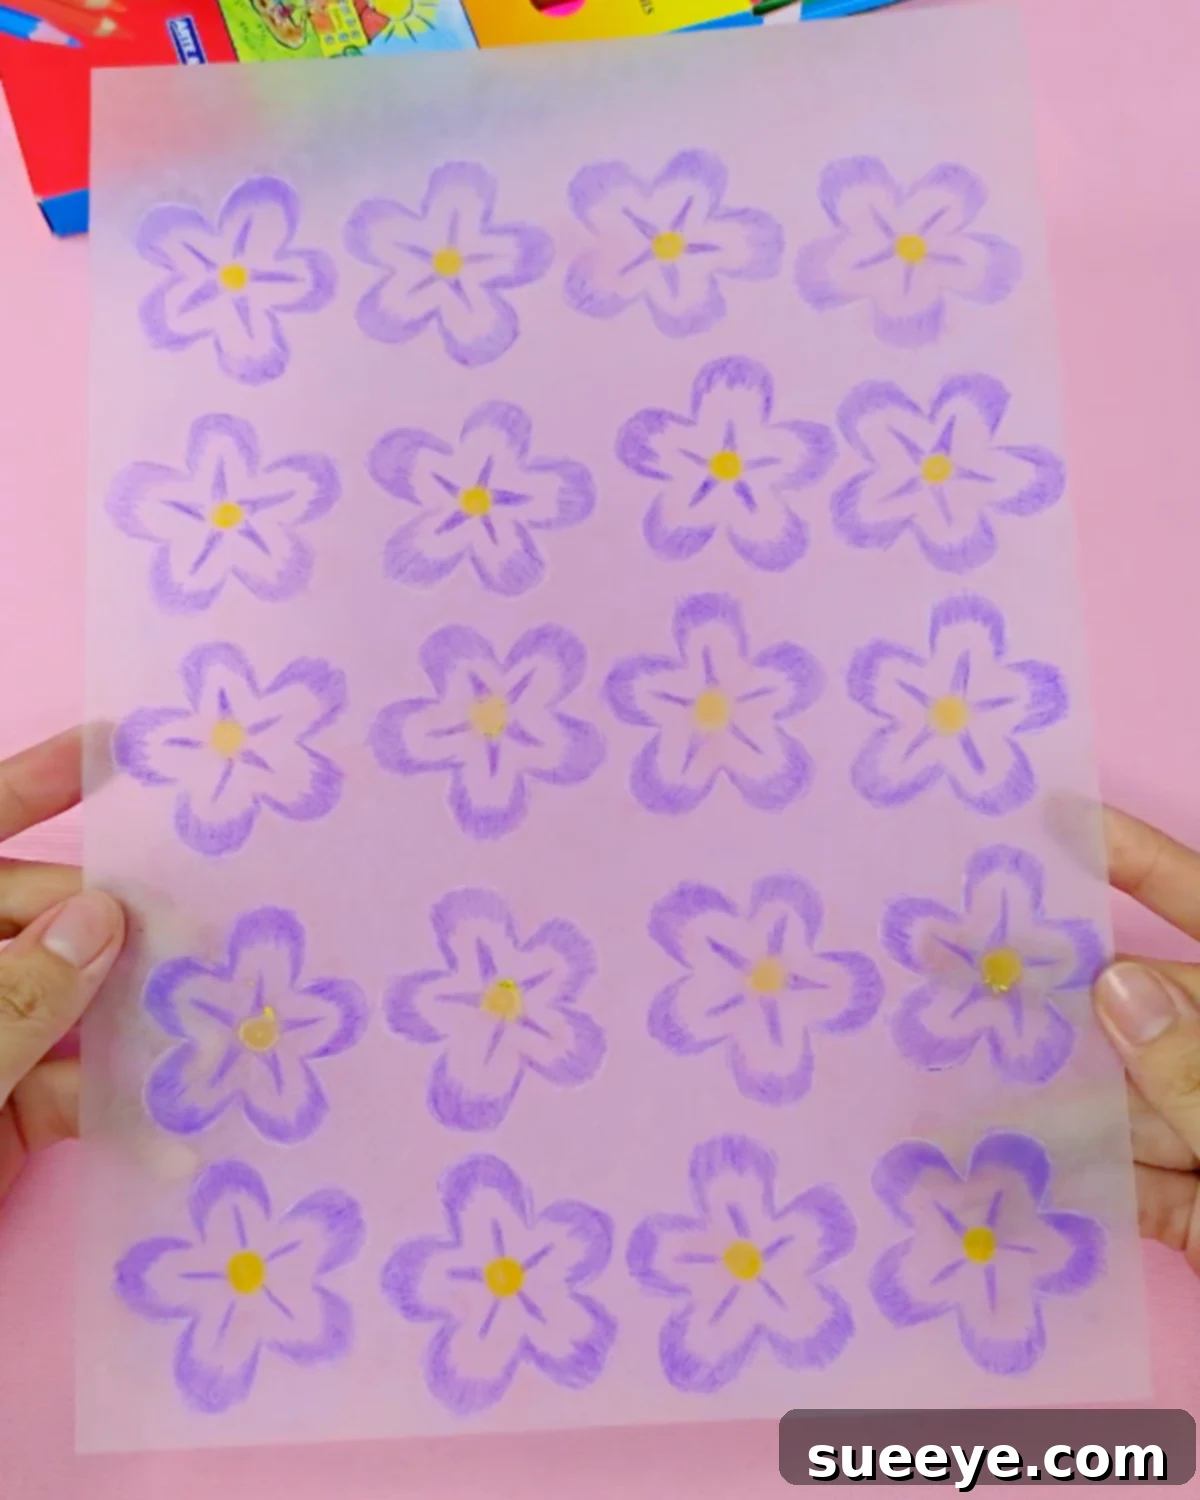
Now comes the exciting part of bringing your flowers to life with rich details. Start by applying oil pastel to the very center of your flower. This will create a vibrant, bold pop of color that serves as the heart of your design. Oil pastels offer a rich, creamy texture that stands out beautifully against the chalk base. Following this, select a colored pencil and carefully draw fine lines extending from the central point, radiating halfway toward the tips of each petal. These lines add texture and visual interest, mimicking the natural veins of real flowers. Finally, to give your petals depth and a realistic, three-dimensional quality, shade the outer edges of each petal. Focus on building up the color gradually, creating a subtle gradient that transitions from the base color. This technique adds sophistication and an artistic flair to your shrink plastic flowers.Tip: For a truly captivating and lifelike layered effect, select a colored pencil that is a slightly darker shade than your initial base color. This subtle difference in tone will enhance the shading, making your flowers appear more realistic and visually engaging. Experiment with complementary colors for stunning contrast.
-
Step 4: Precisely Create a Center Hole and Shrink the Flowers
A crucial step for jewelry making is creating a clean hole in the center of each flower for attachment. The easiest method is to use a standard hole puncher before shrinking, ensuring a perfectly round and consistent hole. If you don’t have a hole puncher, an alternative method involves carefully heating a needle (using a candle or lighter) and quickly pushing it through the center of your flower, then pulling it out before it cools and fuses. Any small burnt bits can be gently scraped away with a craft knife. After creating the hole, carefully cut out your flower designs using scissors. Next, place each flower onto a skewer or an ice pick, holding it firmly against a flat, heat-resistant surface. Using a heat gun set to its highest setting, apply heat evenly to the plastic flower. Watch as the magic unfolds: the plastic will curl, twist, and then flatten as it shrinks to approximately one-third of its original size. Continue heating until the flower is completely flat and rigid, ensuring it hardens into its final durable form. This shrinking process makes the plastic considerably thicker and sturdier, perfect for enduring daily wear. -
Step 5: Attach Eye Pins Securely to the Flowers
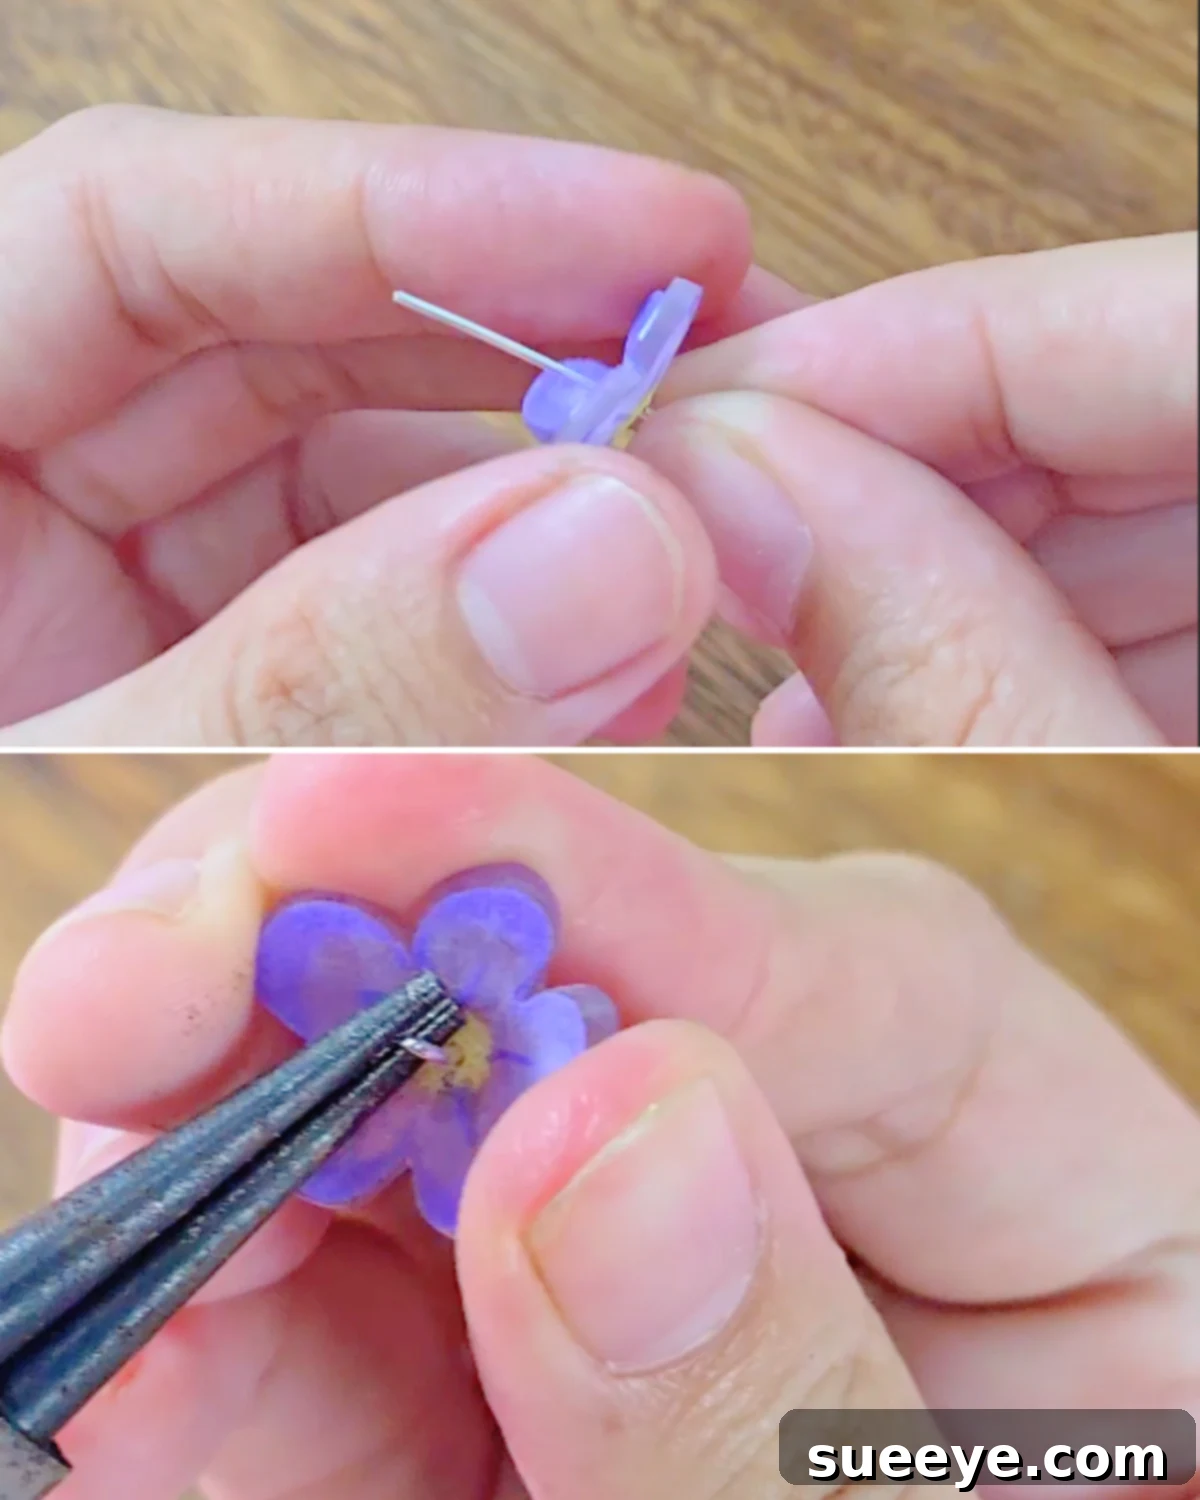
With your shrunk and hardened flowers ready, it’s time to add the crucial component for connecting them: the eye pin. Carefully insert an eye pin through the hole you created in the center of each flower. Ensure it passes through smoothly and sits flush with the flower’s surface. Sometimes, the tail of the eye pin might be longer than necessary for your design. If so, use a pair of wire cutters to trim the excess wire, leaving approximately 0.5 to 1 cm of wire extending from the back of the flower. This ensures a neat finish and prevents unnecessary bulk. Next, using long-nose pliers, gently grasp the remaining wire tail. Bend and curve the excess wire to create a secure loop or bend it back against the flower, effectively locking the eye pin in place. This prevents the eye pin from slipping out and provides a sturdy attachment point for linking your flowers together or adding them to a bracelet chain. A well-secured eye pin is vital for the longevity and integrity of your handmade jewelry. -
Step 6: Coat with UV Resin for Durability and Shine
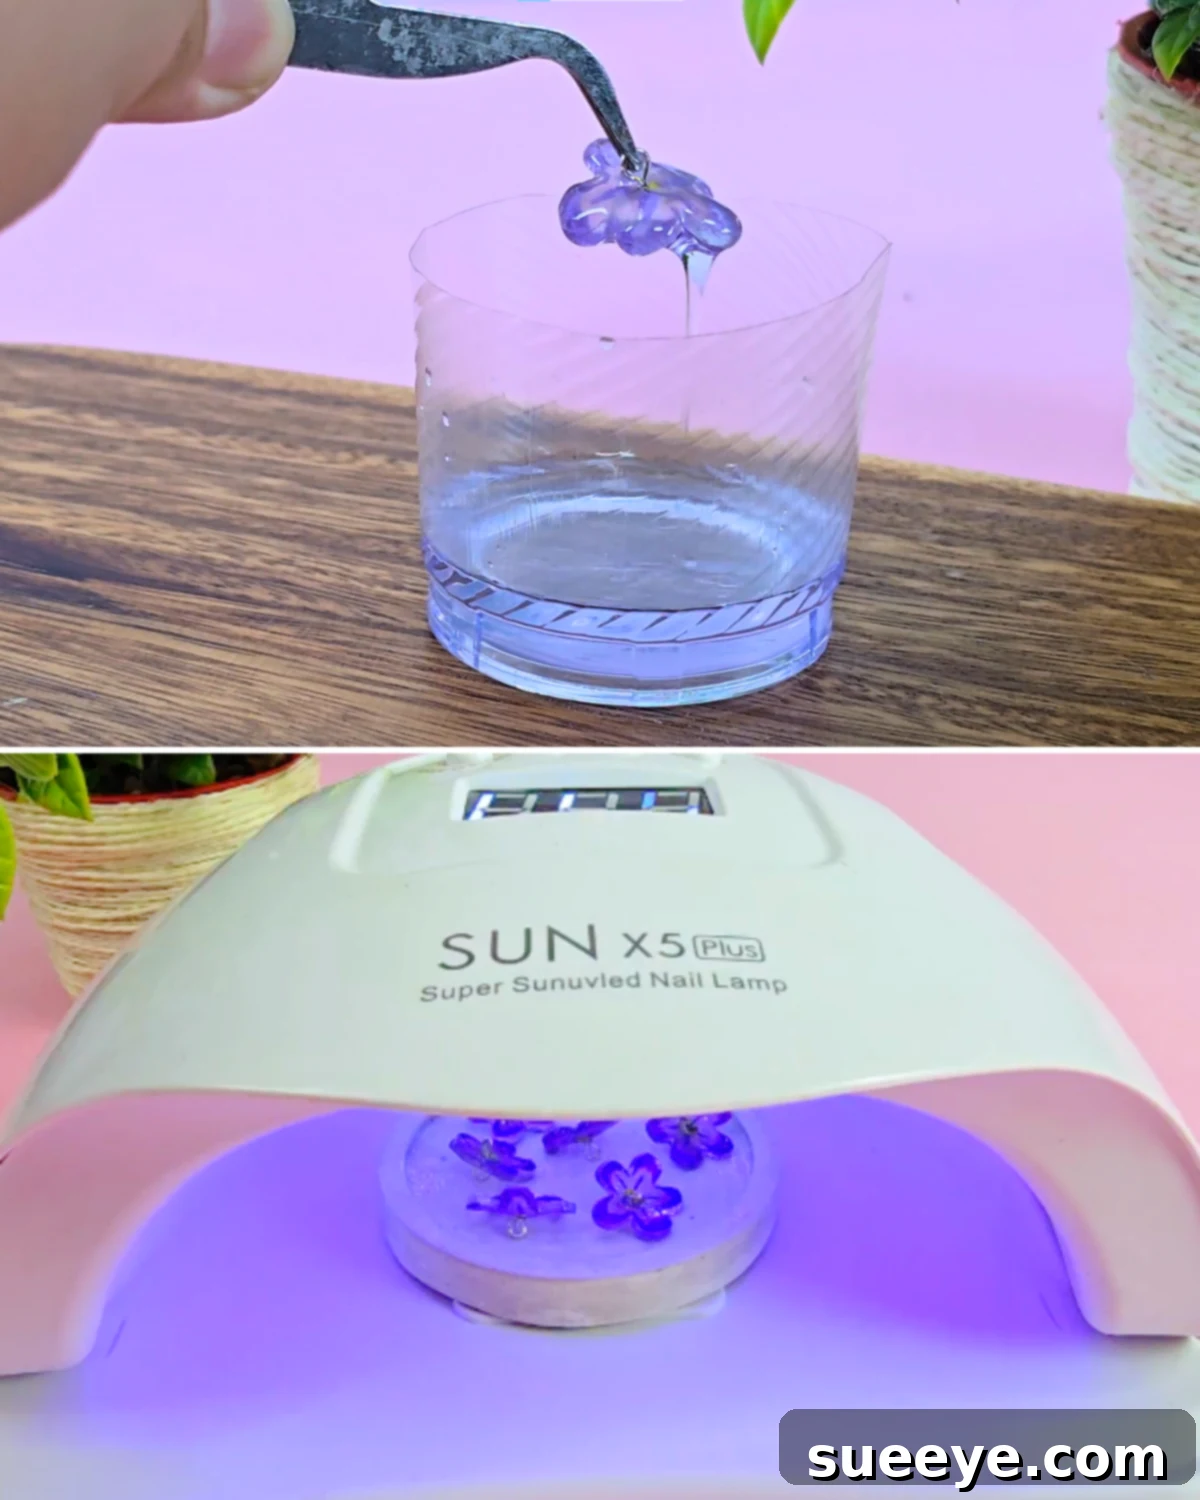
To give your Shrinky Dink flowers a professional, glossy finish, and enhanced durability, a UV resin coating is essential. Pour a small amount of UV resin into a shallow, deep container. Using tweezers, carefully dip each flower into the resin, holding it by the eye pin. Ensure the entire flower, especially the colored surface, is fully submerged for even and complete coverage. Slowly lift the flower out of the resin, allowing any excess to drip back into the container. To prevent pooling and ensure a smooth finish, transfer the flower to a separate spot, such as a temporary drying rack or a non-stick surface, to allow further dripping. Once the drips have minimized, move the flower to another clean container or mat and place it under a UV lamp. Cure the resin under the lamp according to the manufacturer’s instructions, typically for several minutes, until it is completely hard, crystal clear, and no longer sticky to the touch. This step not only protects your artwork but also gives it a beautiful, jewel-like sheen, making your flowers truly pop.Congratulations! Once your beautiful Shrinky Dink flowers are fully cured and hardened, they are perfectly ready to be transformed into exquisite components for your custom DIY bracelets. You now have the fundamental pieces to begin assembling your unique jewelry creations!
Materials Required for Your Shrinky Dink Flower Bracelet
Gathering the right tools and materials is the first step towards a successful crafting project. For this DIY Shrinky Dink flower bracelet, you’ll need a combination of common craft supplies and specialized items. Ensure you have everything listed below before you begin to make your creative process seamless and enjoyable.
- Shrinky Dink or Shrink Plastic Sheets (frosted or rough surface recommended for coloring)
- X-Acto or Craft Knife (for precise outlining and cleaning)
- Scissors (for cutting out your flower shapes)
- Pencil (for initial drawing)
- Oil Pastels (for bold, vibrant center colors)
- Colored Pencils (for detailed lines and shading)
- Chalk (for subtle base coloring)
- Napkin (for blending chalk colors smoothly)
- Needle or Hole Puncher (for creating attachment holes)
- Skewer or Ice Pick (for holding flowers during heating)
- Heat Gun (essential for shrinking the plastic; an oven can be an alternative, but heat gun offers more control)
- Eye Pins (for connecting flowers and bracelet components)
- Wire Cutter (for trimming eye pins)
- Long Nose Pliers (for bending and securing eye pins)
- UV Resin and UV Lamp (for a durable, glossy finish)
- Assortment of Beads, Hook Clasp, Bracelet Chain, and Nylon Cord (for assembling the final bracelet structure and adding embellishments)

⭐ Pro Tip: Mastering Shrinky Dink Shrinkage
Always design much larger than your desired final size. Shrinky Dink plastic undergoes a dramatic reduction in size, typically shrinking down to about 1/3 of its original dimensions while simultaneously becoming thicker and more robust. This significant change means that if you aim for a flower that is 1 inch in diameter, your initial drawing on the shrink plastic should be approximately 3 inches across. It’s always a good idea to create a test piece first to understand how your specific brand of shrink plastic behaves and how much it shrinks. This prevents disappointment and ensures your final jewelry components are perfectly sized for your project.
Once you’ve mastered the art of creating these charming Shrinky Dink flowers, the possibilities for incorporating them into various jewelry pieces are endless. Imagine combining them with elegant pearls, vibrant glass beads, or even other handmade charms to create truly bespoke designs. The delicate yet durable nature of the shrunk plastic makes it an ideal canvas for unique expressions, suitable for necklaces, earrings, or even hair accessories. This tutorial provides the foundation, but your creativity is the only limit.
Other Inspiring Crafts You’ll Love
Sewing Ideas
Easy Christmas Sweater Embroidery Hack
Seasonal
DIY Christmas Tree With Pipe Cleaners
Seasonal
Easy Paper Christmas Ornament
General
DIY Egg Tray Sugar Skull
Embarking on the journey of creating a DIY Shrinky Dink flower bracelet is not merely about assembling materials; it’s about igniting your creative spirit and crafting something truly personal and meaningful. This project offers a delightful blend of simplicity and sophistication, resulting in a piece of jewelry that is both eye-catching and filled with your unique artistic flair. The enduring appeal of handmade items lies in their story, their individuality, and the passion poured into their creation. So, gather your supplies, follow these steps, and prepare to wear a piece of art that you’ve brought to life with your own hands. We hope this comprehensive guide inspires you to explore the endless possibilities of Shrinky Dink and handmade jewelry, transforming simple materials into cherished treasures. Happy crafting!
*If you cherished this detailed craft tutorial and are eager for more innovative DIY ideas, we warmly invite you to visit our official website for an expansive collection of projects. Don’t miss out on our latest updates and creative inspiration; be sure to follow our Facebook page and subscribe to our vibrant YouTube channel for a constant stream of new and exciting crafts!