
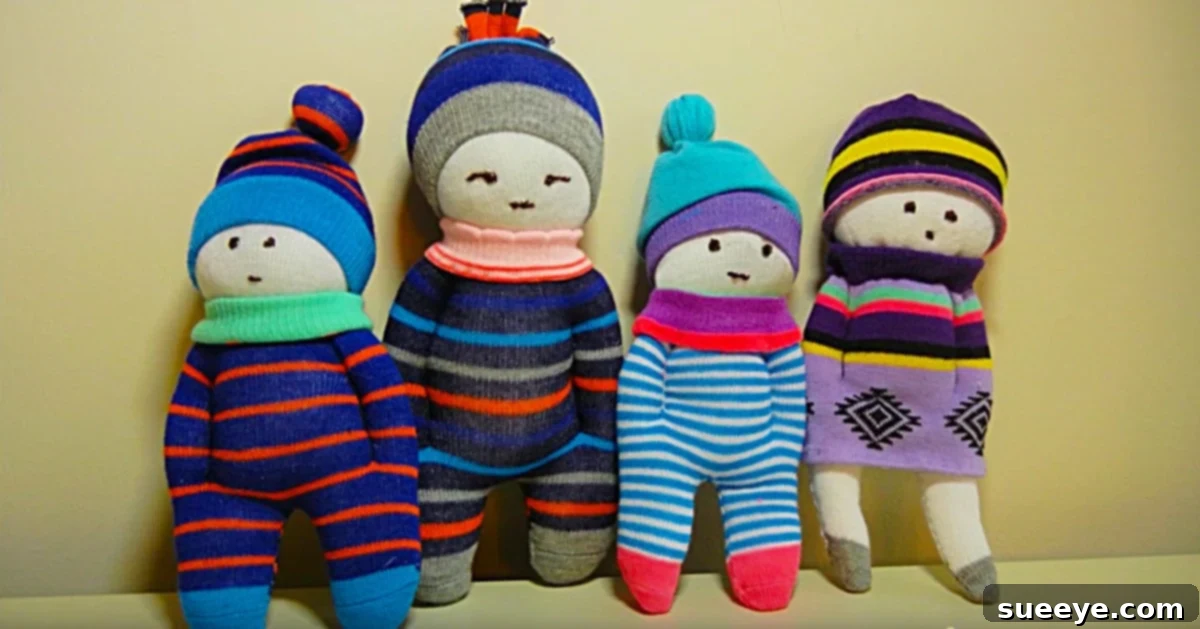
DIY Sock Dolls: Craft Adorable, Unique Gifts with Ease!
Have you ever considered the magic hidden within an old sock? What if we told you that with a few simple steps and common household items, you could transform a humble sock into an endearing, one-of-a-kind doll? Welcome to the wonderful world of DIY sock doll crafting! This festive season, or any time you’re looking for a delightful project, join us as we explore how to create these charming companions. Perfect for gifting, decorating, or simply enjoying the creative process, sock dolls are a testament to the joy of handmade crafts. They’re incredibly fun to make, surprisingly easy to assemble, and each one develops its own unique personality, promising endless smiles.
The holidays, while wonderful, can sometimes bring moments of restless energy, especially for children. Keeping spirits high and minds engaged is key to a harmonious festive period. That’s where creative projects come in! Imagine pulling out a box of craft supplies, laying them out on the table, and watching as everyone, from the youngest to the oldest, settles down, quietly focused on bringing their imaginative visions to life. DIY sock dolls are an absolute favorite for such occasions. This project is a fantastic way to channel creative energy, offering a delightful blend of simplicity and endless customization that captivates crafters of all ages. From Thanksgiving gatherings to Christmas Eve anticipation, these charming dolls provide hours of constructive entertainment and result in truly special keepsakes or gifts.
Why Choose DIY Sock Dolls for Your Next Craft Project?
Beyond being an entertaining pastime, crafting DIY sock dolls offers a plethora of benefits. Firstly, they are remarkably cost-effective. You can repurpose old socks that might otherwise be discarded, giving them a new lease on life. This sustainable approach not only saves money but also promotes environmental consciousness, transforming potential waste into whimsical treasures. Imagine the satisfaction of knowing your beautiful creation was born from something as simple as a forgotten sock! This makes them an ideal budget-friendly activity for families, schools, or community groups.
Secondly, sock dolls are incredibly versatile. They can be designed to suit any personality, theme, or occasion. Whether you’re aiming for a cuddly companion, a quirky character, a festive ornament, or even a personalized gift representing a friend or family member, the possibilities are limited only by your imagination. They make exceptional, heartfelt gifts that carry a personal touch, far more meaningful than anything bought from a store. The recipient will undoubtedly cherish a gift made with such care and creativity, knowing the time and love poured into its making, creating a lasting memory.
Moreover, this craft is fantastic for developing fine motor skills, encouraging patience, and fostering a sense of accomplishment. Children especially benefit from hands-on activities that boost their creativity and problem-solving abilities, helping them follow instructions while also encouraging independent thought. Even adults will find the process therapeutic and rewarding, a perfect escape from daily stresses and a chance to unwind. Gather your family and friends; sock doll making is an ideal group activity, sparking conversations, shared laughter, and helping to build cherished memories together.
Gather Your Supplies: What You’ll Need for Your Sock Doll Adventure
One of the many beauties of crafting sock dolls is that the required materials are often already lying around your home, minimizing the need for an expensive trip to the craft store. You won’t need an extensive list of specialized items to get started, making it accessible for everyone. Here’s what you’ll typically need to embark on your sock doll journey:
- Socks: The star of our show! Old, clean socks work perfectly. Consider various sizes, colors, and patterns for different doll characters. Crew socks, knee-high socks, even mismatched single socks are ideal candidates for repurposing. Socks made from cotton blends or slightly stretchy materials often work best for shaping and holding filler securely.
- Filler Material: This is what gives your doll its shape, weight, and cuddliness.
- Rice: A popular, readily available, and affordable choice. About 1-2 cups of uncooked rice per doll is usually sufficient, depending on the size of your sock and desired doll.
- Poly-Pellets: These small plastic pellets (readily available at craft stores like JoAnn’s or Michael’s for around $6-$10 a bag) provide excellent weight and allow for a more flexible, squishy doll. They are also washable, unlike rice, which can be a consideration.
- Dried Beans/Lentils: Another pantry staple that works well as a filler, providing a similar weight to rice.
- Cotton Stuffing/Polyester Fiberfill: For a softer, lighter, more plush doll. You might consider adding a small bag of rice or Poly-Pellets at the very bottom of the doll for added stability, especially if you want it to sit upright.
Pro Tip on Fillers: If you’re using rice or other grains and are concerned about weevils or pests that might be attracted to them, simply freeze your filler material for about 24-48 hours beforehand. This simple step ensures your doll remains pest-free and long-lasting, preserving your handmade treasure.
- Thread and Needle: A basic sewing kit is all you need for securing parts and adding features. Strong, all-purpose thread is recommended. While matching thread to your sock color is ideal for discreet seams, contrasting thread can also be used as a deliberate decorative touch, adding to the doll’s character.
- Scissors: A good pair of sharp fabric scissors is essential for cutting socks and various embellishments cleanly and precisely.
- Embellishments and Decorations: This is where your doll truly comes to life and gains its unique personality!
- Buttons: Can be used for eyes, noses, or decorative accents on clothing. (Use with extreme caution for very young children due to choking hazards; felt or embroidered eyes are much safer alternatives for little ones.)
- Felt Scraps: Incredibly versatile for creating eyes, mouths, rosy cheeks, hair, clothing pieces, or any other small accessories. Felt doesn’t fray, making it easy to work with.
- Yarn or Embroidery Floss: Perfect for adding hair, hand-stitching intricate facial features (like expressive eyes or a sweet smile), or creating decorative stitching details on the doll’s body or clothing.
- Fabric Markers/Permanent Markers: An easy way to draw on facial features, add patterns, or create small details directly onto the sock fabric. Ensure they are permanent to prevent smudging.
- Craft Glue (Fabric Glue or Hot Glue Gun): Essential for quickly and securely attaching embellishments like felt pieces, buttons, or ribbons. Always use a hot glue gun with adult supervision.
- Ribbons, Small Fabric Scraps, Lace: Ideal for crafting charming scarves, bows, belts, tiny clothing details, or other decorative touches that add flair and character.
Step-by-Step Guide to Crafting Your Adorable Sock Doll
Let’s dive into the creative process! While there are many variations in making sock dolls, we’ll walk you through a method that results in a charming, articulate doll, often with distinct legs and head, much like the lovely examples you see pictured. This method provides a clear structure, but remember, every step can be adapted to your creative vision.
Step 1: Preparing Your Sock and Forming the Legs
Begin by selecting a clean, ideally knee-high or crew sock. For a doll with distinct legs, you’ll want to prepare your sock accordingly. Lay your chosen sock flat and smooth it out. Carefully cut the sock in half horizontally, just above the heel. The foot part will become the lower body and legs, while the upper part, the cuff section, will be used for the head and possibly arms or clothing later.
To create the legs, take the foot part and cut a slit up the middle from the toe towards the heel, stopping about an inch or two short of the heel. This creates two leg sections. Now, it’s time to fill. Gently spoon your chosen filler (rice, Poly-Pellets, or a mix) into each leg section, ensuring they are firm but not overly stuffed. Aim for about one to one-and-a-half cups of filler for the body/legs, distributing it evenly to create plump, shapely limbs. Once filled, sew the top opening of each leg closed or tie them off tightly with strong thread, forming two distinct, soft legs. You might then stitch these two leg sections together at the top to form a cohesive lower body, or leave them slightly separate for more movement in your doll.
Next, take the upper half of the sock you cut earlier. This will form the head. Fill this section with approximately half a cup to a cup of your chosen filler, gently manipulating it to create a round, firm head shape. Tie this section off tightly at the bottom with a sturdy thread to secure the filler and prevent it from spilling. You now have the primary components of your doll ready for assembly!
Step 2: Assembling Your Doll’s Body and Head
With your filled leg/body section and head section ready, it’s time to bring them together to form the main structure of your doll. Carefully position the filled head section on top of the body/leg section. Ensure it’s centered and aligned nicely, creating a natural neckline. Using a sturdy needle and strong, matching thread, firmly stitch the head to the body. You can use a simple whip stitch, carefully wrapping the thread around the join, or a ladder stitch for a more invisible and neat seam. Take your time with this step to ensure the head is securely attached and sits snugly on the “shoulders” of the body. This step creates the basic silhouette of your sock doll, transitioning smoothly from the lower body to the head, giving your doll its fundamental form.
Step 3: Bringing Your Doll to Life with Arms, Hat, and Scarf
Now for the fun part: adding personality and detail! To create arms, identify where you’d like the arms to be on the doll’s sides, usually just below the head join. Gently pinch the fabric on each side to create a defined “arm” shape. You can then make a small stitch or two across the pinched section to hold the shape in place, or sew a more pronounced groove to make the arms more distinct. For a different approach, you could cut two small strips from another sock, fill them with a tiny bit of filler, sew them closed, and then attach these separate “arm” pieces securely to the doll’s sides, allowing for more independent arm movement.
A hat adds instant charm and character! You can easily create a simple conical hat from a small sock scrap or a piece of felt. Just cut a semi-circle, roll it into a cone, and glue or stitch the seam. Attach it to the doll’s head with a few discreet stitches or a dab of fabric glue. For a cozy and stylish touch, fashion a scarf collar. Cut a small circle from a contrasting sock or felt, make a hole in the center for the doll’s neck, and gently slip it on. Secure it with a stitch or two if needed to prevent it from shifting. These initial accessories begin to transform your plain sock form into a character with unique style and an adorable presence.
Step 4: Adding Personality: Facial Features and Final Embellishments
This is where your doll truly gets its soul and unique expression. Using embroidery floss, a fine-tipped permanent fabric marker, or small buttons (securely sewn for safety, especially if the doll is for young children), create charming facial features. Simple French knots or small backstitches can form expressive eyes and a sweet smile. A tiny felt circle or a few stitches can be a cute nose. Remember, less is often more, and a simple expression can convey a lot of character and warmth. Don’t be afraid to experiment with different expressions to see what personality emerges!
Don’t stop there! Think about other embellishments that can enhance your doll’s character. Could your doll use some yarn hair, stitched securely to the head? Perhaps a tiny ribbon bow, a hand-stitched felt heart on its chest, or even miniature jewelry made from beads or wire? You can create tiny outfits from fabric scraps, add decorative patches, or incorporate unique stitches to make clothing details. Let your imagination run wild! Every little detail contributes to the unique charm and story of your handmade creation, making it truly one-of-a-kind.
Tips for a Perfect DIY Sock Doll Experience
- Choosing the Right Sock: Experiment with different sock types and materials. Thicker, stretchier socks (like athletic socks, wool socks, or even fuzzy socks) tend to hold their shape better when filled and are easier to manipulate. Patterned socks can add instant character and charm without much extra embellishment, while plain socks offer a blank canvas for more detailed designs.
- Filler Consistency: Don’t overstuff your doll; it can make it rigid, lumpy, and difficult to shape or sew. Aim for a firm but still pliable consistency that allows you to sculpt the doll’s features. If using rice, ensure it’s evenly distributed throughout the sections to avoid unwanted lumps or gaps.
- Sewing for Beginners: Don’t be intimidated by the sewing aspect! For most of this project, simple running stitches or whip stitches are all you need, which are easy for even novice crafters to master. If sewing isn’t your strong suit, many elements, especially embellishments, can be securely attached with strong fabric glue or a hot glue gun (always with adult supervision for safety).
- Child Safety Considerations: If the finished doll is intended for a very young child (under three years old), it is crucial to avoid any small buttons, beads, or other detachable embellishments that could pose a choking hazard. Opt for securely embroidered features, felt cut-outs that are firmly glued or sewn, or permanent fabric markers for creating eyes, noses, and mouths.
- Embrace Imperfection: The true beauty of DIY lies in its unique, handmade charm. Don’t strive for machine-made perfection; instead, celebrate the quirks and individualities that make your doll special. Each handmade doll will have its own personality, and these slight “imperfections” are what give it character and make it truly unique and endearing.
Beyond the Basics: Creative Variations and Customization
Once you’ve mastered the basic sock doll, the wonderful world of creative variations truly opens up! Think beyond simple human-like figures. You can transform socks into adorable animals – a long, thin sock could become a slithering snake, a small sock a cute mouse or bunny, or with a few extra cuts and stitches, a charming cat or dog. Consider developing specific themes for your dolls: holiday characters, brave superheroes, mystical forest creatures, or even personalized dolls that resemble family members or friends, complete with their signature hair color or clothing style.
Experiment with different fabrics for clothing and accessories. Old t-shirts, lace scraps, satin ribbons, felt, or even pieces of an old sweater can be upcycled into stylish outfits, tiny capes, or decorative elements for your doll. Add unique embellishments like tiny bells, glittering sequins, small beads (again, always minding safety for children), or even small pieces of wire for posable limbs (for older crafters). For an extra sensory touch, you could even add a few drops of child-safe essential oil to the filler (like lavender for a calming effect) to create a scented comfort doll. Sock dolls can also be adapted into practical items, such as quirky door stoppers (using heavier filler like sand or heavier pellets) or charming decorative ornaments for a Christmas tree or mantelpiece.
The Joy of Handmade Gifts and Holiday Crafting
In a world increasingly dominated by mass-produced items, there’s something truly special and heartwarming about a handmade gift. A DIY sock doll isn’t just a toy or a decoration; it’s a tangible expression of love, creativity, and thoughtfulness. It carries a unique story, a personal connection to the person who made it, making it an invaluable keepsake that will be cherished far beyond its material value. Handmade items resonate with a deeper meaning, reminding us of the care and effort put into their creation.
Embracing holiday crafting, whether for Thanksgiving, Christmas, or any special occasion, creates cherished family traditions that can be passed down through generations. These projects offer a wonderful opportunity to slow down, connect with loved ones, and immerse yourselves in the spirit of giving and creation, away from screens and distractions. The anticipation of making something beautiful and unique for someone else is a gift in itself, fostering generosity and joy. So, gather your socks, your chosen fillers, and your boundless imagination, and get ready to create a whole family of these adorable, unique, and incredibly heartwarming sock dolls this season!