
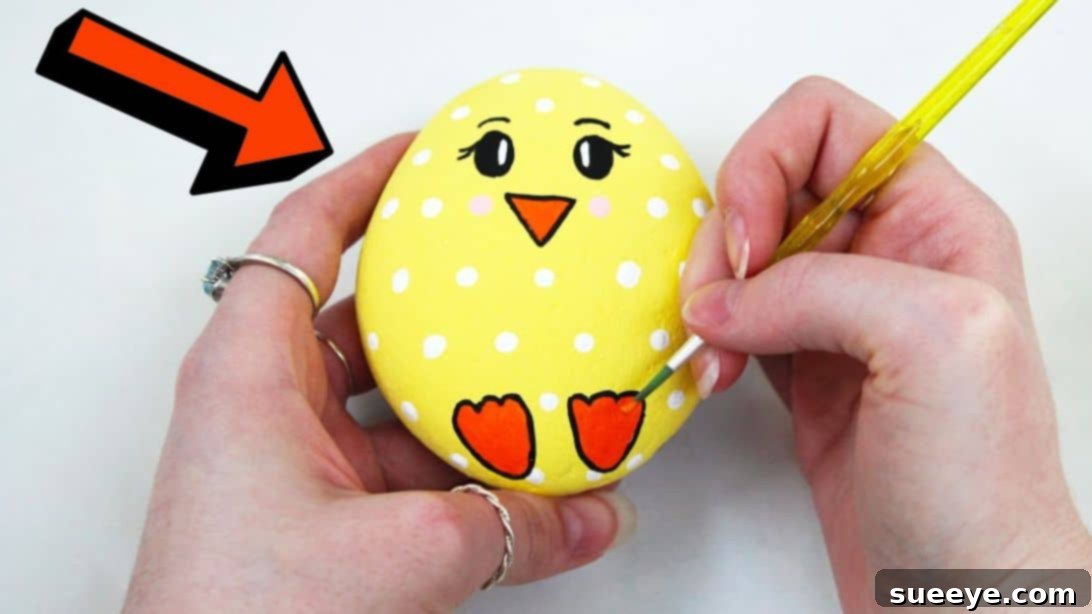
Transform Ordinary Stones into Adorable Easter Baby Chicks: A Fun DIY Painting Guide
Easter brings with it a season of vibrant colors, delightful decorations, and cherished family traditions. While traditional Easter eggs are a classic, why not explore a creative and incredibly charming alternative this year? Imagine swapping delicate eggs for sturdy stones, transforming them into irresistibly cute baby chicks that will delight both children and adults alike. This fantastic and super adorable stone baby chick craft, inspired by the talented Kristyona on YouTube, offers a durable, reusable, and endlessly fun way to celebrate the holiday.
These painted stone chicks aren’t just a pretty addition to your Easter decor; they’re also perfect for imaginative Easter egg hunts. Kids will love discovering these unique treasures, and the vibrant colors will add an extra layer of excitement to any celebration. Beyond their aesthetic appeal, this idea is remarkably cost-effective compared to purchasing or preparing numerous real eggs. Plus, unlike fragile eggs, these stone creations are incredibly robust, won’t break easily, and can be lovingly stored and brought out for many Easters to come, making them a sustainable and sentimental holiday keepsake.
Why Choose Stone Painting for Your Easter Festivities?
Embracing stone painting for Easter crafts offers a myriad of benefits that extend beyond simple decoration. It’s an activity that sparks creativity, engages all age groups, and provides lasting memories. Here are several compelling reasons to try this delightful craft:
- Unmatched Durability: Unlike real eggs, which are prone to cracking and breaking, painted stones are incredibly resilient. This means your artistic efforts will withstand the test of time, clumsy hands, and outdoor elements, making them perfect for repeated use in Easter egg hunts or as garden embellishments.
- Eco-Friendly and Reusable: By utilizing natural stones, you’re choosing an environmentally conscious craft. These sturdy little chicks can be carefully packed away after the festivities and reused year after year, reducing waste and becoming a cherished part of your family’s annual Easter traditions.
- Cost-Effective Creativity: Stones can often be found for free in gardens, parks, or along riverbeds, making this an incredibly budget-friendly project. With just a few basic acrylic paints and brushes, you can create an entire flock of adorable chicks without significant expense.
- Engaging for All Ages: Stone painting is a wonderfully inclusive activity. Toddlers can enjoy painting base coats, while older children and adults can focus on intricate details. It’s a fantastic way to bond with family members and encourage artistic expression in a relaxed, fun environment.
- Versatile Decor and Play Pieces: These stone chicks aren’t just for display. They can be hidden for an alternative Easter “egg” hunt, used as charming table centerpieces, added to potted plants, or even given as handmade gifts. Their versatility makes them a valuable addition to your holiday repertoire.
- Less Mess, More Fun: Working with stones eliminates the mess and potential for spoilage associated with real eggs. There’s no need to worry about raw egg contents or delicate shells, allowing for a more enjoyable and stress-free crafting experience.
By opting for painted stones, you’re not just creating a craft; you’re creating durable, eco-friendly, and endlessly charming tokens of Easter joy that will bring smiles for years to come.
Essential Materials for Your Stone Baby Chick Project
Gathering your supplies is the first exciting step in bringing your stone baby chicks to life. Most of these items are readily available at craft stores, and you might even have some of them around your home. Choosing quality materials will ensure your chicks look their best and last longer.
- Smooth Stones: The foundation of your craft. Look for stones that are relatively flat and smooth, fitting comfortably in your hand. An oval or egg-like shape is ideal for a chick, but don’t be afraid to experiment with unique shapes!
- Fine-Tip Marking Pen: Essential for outlining delicate features like eyes, beaks, and feet. A waterproof, permanent marker works best to ensure lines don’t smudge when painted over.
- White Acrylic Paint: Used as a primer to ensure vibrant colors and for adding specific details.
- Pink Acrylic Paint: For those adorable rosy cheeks.
- Orange Acrylic Paint: To bring the beak and feet to life with a warm, cheerful hue.
- Yellow Acrylic Paint: The main color for your fluffy little chick. Choose a bright, cheerful yellow!
- Assorted Paintbrushes: You’ll need a couple of sizes: a larger flat brush for base coats and a smaller, fine-tipped brush for intricate details.
- Clean Water Container: For rinsing brushes.
- Paper Towels or a Rag: For drying brushes and cleaning up any spills.
- Optional: Clear Sealant Spray (Matte or Glossy): To protect your finished artwork from the elements and give it a polished look.
Step-by-Step Directions to Paint Your Adorable Stone Baby Chick
Creating these charming baby chick stones is a rewarding process that’s easier than you might think. Follow these detailed steps to bring your feathered friends to life:
Step 1: Preparing Your Stone and Laying the Foundation
The first crucial step is preparation. Begin by thoroughly washing the stone you’ve selected. Use soap and water to remove any dirt, dust, or debris. A clean surface is paramount for the paint to adhere properly and create a smooth finish. Once cleaned, allow the stone to air dry completely. Any residual moisture can affect paint adhesion and cause bubbling.
Next, apply a generous, even coat of white acrylic paint to the entire surface of the stone. This white primer serves a vital purpose: it provides a neutral base that will make your subsequent yellow and other colors appear much brighter and more vibrant. It also helps to seal the porous surface of the stone. Ensure the stone is completely covered, then set it aside in a well-ventilated area to dry thoroughly. This might take 15-30 minutes, depending on the thickness of the paint and humidity.
Once the white base is dry to the touch, it’s time to add the primary color. Paint the entire stone with a cheerful yellow acrylic paint. You might need two thin coats to achieve full, opaque coverage, allowing each coat to dry completely before applying the next. Patience here ensures a smooth, even, and professional-looking finish for your chick’s body.
Step 2: Adding Facial Features and Delicate Details
With your vibrant yellow base coat fully dry, it’s time to bring your chick to life with its adorable features. Using your fine-tip marking pen, carefully draw the eyes, beak, and feet onto the stone, referencing the design demonstrated in the original video for placement and style. You can lightly sketch these features with a pencil first if you prefer, ensuring you’re happy with the positioning before committing with the permanent marker. For the eyes, simple dots or small oval shapes work well. The beak can be a small triangle or a diamond shape, and the feet can be simple three-toed lines at the bottom.
Next, using your smaller paintbrush and white acrylic paint, carefully fill in the beak and the feet you just outlined. The white provides a bright contrast and will make the final orange color pop even more. Be precise with your brush strokes to stay within the lines drawn by the marker. Allow this white paint to dry completely.
Now, for a touch of undeniable cuteness, dip the very tip of the handle of one of your paintbrushes (or a cotton swab) into the pink acrylic paint. Gently dab a small, circular blush on each side of the chick’s beak, creating two sweet rosy cheeks. These small pink dabs add character and warmth to your baby chick’s face.
Step 3: Polka Dots, Eye Sparkle, and Final Touches
Let’s add some playful texture! Dip the tip of your paintbrush handle into white paint once more. Gently dab small white dots all over the chick’s yellow body. Vary the size and placement of these dots for a charming, whimsical effect. Don’t worry about perfect uniformity; the slight imperfections add to the handmade charm. Once you’re satisfied with your polka dots, set the stone aside and allow the white paint to dry completely. This step ensures that subsequent layers won’t smudge your newly applied dots.
After the dots are dry, you can gently “polish” the edges of the dots if you wish, using a very fine brush to neaten them up, though this is optional. Now, grab your smallest brush and a tiny bit of white paint. Carefully paint a tiny white line or a small dot on the upper part of each chick’s eye. This creates a beautiful highlight, making the eyes appear more lively and expressive, adding that sparkling “baby chick” look.
Finally, for the last splash of color, use a small brush and orange acrylic paint to meticulously fill in the beak and feet. The white base you applied earlier will ensure the orange looks bright and opaque. Take your time to get clean, crisp lines. Once all the orange paint is applied, allow your stone baby chick to dry completely. For added protection and a professional finish, consider spraying your finished chick with a clear sealant (either matte or glossy) once all paint is thoroughly dry. This will protect your artwork from chipping, fading, and moisture, ensuring it remains beautiful for many Easters to come. Congratulations, your adorable Easter baby chick stone is complete!
Pro Tips for Perfect Painted Stone Chicks
Achieving a beautiful and long-lasting painted stone chick is all about a few key techniques and considerations. Keep these tips in mind to elevate your crafting experience:
- Stone Selection Matters: The smoother the stone, the easier it will be to paint and achieve clean lines. Flat, oval-shaped stones are ideal, but don’t shy away from unique shapes that might add character to your chick.
- Cleanliness is Key: Always start with a thoroughly washed and dry stone. Any dirt, dust, or oils can prevent the paint from adhering properly, leading to peeling or an uneven finish.
- Thin Coats are Best: Instead of one thick layer, apply several thin coats of paint, allowing each to dry completely. This prevents paint from cracking, creates a smoother surface, and yields more vibrant colors.
- Patience with Drying Times: Rushing the drying process between layers is a common mistake. Acrylic paint dries relatively quickly, but ensure each layer is fully dry to the touch before adding the next. This prevents smudging and mixing of colors.
- Use Quality Brushes: Invest in a good set of acrylic paintbrushes, including fine-tipped ones for details and broader ones for base coats. Clean your brushes thoroughly after each use to prolong their life.
- Sketch First: For those less confident in freehand drawing, use a pencil to lightly sketch the chick’s features (eyes, beak, feet) before applying the permanent marker or paint. This allows for adjustments and ensures you’re happy with the composition.
- Seal for Longevity: Once your painted chick is completely dry (wait at least 24 hours), apply a clear outdoor-grade sealant. This protective layer will shield your artwork from UV rays, moisture, and general wear and tear, ensuring your chicks look fresh for years, whether they’re indoors or out in the garden.
- Experiment with Tools: Besides brushes, consider using cotton swabs, toothpicks, or the blunt end of a paintbrush handle for making perfect dots or tiny details.
Creative Variations & Uses for Your Stone Chicks
The beauty of this craft lies in its adaptability. Once you master the basic baby chick, you can explore countless variations and creative uses:
- Different Chick Personalities: Experiment with different eye shapes (closed, winking, wide-eyed), eyebrow expressions, or even adding tiny eyelashes. Change the position of the beak or feet for a unique stance.
- Beyond Yellow: While yellow is classic, why not paint a blue chick, a purple chick, or even a rainbow chick? Let your imagination soar with a palette of colors.
- Add Texture and Sparkle: Before sealing, you can sprinkle fine glitter onto wet paint for a shimmery effect, or glue on tiny googly eyes for a whimsical touch.
- Themed Collections: Create a whole family of stone animals for Easter! Instead of just chicks, paint bunnies, lambs, ladybugs, or colorful Easter eggs on stones.
- Easter Egg Hunt Alternatives: Use these durable stone chicks for your annual Easter egg hunt. They won’t crack if dropped and can be hidden in more adventurous spots outdoors. Kids can collect them and trade them for candy or small prizes.
- Garden Decor: Place your sealed stone chicks among your spring flowers or in potted plants to add a cheerful pop of color and personality to your garden or patio.
- Thoughtful Gifts: A handmade stone chick makes a wonderful, heartfelt gift for teachers, neighbors, or friends. Package it with a small note about its reusability and charm.
- Storytelling Props: Encourage imaginative play by using the painted stones as characters in stories or puppet shows.
Conclusion: Crafting Lasting Easter Memories
This delightful project of transforming ordinary stones into charming baby chicks is more than just a craft; it’s an opportunity to create lasting memories and beautiful, durable decorations that embody the spirit of Easter. With simple materials and straightforward steps, you can craft a collection of these adorable creatures that will bring smiles and joy for many seasons to come.
Whether you’re looking for a unique Easter egg hunt alternative, a charming addition to your home decor, or a fun activity to share with loved ones, these painted stone chicks are an ideal choice. They celebrate creativity, sustainability, and the simple pleasure of handmade artistry. So gather your stones, unleash your inner artist, and embark on a colorful journey to create your very own flock of adorable Easter baby chicks. A heartfelt thank you again to Kristyona via YouTube for sharing this wonderful and inspiring DIY project!