
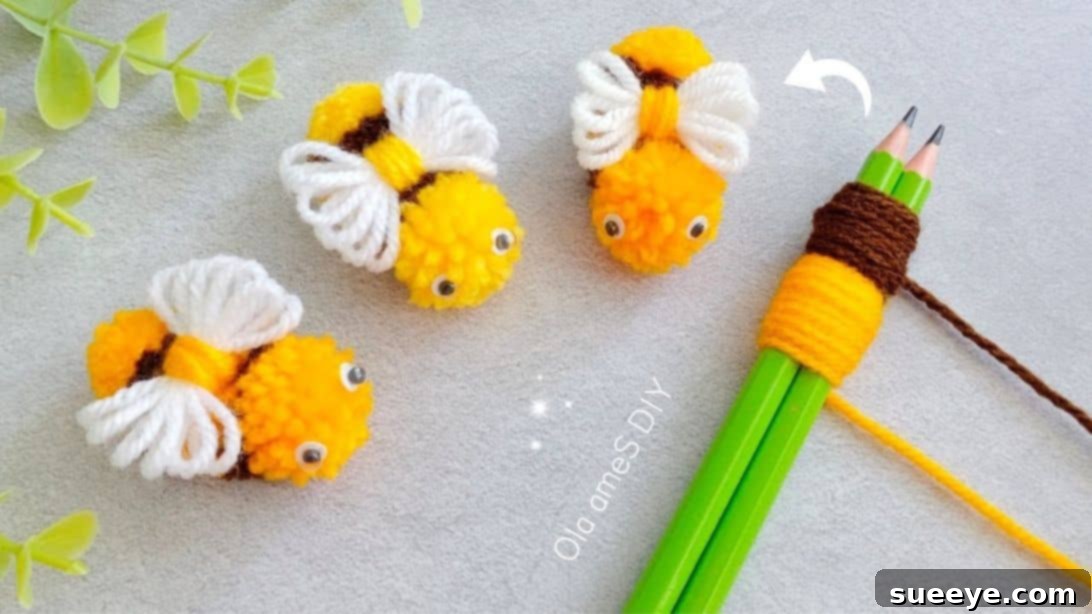
Welcome to a delightful world of yarn crafting where creativity takes flight! If you’re searching for an adorable, simple, and incredibly satisfying DIY project, look no further. This super easy tutorial will guide you through creating charming bee pom poms that are guaranteed to bring a smile to anyone’s face. These fuzzy little friends are not just cute; they’re incredibly versatile! Imagine them adding a whimsical touch to your favorite bag, adorning a cozy crochet blanket, jazzing up a plain hat, or even transforming into unique refrigerator magnets. Perfect for crafters of all skill levels, especially beginners, this project promises a rewarding experience. We’re diving deep into the craft, inspired by the fantastic work of Ola ameS DIY on Youtube, ensuring every step is clear, concise, and enjoyable.
Buzz-Worthy DIY: Create Your Own Adorable Bee Pom Poms
An Easy Yarn Craft Tutorial for All Ages
Crafting offers a wonderful escape, a chance to create something beautiful with your own hands. This bee pom pom project is a fantastic entry point into the world of yarn crafts, requiring minimal tools and maximum fun. Beyond their undeniable cuteness, these pom poms make thoughtful handmade gifts, charming party favors, or delightful additions to your home decor. Let’s gather our materials and get ready to create some buzzing masterpieces!
Gather Your Crafting Essentials
Before we embark on our bee-making adventure, ensure you have all the necessary supplies readily available. Choosing the right materials is key to a smooth and enjoyable crafting experience, and for achieving that perfectly fluffy, vibrant bee.
- 100% Acrylic Yarn: You’ll need white, brown, and yellow. Acrylic yarn is highly recommended for pom poms due to its durability, affordability, wide color range, and excellent ability to hold its shape and fluffiness. It’s also relatively easy to work with for beginners.
- Two Pencils: These humble writing tools will serve as your pom pom maker, providing the perfect structure for wrapping your yarn evenly. Any standard pencils will do, but ensure they are straight and of similar size.
- Sharp Scissors: A good pair of sharp scissors is crucial for clean cuts, especially when trimming the pom poms into their desired shapes. Dull scissors can fray the yarn and make the shaping process frustrating.
- Comb: A fine-tooth comb will be indispensable for creating the delicate, fluffy wings of your bee. It helps separate the yarn strands neatly and evenly.
- Googly Eyes: These small, wiggly eyes are the secret ingredient to bringing your bee pom poms to life, adding a playful and endearing personality. You can choose various sizes depending on how prominent you want the eyes to be.
- Craft Glue or Hot Glue Gun: While not explicitly listed in the original, a strong craft glue or a hot glue gun (with adult supervision if necessary) is essential for securing the various parts of your bee together, especially the eyes and wings. A quick-drying, clear-setting glue is ideal.
- Optional: Key Ring, Brooch Pin, Magnet: Depending on how you plan to use your finished bee pom pom, consider having these on hand for immediate application!
Having your materials organized before you start will help you maintain a steady crafting rhythm and focus on the fun parts of the process!
Step-by-Step Guide: Crafting Your Adorable Bee Pom Pom
Now that your materials are ready, let’s dive into the detailed instructions. Each step is designed to be clear and easy to follow, ensuring you create a beautiful, fluffy bee pom pom with confidence. Take your time, enjoy the process, and don’t be afraid to experiment!
Step 1: Preparing Your First Yarn Strand
Begin by taking your vibrant yellow yarn. Carefully cut a small, manageable strand, approximately 6 to 8 inches long. The exact length isn’t critical, but it needs to be long enough to comfortably tie a secure knot in a later step. Set this small yellow strand aside in a place where it won’t get lost, as you’ll need it very soon to bind the core of your bee’s body.
Step 2: Constructing the Bee’s Striped Body Base
Grab your two pencils and hold them parallel to each other, with a small gap between them. This gap will become the central channel for tying. Now, take your main spool of yellow yarn. Starting in the middle of the pencils, begin wrapping the yellow yarn snugly around both pencils. Aim for consistency in tension – not too tight that it distorts the pencils, but firm enough to create a dense pom pom. Wrap the yellow yarn exactly 20 times. Once the yellow layers are complete, seamlessly switch to your brown yarn. Without cutting the yellow yarn (you can just let it hang or secure it with a clip), start wrapping the brown yarn directly on top of the yellow layers, again wrapping it 20 times. This creates the iconic striped pattern of our bee’s body. Ensure the layers are evenly distributed for a balanced pom pom.
Step 3: Securing the Body and Forming the Core
This is a crucial step for the integrity of your pom pom. Retrieve the small yellow strand you cut and set aside earlier. Carefully insert this strand between the two pencils, passing it through the center channel where the yarn has been wrapped. Ensure it goes all the way around, allowing you to bring both ends of the small strand to the top. Slowly and firmly, tie this small strand into a secure knot, tightening it as much as possible around the wrapped yarn. This knot will hold all the loops together. Once the knot is tight, gently slide the entire wrapped yarn bundle off the pencils. You will now have a tightly cinched bundle of yarn loops. Use your sharp scissors to carefully trim any excess length from the tying strand, ensuring it’s neat and barely visible.
Step 4: Shaping the Bee’s Body and Creating Symmetry
With your scissors, begin cutting through all the loops on both sides of your tightly tied yarn bundle. As you cut, the loops will transform into individual strands, beginning to reveal the fluffy pom pom shape. Once all loops are cut, you’ll have one half of your bee’s body. To create a full, rounded bee, you need to repeat the entire process from Step 1 through Step 3 to make a second identical piece. Once both halves are ready, take them and glue them together. For a classic bee look, glue them in “opposite colors,” meaning if one piece has yellow on top and brown below, the other should align brown on top of yellow. This creates a beautifully defined striped effect. After gluing, gently begin to trim and sculpt the two joined pom poms into a smooth, elongated oval shape. This might take a little patience and several small snips to achieve the desired bee-like contour.
Step 5: Crafting the Bee’s Head
Now it’s time to give our bee a distinct head! Take your yellow yarn again. This time, you’ll use your index finger as the wrapping guide. Wrap the yellow yarn around your index finger approximately 20 times. Ensure the wraps are snug but not so tight that they cut off circulation. Once wrapped, carefully slide the loop of yarn off your finger. Take another small piece of yellow yarn (similar to the one from Step 1) and tie it tightly around the middle of the yarn loop you just created. This forms the base of the head pom pom. Using your sharp scissors, cut through all the loops on both sides of the tied yarn, just as you did for the body. Once cut, gently fluff the yarn and trim it carefully into a neat, spherical ball shape. This will be your bee’s adorable yellow head.
Step 6: Attaching the Head to the Body
With your perfectly shaped yellow head ball ready, apply a small amount of craft glue or hot glue to one end of the bee’s main body (the “brown end” if you glued your body sections in alternating colors as suggested in Step 4). Carefully press the yellow head onto the glued end, holding it firmly in place for a few moments until the glue begins to set. Ensure it’s centered and securely attached, as this forms the main structure of your bee. Allow sufficient time for the glue to fully cure before moving on to the next steps to prevent any parts from coming loose.
Step 7: Crafting the Delicate Bee Wings
Now for the magical touch – the wings! Take your comb and your white yarn. Insert the end of the white yarn into one of the teeth of the comb. Count 10 teeth down from that point and insert the yarn into that tooth as well, creating a loop. Repeat this process 5 times, effectively creating 5 parallel loops of white yarn stretched across the comb’s teeth. Once you have your 5 loops, carefully tie the free ends of the white yarn together to secure the loops. Next, thread a piece of yellow yarn onto a needle. Using this needle and yellow yarn, carefully sew through the very middle of the white loops several times. This central stitching will hold the wing shape together and allow for attachment to the bee’s body. Once secured, cut the white loops along the edges of the comb and gently remove the entire wing structure from the comb. You will now have a delicate, slightly oval-shaped set of wings.
Step 8: Final Assembly: Wings and Googly Eyes
The final touches bring your bee to life! Take the delicate white wings you just crafted and apply a small amount of craft glue or hot glue along the central stitched line. Carefully position and press the wings onto the back of your bee’s body, ensuring they are centered and symmetrical. Hold them in place until the glue starts to set. Finally, it’s time for those endearing googly eyes! Apply a tiny dot of glue to the back of each googly eye and carefully attach them to the yellow head of your bee. Play around with their positioning to give your bee a unique expression. Allow ample time for all the glue to dry completely, ensuring all parts are firmly attached. Congratulations! You’ve successfully created your very own adorable bee pom pom!
Why You’ll Love Making Bee Pom Poms
Beyond the undeniable cuteness, crafting these bee pom poms offers a multitude of benefits. It’s a wonderful way to engage in a mindful activity, allowing you to relax and focus on the creative process. For parents and educators, it’s a fantastic project to share with children, helping them develop fine motor skills, follow instructions, and express their creativity. These charming little bees also make incredible, personalized gifts that truly show you care. They’re perfect for decorating nurseries, brightening up a workspace, or adding a handmade touch to any item.
Creative Ways to Use Your Bee Pom Poms
The versatility of these little fuzzy bees is boundless! Once you’ve created your swarm, consider these ideas:
- Bag Charms: Attach them to your handbag, backpack, or even a school bag for a pop of personality.
- Keychains: A small jump ring and a keychain attachment can transform your bee into an adorable companion for your keys.
- Brooches: Secure a brooch pin to the back, and instantly elevate a jacket, scarf, or hat.
- Magnets: Glue a small magnet to the back for a delightful refrigerator or locker decoration.
- Hair Accessories: Attach to a hair clip or headband for a whimsical touch.
- Gift Toppers: Use them instead of a bow on wrapped gifts for an extra special touch.
- Nursery Decor: Create a mobile, garland, or simply place them on shelves for a sweet, playful atmosphere.
- Crochet & Knitting Embellishments: Sew them onto blankets, scarves, or sweaters for a unique handmade detail.
Tips for Perfect Pom Poms Every Time
Even though this is an easy project, a few tips can help ensure your bee pom poms are extra fluffy and well-shaped:
- Even Wrapping: Maintain consistent tension when wrapping yarn around the pencils or your finger. This ensures a dense, even pom pom.
- Tight Knot: The central tie must be as tight as possible. A loose knot will result in a messy, falling-apart pom pom.
- Sharp Scissors are Key: This cannot be stressed enough! Sharp scissors make trimming much easier and give you cleaner, neater results.
- Trim Gradually: When shaping, trim small amounts at a time. You can always take more off, but you can’t put it back on! Rotate your pom pom as you trim to ensure even shaping.
- Fluff as You Go: After trimming, gently fluff your pom pom with your fingers to make sure all the strands are standing out nicely.
- Experiment with Yarn: While acrylic is recommended, feel free to try different yarn weights or textures once you’re comfortable with the basic technique.
Troubleshooting Common Pom Pom Challenges
Even experienced crafters encounter little hiccups! Here are some common issues and how to solve them:
- Pom Pom Looks Uneven/Sparse: This usually means you didn’t wrap enough yarn or the tension was inconsistent. More wraps mean a denser, fluffier pom pom.
- Yarn Falling Out: The central knot wasn’t tied tightly enough. When making your next pom pom, ensure you pull that tying strand as taut as possible.
- Difficulty Shaping: Dull scissors are often the culprit. If your pom pom isn’t taking shape, try sharpening your scissors or using a new pair. Trimming against a flat surface can also help.
- Wings Aren’t Stiff Enough: For stiffer wings, you could try using a yarn that has more body, or even stiffen the white yarn slightly with a fabric stiffener before forming the wings (ensure it dries completely before handling).
This simple project is more than just making a decorative item; it’s an invitation to explore your creativity and enjoy the satisfying process of bringing something charming to life with your own hands. Remember, every handmade item carries a piece of your unique spirit, making these bee pom poms truly special.
Inspired by this delightful craft? We highly encourage you to check out Ola ameS DIY on YouTube for more fantastic DIY crafts and endless inspiration! Their channel is a treasure trove of creative projects just waiting to be discovered. Happy crafting!