
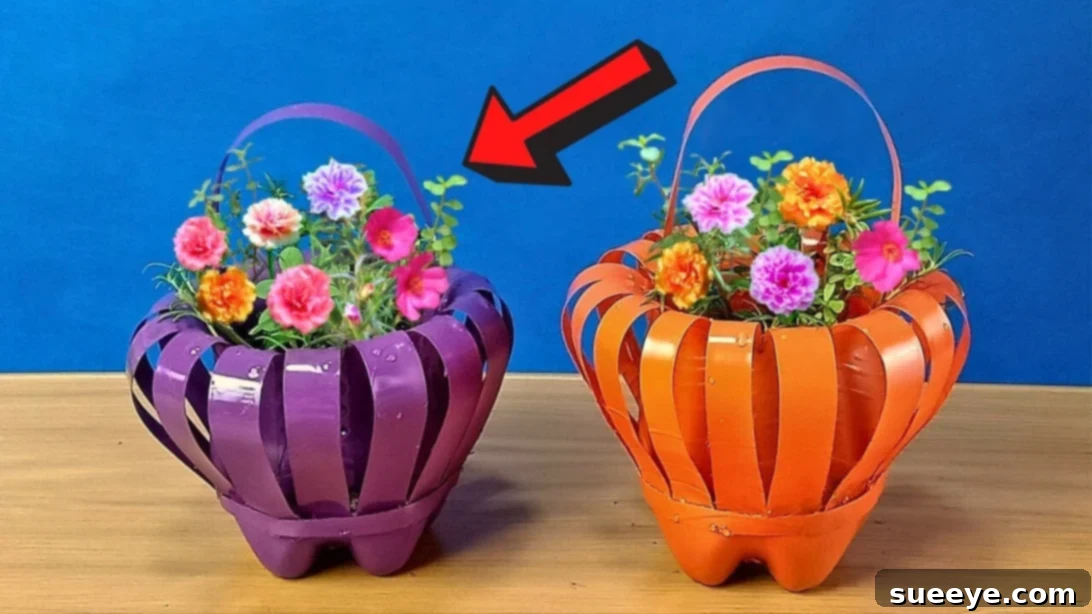
DIY Recycled Plastic Bottle Flower Baskets: A Step-by-Step Guide to Sustainable Garden Decor
In a world increasingly aware of its environmental footprint, finding creative ways to reduce waste is more important than ever. As an avid enthusiast of repurposing household items, I often find immense joy in transforming everyday discards into something new and beautiful. It’s a rewarding hobby that not only lessens waste but also sparks creativity and adds a unique, personal touch to my living space.
One of my absolute favorite DIY transformations, perfect for adding a splash of color and life to any garden or balcony, is turning ordinary plastic bottles into delightful flower baskets. This ingenious project, popularized by creative minds like Suking DiY Ideas, offers a fantastic way to give plastic a second life. Instead of contributing to overflowing landfills, you can craft charming, vibrant containers for your favorite blooms. Imagine your garden adorned with these unique, hand-painted baskets, each holding a vibrant flower, bringing an instant burst of brightness and an undeniable sense of accomplishment.
This comprehensive guide will walk you through the entire process, making it easy for anyone, regardless of their DIY experience, to create stunning flower baskets from materials you likely already have at home. Get ready to unleash your creativity, embrace sustainability, and watch your garden flourish with these charming, upcycled creations!
Why Repurpose Plastic Bottles for Your Garden?
Before diving into the craft, it’s worth understanding the profound impact and numerous benefits of choosing to repurpose plastic bottles:
- Environmental Stewardship: Plastic pollution is a global crisis. By reusing plastic bottles, you actively divert waste from landfills and oceans, significantly reducing your environmental footprint. This small act contributes to a larger movement towards a circular economy.
- Cost-Effective Decor: Why spend money on new planters when you can create unique ones for free? This project utilizes readily available materials, making it an incredibly budget-friendly way to enhance your garden’s aesthetic.
- Unleash Creativity: Each bottle offers a blank canvas. From selecting vibrant spray paints to adding intricate designs, you have complete freedom to personalize your flower baskets to match your style or garden theme. No two baskets have to be exactly alike!
- Durable and Practical: Plastic bottles, especially PET types, are lightweight yet surprisingly durable. They are weather-resistant and won’t break as easily as ceramic or terracotta pots, making them ideal for outdoor use. The added drainage holes ensure your plants thrive.
- Educational and Inspiring: Engaging in DIY recycling projects can be a wonderful activity for families, teaching valuable lessons about sustainability and the importance of resourcefulness. Your colorful creations might even inspire friends and neighbors to start their own upcycling adventures!
Ready to turn trash into treasure? Let’s gather our tools and begin this exciting transformation!
Materials You’ll Need:
Gathering your materials before you start ensures a smooth and enjoyable crafting experience. Most of these items are common household staples or easily accessible:
- Plastic Bottle: Opt for larger soda or water bottles (1.5L or 2L works best) as they provide ample material for the basket structure. Ensure it’s clean and free of labels. Clear or lightly colored bottles are easiest to paint.
- Glue Gun and Glue Sticks: Essential for securely bonding the plastic strips. A hot glue gun provides a strong, quick-drying hold that is crucial for the basket’s integrity.
- Cutter or Utility Knife: Used for the initial, precise cuts on the bottle. Always exercise extreme caution when using a blade.
- Marker: A permanent marker (like a Sharpie) is perfect for drawing clear, visible guidelines on the plastic.
- Sharp Scissors: Crucial for cutting consistent strips. Dull scissors will make the job difficult and result in uneven edges. Consider a pair specifically for crafting.
- Spray Paint: Choose outdoor-friendly spray paint in your favorite colors. Look for paints designed for plastic surfaces for optimal adhesion and durability. Primers specifically for plastic can also be beneficial.
- Heat Source (optional, for drainage holes): A lighter or candle to heat a screw tip for creating drainage holes. Alternatively, a small drill bit can be used.
- Cloth: For wiping off marker lines and keeping your workspace clean.
- Newspapers or Drop Cloth: To protect your work surface when spray painting.
With your materials ready, let’s move on to the fun part: transforming those bottles!
Step-by-Step Transformation Guide:
Step 1: Preparing Your Plastic Bottle and Marking Guidelines
Begin by thoroughly cleaning your plastic bottle and removing any labels or residue. A clean surface ensures better adhesion for paint and glue. Once clean, use your marker to draw a clear line around the circumference of the bottle, approximately one-third to half-way down from the top. This line will serve as the base for your flower basket’s “petals.” Next, carefully cut off the very top portion of the bottle, just above where the neck begins to widen. With your sharp scissors, meticulously cut vertical strips from the top edge down to the horizontal line you drew. Aim for strips of uniform width – approximately 1 to 1.5 cm each – all the way around the bottle. Precision here will contribute to a more symmetrical and aesthetically pleasing final product. After cutting, gently wipe away any remaining marker lines with a cloth to ensure a clean finish before painting.
Step 2: Creating the Reinforcement Ring
From the top section of the bottle you initially cut off, locate the small, sturdy plastic ring that forms the very top of the bottle’s neck. Using your cutter or a sharp blade, carefully cut this small ring free. This ring will later serve a crucial purpose in securing the bent strips and giving your basket a strong, finished edge. Handle with care to ensure a clean, even cut.
Step 3: Forming the Basket Shape
Now comes the transformative step! Gently bend each individual strip you cut in Step 1 towards the bottom of the bottle, pressing it down firmly. As you bend them, you’ll see the base of the bottle begin to take on a beautiful, flower-like shape, with the strips resembling petals. Once each strip is bent into place, secure its end firmly to the side of the bottle’s base using your hot glue gun. Apply a small dot of hot glue to the inside of the strip’s tip and press it against the bottle’s body. Hold for a few seconds until the glue sets. Work your way around, ensuring all strips are uniformly bent and glued, creating a symmetrical and robust base for your basket.
Step 4: Securing the Basket Structure with the Ring
Take the small plastic ring you cut in Step 2. You’ll need to make a single cut in this ring to open it up, allowing you to wrap it around the joined ends of the strips. Once opened, carefully fit this ring around the point where all the bent strips meet and are glued to the bottle’s body. Use your hot glue gun to secure this ring in place, ensuring it encases the ends of all the strips. This not only provides extra structural integrity, preventing the strips from coming undone, but also gives your flower basket a clean, finished look, much like a decorative band.
Step 5: Adding a Convenient Handle
For ease of carrying and hanging, your flower basket needs a handle. Take another plastic bottle (or a sturdy piece of plastic from the discarded top section if it’s wide enough) and cut a strip approximately 2-3 cm wide and long enough to form a comfortable handle. Bend this strip into an arch. Using your hot glue gun, firmly attach each end of this handle strip to opposite sides on the inside rim of your newly formed flower basket. Apply generous amounts of glue for a strong bond, as this handle will bear the weight of soil and plant. Allow it to cool and set completely before handling.
Step 6: Ensuring Proper Drainage
For any plant to thrive, proper drainage is essential to prevent waterlogging and root rot. Carefully create several small holes at the very bottom of your plastic flower basket. The simplest method is to heat the tip of a screw (using a lighter or candle) and gently press it into the plastic. The heated tip will melt through the plastic, creating clean drainage holes. Alternatively, a small drill bit can also be used, but ensure you place a piece of scrap wood underneath to protect your work surface and prevent the plastic from cracking. Aim for 3-5 holes, evenly spaced.
Step 7: Personalizing with Paint
This is where your basket truly comes to life! Move your prepared basket to a well-ventilated area, preferably outdoors, and place it on a protective surface like newspaper or a drop cloth. Apply an even coat of your chosen spray paint. If you’re using lighter colors or want a really opaque finish, multiple thin coats are always better than one thick coat, as thick coats can drip and look uneven. Allow each coat to dry completely according to the paint manufacturer’s instructions before applying the next. Once you’re satisfied with the coverage and color, let the basket dry thoroughly for several hours, or even overnight, to ensure the paint is fully cured and durable for outdoor use.
Step 8: Planting Your Favorite Flowers
Once your beautifully painted basket is completely dry and cured, it’s time for the grand finale! Carefully fill your new upcycled planter with high-quality potting soil. Gently plant your chosen flowers or herbs, making sure to loosen their roots slightly before placing them in the basket. Water them immediately after planting. Now, find the perfect spot in your garden, on your patio, or hanging on your balcony where your new, eco-friendly flower basket can proudly display its vibrant contents and bring joy to your outdoor space!
Tips for Success and Creative Customization
To ensure your DIY flower baskets are not only functional but also truly unique and long-lasting, consider these additional tips:
- Choosing the Right Bottle: While any plastic bottle can work, thicker PET plastic bottles (like those for soda) offer more rigidity and durability for the strips and overall structure.
- Safety First: Always supervise children if they are involved in the project, especially when using cutters, sharp scissors, or hot glue guns. Work in a well-ventilated area when spray painting and wear appropriate protective gear like gloves and a mask.
- Paint Adhesion: For best results, consider lightly sanding the plastic surface with fine-grit sandpaper before painting. This creates a slightly rougher texture, allowing the spray paint to adhere better and preventing chipping. A plastic-specific primer can also significantly improve paint durability.
- Creative Decorating Beyond Paint: Don’t limit yourself to just spray paint!
- Decoupage: Apply colorful paper, fabric scraps, or even dried leaves with Mod Podge for a unique texture.
- Stencils: Use stencils and contrasting paint colors to add patterns, letters, or images.
- Embellishments: Glue on beads, buttons, ribbons, or even small pebbles for added flair.
- Handle Alternatives: Instead of a plastic strip, you could use sturdy rope, wire wrapped with fabric, or even a piece of decorative chain for a different aesthetic.
- Plant Selection: Choose plants that are suitable for containers and thrive in the amount of sunlight your basket will receive. Smaller annuals, herbs, succulents, or trailing plants like petunias and impatiens work wonderfully.
- Drainage Enhancement: Place a layer of small pebbles or gravel at the bottom of the basket before adding soil. This can further improve drainage and prevent soil from washing out through the holes.
Embrace the Joy of Sustainable Crafting
Transforming plastic bottles into beautiful flower baskets is more than just a craft project; it’s a statement. It’s a commitment to sustainability, a testament to your creativity, and a rewarding way to enhance your living environment. Each basket you create is a small victory against waste and a vibrant addition to your garden.
This DIY project from Suking DiY Ideas offers an accessible entry point into the world of upcycling, proving that often, the most beautiful and meaningful decor pieces are those we create ourselves. So, gather your empty bottles, unleash your inner artist, and prepare to be amazed by what you can achieve with a little effort and a lot of imagination.
Share your creations with the world and inspire others to join the movement of turning everyday waste into extraordinary treasures. Happy crafting, and may your garden bloom with sustainable beauty!