
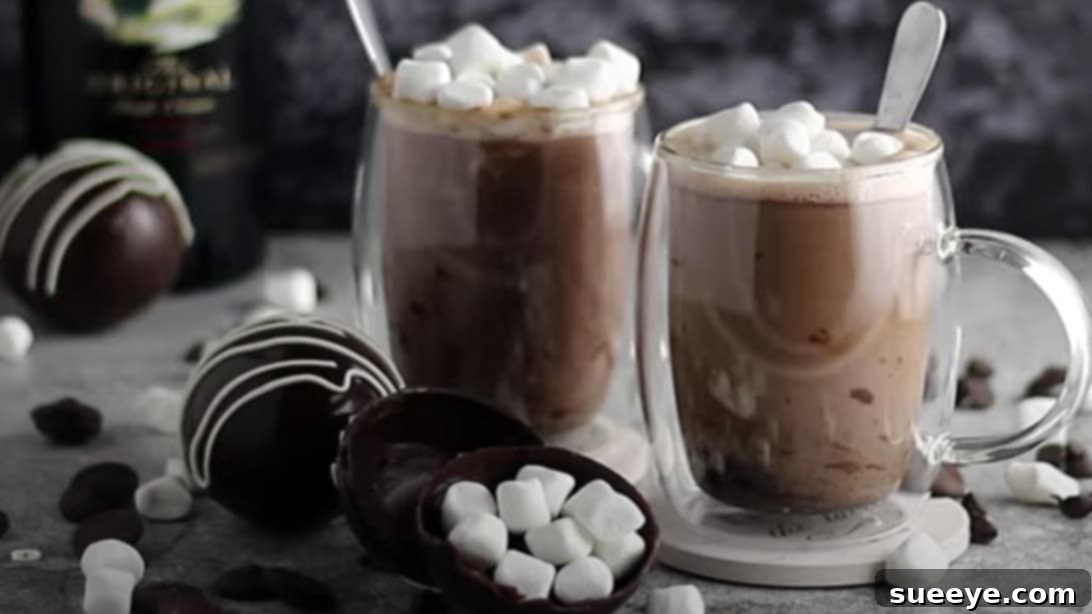
Elevate Your Hot Chocolate Experience: Crafting Gourmet Bailey’s Hot Chocolate Bombs
Hot chocolate bombs have taken social media by storm, captivating hearts with their magical reveal. These delightful chocolate spheres, typically filled with hot cocoa powder and mini marshmallows, offer a whimsical treat. The sheer joy of pouring hot milk over them and watching the contents burst forth brings out a childlike wonder in everyone. But what if you could take this beloved trend and elevate it to a truly gourmet experience, without breaking the bank?
Imagine a hot chocolate bomb that offers a sophisticated twist – rich, authentic chocolate flavor infused with the creamy notes of Bailey’s Irish Cream. We’re about to transform the simple hot cocoa bomb into an adult-friendly indulgence, perfect for cozy evenings or as a charming gift. Instead of standard hot chocolate mixes, our recipe utilizes homemade chocolate ganache, delivering an unparalleled depth of flavor and a silky-smooth texture that powdered mixes simply can’t match.
Our inspiration comes from the creative culinary minds at Sweet Serenity Kitchen on Youtube, who shared their brilliant approach to these luxurious treats. They’ve shown us how to achieve an authentically chocolatey experience by incorporating ganache, alongside the delightful addition of Bailey’s for that extra special touch. This guide will walk you through every step, ensuring your homemade hot chocolate bombs are nothing short of spectacular.
Why Go Gourmet? The Magic of Bailey’s and Ganache
Before diving into the recipe, let’s understand why this gourmet approach makes all the difference. While convenience is king, sometimes a little extra effort yields extraordinary results. Standard hot chocolate bombs often rely on pre-packaged cocoa mixes, which can sometimes taste artificial or lack the rich, deep chocolate notes that true chocolate lovers crave. This is where homemade ganache steps in.
Chocolate ganache, a luxurious mixture of chocolate and cream, provides an intense and authentic chocolate flavor. Its smooth, decadent texture melts beautifully into hot milk, creating a velvety beverage that feels incredibly indulgent. By making your own ganache, you control the quality of ingredients, ensuring a superior taste profile that powdered mixes simply cannot replicate.
The addition of Bailey’s Irish Cream takes this indulgence to another level. Bailey’s, with its creamy texture and distinct notes of Irish whiskey, cocoa, and vanilla, pairs exquisitely with chocolate. It introduces a subtle warmth and a sophisticated flavor dimension that transforms a simple hot chocolate into a luxurious adult beverage. For those who prefer a non-alcoholic option, don’t worry – we’ll guide you on how to achieve a similar creamy flavor profile without the alcohol, ensuring everyone can enjoy this special treat.
Essential Ingredients for Your Gourmet Hot Chocolate Bombs
Creating these exquisite hot chocolate bombs requires a few key ingredients. We recommend using high-quality components to ensure the best possible flavor and texture. Pay attention to the details, and your efforts will be rewarded with a truly decadent experience.
For the Decadent Bailey’s Chocolate Ganache:
- ½ cup Semi-Sweet Chocolate Chips: Opt for good quality semi-sweet chocolate chips or finely chopped semi-sweet chocolate bars (around 60-70% cacao). Semi-sweet provides a balanced chocolate flavor that isn’t overly bitter or too sweet, making it perfect for pairing with Bailey’s. You can experiment with dark chocolate for a more intense flavor or milk chocolate for a sweeter profile, but semi-sweet is generally the most versatile.
- ½ cup Bailey’s Irish Cream: The star of our ganache! The original Irish Cream offers the classic flavor, but feel free to explore other Bailey’s variations like Espresso Crème or Salted Caramel for an interesting twist. If you prefer a non-alcoholic version, you can substitute with a non-alcoholic Irish cream flavored coffee creamer, or even a blend of heavy cream and a few drops of Irish cream flavor extract (available at baking supply stores).
For the Irresistible Hot Chocolate Bombs:
- 10 ounces of Melting Wafers or Candy Melts: These are crucial for creating sturdy, glossy, and easily unmoldable chocolate shells. Unlike regular chocolate, melting wafers (also known as candy melts or compound chocolate) contain vegetable fats instead of cocoa butter, making them easier to melt and temper without the fuss. They provide a smooth finish and a good snap. Choose your favorite chocolate flavor – milk, dark, or white – to form the shells.
- Mini Marshmallows: The classic hot chocolate companion! Mini marshmallows are perfect for fitting inside the bombs. You can also experiment with different flavored marshmallows, or even add a few festive sprinkles or a pinch of crushed candy canes for extra flair.
- Bailey’s Chocolate Ganache: Our homemade ganache, prepared fresh, will serve as the rich, flavorful core of your hot chocolate bombs.
Essential Tools:
- Microwave-safe bowls
- Whisk
- Silicone sphere molds (typically 2.5-inch diameter halves are ideal for standard mug sizes)
- Spoon or small pastry brush
- Parchment paper or wax paper
- Small offset spatula (optional, for sealing)
Step-by-Step Directions: Crafting Your Gourmet Hot Chocolate Bombs
Patience and precision are key to creating perfect hot chocolate bombs. Follow these detailed instructions carefully, and you’ll be rewarded with stunning, delicious treats.
Part 1: Preparing the Luxurious Bailey’s Chocolate Ganache
The ganache is the heart of our gourmet bomb, so let’s make sure it’s perfect.
- Heat the Bailey’s Irish Cream: Pour ½ cup of Bailey’s Irish Cream (or your chosen non-alcoholic alternative) into a small saucepan or a microwave-safe bowl. Gently heat it on the stove over medium-low heat, or in the microwave in 30-second intervals, stirring in between. The goal is to heat the cream until it barely begins to simmer or show small bubbles around the edges, but do not let it come to a rolling boil. Overheating can cause the cream to scorch, which will impart a bitter or sometimes sour taste to your ganache.
- Combine with Chocolate Chips: Place ½ cup of semi-sweet chocolate chips into a heat-proof bowl. Once the Bailey’s cream is heated to the desired temperature, immediately pour it over the chocolate chips.
- Rest and Melt: Do not stir yet! Allow the mixture to rest undisturbed for 2-3 minutes. This resting period is crucial as it gives the hot cream time to thoroughly melt the chocolate chips, resulting in a smoother ganache.
- Whisk to Perfection: After the resting time, begin gently whisking the chocolate and cream mixture. Start from the center and gradually work your way outwards. Continue whisking steadily until all the chocolate is melted, and the mixture transforms into a silky, smooth, and homogenous chocolate ganache. It should be glossy and free of any lumps.
- Cool and Thicken: Set the ganache aside to cool completely at room temperature. As it cools, it will thicken to a spreadable, pipeable consistency, perfect for filling your hot chocolate bombs. If you’re in a hurry, you can place it in the refrigerator for about 20-30 minutes, stirring occasionally, until it reaches the desired consistency. Avoid chilling it for too long, as it will become too firm to work with.
Part 2: Crafting the Perfect Chocolate Bomb Shells
Creating beautiful, sturdy chocolate shells is essential for a successful hot chocolate bomb. Take your time with this step.
- Melt the Chocolate Wafers: Place the 10 ounces of melting wafers or candy melts in a microwave-safe dish. Microwave on medium power for 30-second intervals, stirring thoroughly after each interval. It’s crucial not to overheat the chocolate, as this can cause it to seize (become stiff and grainy) or burn, resulting in a bitter taste and difficult texture. Continue this process until the chocolate is fully melted and completely smooth. Alternatively, you can use a double boiler for more controlled melting, ensuring even heat distribution.
- Coat the Silicone Molds (First Layer): Using a spoon or a small pastry brush, apply a thin, even layer of melted chocolate to the inside of each cavity of your silicone sphere mold. Ensure the chocolate covers all surfaces, especially the edges, to create strong shells. For extra durability, especially if your first layer is very thin, you can apply a second thin layer after the first has set slightly.
- Remove Excess Chocolate: Once the cavities are coated, carefully invert the silicone mold onto a piece of parchment or wax paper. This allows any excess chocolate to drip off, ensuring a thin and even shell thickness. This also prevents pooling at the bottom, which could make your bombs unstable. You can gently scrape off any pooled chocolate around the edges with a clean spoon or spatula.
- Chill to Set: Place the mold in the refrigerator for approximately 5-10 minutes. This quick chill will allow the chocolate shells to set firmly, making them easy to unmold. Avoid chilling for too long, as this can lead to condensation forming on the chocolate when removed, potentially affecting its appearance or making it sticky.
- Unmold the Shells: Once firm, carefully peel the silicone mold away from the chocolate shells. Work gently to avoid cracking them. You should now have perfect, hollow chocolate hemispheres.
Part 3: Assembling Your Gourmet Hot Chocolate Bombs
Now comes the fun part – filling and sealing your bombs to create a magical reveal.
- Prepare for Filling: Ensure your Bailey’s chocolate ganache has cooled to a thick, spreadable, or pipeable consistency. If it’s too firm, let it sit at room temperature for a bit; if too soft, chill briefly.
- Fill the Half-Shells: Take half of your chocolate hemispheres. Spoon a generous tablespoon (or more, depending on your preference) of the Bailey’s chocolate ganache into the center of each chocolate half. You can pipe it for a neater look.
- Add Marshmallows: Gently place a desired amount of mini marshmallows on top of the ganache. Don’t overfill, as you need space to seal the bomb halves together.
- Prepare to Seal: You need a warm surface to gently melt the edges of the empty chocolate hemispheres. You can do this by heating a clean, dry plate in the microwave for 30-60 seconds until it’s warm to the touch (not hot). Alternatively, melt a small amount of extra chocolate wafers in a separate bowl to use as “glue.”
- Seal the Bombs: Take an empty chocolate hemisphere and carefully place its edge onto the warm plate for a few seconds, just enough to slightly melt the rim. Immediately press this melted rim onto the top of a filled chocolate half, gently rotating and applying light pressure to create a secure seal. If using melted chocolate as glue, apply a thin bead of melted chocolate along the rim of an empty half and then press it onto a filled half.
- Smooth and Secure: Ensure the two halves are perfectly aligned and sealed. You can use a clean finger or a small offset spatula to gently smooth out any excess chocolate along the seam for a clean finish. If there are small gaps, you can dab a tiny bit of melted chocolate over them to seal.
Part 4: Decorating and Serving Your Masterpiece
Add the finishing touches and get ready to enjoy your decadent creation.
- Decorate (Optional): For an extra touch of elegance, you can drizzle additional melted chocolate over the sealed bombs using a spoon or a piping bag with a fine tip. You can also sprinkle them with a dusting of cocoa powder, edible glitter, or crushed toppings like chopped nuts or candy canes before the drizzle sets. Allow any decorative drizzles to set completely at room temperature or in the refrigerator for a few minutes.
- Serving Your Hot Chocolate Bombs: When ready to enjoy, place one hot chocolate bomb into your favorite mug.
- The Grand Reveal: Heat about 8-10 ounces of milk (dairy or non-dairy, your preference) until it’s steaming hot, but not boiling. Carefully pour the hot milk over the hot chocolate bomb in the mug.
- Stir and Enjoy: Watch the magic unfold as the chocolate shell melts, releasing the ganache and marshmallows into the hot milk. Stir gently with a spoon until the ganache is fully dissolved, creating a rich, creamy, and wonderfully flavored hot chocolate.
- Garnish (Optional): Enhance your drink with a dollop of whipped cream, chocolate shavings, a sprinkle of cinnamon, or even a splash of extra Bailey’s for an even more intense flavor.
Storage Tips:
Store your finished hot chocolate bombs in an airtight container at room temperature in a cool, dry place for up to two weeks. If your kitchen is particularly warm, or if you used a very soft ganache, storing them in the refrigerator might be a better option. Just be aware that refrigeration can sometimes cause a slight bloom (white film) on the chocolate, which is harmless but can affect appearance. For best flavor and texture, consume them within a week.
With these gourmet Bailey’s Hot Chocolate Bombs, you’re not just making a drink; you’re crafting an experience. Enjoy the process, savor the rich flavors, and delight in the joy they bring to you and your loved ones. Cheers to a truly elevated hot chocolate experience!