
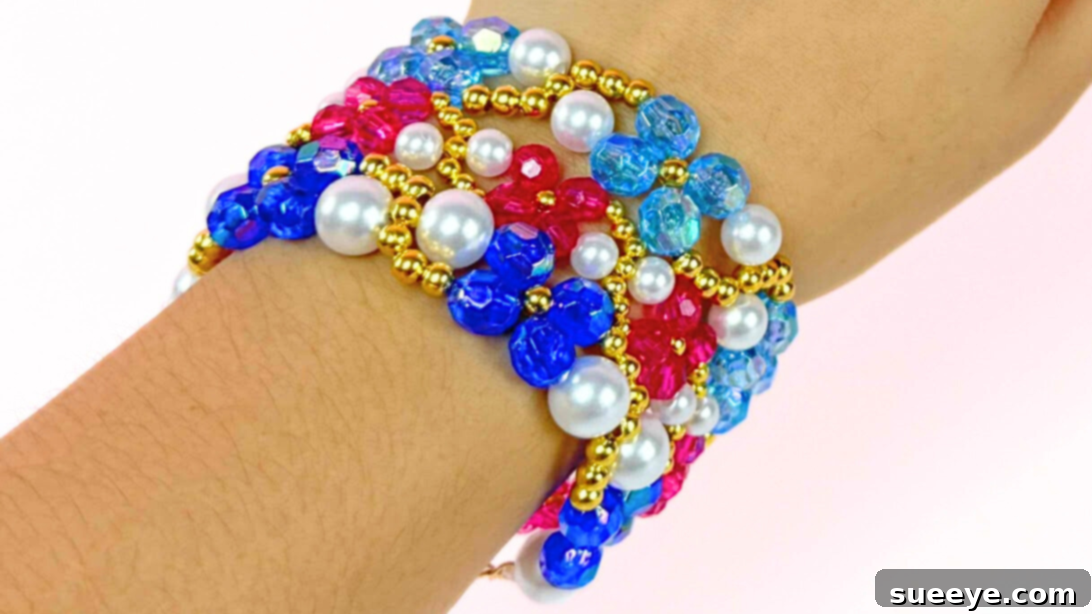
Welcome to the vibrant and rewarding world of DIY beaded crafts! My journey into this captivating hobby began modestly, with just a handful of basic bead sets. Over time, that humble collection blossomed into a comprehensive organizer brimming with an array of beads – different colors, shapes, and materials. My initial forays into beading included crafting a charming beaded wind chime and a delightful picture frame suncatcher. Both projects, once completed, not only added a touch of handmade beauty to my space but also ignited a passion to explore even more intricate and exciting bead designs. There’s something uniquely satisfying about transforming simple beads into beautiful, tangible objects that reflect personal style and creativity.
Among the myriad of possibilities that beading offers, creating handmade jewelry stands out as one of the most popular and enjoyable avenues. Beads lend themselves perfectly to crafting stunning necklaces, elegant earrings, and, perhaps most universally appealing, beautiful bracelets. The world of bracelet designs is truly boundless, ranging from incredibly simple, beginner-friendly patterns to highly intricate and detailed masterpieces that demand greater patience and advanced skill. Whether you’re aiming for a minimalist look, a bohemian stack, or a statement piece, there’s a beaded bracelet design for every taste and occasion. Crafting your own jewelry allows for unparalleled personalization, ensuring that each piece is as unique as the person wearing it.
RELATED: DIY Beaded Wind Chime Tutorial – Start Your Beading Journey
If you’re new to the art of beading, it’s natural to feel a bit overwhelmed by the sheer variety of techniques and styles available. However, there’s absolutely no need to rush into complex designs. The best approach for beginners is to start with an easy bead bracelet tutorial. This strategy allows you to comfortably learn the fundamental beading techniques, build your confidence with each step, and experience the immense satisfaction of creating something beautiful with your own hands, all without the pressure of advanced skills. This foundational experience is key to fostering a long-term love for crafting and opening the door to more elaborate projects in the future.
For those just dipping their toes into the exciting waters of jewelry making, I wholeheartedly recommend starting with a captivating flower bead bracelet. This project is not only incredibly fun and easy to follow but also serves as an excellent introduction to the core principles of beading techniques, such as threading, knotting, and pattern repetition. Even if you’ve never threaded a bead before, you’ll be amazed at how quickly you can create a bracelet that looks both stylish and thoughtfully handmade. This project is meticulously designed to be accessible, ensuring a positive and encouraging first crafting experience that will leave you eager for more.
What makes this particular bead bracelet ideal for beginners? It’s wonderfully straightforward, requiring no specialized tools or advanced techniques that might intimidate a novice. All you’ll truly need are some colorful beads, a sturdy stringing material like fishing line or nylon wire, and a dash of personal creativity. The simplicity of the design allows you to focus on developing your dexterity and understanding the mechanics of jewelry assembly. Once you complete your very first flower bracelet, you’ll feel an immediate surge of accomplishment and inspiration, ready to delve into more DIY jewelry projects and further expand your growing collection of beads and crafting skills. It’s a fantastic gateway to a world of endless creative possibilities and a rewarding pastime.
Why Choose a Beaded Flower Bracelet for Your First Project?
The beaded flower bracelet isn’t just a pretty accessory; it’s a perfect learning tool for budding crafters. Its repetitive yet engaging pattern helps you master fundamental techniques such as threading, knotting, and maintaining consistent tension – skills that are transferable to countless other jewelry designs. The visual reward of seeing a beautiful floral design emerge with each added bead provides continuous motivation, making the learning process enjoyable and highly satisfying. This project also offers ample room for personalization, allowing you to experiment with different color combinations, bead finishes, and even sizes to create a piece that truly reflects your unique style or serves as a thoughtful, custom gift. It’s a low-commitment project with high-reward outcomes, ideal for building confidence and developing a lifelong love for handmade jewelry. Moreover, the sense of pride you feel wearing or gifting something you made yourself is incomparable.
What You’ll Need for Your Easy Beaded Flower Bracelet: Materials & Tools
Before diving into the actual crafting process, it’s essential to gather all your materials and tools. Having everything laid out and ready will make your crafting experience much smoother, more efficient, and ultimately, more enjoyable. Here’s a detailed look at what you’ll need to create your beautiful beaded flower bracelet:
Materials
- Assorted Beads: You’ll need two main types of beads to create the flower effect:
- Petal Beads: These are typically smaller beads, often seed beads (e.g., size 8/0 or 11/0), that will form the petals of your flowers. Choose a vibrant color like blue, pink, or green.
- Center & Connecting Beads: Slightly larger beads for the center of each flower and for connecting the flowers in a chain (e.g., gold round beads, pearl beads, or even small crystal beads). These provide structure and contrast.
Experiment with different colors and finishes (matte, glossy, iridescent) to personalize your bracelet.
- Lobster Clasps: These are a popular and secure choice for bracelets. Their spring-loaded mechanism makes them easy to open and close, ensuring your bracelet stays safely on your wrist. Select a size appropriate for your bracelet’s overall look.
- Bracelet Chain Hook or Jump Ring: This small, open metal loop will be attached to one end of your bracelet. It provides a secure point for the lobster clasp to hook onto. Jump rings are commonly used, and you’ll typically need a pair of pliers (flat-nose or round-nose) to open and close them securely, though some lobster clasps come with a jump ring already attached.
- Fishing Line or Nylon Wire: A strong, durable, and thin stringing material is crucial.
- Fishing Line (Monofilament): Offers transparency and excellent strength, making it nearly invisible for a floating bead effect.
- Nylon Wire (Beading Thread): Often offers a bit more flexibility and can be easier to tie knots with.
Choose a thickness (e.g., 0.2mm to 0.3mm diameter) that can pass through your bead holes multiple times without splitting or becoming too stiff.
- Scissors: A sharp pair of small craft scissors is essential for cleanly trimming your fishing line or nylon wire. Precision is key for a neat finish.
- Optional: Bead Mat or Tray: While not strictly necessary, a specialized bead mat or even a simple piece of felt prevents beads from rolling away and helps keep your workspace organized. This can significantly reduce frustration, especially when working with many small beads.
- Optional: Clear Craft Glue or Nail Polish: A tiny dab can be used to further secure knots, preventing them from unraveling over time.
How to Make a Beaded Flower Bracelet: Step-by-Step Tutorial
Now that you have all your materials ready, let’s begin crafting your beautiful flower bead bracelet. Follow these steps carefully, paying attention to the details, and you’ll have a charming handmade accessory in no time! Remember to take your time and enjoy the creative process – it’s a journey as much as a destination.
-
Step 1: Prepare Your Stringing Material and Attach the Clasp

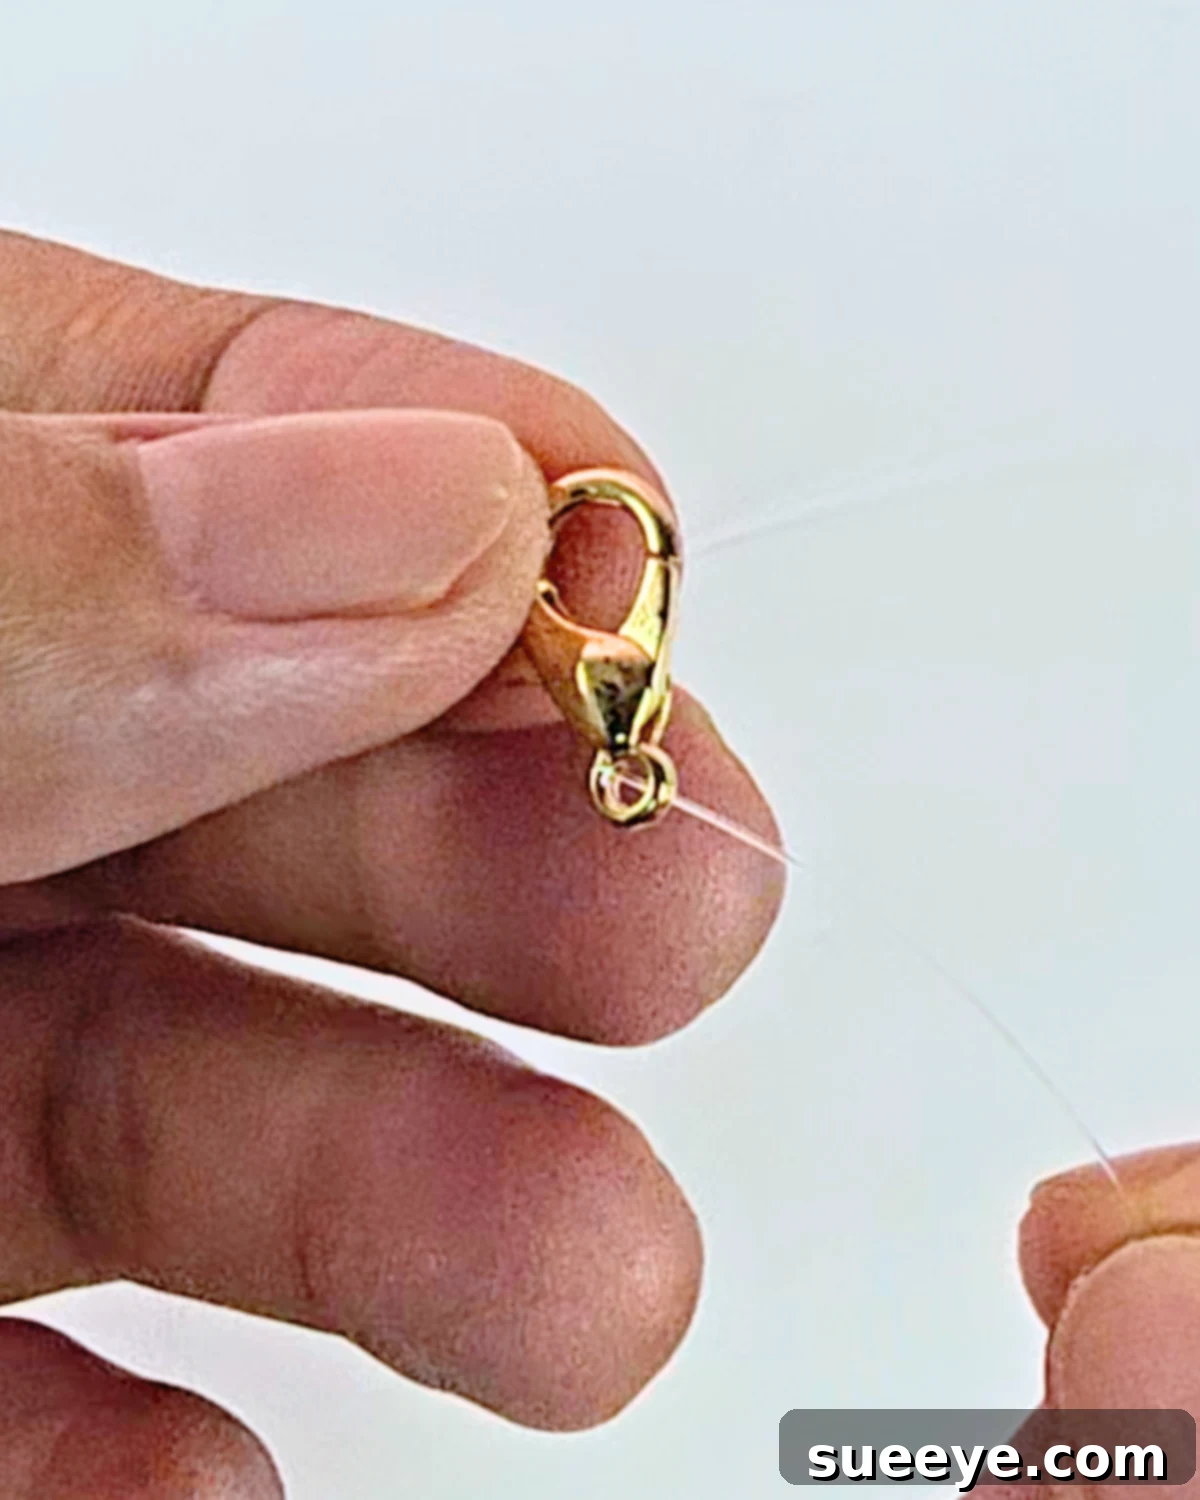
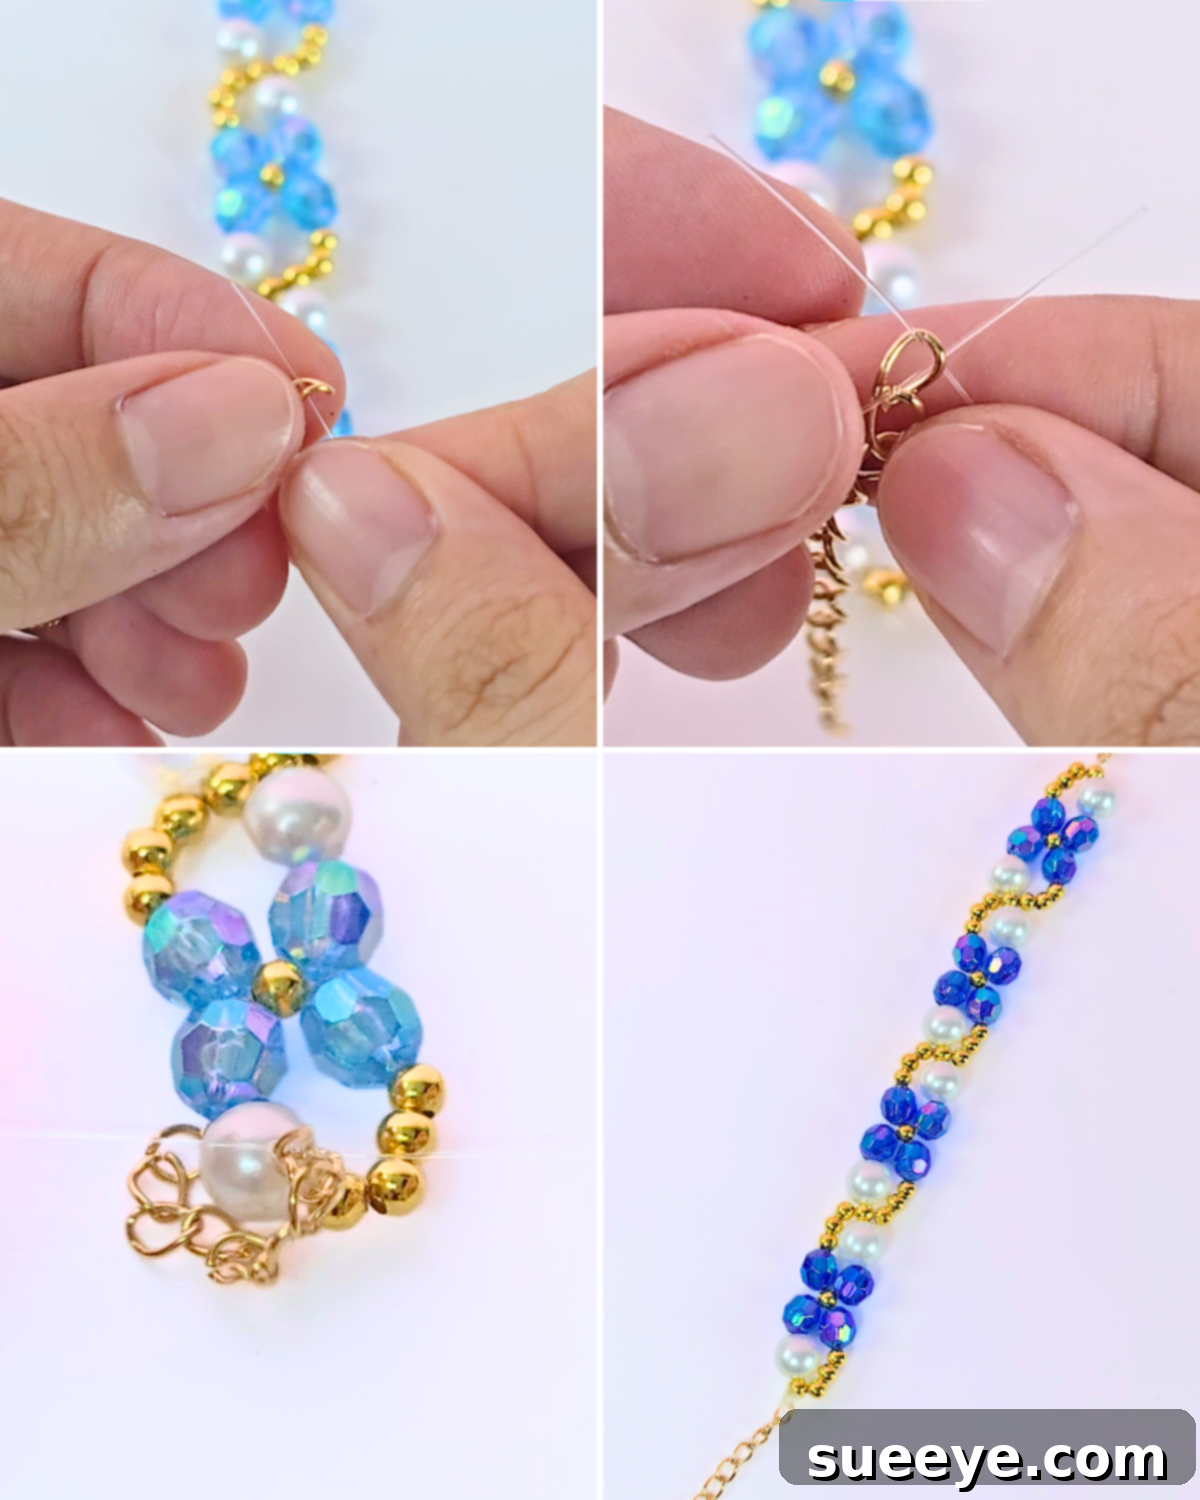
Start by cutting a generous length of fishing line or nylon wire – typically about 30-40 inches (75-100 cm) is a good starting point. This extra length provides plenty of room to work with and tie secure knots without feeling rushed. Take one end of your chosen stringing material and thread it through the small loop of your lobster clasp. Bring the two ends of the line together, ensuring they are even, and tie a secure knot right at the base of the clasp. A double overhand knot or a surgeon’s knot will provide excellent security. Pull it very tight to ensure it won’t come undone with wear. This clasp will serve as the starting point and one end of your finished beaded flower bracelet. -
Step 2: Introduce the First Connecting Bead
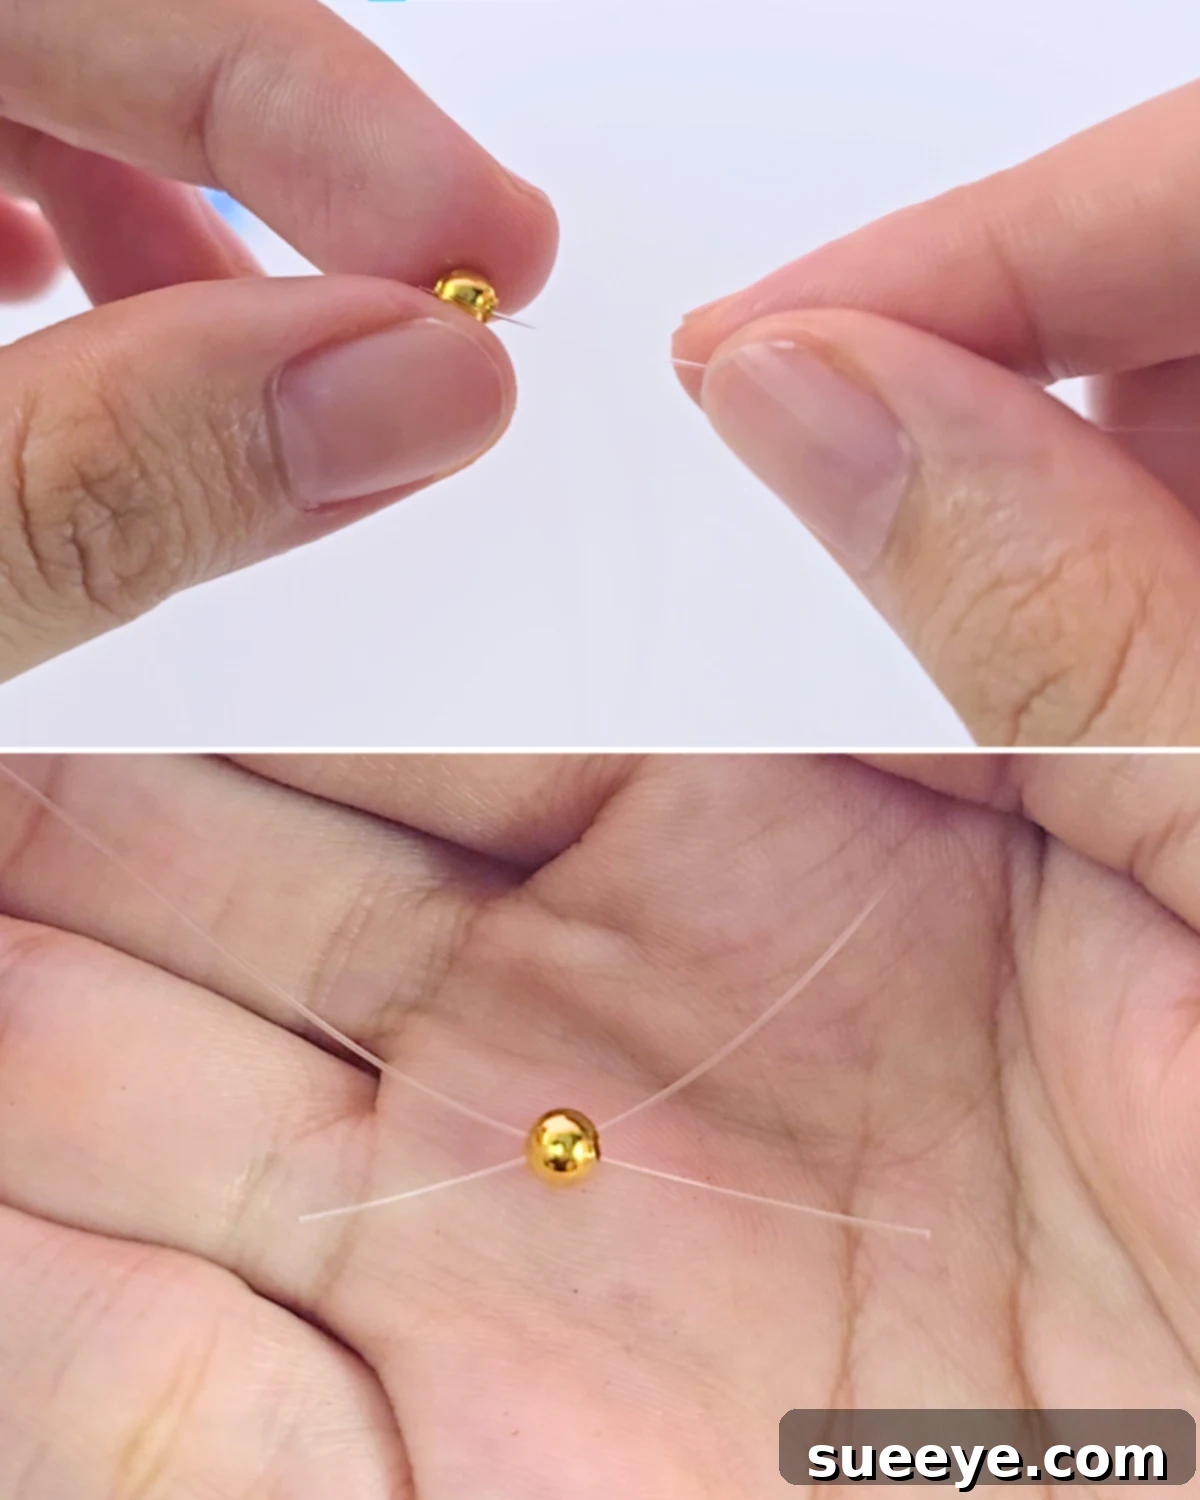
Now that your clasp is securely attached, you will begin building the foundation of your bracelet. Take both loose ends of the fishing line. Slide a central connecting bead (e.g., a gold bead) onto *one* of the lines. Then, take the *other* line and cross it through the *same* gold bead, but from the opposite direction. Essentially, both lines should pass through this single bead from opposing sides, forming an “X” shape within the bead. Gently pull both fishing line ends in opposite directions, ensuring even tension. The bead will slide down and rest securely in the center, snugly against the knot and clasp you just created. This technique, known as “crossing the lines,” is fundamental to forming your flower shapes and ensures a strong, interconnected structure. -
Step 3: Form the First Beaded Flower and Continue the Pattern
This is where your charming flower design begins to take shape.
Part A: Building the Petals (Initial Half)
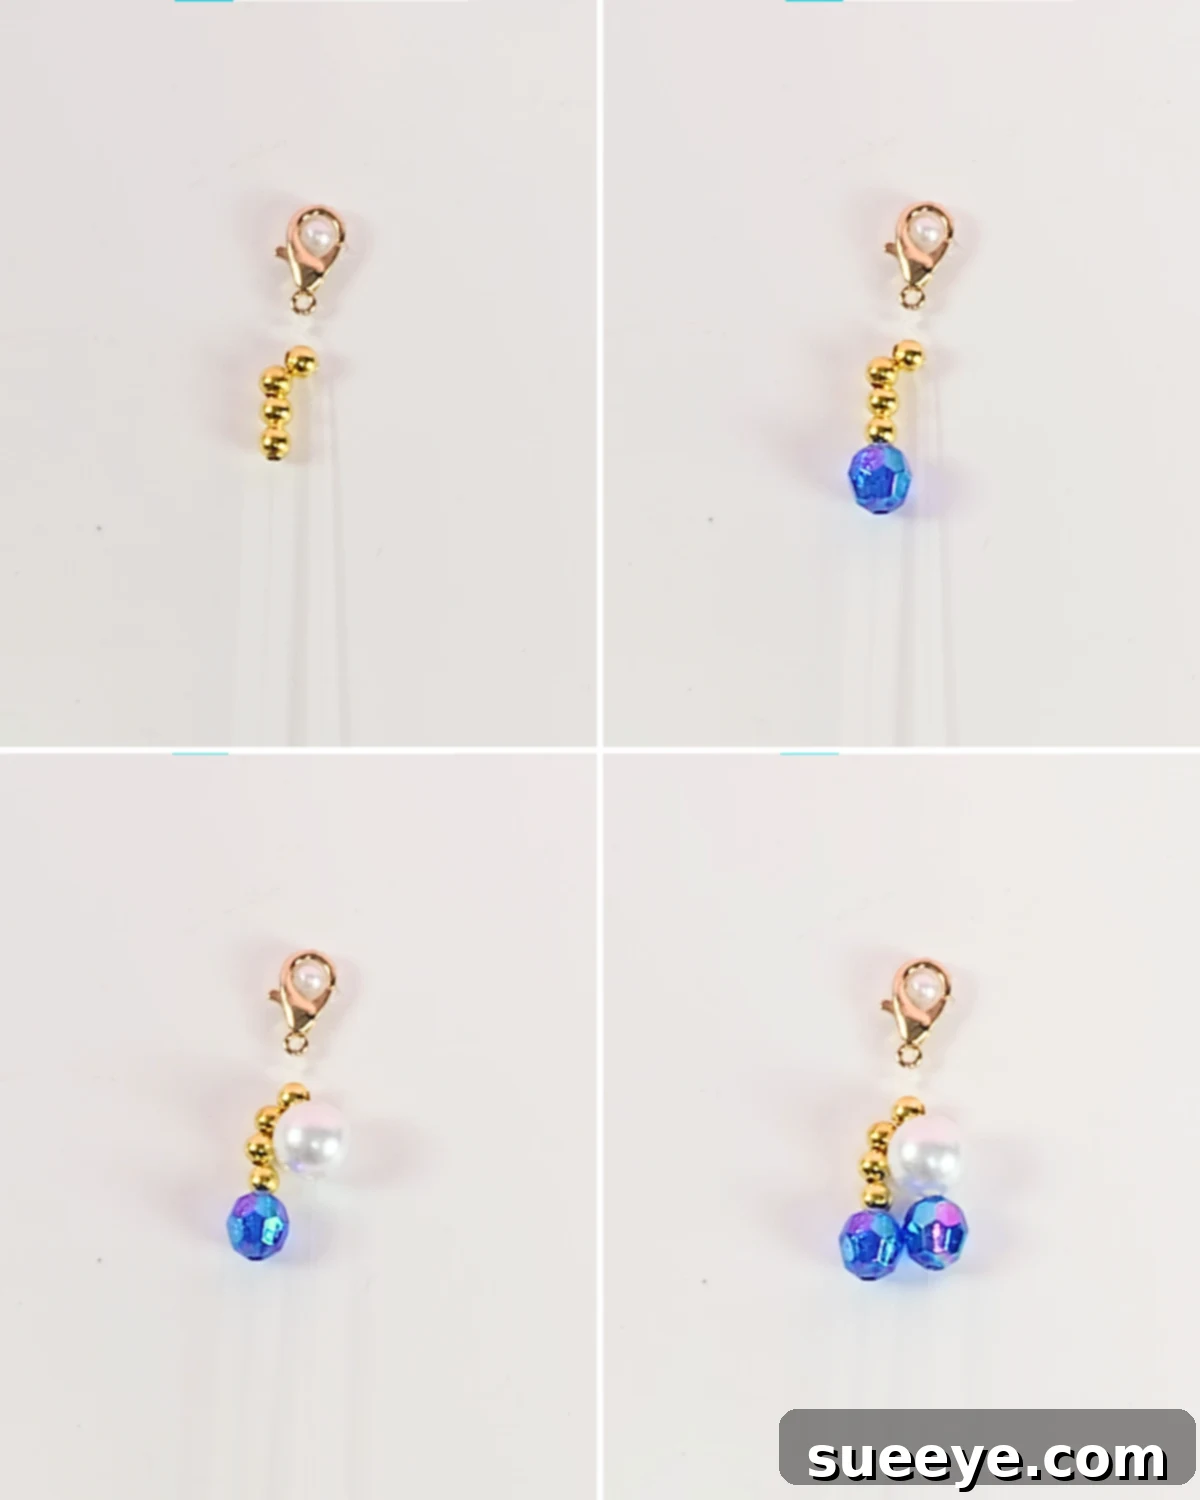
On one of your fishing lines, thread three small petal beads (e.g., blue seed beads). These beads will form the top arc of your flower.
On the other fishing line, thread just one small petal bead (e.g., a blue seed bead). This bead will be one of the side petals.
Next, take both lines again and cross them through a new connecting bead (e.g., another gold bead), just like you did in Step 2. Pull gently and evenly to secure the beads. You should now see a distinct half-flower shape forming around the central gold bead.
Part B: Completing the Flower and Repeating the Pattern
Now, to complete the flower, on each of the two fishing lines, thread one small petal bead (e.g., blue seed bead). These will form the remaining two side petals.
After adding these two beads, take both lines again and cross them through yet another new connecting bead (e.g., a gold bead). Pull gently to secure. Congratulations, you’ve now completed your first full beaded flower!Continue this sequence to create the desired length for your bracelet:
1. On one line, thread three petal beads.
2. On the other line, thread one petal bead.
3. Cross both lines through a connecting bead.
4. On each line, thread one petal bead.
5. Cross both lines through a new connecting bead.
Repeat this pattern, forming flower after flower, until your bracelet reaches the desired length. Periodically, wrap the bracelet around your wrist to check the fit and ensure it’s not too tight or too loose. Remember to maintain consistent tension throughout this process to ensure uniform flowers. -
Step 4: Secure the Bracelet Chain Hook and Finish
Once your bracelet has reached the perfect length and you’ve formed your final flower, it’s time to secure the other end. Take both ends of the fishing line and thread them through the loop of your bracelet chain hook (or a jump ring that you will attach to the clasp later). Cross the lines over each other once more, bringing them back through a few of the nearby beads in the bracelet for added security, if possible. This helps to anchor the knot more firmly within the beadwork. Then, tie several very tight knots right against the chain hook. A few double knots will ensure maximum durability and prevent the bracelet from coming undone. After the knots are securely tied, trim off any excess fishing line very close to the knot using your sharp scissors. For extra reinforcement and peace of mind, you can apply a tiny dab of clear craft glue or even clear nail polish to the knot. Allow it to dry completely before wearing your beautiful new creation. This extra step helps prevent the knot from loosening over time, prolonging the life of your handmade bracelet.

Pro Tips for a Perfect Beaded Flower Bracelet 💡
- Maintain Consistent Tension: This is arguably the most important tip. As you work, always keep the fishing line pulled taut, but not so tight that the bracelet becomes rigid. Consistent tension is crucial for maintaining even flower shapes, preventing gaps between beads, and ensuring your bracelet drapes nicely. Too loose, and your bracelet might look flimsy; too tight, and it won’t lay flat or fit comfortably.
- Secure Knots with Adhesive: When you reach your desired bracelet length and tie the final knot, apply a tiny dab of clear super glue, clear craft glue, or even clear nail polish directly onto the knot. This provides significant extra durability and prevents the knot from unraveling over time, especially with regular wear. Allow it to dry completely before trimming any excess line to ensure maximum bond.
- Pre-Plan Your Colors and Layout: Before you even start threading, lay out your chosen beads in the order you envision them for a segment of your bracelet. This helps you visualize the final design, ensure you have enough beads of each color, and make any adjustments to the pattern or color scheme before you commit to stringing.
- Practice Makes Perfect: Don’t get discouraged if your first few flowers aren’t absolutely perfect. Beading, like any craft, improves significantly with practice and patience. The more you make, the more consistent and beautiful your work will become. Embrace the learning curve!
- Consider Gifting Handmade: Handmade beaded bracelets make truly wonderful, heartfelt gifts for friends and family. A personalized color scheme can make the gift even more special and show the recipient how much thought and effort you put into it.
- Work in Good Lighting: Good lighting is essential when working with small beads and fine fishing line. It helps reduce eye strain and ensures you can clearly see your work, preventing mistakes.
Customizing Your Flower Bead Bracelet: Endless Possibilities
One of the most exciting aspects of DIY jewelry making is the unparalleled ability to personalize your creations. Your flower bead bracelet is a fantastic canvas for self-expression, allowing you to craft a piece that is truly unique.
Color Combinations: Don’t feel limited to just one color for your petals or a single accent color. Experiment with ombre effects, where colors subtly blend from light to dark, or try alternating colors for a vibrant, striped look within your flowers. Imagine creating elegant monochromatic designs using different shades of the same color, or soft pastels for a delicate, ethereal touch. The possibilities are truly endless, limited only by your imagination and the variety in your bead collection. You can match outfits, represent birthstones, or simply create a piece that sparks joy.
Bead Types and Sizes: While seed beads are ideal for achieving the classic flower pattern, consider incorporating different finishes like matte, glossy, transparent, or iridescent beads for varied textures and light play. You can also subtly vary the size of your central connecting beads or even introduce tiny accent beads between flowers to add subtle sparkle or flair. Just ensure all your chosen beads have holes large enough for your fishing line to pass through multiple times, especially when crossing the lines. Larger beads can make a bolder statement, while smaller ones create a more delicate look.
Adding Charms and Pendants: For an extra personal touch, consider attaching a small charm or pendant to your bracelet using a jump ring. This could be an initial, a meaningful symbol, a tiny animal, or any small embellishment that resonates with you or the recipient if it’s intended as a gift. Charms can instantly elevate a simple design and add significant sentimental value.
Beyond the Basics: What’s Next in Your Beading Journey?
Successfully completing your first flower bead bracelet is a significant achievement and a wonderful stepping stone into the broader, expansive world of jewelry making. You’ve now mastered essential techniques like threading, knotting, and pattern repetition, which are foundational skills for many other beading projects.
From here, your creative journey can take many exciting paths. You might explore more complex bead weaving patterns like peyote stitch or brick stitch, delve into the intricate art of wire wrapping to create unique components, or even experiment with different types of stringing materials and specialized tools. Consider trying out a multi-strand bracelet for a layered look, a simple beaded necklace to complement your new bracelet, or perhaps even a pair of matching earrings to complete a set. The skills you’ve gained from this beginner-friendly project are incredibly transferable and will open up a myriad of new creative opportunities. Keep practicing, keep experimenting with new materials and designs, and most importantly, keep enjoying the liberating and fulfilling creative process! The world of DIY jewelry is vast and waiting for you to explore it.
Must-Try Viral Crafts for Every Crafter
Seasonal
DIY Honeycomb Paper Christmas Tree Ornament
Crafts
3D Origami Christmas Tree Tutorial
Sewing Ideas
Easy Christmas Sweater Embroidery Hack
Seasonal
DIY Christmas Tree With Pipe Cleaners
Loved this easy beading project? Don’t forget to visit our official website for more inspiring DIY crafts and comprehensive tutorials! You can also follow our Facebook page for daily doses of creative inspiration, behind-the-scenes glimpses, and engaging community content. Be sure to subscribe to our YouTube channel for video tutorials, detailed guides, and exciting new project ideas delivered straight to your feed. Happy crafting, and we can’t wait to see what you create!