
As the air grows crisp and autumn leaves begin their vibrant dance, my thoughts invariably turn to Halloween – a season brimming with delightful frights, creative costumes, and, of course, enchanting treats. Every year, I strive to make my daughter’s Halloween party an unforgettable event, and at the heart of any memorable gathering is a show-stopping centerpiece. This year, I discovered an incredible Halloween Pumpkin Cake icing tutorial that promised to elevate my beloved vanilla pound cake from a simple dessert to a spectacular work of edible art. The idea instantly captivated me; I knew this concept would not only be visually stunning but also a fabulously delicious addition to our spooky festivities, transforming a classic into a festive marvel.
Crafting the Ultimate Halloween Pumpkin Cake: A Festive Centerpiece
The quest for the perfect Halloween treat can often lead down paths of intricate recipes and complex decorations. However, sometimes the most impressive results come from simple, clever twists on beloved classics. My family adores my special vanilla pound cake, a recipe perfected over years of gatherings and celebrations. This year, the challenge was to infuse it with the spirit of Halloween without sacrificing its comforting familiarity. The answer presented itself in the form of a brilliant pumpkin cake decorating idea – an ingenious way to dress up an already delicious cake in festive attire, making it the star of our Halloween spread. This tutorial wasn’t just about baking; it was about transforming, making art, and creating lasting memories.
The Inspiration Behind Our Spooktacular Halloween Creation
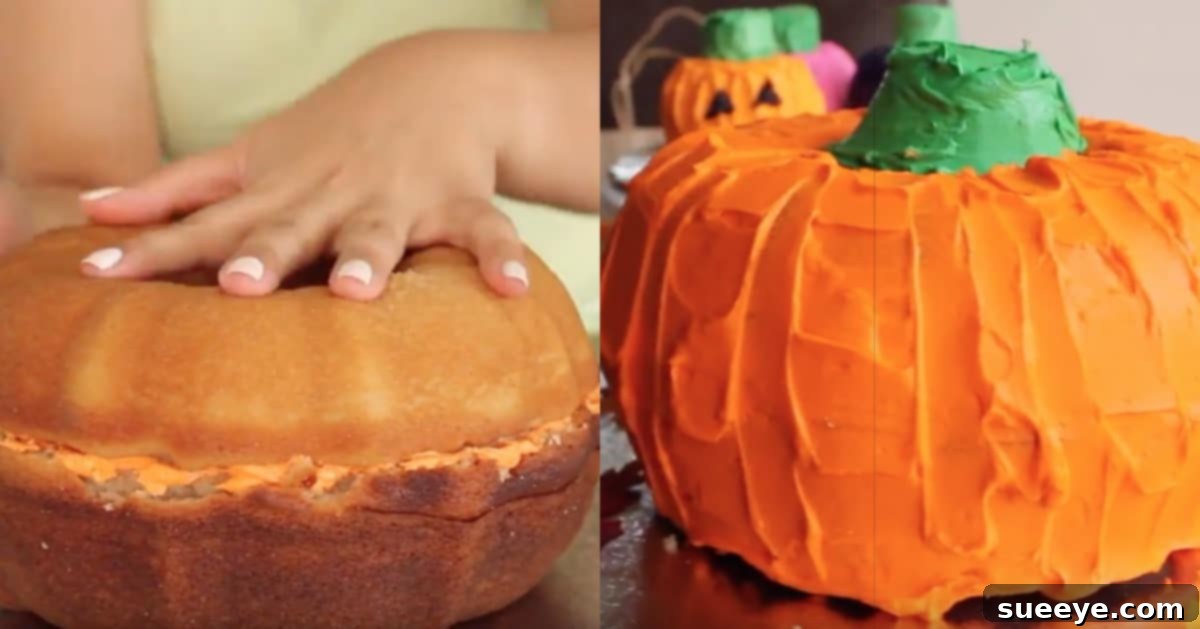
Upon stumbling upon the Halloween Pumpkin Cake icing tutorial, I was immediately struck by its simplicity and profound visual impact. It wasn’t about baking a specific pumpkin-flavored cake, but rather about ingeniously decorating a classic pound cake to resemble a charming, edible pumpkin. The instructions were wonderfully straightforward: slice the cake in half, ice the middle to secure the layers, and sandwich it back together. Then, cover the entire cake with a vibrant orange frosting, chill it briefly, and apply a second coat, artfully cutting pumpkin grooves along the sides to mimic the natural ridges of a pumpkin. The ingenious final touch involved stacking green-iced cupcakes in the center to form a realistic stem. This approach promised a delightful combination of rustic charm and artistic flair, a true conversation starter that would capture the essence of the season.
What truly appealed to me was how this decorating technique offered a fresh perspective on a familiar dessert. It took the inherent deliciousness of my vanilla pound cake and gave it a dramatic Halloween makeover. This wasn’t just a cake; it was a character, a playful nod to the season’s iconic symbol. The tutorial didn’t require specialized baking skills beyond what I already possessed, but it unlocked a new level of creative expression. It was an invitation to transform the ordinary into the extraordinary, proving that sometimes, all it takes is a little imagination and a few simple steps to achieve a truly breathtaking result.
Choosing the Perfect Base: The Unbeatable Vanilla Pound Cake
Why Pound Cake is Your Best Friend for Festive Baking
For this particular Halloween masterpiece, my classic vanilla pound cake was the undisputed foundation. Pound cake, with its dense yet tender crumb and rich, buttery flavor, is an ideal canvas for elaborate decorations. Its sturdiness ensures it holds its shape beautifully under layers of frosting and during slicing, unlike lighter, more delicate sponges. This structural integrity is crucial when you’re going to be slicing, icing, and shaping a cake into something as iconic as a pumpkin. Furthermore, its comforting, universally loved taste ensures that while the appearance might be spooky, the flavor remains utterly delightful and satisfying for all ages. It’s a dependable choice that guarantees both visual appeal and gastronomic pleasure, making it a staple in my festive baking repertoire.
The versatility of pound cake also makes it a fantastic option. While vanilla is a crowd-pleaser, you could easily adapt the recipe with a hint of cinnamon, nutmeg, or even a touch of pumpkin spice for an even deeper autumnal flavor profile. The dense texture also means it stays fresh longer, a definite advantage when preparing for a party where you want to minimize last-minute stress. It’s a robust cake that can handle being made a day in advance, allowing you more time to focus on the fun part – the decoration!
Mastering the Bundt Pan: Tips for a Flawless Foundation
To achieve the perfect pumpkin shape for my main cake, I turned to my trusty Bundt pan. Out of all the baking pans I’ve accumulated over the years, my Bundt pan holds a special place in my heart; it is, without a doubt, my hands-down favorite. There’s something inherently charming and elegant about Bundt cakes. They emerge from the oven already gorgeous, with their intricate grooves and unique forms, even before any icing is applied. They offer that “wow” factor with minimal effort, which is a true gift for any baker, especially during busy holiday seasons.
Using a Bundt pan effectively, however, requires a few crucial steps to ensure your cake doesn’t stick and releases cleanly. Most Bundt pans feature elaborate designs, making thorough greasing and flouring absolutely essential. My preferred method is to generously coat every nook and cranny with shortening or butter, then dust it thoroughly with flour, tapping out any excess. A pastry brush or baking spray specifically designed for intricate molds works wonders here. Don’t rush this step; a well-prepared pan is the key to a beautiful, intact cake. After pouring the batter, gently tap the bottom of the pan on the counter a few times. This helps to eliminate any air bubbles and ensures the batter settles into all the beautiful Bundt grooves, guaranteeing a perfectly formed cake. Remember, patience is a virtue when baking with Bundt pans. Once baked, it’s vital to let your Bundt cake cool in the pan for 10-15 minutes before attempting to invert it. If it cools completely in the pan, it will likely stick and rip upon removal, undoing all your careful preparation. A short cooling period allows the cake to firm up slightly and separate from the pan walls, ensuring a smooth, graceful release.
Beyond the main pumpkin, I also baked a batch of smaller “Baby Bundt” cakes. These charming mini versions were perfect for decorating the periphery of my main centerpiece, adding depth and visual interest to the overall display. They also provided individual canvases for my children to decorate, turning the baking process into a truly collaborative family effort.
Step-by-Step Guide: Transforming Your Cake into a Halloween Pumpkin Masterpiece
The magic truly happens during the decoration phase. With our beautifully baked Bundt cake as the base, it’s time to bring the pumpkin to life!
Ingredients & Tools You’ll Need:
- One prepared vanilla pound cake (baked in a Bundt pan)
- Several baby Bundt cakes (optional, for additional decorations)
- Orange buttercream frosting (homemade or store-bought, tinted)
- Green buttercream frosting (homemade or store-bought, tinted)
- Three green-iced cupcakes (for the pumpkin stem)
- A sharp serrated knife
- Offset spatulas or butter knives for spreading icing
- A bench scraper or the back of a knife for creating grooves
- A cake plate or serving platter
- Piping bag with a round tip (optional, for details)
The Icing Prep: Colors and Consistency
For the vibrant orange and green icings, I opted for a classic buttercream, as its smooth consistency is perfect for spreading and holding shape. Achieving the right colors is key. For the orange, I used a gel food coloring for a rich, deep hue that truly resembled a pumpkin. A little goes a long way with gel colors, so add it gradually until you reach your desired shade. For the green, a similar approach ensured a bright, leafy green for the stem. The consistency of the buttercream should be smooth and spreadable, not too stiff and not too runny, allowing it to adhere well to the cake and maintain its form when sculpted.
Assembling Your Pumpkin Cake: A Visual Tutorial
- Slice and Fill: Carefully slice your cooled Bundt cake horizontally into two even halves. This creates a surface for a delicious layer of frosting in the middle. Spread a generous layer of orange buttercream on the bottom half, then gently place the top half back on, creating a two-layered cake. This step also adds stability and moisture to the finished product.
- First Crumb Coat: Apply a thin, even layer of orange buttercream over the entire exterior of the cake. This “crumb coat” traps any loose crumbs, creating a smooth surface for your final layer of frosting. Don’t worry about perfection at this stage.
- Chill Time: Place the cake in the refrigerator for about 20 minutes. This allows the crumb coat to set, making it easier to apply the final, smooth layer of frosting without pulling up crumbs.
- Second Layer & Pumpkin Grooves: Once chilled, apply a thicker, more generous layer of orange buttercream over the entire cake, striving for an even, smooth finish. While the frosting is still soft, use a bench scraper, the back of a butter knife, or even the edge of a spoon to gently press and drag lines from the center hole outwards, creating the distinct vertical grooves of a pumpkin. Repeat this around the entire cake to form realistic pumpkin segments.
- Creating the Stem: This is where the green-iced cupcakes come in! Carefully stack your three green-iced cupcakes in the center hole of the Bundt cake. The original tutorial suggested this clever trick, and it works beautifully to create a sturdy, visually appealing pumpkin stem. You can use a little extra green frosting to “glue” them together and to the cake base. For added detail, you can pipe a few green leaves or tendrils around the base of the stem.
- Finishing Touches: Step back and admire your creation! You can add small details like edible glitter for a magical sparkle, or arrange candy corn around the base for an extra festive touch. Arrange the smaller baby Bundt cakes, also decorated as mini pumpkins, around the main cake for a cohesive and bountiful display.
Baking with Little Ghouls: A Family Affair
One of the most heartwarming aspects of this entire project was the enthusiastic involvement of my children. As soon as I started mixing the orange and green icing, my daughter, with eyes sparkling, declared, “Mommy, I watched the tutorial and I know just what to do!” How absolutely cute and endearing was that? Her eagerness was infectious, and I immediately knew this wasn’t just my project anymore; it was ours.
I decided to let her take the lead on decorating the main Halloween Pumpkin Cake, standing right by her side for support and guidance, but making a conscious effort not to interfere with her creative flow. It was truly a joy to watch her concentrate, meticulously spreading the icing and carefully drawing the pumpkin grooves. She did a beautiful job, pouring her heart into every stroke. Her pride in her work was palpable, and that, to me, was more precious than any perfectly sculpted cake. After she completed the main masterpiece, I managed to persuade her to let her brothers each decorate one of the smaller baby Bundt pumpkin cakes. This ensured everyone had a hand in the creation, fostering a sense of ownership and collective joy. We spent the best day together, baking, decorating, and laughing. These shared moments of creativity and teamwork are truly the magic of holiday preparations, forging memories that last far longer than any treat.
Involving children in baking not only teaches them valuable life skills but also sparks their creativity and boosts their confidence. It’s a wonderful way to bond, create lasting family traditions, and instill a love for the culinary arts from a young age. Plus, let’s be honest, their unbridled enthusiasm often makes the entire process infinitely more fun and memorable!
Presentation and Party Impact: Your Halloween Centerpiece
When the Halloween party arrived, our pumpkin cake centerpiece was an absolute triumph. It commanded attention on the dessert table, drawing gasps of delight and appreciative murmurs from all our guests. The vibrant orange, the realistic grooves, and the clever green stem made it an unmistakable symbol of the season, a true focal point that beautifully tied together all our Halloween decorations. It wasn’t just a cake; it was a conversation starter, a piece of edible art that perfectly embodied the festive spirit. The smaller Bundt pumpkin cakes, arranged artfully around the main centerpiece, created a charming pumpkin patch effect, adding to the visual spectacle.
Serving this cake was as much a pleasure as making it. Each slice revealed the beautiful vanilla pound cake base, a comforting contrast to the playful exterior. Paired with warm cider or a ghostly punch, it was the perfect sweet treat for a night of spooky fun. This pumpkin cake wasn’t just a dessert; it was an experience, a joyous expression of Halloween that brought smiles to every face and made the party truly shine.
Beyond the Pumpkin: Variations and Creative Twists
While the classic pumpkin look is undeniably charming, this decorating method offers a fantastic foundation for creative variations. You could experiment with different cake flavors for the base—perhaps a spiced apple pound cake for an even deeper autumnal theme, or a rich chocolate pound cake for a darker, more mysterious Halloween vibe. The icing colors are also open to interpretation: imagine a ghostly white pumpkin, or a vibrant purple and black striped cake for a more whimsical approach. Additional edible decorations like candy corn, chocolate spiders, gummy worms, or even delicate edible glitter could further enhance the festive appeal. For a truly unique touch, consider carving small, intricate patterns into the frosting before it sets completely, much like you would a real pumpkin, to create a Jack-o’-lantern face. This technique isn’t limited to pumpkins; with a change of color and a bit of imagination, it could be adapted for other holiday themes as well, making it a versatile skill for any home baker.
Conclusion: A Sweet Success Story for Your Halloween Celebration
In the end, our Halloween Pumpkin Cake was more than just a dessert; it was the heart of our celebration. It represented creativity, family bonding, and the simple joy of making something beautiful and delicious together. The process was enjoyable, the instructions were easy to follow, and the result was undeniably spectacular. This project transformed a simple pound cake into an iconic Halloween centerpiece that delighted everyone, especially my daughter and her proud brothers. If you’re looking for a relatively straightforward yet incredibly impactful way to elevate your Halloween party, I wholeheartedly recommend giving this pumpkin cake decorating idea a try. It’s a sweet success story waiting to happen, promising delicious flavors, stunning visuals, and cherished memories for years to come. Happy Halloween baking!