
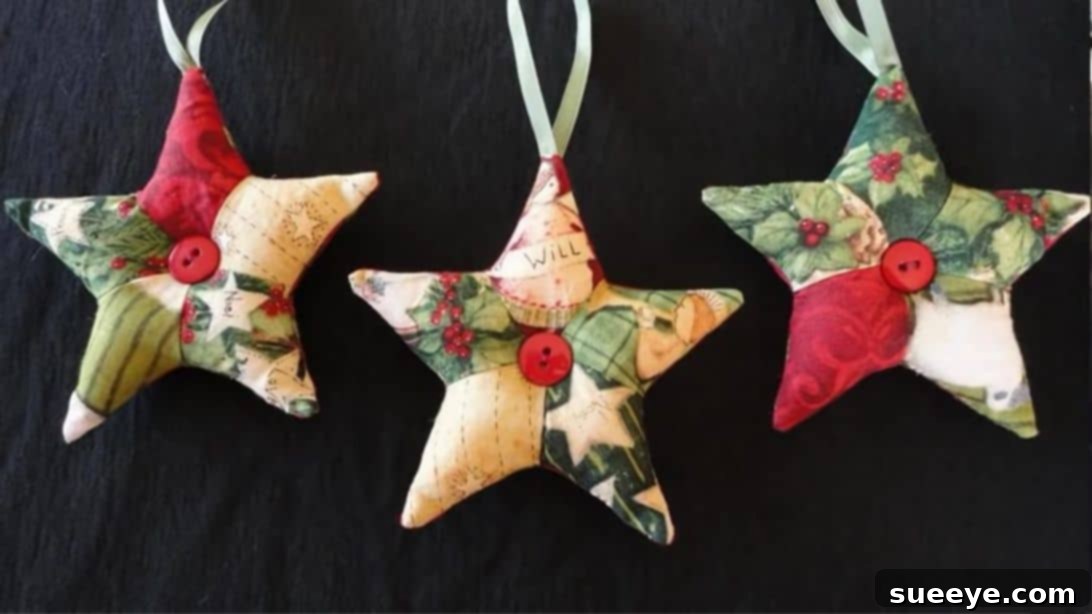
Create Charming Patchwork Star Ornaments: An Easy Sewing Tutorial for Festive Home Decor
Embrace the spirit of handmade holidays with this delightful sewing project brought to you by the creative minds at Crouton Crackerjacks. If you’re looking for a fun, affordable, and quick way to add a personalized touch to your Christmas tree, these patchwork star ornaments are absolutely perfect. Not only do they make wonderful festive decorations, but they also offer a fantastic opportunity to utilize those precious fabric scraps from previous sewing adventures, transforming them into something truly special. This tutorial is designed to be straightforward and accessible, making it an ideal project for beginners to dive into the world of sewing. Imagine adorning your tree with unique, handcrafted stars, each telling its own story through a mix of colors and patterns!
Crafting these beautiful ornaments is a rewarding experience that combines creativity with practicality. You’ll be amazed at how quickly you can assemble these charming stars, making it possible to create a whole collection in just a short amount of time. Whether you’re making them for your own home, as thoughtful gifts for loved ones, or simply enjoying the process of creation, these patchwork star ornaments are sure to become a cherished part of your holiday traditions.
Gather Your Supplies: Essential Materials for Your Star Ornaments
Before you embark on this exciting sewing journey, it’s important to gather all the necessary materials. Having everything ready and organized will ensure a smooth and enjoyable crafting experience. Most of these items are common sewing supplies, and you might already have them in your craft stash, especially the fabric scraps!
- Fabric scraps: Variety is key here! Choose a mix of colors and patterns that complement each other for a truly unique patchwork effect.
- Cardstock: Essential for creating a sturdy and reusable template that will help you cut precise shapes.
- Ribbon: A small length for each ornament to create a hanging loop. Choose a color that matches or contrasts nicely with your fabric.
- Button: A decorative touch for the center of each star, adding a charming finish.
- Needle and thread: For hand-sewing the final closure and attaching the button.
- Fabric pins: To hold your fabric pieces securely in place during sewing.
- Stuffing: Polyester fiberfill or similar stuffing material to give your stars a lovely plump shape.
- Marking pen: A fabric-safe marker or chalk for tracing your template onto the fabric.
- Iron: For pressing seams flat, which is crucial for a neat and professional finish.
- Sewing machine: While some steps can be hand-sewn, a machine will make the process much faster and more efficient.
Having these materials at hand ensures that you can move through each step of the tutorial without interruption, allowing you to fully immerse yourself in the creative process of bringing your patchwork stars to life.
Step-by-Step Guide: Crafting Your Patchwork Star Ornaments
Follow these detailed instructions to create your own collection of charming patchwork star ornaments. Precision in each step will contribute to a beautifully finished product, but don’t be afraid to add your own creative flair!
Step 1: Preparing Your Diamond Pieces and Assembling the Star Design
The foundation of a beautiful patchwork star begins with accurate preparation. First, you’ll need to create a template for your diamond pieces. Using a piece of sturdy cardstock, carefully draw a diamond shape that will form one point of your star. Referencing the video tutorial by Crouton Crackerjacks can provide visual guidance for the exact dimensions and shape, ensuring your star points come together perfectly. Precision at this stage is crucial for symmetrical stars, so take your time to cut out your cardstock template cleanly.
Once your template is ready, it’s time to bring your fabric scraps into play. Lay your chosen fabric scraps flat and use your marking pen to trace the diamond template onto the wrong side of the fabric. Trace around the template carefully, ensuring that your lines are clear and consistent. After tracing, use sharp fabric scissors to cut out each diamond piece. Aim for clean, crisp edges, as this will make assembly much easier and result in a neater finish. You will need a total of ten diamond pieces for each star ornament (five for the front and five for the back).
Now, let’s start forming the star shape. Select five of your cut diamond pieces for the front of one star. This is where your creativity shines! Mix and match different patterns and colors to create a visually appealing design. Take two diamond pieces and place them together with their right sides facing each other, ensuring their edges align perfectly along one side. Secure them with a few fabric pins to prevent shifting. Using your sewing machine, sew these two pieces together along the aligned edge with a precise ¼-inch seam allowance. This consistent seam allowance is vital for the star’s overall shape and size.
Carefully open the two sewn pieces and gently press the seam flat. Pressing is a critical step in patchwork as it ensures your pieces lie smoothly and accurately, preventing bulkiness. For a professional finish, press the seam allowance towards one side (usually the darker fabric, if applicable, or consistently in one direction). Now, take a third diamond piece, place its right side against the right side of the previously sewn pair, align the edges, and sew it on with the same ¼-inch seam allowance. Continue this process, adding one diamond piece at a time, until you have successfully sewn all five pieces together to form a beautiful, flat star shape. After each seam, remember to press it flat. For the final star assembly, pressing all seams in a clockwise or counter-clockwise direction can help reduce bulk at the center point, creating a smoother finish. Repeat this entire process with the remaining five diamond pieces to create the second identical star patchwork, which will form the back of your ornament.
Step 2: Assembling, Stuffing, and Finishing Your Patchwork Star Ornament
With both halves of your star pieced together, it’s time to assemble your ornament. Lay one piece of the star patchwork flat, with its right side facing up. Now, take the second star patchwork piece and place it directly on top, with its right side facing down. Carefully align all the edges and points of both star pieces, ensuring they match up perfectly. Use several fabric pins to secure them together, placing pins at each point and along the edges to prevent any shifting during sewing. This meticulous alignment is key to achieving a beautifully symmetrical star.
Next, prepare the ribbon for hanging. Cut a small length of ribbon, approximately 6-8 inches, and fold it in half to create a loop. Decide which point of your star will be the top – typically one of the sharper points. Sandwich the raw edges of the folded ribbon between the two layers of fabric at your chosen top point. Ensure that the raw edges of the ribbon are facing outward, aligning with the fabric edges, and the loop of the ribbon is tucked inward between the two fabric star pieces. Pin the ribbon securely in place, reinforcing it with an extra pin if needed.
Now, head to your sewing machine. Begin sewing around the perimeter of the star, starting a few inches away from one point. Use a consistent ¼-inch seam allowance. As you sew, be sure to backstitch at the beginning and end of your stitching for added security. When you reach each point of the star, lift your presser foot, pivot the fabric, and continue sewing down the next edge. Crucially, remember to leave a small opening, about 1.5 to 2 inches wide, along one of the star’s edges. This opening will be used for turning the ornament right side out and for stuffing it. Make sure to backstitch firmly at both ends of this opening.
After sewing, carefully snip off the excess fabric at each of the star’s points, right up to the seam allowance, taking care not to cut through your stitches. This step helps to reduce bulk in the corners, ensuring sharp, crisp points when the star is turned. For the inner corners (the “valleys” between the points), notch the seam allowance. This means cutting a small V-shape into the seam allowance. These trimming and notching techniques are essential for achieving a smooth and well-defined shape once the fabric is turned.
Gently turn the star right side out through the opening you left. Take your time with this step, especially at the points. Use a point turner, a chopstick, or even the blunt end of a pencil to carefully poke out each point of the star, making them as sharp and defined as possible. Once the star is fully turned, it’s time to stuff it. Take small amounts of stuffing and gradually insert them into the star, distributing the fiberfill evenly. Ensure that all points are firmly stuffed but avoid overstuffing, which can distort the shape or strain the seams. The goal is a plump, yet shapely star.
Finally, close the opening. Carefully tuck the raw edges of the fabric inward, aligning them with the sewn seam. Use a needle and thread to hand-stitch the opening closed using an invisible stitch, such as a ladder stitch. This stitch technique creates a neat, almost imperceptible closure. For the finishing touch, select a decorative button and sew it securely to the very center of one side of your patchwork star. This not only adds a charming embellishment but can also help to draw the fabric taut at the center, giving your star a beautiful, finished look. And just like that, your handmade patchwork star ornament is complete and ready to adorn your tree!
These beautiful patchwork star ornaments are a testament to the joy of handmade creations. They’re not just decorations; they’re tiny pieces of art, infused with your effort and creativity. Perfect for adding a rustic charm to your own home or for gifting to friends and family, these stars are a delightful way to celebrate the holiday season. Experiment with different fabric combinations, try varying sizes, or even add small embellishments like beads or embroidery to make each star truly unique. Enjoy the process of bringing these festive creations to life, and watch your Christmas tree sparkle with personalized charm.
*All image credit for this tutorial belongs to Crouton Crackerjacks via YouTube. We highly recommend following and subscribing to his channel for more inspiring and easy-to-follow DIY sewing projects!
Scrappy Patchwork Star Ornaments: A Beginner-Friendly Sewing Tutorial