
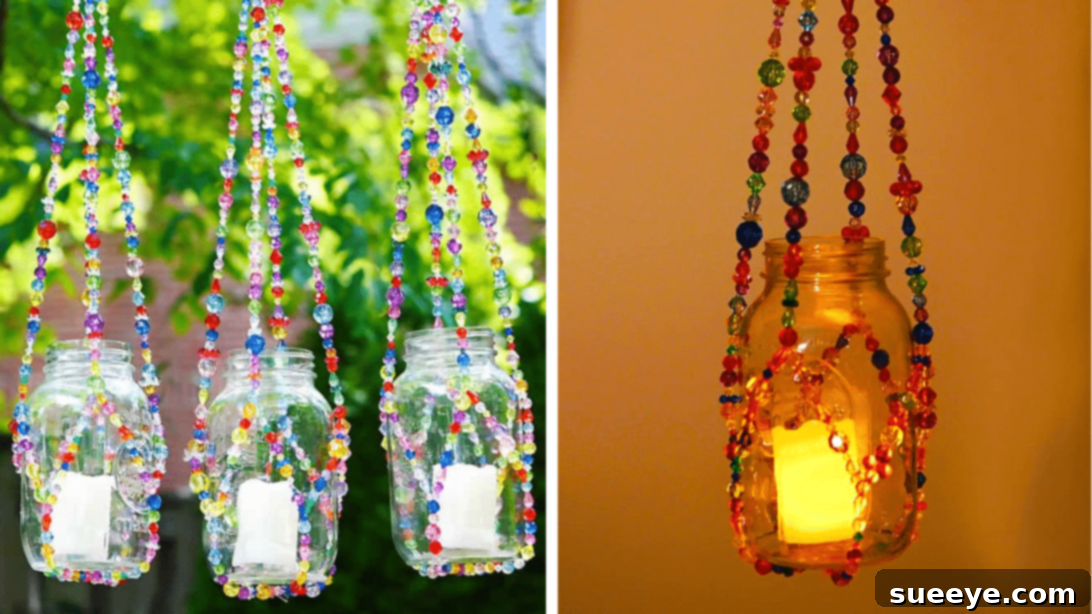
There’s a unique charm in transforming forgotten objects into beautiful, functional pieces for your home or garden. As a passionate advocate for sustainable living and creative expression, I’ve always found immense joy in DIY projects that involve repurposing old materials or giving them an entirely new lease on life. The satisfaction of crafting something beautiful from simple components is unparalleled, and the internet abounds with incredible ideas to spark your imagination. Among the myriad of inspiring projects you can discover online, this particular DIY creation by One Little Project on YouTube stands out as a true gem, offering both aesthetic appeal and remarkable versatility. It’s one of my absolute favorites to recreate, and for good reason.
RELATED: Adorable Hanging Pinch Pot Planters Tutorial
What truly elevates this DIY project, beyond its inherent beauty and straightforward construction, is its incredible multifunctionality. Imagine a single craft item that can gracefully serve as a charming planter, both indoors and out, or elegantly transition into a warm, inviting hanging lantern. This duality makes it an exceptional addition to any living space, offering endless possibilities for home and garden decor. Whether you envision it holding a vibrant succulent to brighten a windowsill, cascading with a trailing ivy from a porch ceiling, or casting a gentle glow as a lantern during an evening gathering, this project promises to infuse your environment with a cozy, handcrafted vibe. It’s perfect for adding a touch of personalized elegance to your patio, balcony, living room, or even a serene bedroom nook. Dive into the simple steps outlined below to craft one for yourself and experience the delight of creating something truly special. It also makes for an incredibly thoughtful and unique handmade gift for friends and family, showcasing your creativity and care.
This tutorial guides you through the process of creating a stunning beaded hanger, designed to perfectly cradle a standard mason jar. The beauty of this design lies in its adaptability; you can easily transform it by inserting a small potted plant, a collection of fairy lights, or a battery-operated candle to suit your mood and needs. The interplay of light through the transparent beads adds a magical touch, making it a focal point in any setting. Get ready to gather your materials and embark on a rewarding crafting journey that will leave you with a versatile piece of decor you’ll cherish.
Essential Materials for Your DIY Beaded Plant Hanger and Lantern
Crafting this elegant beaded hanger requires only a handful of readily available materials. Sourcing these items is often simple, and many can be found at your local craft store or even online. The key to a successful project lies in selecting quality materials that will ensure durability and enhance the aesthetic appeal of your finished piece.
- Wooden Ring: This serves as the sturdy foundation from which your hanger will suspend. Opt for a smooth, sanded wooden ring, typically 2-3 inches in diameter, to ensure it’s comfortable to work with and provides a polished finish. A larger ring offers more space for looping your fishing line, while a smaller one can create a more compact look. Consider rings made from natural wood tones for an organic feel, or a painted ring if you have a specific color scheme in mind.
- Fishing Line: Transparency and strength are crucial here. A clear monofilament fishing line, ranging from 10-20 lb test, is ideal. Its transparency allows the focus to remain on your beautiful beads, making them appear as if they’re floating. The strength ensures your hanger can securely hold a mason jar, whether it’s filled with a plant or a candle. Avoid lines that are too thin, as they may be difficult to work with and less durable, or too thick, as they can be rigid and harder to knot.
- Transparent Beads, Assorted Sizes (5-15mm): These are the stars of your project! Opting for transparent beads allows light to pass through, creating a dazzling effect, especially when used as a lantern. An assortment of sizes (e.g., 5mm, 8mm, 10mm, 15mm) adds visual interest and depth to your design. You can choose clear beads for a classic, ethereal look, or experiment with subtle tints like amber, sapphire, or emerald to complement your decor. Glass beads offer a lovely weight and sparkle, while acrylic beads are lighter and often more budget-friendly. Feel free to mix shapes too – round, faceted, or even some decorative accent beads can elevate the design.
- Scissors: A sharp pair of craft scissors will ensure clean cuts of your fishing line, preventing fraying and making it easier to thread through beads. Using dedicated craft scissors will keep them sharp and free from sticky residues.
- Painter’s Tape: This seemingly simple item is incredibly useful for temporarily securing your fishing line strands while you work, preventing tangles and keeping your project organized. It’s gentle enough not to leave residue on your wooden ring or workspace.
- Ruler or Tape Measure: Accuracy is key for a balanced and symmetrical hanger. A good ruler or tape measure will help you cut your fishing line to precise lengths and ensure consistent bead sections throughout your project.
Having these materials on hand and organized before you begin will make the crafting process much smoother and more enjoyable. Take a moment to lay everything out and visualize your project!
How to Craft Your Beaded Plant Hanger and Lantern: A Step-by-Step Guide
Embark on this creative journey with confidence, as each step is designed to be straightforward and rewarding. Remember, patience and attention to detail will yield the most beautiful results.
Step 1: Preparing Your Base and Initial Strands
Begin by carefully cutting four individual pieces of your fishing line. Each piece should measure approximately 5 feet (or 60 inches) in length. Precision here is important for the overall balance of your hanger. Once all four pieces are cut, align their ends evenly and then fold the entire bundle in half. This creates eight working strands from your four initial cuts. Now, take the folded loop and feed it through your wooden ring. Then, bring the loose ends of the fishing line through this loop, creating a secure lark’s head knot around the wooden ring, as expertly demonstrated in the video tutorial. This method ensures a strong, non-slip attachment point. To keep your wooden ring stable and prevent it from shifting while you work, gently secure it to your workspace with a piece of painter’s tape. This small trick makes a big difference in maintaining tension and organization. After securing the ring, gather all eight strands of fishing line together and thread one large transparent bead through them. This initial large bead will sit just below the wooden ring, serving as a decorative anchor and helping to keep your strands neatly grouped.
Step 2: Building the First Beaded Sections
With your base established, it’s time to start building the intricate beaded design. Divide the eight strands of fishing line into four distinct sections, with each section containing two individual strings. Begin with the two leftmost strands. Carefully thread your chosen transparent beads onto these two strings. Continue adding beads until this section measures approximately 16 inches in length. The choice of bead sizes and types within this section is up to your creative vision, but consistency in length across all four sections is crucial for a balanced hanger. Repeat this exact process for the remaining three sections, ensuring each pair of strands is beaded to a consistent 16-inch length. Once these four sections are complete, you will once again separate the strands, creating eight individual beaded strings. Now, focus on the very leftmost individual strand. Thread beads onto this single string until it reaches a length of approximately 3½ inches. Repeat this process for the second individual strand from the left, ensuring it also measures 3½ inches. This meticulous bead threading begins to define the structure of the hanger that will eventually cradle your mason jar.
Step 3: Forming the Connecting Segments and Symmetry
Continue the pattern of adding beads to all eight individual strands until each one measures approximately 3½ inches in length. This creates a uniform foundation for the next stage of your hanger. Once all eight strands are beaded to this consistent length, it’s time to begin forming the “basket” or “net” that will hold your mason jar. To do this, you will start connecting the strands. Temporarily set aside the leftmost and rightmost individual strands; these will be connected later. Now, bring together the second and third strands from the left. Thread beads onto this newly paired bundle of two strings until it reaches a length of approximately 4 inches. This creates a connecting arc. Repeat this same bundling and beading process for the fourth and fifth strands, and then again for the sixth and seventh strands. Each of these three bundles should also be beaded to a consistent 4-inch length. This step is critical in establishing the symmetrical points that will support your jar, so ensure your measurements are precise and your bead counts are consistent across these segments.
Step 4: Completing the Structure and Final Assembly
You’re almost there! With the three central connecting segments complete, it’s time to incorporate the two “unconnected” strands you set aside earlier—the very leftmost and rightmost strands. Bring these two strands towards the middle, effectively connecting them to form the final segment of your hanger’s support structure. Thread beads onto these two strands until they also reach a length of approximately 4 inches, matching the length of the other connecting segments. Now that all the beaded sections are complete and have formed a cohesive structure, carefully gather all eight fishing line strands together at a single point below the last beaded sections. This gathering point will be the bottom of your hanger. Tie all eight strands together in a very secure knot. A double or triple knot is recommended to ensure the hanger can safely bear the weight of your mason jar and its contents. After the knot is firm and secure, use your sharp scissors to carefully trim any excess fishing line, leaving a neat and tidy finish. Your beautiful beaded hanger is now complete! To use it, simply place your mason jar—whether it contains a vibrant plant or a flickering candle—into the bead hanger, ensuring it sits snugly within the beaded net. Hang your new creation anywhere you desire: from a ceiling hook, a wall bracket, a sturdy tree branch in your garden, or even a curtain rod. Enjoy the handcrafted elegance and versatile functionality it brings to your space!
Creative Variations and Personalization Tips
One of the most exciting aspects of DIY projects like this beaded hanger is the endless potential for personalization. While the basic design provides a beautiful starting point, you can truly make it your own with a few creative tweaks:
- Bead Choices: Don’t limit yourself to clear transparent beads! Experiment with colored glass beads for a stained-glass effect, frosted beads for a softer glow, or natural wooden beads for a bohemian, earthy feel. Iridescent or pearlized beads can add an extra touch of glamour. You can also incorporate a mix of opaque and transparent beads to create unique patterns and textures.
- Embellishments: Consider adding small charms, delicate metal spacers, or even a larger, uniquely shaped bead at the very bottom knot for an added flourish. These small details can significantly change the overall aesthetic.
- Jar Alternatives: While mason jars are classic, feel free to use other types of glass jars or even decorative glass containers that fit the general dimensions. Tinted glass jars, antique canning jars, or even repurposed candle holders could work beautifully, offering different light diffusion patterns.
- Plant Selection: For planters, small succulents, air plants, herbs (like mint or basil), or trailing plants such as Pothos or String of Pearls are excellent choices. Ensure your chosen plant has suitable light and watering needs for its intended location. Remember to include a drainage layer if using directly as a planter.
- Lighting Options: If using it as a lantern, battery-operated LED fairy lights or flameless candles are highly recommended for safety, especially if hanging indoors or in areas prone to wind. For outdoor use in a sheltered spot, small tea lights or votives can create a magical ambiance, but always exercise caution with open flames.
- Themed Decor: Adapt your bead choices to match specific holidays or seasons. Use red and green beads for Christmas, pastels for Easter, or autumnal colors for fall. This makes the hanger a versatile piece that can evolve with your home decor throughout the year.
- Gift Giving: When presenting this as a gift, consider packaging it with a small plant, a set of LED fairy lights, or a scented candle. A beautifully wrapped handmade gift speaks volumes about your thoughtfulness.
By exploring these variations, you can create multiple unique hangers, each reflecting a different mood or complementing a specific area of your home. Let your creativity be your guide!
Care and Maintenance for Your Beaded Hanger
To ensure your beautiful beaded plant hanger or lantern remains a cherished piece for years to come, a little care and maintenance go a long way.
- Cleaning: Over time, dust can accumulate on the beads and jar. For a quick clean, gently wipe the beads and fishing line with a soft, damp cloth. For a deeper clean, especially if using it as a planter where soil might splash, you can carefully remove the jar and rinse the beaded hanger under lukewarm water with a tiny drop of mild soap. Allow it to air dry completely before reinserting the jar.
- Knot Inspection: Periodically check the knots, particularly the one securing the hanger to the wooden ring and the final knot at the bottom. While fishing line is strong, constant exposure to elements (if outdoors) or stress from heavy plants can eventually cause wear. Re-tie or reinforce knots if they appear loose.
- Outdoor Use Considerations: If your hanger is destined for the outdoors, remember that prolonged exposure to direct sunlight can, over many years, potentially degrade fishing line or fade certain types of beads. Similarly, extreme temperature fluctuations might affect the materials. Bringing the hanger indoors during harsh weather can extend its lifespan.
- Plant Maintenance: For plant hangers, be mindful of watering. Ensure your plants are not overwatered, as excessive moisture can drip onto the beads and potentially cause mineral buildup or, in some cases, affect the fishing line over time. Using a small dish or liner inside the mason jar can help catch excess water.
- Lantern Safety: If you opt for real candles, always place the hanger in a safe, stable location away from flammable materials and out of reach of children or pets. Never leave a burning candle unattended. Flameless LED options offer a safer alternative with less maintenance.
By following these simple guidelines, you can preserve the beauty and functionality of your DIY beaded hanger, allowing it to continue bringing joy and elegance to your space for seasons to come. It’s a testament to the enduring appeal of handmade decor.
*All these images are credited to One Little Project via YouTube. Give their channel a visit and subscribe for more amazing DIY inspiration and tutorials! Their clear instructions and creative vision make crafting accessible and fun for everyone.
Easy DIY Beaded Plant Hanger & Lantern Tutorial: Your Next Creative Project
In conclusion, this DIY beaded plant hanger and lantern project is more than just a craft; it’s an opportunity to infuse your living spaces with personal charm, sustainable practices, and a touch of handmade warmth. From the simple act of threading beads to the final moment of hanging your creation, each step is a rewarding experience. Whether you’re looking to elevate your indoor plant display, add a magical glow to your outdoor evenings, or craft a heartfelt gift, this tutorial provides all the guidance you need. Its versatility, ease of creation, and stunning visual impact make it an ideal project for crafters of all skill levels. So, why wait? Gather your materials, follow these detailed steps, and discover the joy of creating a functional piece of art that truly reflects your style. Embrace the beauty of repurposing and enjoy the cozy ambiance your new beaded hanger will bring!