
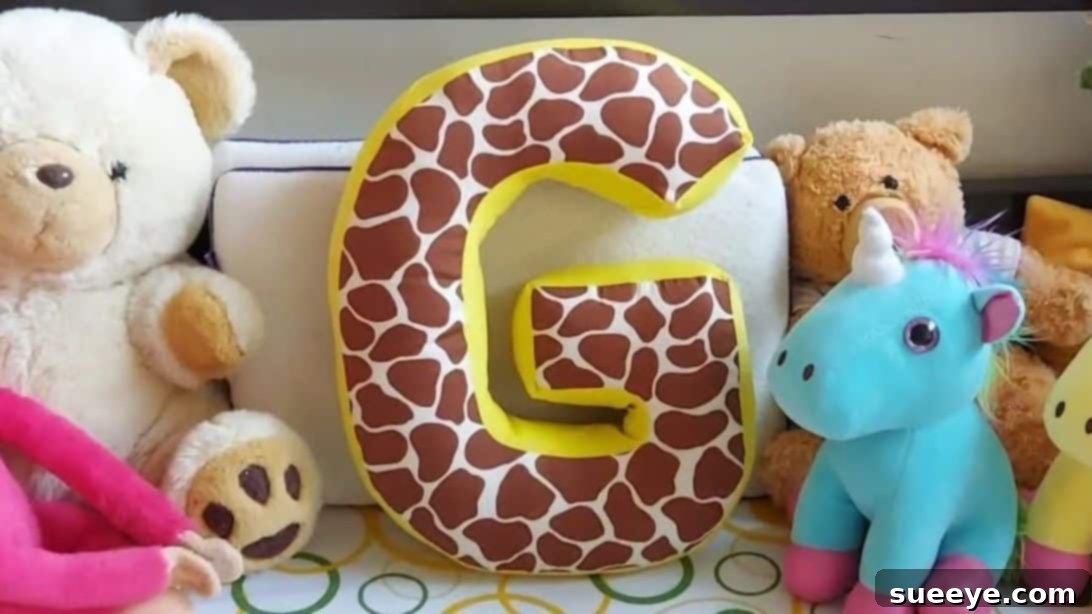
Craft Your Own Personalized Letter Pillow: A Complete Sewing Tutorial
Embark on a delightful crafting journey and create a charming, personalized letter pillow! This comprehensive sewing tutorial, inspired by the creative insights of Procraftinators Hive on YouTube, is designed to guide you through every step, making it an enjoyable and accessible project even for beginner sewers. Imagine transforming a simple piece of fabric into a unique decorative accent for your home, a thoughtful handmade gift, or even a sellable item for your craft business. With just a few basic materials and some fabric scraps, you can sew an adorable, custom letter pillow that adds a personal touch to any space. Dive in and discover the joy of bringing your own letter pillow to life!
Why Sew a Personalized Letter Pillow? The Allure of Custom Crafting
Personalized letter pillows offer a wonderful blend of functionality and aesthetic appeal. They are more than just cushions; they are expressions of individuality and thoughtfulness. Here’s why this project stands out:
- Unique Home Decor: Add a monogram to your couch, spell out a name in a child’s room, or declare a favorite word in your living space. The possibilities are endless for making your home truly yours.
- Heartfelt Gifts: A handmade letter pillow is an incredibly personal gift for birthdays, baby showers, housewarmings, or holidays. It shows immense care and effort, making it far more special than a store-bought item.
- Beginner-Friendly: Despite its professional look, this project uses fundamental sewing techniques, making it an excellent practice piece for those new to sewing machines.
- Utilize Fabric Scraps: This tutorial is perfect for using up those leftover fabric pieces you’ve been saving, transforming them into something beautiful and useful.
- Creative Expression: Choose fabrics that reflect your style, whether it’s vibrant patterns, soft pastels, or luxurious textures. Each pillow becomes a canvas for your creativity.
Essential Materials for Your Letter Pillow Project
Before you begin, gather these key materials. Having everything ready will ensure a smooth and enjoyable crafting experience:
- Cardboard: A sturdy piece of cardboard, approximately 10 by 13 inches, will serve as your template for the chosen letter. Cereal boxes or old delivery boxes work perfectly for this.
- Main Fabric: This will be the visible exterior of your pillow. Choose a durable yet soft fabric that complements your decor. Cotton, linen, or even a soft minky fabric are excellent choices. Consider the color and pattern carefully.
- Lining Fabric (Side Strip Fabric): Often referred to as the side strip or binding fabric, this material forms the depth of your pillow. While you can use scraps if you have a large enough piece, any coordinating or contrasting fabric will work beautifully. It should be wide enough to be cut into 3-inch diagonal strips.
- Chalk or Marking Pen: Essential for tracing your letter pattern onto the fabric, ensuring accuracy. A fabric-specific marker or tailor’s chalk is recommended as it washes out easily.
- Pins: Numerous pins are needed to secure your pattern to the fabric and hold fabric pieces together during sewing. Invest in good quality, sharp pins to avoid snags.
- Sewing Machine: While hand-sewing is possible, a sewing machine will significantly speed up the process and provide stronger, more consistent stitches.
- Needle and Matching Thread: Select a universal needle appropriate for your fabric type and a high-quality polyester thread that matches or subtly contrasts with your main fabric.
- Scissors: Sharp fabric scissors are crucial for clean, precise cuts. Avoid using them on paper to keep them sharp.
- Measuring Tape: For accurate measurements of your fabric and pattern pieces, ensuring everything fits together perfectly.
- Polyester Filling (Fiberfill): The stuffing that gives your pillow its plush form. Choose a good quality, resilient fiberfill that won’t clump over time. You’ll need a generous amount to make the pillow firm and shapely.
- Optional Tools: A rotary cutter and mat can make cutting strips faster and more precise. An iron and ironing board are also helpful for pressing seams.
Step-by-Step Guide: Sewing Your Personalized Letter Pillow
Follow these detailed instructions to create your unique letter pillow. Take your time with each step for the best results.
Step 1: Preparing Your Pattern and Fabric Foundation
Accuracy in this initial stage is key to a well-formed pillow.
1A. Creating Your Cardboard Letter Template: Begin by cutting a piece of sturdy cardboard to a manageable size, such as 10 by 13 inches. On this cardboard, draw the letter you wish to transform into a pillow. You can freehand it, print a large template from your computer, or use a stencil. Ensure the letter is bold and clear, taking up most of the cardboard space. Carefully cut out your drawn letter from the cardboard. This will be your reusable pattern.
1B. Preparing the Main Fabric Pieces: Take your chosen main fabric and fold it in half, ensuring the right sides of the fabric are facing each other. This means the side you want to be visible on the finished pillow should be on the inside of the fold. Lay your cut-out cardboard letter template on top of this folded fabric. Position it carefully to ensure you have enough fabric around all edges. Secure the cardboard template to the fabric by inserting pins around both the outside and, for letters with inner holes (like A, B, D, O, P, Q, R), around the inside edges of the cardboard letter. This prevents the fabric from shifting while you trace.
1C. Tracing and Cutting the Main Fabric: Using your chalk or fabric marking pen, meticulously trace around the cardboard letter template. Once traced, remove the pins and the cardboard template. Now, you need to add a seam allowance. With your measuring tape, mark a half-inch seam allowance around all the traced lines, both exterior and interior. This half-inch margin will give you room to sew without encroaching on your letter shape. Carefully cut along these newly marked lines, ensuring you cut through both layers of the folded fabric. You should now have two identical fabric pieces that form the front and back of your letter pillow.
1D. Measuring for the Side Strip: With your main fabric pieces cut, grab your measuring tape and carefully measure the entire perimeter of one of your letter fabric pieces. This measurement must include all inner curves and straight edges. For letters like “A” or “O,” you will need two separate measurements: one for the outer perimeter and one for the inner perimeter. This total measurement will determine the length of the side strip (lining fabric) you need to cut.
Step 2: Assembling, Stuffing, and Finishing Your Pillow
This stage brings your flat fabric pieces into a three-dimensional pillow.
2A. Preparing the Lining Fabric (Side Strip): For the lining fabric, which forms the “side” of your letter pillow, you’ll need to cut several strips. Based on the total measurement from Step 1D, cut diagonal strips of your chosen lining fabric, each approximately 3 inches wide. The diagonal cut helps with curves and reduces bulk. If your letter has an inner hole (like an “A”), remember you will need separate strips for that inner perimeter. If one strip isn’t long enough, you’ll need to join multiple strips. To do this, place two strips right sides together at their slanted edges, pin them, and sew them with a straight stitch. Trim the seam allowance and press open to reduce bulk. Continue joining until you have a continuous strip (or strips) matching the perimeter measurement(s).
2B. Attaching the Side Strip to the Main Fabric: Pin one end of your long lining fabric strip to the edge of one of your main letter fabric pieces, ensuring right sides are facing each other. Start at a relatively straight section of the letter, as this will be your turning gap later. Carefully pin the entire length of the lining strip around the perimeter of the main fabric letter, easing it around curves and corners. This is where the diagonal cut of the strips helps. Sew the lining fabric along the main fabric with a half-inch seam allowance. Crucially, leave an unsewn gap of about 3 to 4 inches in the middle of a relatively straight section. This opening is essential for turning the pillow right side out and stuffing it later. Repeat this entire process for the other main fabric letter piece, attaching the other edge of your long lining strip, also leaving a 3-4 inch gap, aligning with the first gap if possible for easier closing.
2C. Notching and Turning: Once both main fabric pieces are sewn to the lining strip, it’s time to prepare the seams for turning. Carefully make small notches (V-shaped cuts) around all the curved areas and clip the corners (trim diagonally across the corner of the seam allowance). Be careful not to cut through your stitching. These notches and clips will allow the fabric to lay flat and smooth once turned right side out, preventing puckering on curves and bulk in corners. Now, reach into the 3-4 inch unsewn gap and carefully turn the entire pillow right side out. Use a blunt tool (like a chopstick or turning tool) to gently push out all the corners and curves, ensuring the letter shape is well-defined.
2D. Stuffing and Closing the Gap: Begin filling your letter pillow with polyester fiberfill. Start by pushing the filling into the farthest corners and curves first, ensuring they are well-packed to maintain the letter’s shape. Gradually add more filling, working your way towards the opening. Don’t be afraid to use a generous amount; a firm, plump pillow looks best. Once you’re satisfied with the fullness and shape, carefully fold under the raw edges of the opening by half an inch. Using a needle and matching thread, hand-sew the gap closed with an invisible ladder stitch or slip stitch. This will create a neat, seamless finish, completing your personalized letter pillow!
Pro Tips for a Perfect Letter Pillow
Elevate your sewing project with these expert recommendations:
- Fabric Choice Matters: For beginners, cotton broadcloth or quilting cottons are ideal as they are easy to cut, pin, and sew. Avoid slippery fabrics like satin or stretchy knits until you gain more experience. Consider pre-washing your fabric to prevent shrinking after your pillow is made.
- Precision is Key: Take your time with measuring and cutting. Even slight inaccuracies in the pattern or seam allowance can alter the final shape of your letter. Use a ruler and clear marks.
- Mastering Curves and Corners: When sewing around tight curves, slow down your machine and use a shorter stitch length for more control. For sharp corners, pivot your fabric with the needle down for crisp points.
- Even Stuffing: Don’t just stuff randomly. Gently pull apart clumps of fiberfill before inserting them to ensure an even, smooth distribution. This prevents lumps and helps maintain the pillow’s elegant shape.
- Ironing for Crispness: Press your seams open before attaching the second main fabric piece. This creates a flatter, neater seam allowance inside the pillow and reduces bulk, especially important on curves.
- Practice Makes Perfect: If you’re new to sewing, consider making a simple square pillow first to get comfortable with your machine and basic techniques before tackling the more intricate curves of a letter.
Creative Variations and Personalization Ideas
Unleash your creativity and make each letter pillow truly unique:
- Vary the Size and Font: Don’t limit yourself to the suggested dimensions. Create mini letter keychains or giant floor pillows. Experiment with different font styles—serif, sans-serif, script—for distinct aesthetics.
- Mix and Match Fabrics: Use a contrasting fabric for the side strip to create a pop of color or texture. Combine different patterns for a whimsical look, or use solids for a more sophisticated appeal.
- Add Embellishments: Enhance your letter pillow with embroidery, applique shapes (like flowers or stars), decorative trims, piping along the edges, or even fabric paint. Ensure any added elements are securely attached.
- Themed Pillows: Create themed letter pillows for specific occasions. For a nursery, choose baby-friendly prints and soft textures. For holidays, use festive colors and motifs.
- Groupings and Words: Instead of just one letter, sew several to spell out a child’s name, a meaningful word like “LOVE,” “HOME,” or “DREAM,” or even initials for a couple.
- Sensory Additions: For children’s pillows, consider adding crinkle paper or small bells (safely enclosed) inside for auditory stimulation, or varying textures for tactile exploration.
Caring for Your Handmade Letter Pillow
To ensure your beautiful handmade letter pillow lasts for years, proper care is essential. Generally, spot cleaning with a mild detergent and a damp cloth is recommended for minor spills. If a more thorough cleaning is needed, check the washing instructions for your specific main and lining fabrics. Most cotton pillows can be gently hand-washed in cold water or machine-washed on a delicate cycle in a pillowcase to protect the stitches, then air-dried or tumble-dried on low heat. Avoid harsh chemicals or excessive heat, which can damage the fabric and filling.
Conclusion: Your New Favorite DIY Project
Congratulations! You’ve successfully navigated the steps to create a charming, personalized letter pillow. This project, while seemingly intricate, is a fantastic way to hone your sewing skills and produce a truly rewarding item. Whether it’s destined to be a cozy addition to your home decor, a cherished gift for a loved one, or a unique piece to sell, your handmade letter pillow carries the unmistakable warmth of personal effort and creativity. We hope this tutorial has empowered you to embrace your inner crafter and discover the satisfaction of bringing personalized textile art to life. Happy sewing!
*A special thank you to Procraftinators Hive via YouTube for providing the inspiration and excellent visuals for this tutorial. Be sure to visit their channel for more creative sewing projects and tutorials!