
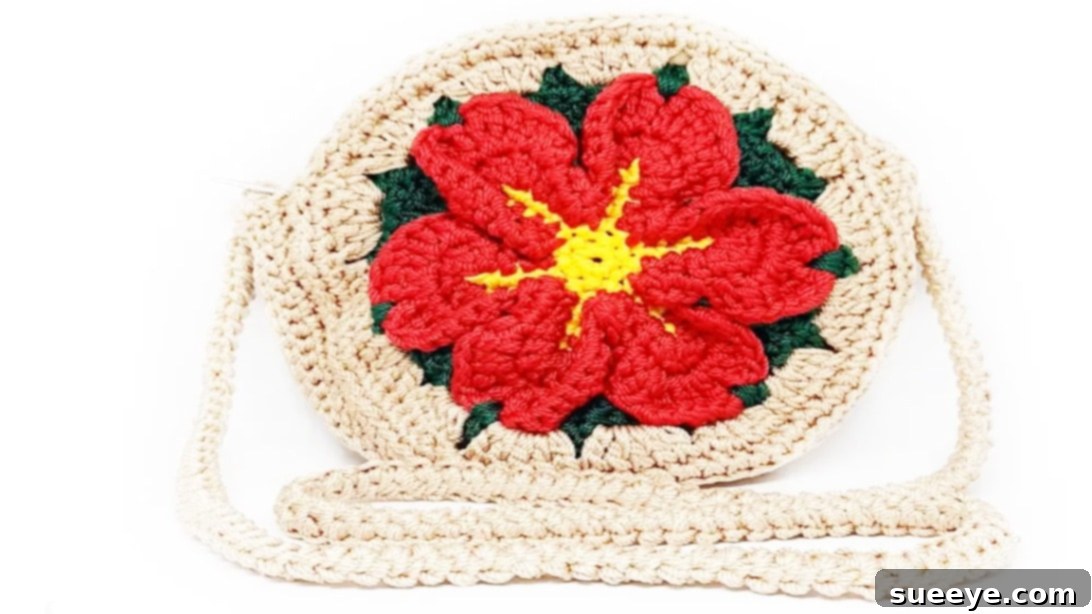
DIY Easy Crochet Flower Handbag: Your Ultimate Beginner-Friendly Guide
Embark on a delightful creative journey and craft your very own charming crochet flower handbag! Often, the thought of creating a beautiful, intricate accessory from scratch can seem daunting, especially for beginners. However, with the right guidance and a little patience, you’ll be amazed at what you can achieve. This comprehensive, step-by-step DIY crochet handbag tutorial by Bag-O-Day Crochet on YouTube simplifies the process, making it an ideal project for anyone looking to add a unique, handmade touch to their wardrobe or expand their crochet skills. Get ready to transform simple yarn into a stunning, functional piece of art!
Why Crochet This Charming Flower Handbag?
Crocheting your own handbag offers a myriad of benefits beyond just having a new accessory. It’s a deeply rewarding craft that allows for personal expression and creativity. Here’s why this particular flower handbag pattern stands out:
- Beginner-Friendly: While the finished product looks sophisticated, the techniques involved are fundamental and explained clearly, making it perfect for those new to crochet. You’ll master essential stitches like slip knots, chains, and double crochets.
- Unique & Personalized: Unlike mass-produced bags, your handmade creation will be one-of-a-kind. Choose your favorite yarn colors and textures to reflect your personal style, ensuring no one else has exactly the same bag.
- Cost-Effective: Crafting your own bag can be significantly more economical than purchasing a designer handbag, especially when you consider the satisfaction of creating it yourself.
- Skill Development: This project will help you build foundational crochet skills, boost your confidence, and prepare you for more complex patterns in the future. Practice truly makes perfect, and this project offers ample opportunity to hone your craft.
- Thoughtful Gift Idea: A handmade crochet handbag makes an incredibly thoughtful and personal gift for friends and family, showing them how much you care.
Materials You’ll Need
Before you begin, gather all your supplies. Having everything organized will ensure a smooth and enjoyable crocheting experience. For this delightful project, you will need:
- 5.5 mm Crochet Hook: This size is versatile and suitable for achieving a good fabric density with four-ply yarn. Ensure your hook is comfortable to hold for extended periods.
- Red Heart Four-Ply Yarn: The original tutorial uses Red Heart yarn, known for its durability and wide range of colors. Four-ply yarn is a medium-weight option, perfect for bags that need to hold their shape. Feel free to experiment with other brands or colors that inspire you!
- Yarn Needle (Tapestry Needle): Essential for weaving in ends and assembling your bag neatly.
- Scissors: For trimming yarn tails.
- Stitch Markers (Optional but Recommended): Especially helpful for beginners to mark the beginning of rounds or specific stitches, ensuring accuracy.
Step-by-Step Crochet Instructions for Your Flower Handbag
Follow these detailed instructions to create each component of your beautiful crochet handbag. Remember to maintain consistent tension for a neat and professional finish.
Part 1: Crafting the Beautiful Flower Front Panel
The front panel of your bag will feature an enchanting flower motif, creating a lovely focal point. This section guides you through making the initial circle and then adding the characteristic ruffles.
Round 1: The Foundation Circle
- Start with a Slipknot: Create a slipknot and place it onto your 5.5 mm crochet hook. This is the very first loop that secures your yarn.
- Chain 4: Yarn over and pull through the loop on your hook to create your first chain stitch. Repeat this three more times, resulting in a chain of four stitches.
- Slip Stitch to Form a Ring: Insert your hook into the very first chain stitch you made. Yarn over and pull through both the stitch and the loop on your hook. This joins your chain into a small, secure ring, which will be the center of your flower.
- Chain 3 (Counts as First Double Crochet): Yarn over and pull through to create three chain stitches. These three chains will count as your first double crochet stitch for this round, giving you the necessary height.
- Work 11 Double Crochets into the Ring: Yarn over, insert your hook into the center of the ring, yarn over, pull up a loop (you should have three loops on your hook). Yarn over, pull through two loops, yarn over, pull through the remaining two loops. This completes one double crochet. Repeat this process 10 more times, working all stitches into the center ring. When combined with your initial chain 3, you will have a total of 12 double crochets.
- Tighten the Center: Gently pull the yarn tail from your slipknot to cinch the center of the ring tightly closed. This creates a neat and compact flower center.
- Close the Round: Locate the top of your initial chain 3 (the third chain from the hook). Insert your hook into this stitch, yarn over, and pull through both the stitch and the loop on your hook to complete a slip stitch. This joins the round securely.
Adding the Ruffles (Flower Petals)
Now, let’s create the beautiful, ruffled texture that gives this panel its flower-like appearance.
- Work in Front Loop Stitches: For this ruffle round, you will be working exclusively into the front loop only of each double crochet stitch from the previous round. This technique creates a distinct ridge and allows for the ruffles to stand out.
- Create 4 Double Crochets in Each Front Loop: Insert your hook into the front loop of the very first double crochet stitch. Work 4 double crochet stitches into this single front loop. This significant increase in stitches is what creates the ruffled effect.
- Repeat Around: Continue this pattern, making 4 double crochets into the front loop of each of the 12 stitches from the previous round. You will see the fabric naturally begin to ripple and form petals.
- Close the Ruffle Round: Once you have worked 4 double crochets into the front loop of the last stitch, locate the first chain 3 you made at the start of this round. Insert your hook into the top of this chain 3 and make a slip stitch to close the round.
After completing the ruffle round, your first beautiful flower panel is complete! Clip the excess yarn tail, leaving a few inches. Use a yarn needle to weave this tail discreetly into the back of your crochet work, ensuring it’s secure and invisible.
Part 2: Expanding the Main Body – Increasing Rounds
Now, we will continue to build the main body of the front panel, expanding its size to form the base of the bag. This section involves working in the back loops to create a defined edge and continuous rounds of increasing stitches.
Round 2: Initial Expansion
- Reattach Yarn and Work in Back Loops: Start with a new slipknot on your hook and join your yarn into any stitch from the previous round, but this time, you will be working into the back loop only of the original 12 double crochet stitches (the loops that were left unworked when you made the ruffles). This creates a neat ridge that separates the flower from the bag’s main body.
- Chain 3 (Counts as First Double Crochet): This establishes the height for your next round.
- Increase Stitches: In the same back loop where you joined, work one additional double crochet. This means you will have two double crochets (the chain 3 plus one DC) in that first back loop.
- Two Double Crochets in Each Back Loop Around: Continue working two double crochets into the back loop of each of the 12 original stitches from your first round. By the end of this round, you will have doubled your stitch count, resulting in a total of 24 double crochets.
- Close the Round: Slip stitch into the top of the initial chain 3 to close the round neatly.
Round 3: Further Expansion and Ruffle Continuation
This round further expands the diameter and reintroduces a subtle ruffle, building on the initial flower design.
- Slip Stitch into the Next Stitch (Front Loop Only): Slip stitch into the next stitch, but this time, work only into the front loop of that stitch. This sets the stage for the next set of ruffles.
- Chain 3 (Counts as First Double Crochet): This will be your first double crochet for this ruffled section.
- Work 3 More Double Crochets in the Same Front Loop: Just like the initial flower ruffles, create 3 more double crochets in that same front loop. You now have 4 double crochets in total within that single front loop.
- Skip One Stitch, then 4 Double Crochets in Next Front Loop: Skip the next stitch. In the front loop of the stitch after that, work 4 double crochets.
- Repeat Around: Continue this pattern: skip one stitch, then 4 double crochets in the front loop of the next stitch. Repeat this sequence all the way around the panel.
- Close the Round: When you reach the end, slip stitch into the top of the first chain 3 to complete the round.
Trim the yarn, leaving a short tail, and use your yarn needle to neatly hide this excess yarn within the crochet fabric. This completes the distinct flower front panel.
Part 3: Creating the Plain Back Panel
The back panel of your handbag will be a simpler, flat circular piece. It follows a similar initial pattern to the front panel but omits the ruffles, focusing purely on increasing the circle to the desired size.
- Initial Circle: Begin by creating a slipknot and chaining 4. Slip stitch into the first chain to form a ring.
- First Round (12 Double Crochets): Chain 3 (counts as your first DC). Work 11 more double crochets into the center of the ring. Pull the yarn tail to tighten the center. Slip stitch into the top of the initial chain 3 to close the round. You now have 12 stitches.
- Second Round (24 Double Crochets – Increase): Chain 3 (counts as first DC). Work one more double crochet into the same stitch. Then, work two double crochets into each subsequent stitch around the entire circle. Slip stitch into the top of the initial chain 3 to close the round. You now have 24 stitches.
- Third Round (36 Double Crochets – Increase): Chain 3 (counts as first DC). Work one more double crochet into the same stitch. Then, work one double crochet in the next stitch, followed by two double crochets in the stitch after that (an increase). Continue this pattern around: *1 DC in next stitch, 2 DC in next stitch* until the end of the round. Slip stitch into the top of the initial chain 3 to close. You should have 36 stitches.
- Subsequent Rounds (Increasing to Size): Continue increasing your circle in this manner for approximately seven rounds in total, or until it matches the diameter of your flower front panel. A common increase pattern for a flat circle is:
- Round 4: Chain 3, 1 DC in same stitch. *1 DC in next 2 stitches, 2 DC in next stitch*. Repeat around. (48 stitches)
- Round 5: Chain 3, 1 DC in same stitch. *1 DC in next 3 stitches, 2 DC in next stitch*. Repeat around. (60 stitches)
- Round 6: Chain 3, 1 DC in same stitch. *1 DC in next 4 stitches, 2 DC in next stitch*. Repeat around. (72 stitches)
- Round 7: Chain 3, 1 DC in same stitch. *1 DC in next 5 stitches, 2 DC in next stitch*. Repeat around. (84 stitches)
Always ensure your stitch count increases evenly and that your circle lies flat. If it starts to cup, you may need more increases; if it ripples, you may have too many. Adjust as needed. Once the back panel matches the size of your front panel, fasten off and weave in the yarn end.
Part 4: Crocheting the Side and Base Panel
This long strip will form the side and bottom of your handbag, connecting the front and back circular panels. The original pattern uses a specific technique for creating this textured strip.
- Start with a Slip Stitch and Chain 13: Begin with a slipknot on your hook, then chain 13 stitches. This chain length determines the width (depth) of your bag.
- First Row – Textured Stitch:
- Skip the first two chains (these act as your turning chain).
- Insert your hook into the third chain from the hook, yarn over, and draw up a loop. You now have two loops on your hook.
- Insert your hook into the next chain, yarn over, and draw up a loop. You now have three loops on your hook.
- Repeat this process for a total of 6 times, always inserting your hook into the next available chain and drawing up a loop. At this point, you should have 7 loops on your hook.
- Yarn over and pull through all 7 loops on your hook. This creates a puff-like stitch.
- Chain 1 to lock the stitch securely.
- Continue the Row:
- Skip the next stitch (the one directly after where you just finished your 7-loop pull-through).
- Go through the next bigger open loop (the one created by pulling through all 7 loops from your previous stitch).
- Repeat the process of drawing up 6 loops (from 6 subsequent chains) and then pulling through all 7 loops on your hook.
- Chain 1 to lock.
- End of Row and Turning: At the very end of your row, you will have completed a sequence of these textured stitches. Chain 1 to secure your work, and then turn your work over to begin the next row.
- Subsequent Rows: Repeat the exact same pattern for the subsequent rows. You will essentially be working these textured stitches into the spaces and loops created by the previous row’s stitches. This creates a dense, sturdy fabric for the side of your bag.
- Length: Continue crocheting rows until your side panel reaches approximately 54 rows, or long enough to comfortably go around the circumference of your front and back panels. You want it to match the combined circumference of both circular pieces when laid flat.
Once your side panel is the correct length, fasten off, leaving a long tail for sewing.
Part 5: Assembling Your Crochet Handbag
Now comes the exciting part – bringing all your crocheted pieces together to form the handbag!
- Prepare for Sewing: Lay out your front panel, back panel, and the long side panel. You’ll be sewing the side panel between the front and back circles.
- Sew the Side Panel to the Front Panel: Using a yarn needle and the long tail from your side panel, begin sewing one edge of the side panel to the circumference of your front flower panel. Use a whip stitch or mattress stitch for a strong, neat seam. Work carefully around the entire circumference, ensuring even spacing. Secure the end with a knot and weave in any remaining tail.
- Sew the Side Panel to the Back Panel: Once the side panel is attached to the front, align the remaining free edge of the side panel with the circumference of your plain back panel. Stitch them together using the same sewing method. Take your time to align the edges perfectly to ensure your bag is symmetrical and sits well. Secure the yarn end and weave it in.
- Check for Gaps: Inspect all seams for any gaps or loose stitches. Reinforce as needed for durability.
Part 6: Making and Attaching the Handles
The handles complete the functionality and aesthetic of your handbag.
- Crochet the Handles (Puff Stitch or Single Crochet): For a sturdy handle, you can crochet a strip of 35 rows using a dense stitch like single crochet or even a puff stitch variation if you desire more texture.
- Start with a slipknot and chain about 6-8 stitches (this will determine the width of your handle).
- Work single crochet stitches (or your chosen dense stitch) across the chain, then chain 1 and turn.
- Repeat this process for 35 rows, or until you reach your desired handle length. Make two identical strips for two handles.
- Thicken the Handles (Optional but Recommended): For added comfort and durability, take one crocheted handle strip. Fold it in half lengthwise and carefully sew the raw edges together using a yarn needle. This creates a double-layered, thicker handle. Repeat for the second handle.
- Attach the Handles to the Bag: Position your handles evenly on the top opening of your bag. Using your yarn needle and matching yarn, securely sew the ends of each handle to the top edge of the bag. Stitch multiple times through both the handle and the bag fabric to ensure they can withstand the weight of the bag’s contents. Weave in all remaining yarn ends for a clean finish.
Pro Tips for Crochet Beginners
To ensure your first crochet handbag project is a success, keep these tips in mind:
- Watch the Video: The YouTube tutorial by Bag-O-Day Crochet is an invaluable visual aid. Pause and replay sections as needed to understand the stitch mechanics.
- Maintain Consistent Tension: This is key for a uniform fabric and a professional-looking finish. Practice holding your yarn and hook until you find a comfortable rhythm.
- Count Your Stitches: Especially in the increasing rounds, regularly count your stitches to avoid mistakes and ensure your circle remains flat and even. Stitch markers can be very helpful here.
- Don’t Be Afraid to Undo: Crocheting is forgiving! If you make a mistake, don’t hesitate to “frog” (unravel) your work back to the error and redo it. It’s part of the learning process.
- Practice Basic Stitches: Before tackling the bag, ensure you are comfortable with slip knots, chain stitches, and double crochets. A few swatches can build confidence.
- Choose the Right Yarn: For beginners, a smooth, light-colored yarn makes it easier to see your stitches. Avoid dark or fuzzy yarns until you’re more experienced.
Caring for Your Handmade Crochet Bag
To keep your beautiful new handbag looking its best for years to come:
- Hand Wash Only: Most acrylic or cotton yarns are best hand-washed in cool water with a mild detergent. Gently squeeze out excess water.
- Reshape and Air Dry: Never put your crochet bag in a dryer, as it can shrink or distort. Lay it flat on a clean towel, reshaping it as it dries. Allow ample time for it to dry completely.
- Spot Clean: For minor spills, spot clean immediately with a damp cloth and mild soap.
- Avoid Overloading: While sturdy, refrain from overfilling your bag with very heavy items to maintain its shape and the integrity of the handles.
Conclusion
Congratulations! You’ve just completed a journey from a ball of yarn to a stunning, handmade crochet flower handbag. This project is a testament to the fact that “practice makes perfect,” and with each stitch, your patience and skill double. We hope this detailed tutorial has empowered you to create a beautiful and functional accessory that you’ll cherish. Whether you made it for yourself or as a thoughtful gift, your handmade bag is a unique expression of your creativity and dedication. Don’t forget to share your finished masterpieces with fellow crafters online – your work might inspire someone else to pick up a hook and yarn!