
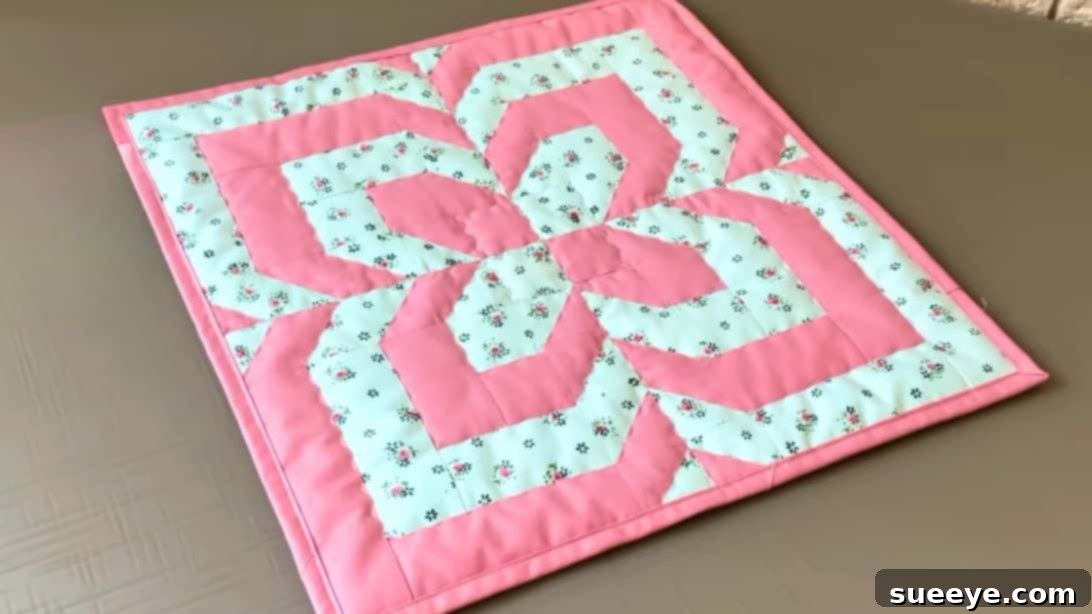
There’s an undeniable magic that comes with spring. The world awakens, bursting into vibrant colors and the cheerful melodies of birdsong. For crafters, this season often sparks a desire to create something equally fresh and beautiful. If you’re searching for a captivating yet achievable sewing project, look no further than this delightful flower patchwork block. Inspired by the incredible creativity of The Melody of Sewing, this unique design is an absolute showstopper and perfectly captures the essence of blooming flowers. It’s a fresh take on traditional floral patterns, offering a modern aesthetic that will instantly captivate your heart. Get ready to add this must-try pattern to your creative agenda!
RELATED: Prairie Flower Quilt Tutorial
Upon first glance, this intricate flower block might appear challenging, especially for those new to quilting. However, I assure you, its deceptive complexity belies a surprisingly beginner-friendly construction. The beauty of this block lies in its clever assembly, which primarily utilizes just a few fundamental quilting components: a simple square unit, classic half-square triangles (HSTs), and a basic 2-inch square. The core technique involves repeatedly sewing fabric strips onto two-patch units, a method that is not only straightforward to master but also incredibly satisfying. This project serves as an excellent opportunity to build confidence and refine your precision sewing skills, making it an ideal choice for both novice and intermediate quilters looking to expand their repertoire.
Why You’ll Love Crafting This Easy Flower Patchwork Block
Beyond its charming aesthetics, this flower patchwork block offers a wealth of benefits that make it an exceptional project for anyone passionate about sewing and quilting. Firstly, its design is truly one-of-a-kind. Unlike many generic flower patterns, this block presents a unique visual texture and arrangement that sets it apart, ensuring your finished projects will have a distinctive flair. Whether you incorporate it into a larger quilt, a decorative cushion, or a beautiful wall hanging, it promises to be a conversation starter.
Secondly, its accessibility for beginners is a huge draw. We’ve all been intimidated by patterns that look too complicated, but this one proves that stunning results can be achieved with foundational techniques. By focusing on accurate cutting, consistent seam allowances, and careful pressing – all skills that will be honed during this project – you’ll quickly see how these simple steps build into a magnificent whole. It’s an empowering experience to create something so beautiful with a manageable learning curve.
Furthermore, working on this block is a fantastic way to develop crucial sewing skills. You’ll gain proficiency in strip piecing, a versatile technique used in many quilting projects, and master the creation of perfect half-square triangles, which are staples in countless quilt designs. This isn’t just about making a pretty flower; it’s about investing in your craft and building a solid foundation for future, more complex projects. Plus, the rhythmic nature of cutting, sewing, and pressing can be incredibly therapeutic, offering a wonderful creative escape.
For more beautiful floral-inspired projects, be sure to explore these fantastic resources: Easy Flower Quilt Block, How to Make Granny’s Pretty Sunflower Quilt, and Easy Sunflower Quilt Block Tutorial.
Gathering Your Flower Block Materials
Before diving into the enjoyable process of stitching together your flower block, it’s essential to gather all your materials. High-quality fabric will make a significant difference in the final appearance and longevity of your project. Consider selecting a vibrant solid fabric for contrast against a charming printed fabric to truly make your flower pop. Remember that accuracy in cutting is key for successful patchwork, so use a sharp rotary cutter and a reliable cutting mat.
- 2″ wide fabric strips (choose both solid and coordinating printed fabrics for visual appeal)
- 2 pieces of 5″ solid fabric squares
- 2 pieces of 5″ printed fabric squares
- Additional 2-inch solid and printed squares (these are often cut from the 2″ wide strips, ensuring consistency)
How to Craft Your Beautiful Flower Block: A Detailed Guide
Step 1: Preparing Your Initial Two-Patch Units
Begin by cutting your base components. From your 2-inch wide solid fabric strip, cut two individual 2-inch squares. Repeat this process with your 2-inch wide printed fabric strip, yielding two more 2-inch squares. You should now have a total of four 2-inch squares. Take one solid square and one printed square and place them right sides together. Sew them along one edge using a precise 1/4-inch seam allowance. Repeat with the remaining solid and printed squares to create two identical “two-patch” units. Press your seams open or to the darker side for a flat finish.
Step 2: Constructing Unit A and Unit B’s First Layer
Take one of your newly sewn two-patch units. Carefully position a solid fabric strip along one side of this unit, ensuring right sides are together and all edges are perfectly aligned. Sew this strip in place using a consistent 1/4-inch seam allowance. This will be the beginning of your Unit A. Trim any excess fabric from the strip. Now, take your second two-patch unit and repeat the process, but this time attach a printed fabric strip to one side to begin your Unit B. After sewing, carefully press the seams open or towards the newly added strip to create a crisp, flat foundation. At this stage, you should start to see an ‘L’ shape forming on both units.
Step 3: Expanding the ‘L’ Pattern on Units A and B
With Unit B, take a solid fabric strip and sew it along an adjacent side (not the one you just attached a strip to), ensuring it forms the other leg of the ‘L’ shape. Similarly, for Unit A, attach a printed fabric strip to its adjacent side. Again, use a 1/4-inch seam and press your seams carefully after sewing. To truly define the ‘L’ pattern, add another layer of the same strips to the *opposite* side of where you just added. For instance, if you added a solid strip to Unit B, add another solid strip to the other perpendicular side. Do the same for Unit A with a printed strip. This mirroring creates a distinctive corner block effect. Refer to the image below for visual clarity on strip placement and the emerging ‘L’ pattern.
Step 4: Creating Mirror Image Blocks
To prepare for the full flower assembly, you will need two identical sets of these ‘L’ shaped blocks, but with reversed fabric placements. Repeat the entirety of Step 3, but this time, swap the fabrics. So, where you used a solid strip for Unit B, use a printed strip, and vice versa for Unit A. This will yield two additional blocks that are mirror images of the first two. Once sewn, press all seams open or to the darker side for a flat finish. You now have four unique ‘L’ shaped units.
Step 5: Crafting Your Half-Square Triangles (HSTs)
Half-Square Triangles are a foundational element in quilting, and precision here is key. Take your two 5-inch printed fabric squares and, on the wrong side of each, draw a diagonal line from corner to corner in both directions, forming an ‘X’. Place each printed square on top of a 5-inch solid square, ensuring right sides are together and edges are perfectly aligned. Now, using your sewing machine, stitch a line 1/4-inch away from each side of the drawn lines. You’ll sew four lines in total for each set. Once sewn, carefully cut directly along the drawn diagonal lines. This will yield eight individual HSTs from your two initial squares. Press these HSTs open, always pressing towards the darker fabric to prevent shadow-through. Finally, trim any excess fabric to square up your HSTs to a consistent size (the finished size will be determined by your pattern, usually 4.5 inches for a 5-inch start, but check your reference tutorial for exact trimming).
Step 6: Assembling the First Quarter of the Flower Block
Now it’s time to bring all the elements together for one quarter of your flower block. Arrange one of your ‘L’ shaped units, two of your perfectly trimmed half-square triangles, and one of your 2-inch squares (either solid or printed, depending on your desired effect and the reference image) on your design wall or flat surface. Position them exactly as shown in the accompanying photo below. This careful arrangement is crucial to forming the correct flower petal. Once you are satisfied with the layout, sew these arranged units together in rows, and then join the rows to form a single, cohesive block. Press all seams diligently.
Step 7: Creating Additional Flower Quarters
To complete your full flower, you’ll need a total of four identical quarters. Repeat Steps 1 through 6 three more times, ensuring each quarter block is assembled with the same care and precision. This repetitive process is excellent for building muscle memory and improving your speed and accuracy. Take your time with each repetition, focusing on square corners and flat seams. By the end of this step, you will have four individual block units, each representing a “petal” of your larger flower.
Step 8: Final Assembly: Sewing the Four-Patch Flower
With all four quarter blocks completed and perfectly pressed, the final step is to join them to form the complete flower. Arrange your four individual blocks on your design surface. Position them just like you would assemble a traditional four-patch quilt block, carefully rotating them until the flower pattern emerges exactly as you desire. Ensure the “petals” align correctly to form the central bloom. Pin the blocks together, aligning all seams meticulously to ensure perfect points. Sew the blocks into two pairs first, pressing the seams in opposite directions to allow for nesting. Then, join the two pairs together to complete your stunning flower block. Press the final seam open or to one side. Congratulations, you’ve just created a truly unique and beautiful flower patchwork block!
Mastering the Easy Flower Patchwork Block for Beginners
This “Easy Flower Patchwork Block” is more than just a sewing project; it’s an invitation to explore your creativity and build valuable quilting skills. From the joy of selecting fabrics that sing together to the satisfaction of seeing your precise stitches transform into a beautiful design, every step is a rewarding experience. Don’t let the intricate appearance of the final flower intimidate you. By breaking down the process into manageable steps and focusing on accuracy with each seam, you’ll be amazed at what you can achieve. This block is perfect for adding a touch of spring to any quilt, pillow, or textile art piece, and it’s a testament to how simple units can combine to form something truly spectacular. Embrace the process, enjoy the journey, and delight in your beautifully handmade flower!