
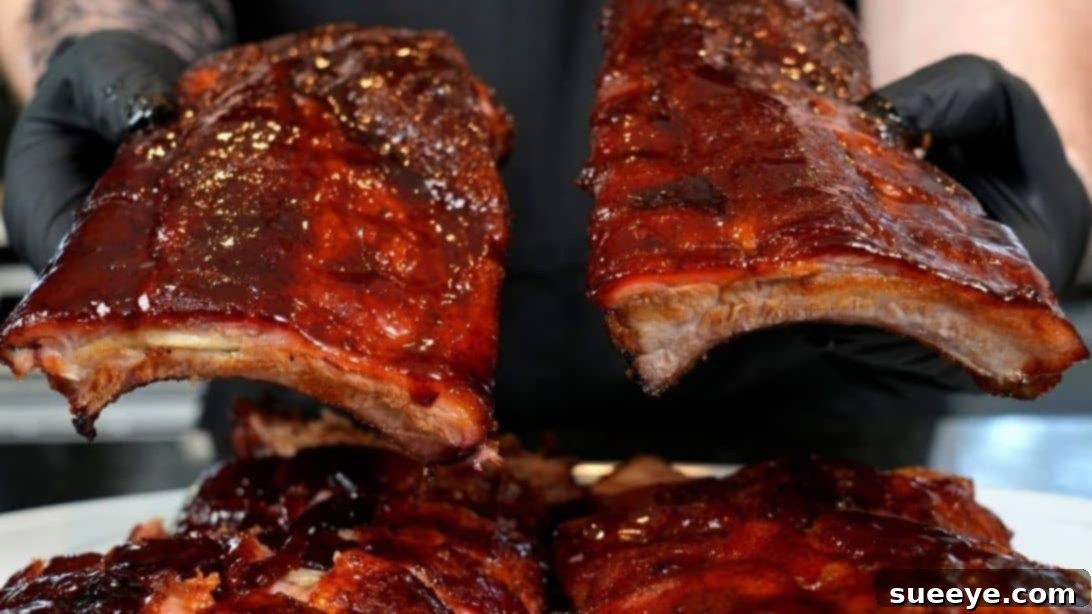
Mastering Irresistible Baby Back Ribs: A Two-Way Recipe for Oven & Smoker
Planning the ultimate backyard barbecue or a cozy family dinner indoors? Look no further! This incredible baby back ribs recipe, inspired by the culinary genius of Mr. Make It Happen on YouTube, is your ticket to succulent, fall-off-the-bone ribs that will have everyone asking for seconds. What makes this recipe truly exceptional is its versatility: we’ll guide you through preparing these delectable ribs using two distinct methods – one perfect for your oven and another for your smoker grill. Whether you’re a seasoned pitmaster or a home cook eager to impress, these ribs promise a tender texture, deep smoky flavor (even indoors!), and seasoning perfected to an art. Prepare to transform humble ribs into a culinary masterpiece that truly lives up to its delicious reputation.
Why These Ribs Are a Game-Changer
There’s a special kind of satisfaction that comes from serving perfectly cooked ribs. This recipe elevates the experience by focusing on flavor depth and unmatched tenderness. The combination of a meticulously crafted dry rub, the binding power of mustard, and a strategic cooking process ensures every bite is juicy and packed with savory goodness. We’re not just cooking ribs; we’re crafting an experience. From the initial smoky embrace to the final caramelized BBQ glaze, each step is designed to maximize flavor and achieve that coveted melt-in-your-mouth texture. Get ready to ditch dry, tough ribs and embrace a new standard of barbecue excellence, adaptable to both your kitchen and your outdoor cooking space.
Essential Ingredients for Succulent Baby Back Ribs
The foundation of any great dish lies in its ingredients. For these baby back ribs, we’re combining classic flavors with a few clever additions to create a profile that is both familiar and exciting. Sourcing quality ingredients is key to achieving the best results.
- Baby Back Ribs: Aim for racks that are well-marbled, indicating good fat content for moisture and flavor.
- A Few Drops of Liquid Smoke: Essential for infusing that authentic smoky aroma, especially when cooking indoors. Choose a high-quality brand for the best taste.
- 1 Stick of Butter: Unsalted butter is preferred to control the overall saltiness of the dish. It adds richness and helps tenderize the meat.
- ¼ Cup of Honey: A touch of sweetness that balances the savory notes and aids in caramelization.
- 2-3 Tablespoons of Yellow Mustard: Acts as an excellent binder for your dry rub, ensuring the seasoning adheres perfectly without imparting a strong mustard flavor to the final product.
- ¼-½ Cup of Brown Sugar: Contributes to the sweet-savory balance and creates a beautiful, caramelized crust during the final cooking stages.
- ½ Cup of Pineapple Juice: The secret weapon for extra tenderness! Pineapple contains enzymes that naturally break down meat fibers, ensuring your ribs are incredibly soft.
- 2 Cups of BBQ Sauce: Your favorite brand will do, or feel free to use a homemade recipe. This will be the glorious finish to your ribs, providing a tangy, sweet, and smoky glaze.
- Dry Rub Blend: A balanced mix of Salt, Black Pepper, Garlic Powder, Onion Powder, Cayenne Pepper, and your preferred BBQ Seasoning. This blend forms the backbone of the flavor.
Step-by-Step Directions for Perfect Ribs
Step 1: Preparation and Dry Rub Application
The journey to perfect ribs begins with proper preparation. This initial stage sets the stage for maximum flavor absorption and tenderness, regardless of whether you choose the oven or smoker method.
Membrane Removal (Optional but Recommended): First, locate the thin, silvery membrane on the bone-side of the ribs. While optional, removing this membrane prevents the ribs from becoming tough or chewy and allows your seasonings to penetrate the meat more effectively. To do this, simply slide a knife under the membrane at one end, lift it slightly, then grip it with a paper towel and peel it off completely. If it tears, just pick up where you left off.
Liquid Smoke & Mustard Binder: Next, if using (especially for oven method), apply a few drops of liquid smoke across the entire surface of the ribs. Spread it evenly with your hands, ensuring both sides and edges are lightly coated. Follow this with a generous drizzle of yellow mustard. Don’t worry, the mustard flavor won’t overpower your ribs; it merely acts as a superb binder, helping the dry rub adhere and form a delicious crust.
Crafting Your Signature Dry Rub: In a bowl, combine a generous amount of salt, freshly ground black pepper, garlic powder, onion powder, cayenne pepper (adjust to your heat preference), and your favorite BBQ seasoning blend. This potent mix will infuse your ribs with incredible depth. Liberally sprinkle this dry rub all over the ribs, ensuring complete coverage, including the sides. Instead of rubbing vigorously, gently pat and press the seasoning firmly into the meat. This technique creates a beautiful bark and prevents the rub from flaking off. Flip the ribs over and repeat this seasoning process on the other side, ensuring every inch is coated.
Method 1: Oven-Baked Ribs for Indoor Perfection
For those who prefer the convenience of indoor cooking or don’t have access to a smoker, the oven method delivers incredibly tender and flavorful ribs. This approach mimics the slow-cooking process of a smoker, ensuring juicy results.
Initial Bake – Setting the Crust: Lay a sheet of heavy-duty aluminum foil on a baking sheet, then place a wire rack on top. This setup allows air to circulate around the ribs and prevents them from sitting in their own juices. Carefully place your seasoned ribs on the wire rack. Transfer the baking sheet to a preheated oven set to a low and slow 275°F (135°C). Bake for approximately 90 minutes. This initial phase helps to “set” the dry rub, creating that desirable crust, and begins the tenderization process, allowing the flavors to meld.
The “Foil Boat” for Maximum Tenderness: After the initial bake, it’s time to create a “foil boat” to steam and tenderize the ribs. On a new, large sheet of aluminum foil, arrange several thin slices of butter down the center. Sprinkle a generous layer of brown sugar and drizzle some honey over the butter. Place the ribs bone-side up on this prepared foil bed. Add another layer of butter slices, brown sugar, and honey directly on top of the ribs. Carefully wrap the foil around the ribs from both sides, creating a sealed pouch, but leave one end slightly unwrapped. Pour the pineapple juice into the pouch, then loosely seal the remaining end. This ensures the ribs braise in their own juices and the added liquids, creating incredible moisture and tenderness.
The Final Bake & Caramelized Glaze: Return the foil-wrapped ribs to the oven (or smoker, if following that method) for another 60 to 90 minutes. This extended cooking time allows the enzymes in the pineapple juice to work their magic, further tenderizing the meat. Once this phase is complete, carefully unwrap the ribs. At this point, they should be incredibly tender – you’ll know they’re ready when they easily bend or a toothpick slides in with little resistance. Finally, liberally coat and brush the ribs with your favorite BBQ sauce. Return them to the oven (unwrapped) for an additional 30 minutes. This last step allows the BBQ sauce to caramelize and thicken, forming a delicious, sticky glaze that is the hallmark of truly great ribs.
Method 2: Smoked Ribs for Authentic Pitmaster Flavor
For those craving an authentic, deep smoky flavor, the smoker grill method is unparalleled. This technique yields ribs with a rich smoke ring and a complex taste profile that is hard to beat. The initial preparation with the dry rub remains the same as in Step 1.
The Smoke Session – Infusing Flavor: Preheat your smoker grill to a consistent 275°F (135°C). Once seasoned, place the ribs directly onto the smoker grates. Allow them to smoke for approximately 2.5 hours. During this initial smoke session, the ribs will absorb the wonderful smoky flavors from your chosen wood (hickory, apple, or pecan are popular choices for ribs). This phase also helps to firm up the rub and begin the tenderizing process. Ensure your smoker maintains a steady temperature for consistent results.
The “Crutch” – Wrapping for Moisture & Tenderness: After 2.5 hours in the smoker, it’s time for the “crutch.” Similar to the oven method, this involves wrapping the ribs in foil to steam them and push them past the “stall” (a point where meat temperature can temporarily stop rising during smoking). Prepare a large sheet of aluminum foil with slices of butter, brown sugar, and a drizzle of honey down the center. Place the bone-side-up ribs on this bed, then add more butter, brown sugar, and honey on top. Seal the foil tightly, leaving a small opening to pour in the pineapple juice, then seal it completely but loosely to allow for steam. This creates a moist environment that ensures the ribs become incredibly tender without drying out in the smoker.
Returning to Heat & The Grand Finale: Place the foil-wrapped ribs back into the smoker (or oven, if you prefer to finish them there) for another 60 to 90 minutes. This phase continues the tenderizing process. Once cooked, check for tenderness – the meat should easily pull away from the bone or flex significantly when lifted. Finally, unwrap the ribs and liberally brush them with your favorite BBQ sauce. Place them back on the smoker (or oven) for a final 30 minutes, allowing the sauce to set and caramelize into a sticky, glossy glaze. This last step adds incredible flavor and texture, completing your smoked masterpiece.
Expert Tips for Unforgettable Ribs
Achieving truly epic ribs goes beyond just following the steps. Here are some pro tips to ensure your baby back ribs are consistently excellent:
- Don’t Rush the Process: Ribs are a labor of love, and slow cooking is key. Resist the urge to increase the temperature or shorten cooking times. Patience will be rewarded with unparalleled tenderness.
- Monitor Temperature: An oven thermometer or a reliable meat thermometer for your smoker is invaluable. Maintaining a consistent temperature is crucial for even cooking and tender results.
- Let Them Rest: Once cooked and glazed, allow your ribs to rest for 10-15 minutes before slicing. This allows the juices to redistribute, ensuring every bite is moist and flavorful.
- Customize Your Rub & Sauce: Feel free to adjust the dry rub ingredients to your taste. Add more cayenne for heat, or smoked paprika for deeper color. Experiment with different BBQ sauces to find your perfect match – sweet, tangy, spicy, or smoky.
- Wood Choice (for Smoker): The type of wood you use for smoking significantly impacts flavor. Hickory offers a strong, classic BBQ flavor, while apple or cherry wood provides a milder, sweeter smoke. Experiment to find your favorite.
- Quality Ribs Matter: Start with good quality baby back ribs. Look for good marbling and a consistent thickness across the rack.
Serving Suggestions
These magnificent baby back ribs deserve equally delicious accompaniments. Pair them with classic BBQ sides for a complete and satisfying meal:
- Creamy coleslaw
- Tangy potato salad
- Sweet corn on the cob
- Hearty baked beans
- Fresh garden salad
- Warm cornbread
Whether you’re hosting a grand barbecue or simply enjoying a meal with loved ones, these ribs are sure to be the star of the show.
We encourage you to share your culinary creations with friends and family! A dish this delicious is meant to be celebrated and enjoyed by many.
In conclusion, preparing these baby back ribs, whether in the oven or on a smoker, is a rewarding experience that culminates in incredibly tender, flavorful meat. Inspired by the expert guidance of Mr. Make It Happen, this recipe provides a clear path to barbecue perfection. Don’t hesitate to try it out and discover for yourself the joy of homemade ribs that rival any restaurant. Give his channel a visit and subscribe for more amazing culinary tutorials!