
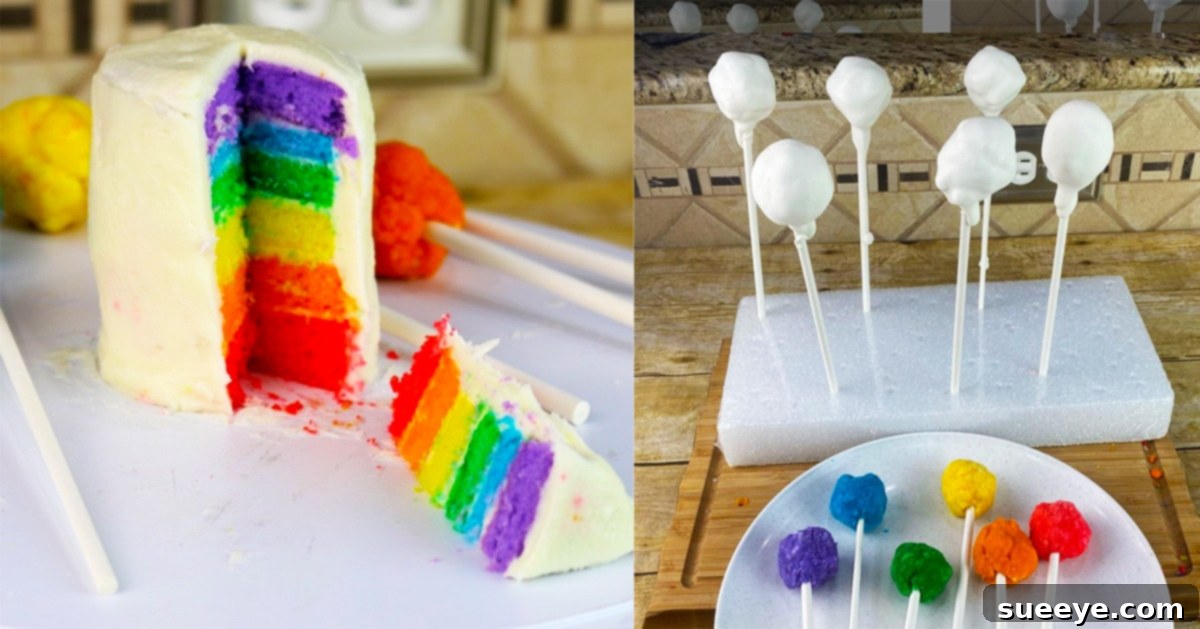
There’s something truly magical about a dessert that bursts with color, and few treats capture that joy as perfectly as a rainbow cake. But what if you could create this show-stopping masterpiece, along with delightful cake pops, without spending hours in the kitchen? This guide is designed to help you do just that! We’ll explore a clever, semi-homemade approach that utilizes a simple white cake mix, transforming it into a vibrant, multi-layered celebration. Whether you’re a baking novice or looking for a quick and impressive dessert, this FunFoods tutorial-inspired recipe simplifies the process, making it accessible and incredibly fun. Get ready to bake a visually stunning rainbow cake and irresistible cake pops that are perfect for any occasion, from a child’s birthday party to a festive Pride Month gathering. Prepare to be amazed by how easily you can create a dessert that is as delightful to look at as it is to eat!
The beauty of this recipe lies in its simplicity and efficiency. By starting with a pre-made white cake mix, you bypass many of the time-consuming steps typically involved in baking from scratch. This makes it an ideal choice for busy individuals, beginners who want to build confidence in the kitchen, or anyone looking to whip up a fantastic dessert with minimal fuss. Don’t let the “semi-homemade” label fool you; the final product is incredibly impressive, boasting bright, distinct colors and a delicious flavor that will leave your guests asking for more. Plus, this method often proves to be more inexpensive, as buying pre-made ingredients like cake mix can significantly reduce costs compared to purchasing individual baking components. You’ll be surprised at how vibrant and professional your rainbow cake turns out, making it a perfect centerpiece for any celebration. And the best part? We’ll also teach you how to turn any leftover cake scraps into adorable, bite-sized cake pops, ensuring no deliciousness goes to waste!
Gather Your Colorful Arsenal: What You’ll Need
Before diving into the fun world of rainbow baking, let’s make sure you have all the necessary components. This list is designed to be straightforward, primarily leveraging everyday supermarket ingredients to keep the process smooth and budget-friendly. The key to our vibrant creation lies in quality food coloring and a reliable white cake mix as our foundation.
- White Cake Mix: Opt for your favorite brand. This forms the base of our colorful cake and provides a consistent, delicious flavor.
- 1/2 cup Vegetable Oil: Essential for moisture and tenderness, follow the measurements specified on your cake mix box or use this as a general guideline.
- 1 1/4 cup Water: Another crucial liquid component for activating the cake mix. Adjust according to package directions if they differ significantly.
- 4 Large Egg Whites: Using only egg whites helps maintain the pristine white base of the cake, allowing the food colors to truly pop without any yellow tint.
- 6 Food Colors: This is where the magic happens! Choose a set of gel food colorings for the most vibrant and concentrated hues. Think red, orange, yellow, green, blue, and purple to create a classic rainbow spectrum.
- Cooking Spray: For ensuring your cake doesn’t stick to the parchment paper or baking sheet.
- Cookie Cutter: A round cookie cutter, approximately 2-3 inches in diameter, is ideal for creating the individual tiny cake layers. You can experiment with other shapes for different effects.
- Vanilla Frosting: A generous tub of ready-made vanilla frosting will serve two purposes: binding the cake layers together and forming the base for our cake pop mixture.
- 1 tbsp Cream Cheese, softened: This addition to the frosting is optional but highly recommended. It adds a delicious tang and extra creaminess to the cake pop mixture, enhancing both flavor and texture.
- White Chocolate Candy Melts: Crucial for coating your cake pops, providing a smooth, hard shell that is easy to decorate.
Essential Kitchen Tools for Success:
- Large mixing bowl
- 6 small separate bowls for coloring the batter
- Whisk or electric mixer
- Measuring cups and spoons
- Baking sheet (cookie sheet)
- Parchment paper
- Rubber spatula
- Wire cooling rack
- Small microwave-safe bowl for melting chocolate
- Lollipop sticks (for cake pops)
- Styrofoam block or a tall glass (for holding cake pops while they set)
Step-by-Step Guide to Your Rainbow Masterpiece
Part 1: The Vibrant Cake Layers
Step 1: Prepare Your Cake Batter
Begin by taking out your chosen white cake mix. In a large mixing bowl, combine the cake mix with the vegetable oil, water, and egg whites. Using an electric mixer or a whisk, mix until the batter is smooth and well-combined. Be careful not to overmix, as this can lead to a tough cake. Mix just until no dry streaks remain, typically following the instructions provided on the cake mix box for mixing time.
Step 2: Divide and Conquer with Color
Once your batter is ready, it’s time for the fun part! Divide the entire cake batter equally into six separate small bowls. Eyeballing it is fine, or you can use a measuring cup for more precision. Now, add a different food coloring to each bowl. For a classic rainbow, choose red, orange, yellow, green, blue, and purple. Start with a few drops of gel coloring, mix thoroughly with a spoon or spatula, and add more color gradually until you achieve the desired vibrant shade. Remember that gel food colorings are highly concentrated, so a little goes a long way. Ensure each color is well-integrated into its respective portion of batter.
Step 3: Prepare for Baking
Preheat your oven to 350°F (175°C). Line a large cookie sheet or baking pan with parchment paper. This step is crucial for easy removal and cleanup. Even with parchment paper, it’s a good practice to lightly spray the surface of the paper with cooking spray to provide an extra layer of non-stick insurance. This ensures your delicate cake layers won’t adhere to the paper.
Step 4: Pour and Bake the Layers
Carefully pour each of the six colored cake mixes onto the prepared cookie sheet. Ensure they are spaced out, leaving approximately 2 inches between each distinct color. This separation is important to prevent the colors from bleeding into each other during baking, allowing them to bake into individual, flat “pancakes” of color. You want relatively thin, even layers. Bake the cake at 350°F (175°C) for approximately 20 minutes, or until a toothpick inserted into the center of a layer comes out clean. Baking time may vary slightly depending on your oven and the thickness of your layers. Keep an eye on them to prevent overbaking.
Step 5: Cool and Cut Your Rainbow Shapes
Once baked, remove the cake from the oven and transfer the parchment paper with the cake layers to a wire cooling rack. Allow the cake to cool completely before proceeding. This is a very important step; attempting to cut warm cake will result in crumbling and an untidy finish. Once fully cooled, grab your chosen cookie cutter (a 2-3 inch round cutter works wonderfully for tiny cakes). Gently press the cookie cutter into each colored layer to mold out your cake slices. You’ll get several cuts from each color. Carefully remove the cutouts and set them aside. Don’t discard the cake scraps – these are gold for our cake pops!
Part 2: Assembling Your Tiny Rainbow Cake
Now that you have your beautifully colored cake slices, it’s time to assemble your individual tiny rainbow cakes. Take one cut-out cake piece, spread a thin layer of vanilla frosting on top, then place another different colored cake piece on top. Repeat this process, stacking your rainbow layers in the desired order (e.g., red, orange, yellow, green, blue, purple) with a thin layer of frosting between each. The frosting acts as both an adhesive and a delicious complement to the cake. Once all layers are stacked, you can apply a thin “crumb coat” of frosting around the sides if you wish for a neater finish, or leave them exposed for a rustic look that highlights the colors.
Part 3: Crafting Delightful Cake Pops
No rainbow treat would be complete without some charming cake pops! This is where those cake scraps come into play, ensuring absolutely no deliciousness goes to waste.
Step 1: Create the Cake Pop Dough
Gather all your leftover cake scraps from cutting out the layers. In a medium bowl, crumble the cake finely with your hands until it resembles coarse breadcrumbs. Add about half of your vanilla frosting to the crumbled cake. If you’re using cream cheese, add the softened 1 tbsp cream cheese here as well. Mix thoroughly with your hands until a thick, uniform dough forms. It should be moist enough to hold its shape when rolled, but not overly sticky. Adjust the amount of frosting as needed – add a little more if it’s too dry, or a few more cake crumbs if it’s too wet.
Step 2: Roll and Chill
Roll the cake dough into small, uniform balls, about 1 to 1.5 inches in diameter. Place these cake balls on a parchment-lined baking sheet and refrigerate them for at least 30 minutes. Chilling is essential as it helps the cake balls firm up, making them easier to handle and preventing them from falling apart during the dipping process.
Step 3: Prepare for Dipping
While your cake pops are chilling, prepare your white chocolate candy melts. Melt the candy melts according to package directions, typically in a microwave-safe bowl in 30-second intervals, stirring in between, until smooth and fluid. You want it to be a good dipping consistency – not too thick, not too thin.
Step 4: Dip and Decorate
Once the cake balls are thoroughly chilled, take a lollipop stick and dip its tip into the melted chocolate (about half an inch). Immediately insert the chocolate-dipped stick into the center of a cake ball. The melted chocolate acts as a “glue” to secure the stick. Repeat for all cake balls. Now, one by one, dip each cake pop into the melted white chocolate, rotating gently to ensure a full, even coating. Tap off any excess chocolate by gently tapping the stick against the side of the bowl. Before the chocolate sets, you can sprinkle with rainbow sprinkles or other edible decorations for an extra festive touch. Place the decorated cake pops upright in a Styrofoam block or a tall glass to allow the chocolate to set completely. This usually takes about 15-30 minutes at room temperature, or faster if refrigerated.
Tips for a Perfect Rainbow Dessert Every Time
- Quality Food Coloring Matters: For the most vivid colors, invest in gel food colorings instead of liquid ones. They are more concentrated and won’t thin out your batter as much.
- Don’t Overmix: Overmixing cake batter can lead to a tough, dry cake. Mix just until ingredients are combined.
- Cool Completely: Patience is key! Ensure your cake layers are completely cooled before cutting and assembling, and your cake pops are well-chilled before dipping. This prevents crumbling and ensures a smooth finish.
- Even Layers for Baking: When pouring the colored batters onto the baking sheet, try to make them as even as possible for uniform baking and easier cutting.
- Working with Melted Chocolate: If your candy melts become too thick, you can add a small amount of shortening or a special candy melt thinning agent to achieve a smoother consistency. Work quickly when dipping, as the chocolate sets fast.
- Storage: Store your assembled rainbow cake and cake pops in an airtight container at room temperature for up to 2-3 days, or in the refrigerator for up to a week.
Creative Variations and Serving Ideas
While the classic tiny rainbow cake and cake pops are delightful on their own, don’t hesitate to personalize your creations. Here are some ideas to inspire you:
- Different Shapes: Instead of round cookie cutters, try star, heart, or even mini animal shapes for a whimsical touch.
- Frosting Flavors: Experiment with different frosting flavors for your cake layers and cake pops. Lemon, cream cheese, or even strawberry frosting can add another layer of deliciousness.
- Decorations Galore: Beyond rainbow sprinkles, consider edible glitter, sanding sugars, mini chocolate chips, or even small fondant cutouts to adorn your cake pops and the top of your mini cake.
- Larger Cake Option: If you’re hosting a bigger gathering and prefer a traditional round cake, you can bake each colored batter in separate 6-inch round cake pans (you might need to adjust baking time and batter quantities). Then, stack and frost as usual.
- From Scratch: For experienced bakers, you can certainly adapt this concept using your favorite white cake recipe from scratch. Just ensure the batter is suitable for coloring and thin spreading.
- Party Favors: Individually wrap your finished cake pops in small cellophane bags tied with a ribbon for charming party favors.
- Dessert Platter: Arrange a beautiful platter with a mix of your tiny rainbow cakes and cake pops for an eye-catching dessert spread.
Unleash Your Inner Baker: A Colorful Celebration Awaits!
As you can see, creating stunning rainbow cakes and delightful cake pops doesn’t have to be an intimidating or time-consuming endeavor. With this semi-homemade approach, you can easily transform a simple cake mix into a vibrant spectacle that is sure to impress. We’ve walked through each step, from preparing your colorful batters and baking the individual layers, to assembling your charming tiny cakes and crafting those irresistible cake pops from any leftover scraps. The result is a dessert that not only tastes wonderful but also brings a burst of joy and color to any table.
The beauty of this recipe lies in its adaptability and the sheer fun it brings to the baking process. It’s perfect for involving kids, celebrating special milestones, adding a festive touch to holidays like Pride Month, or simply brightening an ordinary day. So, gather your ingredients, put on your apron, and get ready to unleash your creativity. You’ll be amazed at the professional-looking, delicious results you can achieve with just a few simple steps. We hope this guide has inspired you to dive into the world of colorful baking. Happy baking, and enjoy the delicious smiles these rainbow treats are sure to bring!