
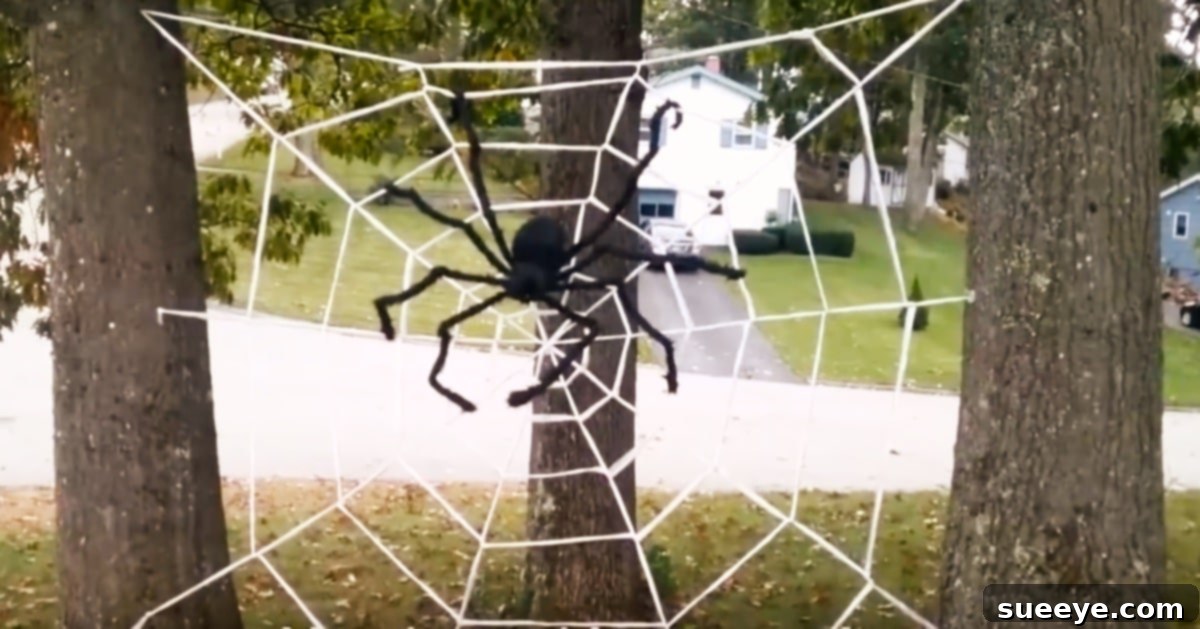
The crisp autumn air signals the arrival of Halloween, a season brimming with spooky excitement and creative decorating possibilities. Yet, for many of us, life’s demands often push holiday preparations to the very last minute. Have you ever found yourself in that familiar predicament? One moment you’ve decided to skip the elaborate outdoor decorations, only to glance around on the eve of the holiday and discover your entire neighborhood has transformed into a spectacular display of festive frights. Suddenly, a familiar tingle sparks within you, a silent command: “Do Something! Anything, and do it fast!” That feeling of wanting to join the fun, to avoid being the “stick in the mud” while everyone else revels in the holiday spirit, is incredibly relatable. We’ve all been there at some point, staring at an undecorated yard, wishing for a magical, instant transformation. For those moments, you need a killer, last-minute Halloween DIY project that delivers maximum impact with minimal effort. Look no further than this incredibly simple, yet breathtaking, Giant Saran Wrap Spider Web. It’s a brilliant solution that requires just a few basic materials: some nails, a large roll of Saran Wrap (the bigger the better, perhaps from a wholesale club like Costco), and a couple of sturdy anchor points like trees or poles to attach it to.
DIY Giant Saran Wrap Spider Web: Transform Your Yard Instantly!
My own journey to discovering this ingenious decoration began with a classic case of the “Halloween Bah Humbugs.” This year, the prospect of decorating felt overwhelming. Our kitchen was undergoing a massive renovation, and that single project had thrown the entire house into a state of delightful disarray. Between dust, contractors, and endless decisions, my festive spirit had dwindled to a tiny flicker. I candidly informed my kids and grandkids that they shouldn’t expect any grand decorating efforts for the tired old Hallows’ Eve. Their disappointment was palpable, and I could practically hear their thoughts: “Grandma has turned into a big fuddy-duddy, completely over the hill and no fun anymore.” At the time, I genuinely didn’t care; the kitchen consumed my every thought.
However, fate, or perhaps the spirit of Halloween, had other plans. As I swept the front porch the day before Halloween, a cool, invigorating autumn breeze caressed my face. I paused, taking in the vibrant colors of the season, and my gaze drifted across the street. Suddenly, I noticed it: all the neighbor’s houses were festively adorned, glowing with pumpkins, ghosts, and enchanting lights. A wave of nostalgia washed over me. I mentally journeyed back to the good old days when my own children were young. We’d dedicate weeks to planning our elaborate costumes, crafting each one by hand, and meticulously decorating our entire yard, transforming it into a wonderland of spooky delights, ready to welcome trick-or-treaters and share treats with all our neighbors. That moment of reflection was a powerful one. I realized then and there that I was indeed being a fuddy-duddy, and I simply couldn’t continue down that path. The joy of Halloween, the anticipation in my grandchildren’s eyes, was far too precious to let a renovation steal it away.
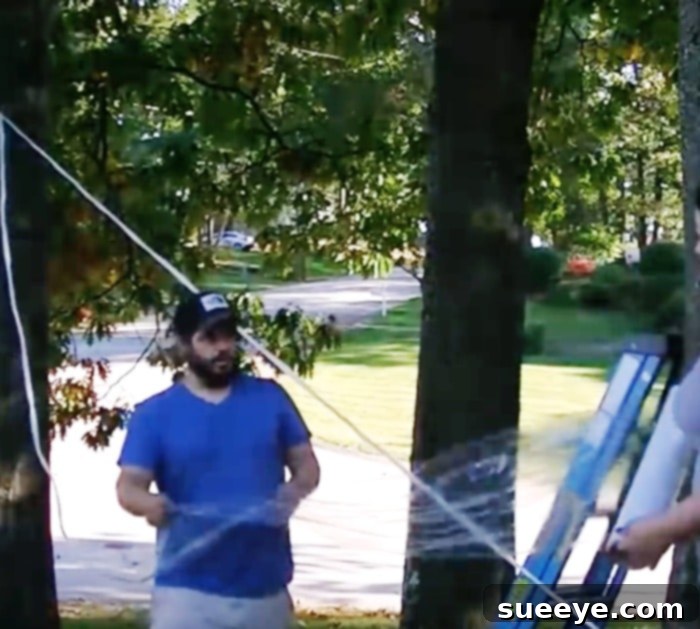
Fueled by a newfound determination, I frantically turned to YouTube, desperately hoping to find the impossible: an easy, highly original, yet impactful DIY statement lawn decoration that could be executed in mere hours. To my utter delight, I found precisely what I was looking for: the DIY Giant Spider Web With Saran Wrap! It was perfect. Even better, I already had all the necessary materials on hand. Without a moment’s hesitation, I roped in my husband, Hubs. We grabbed the ladder and headed out to the front yard, a renewed sense of purpose guiding our steps. In what felt like no time at all, the Saran Wrap web installation was complete. It looked absolutely grand! To truly bring our creation to life, we sourced a giant spider from Michael’s Craft Store and carefully positioned it right in the middle of our colossal web. Hubs, ever competitive, wasn’t about to let us be outdone by anyone else. He strategically placed three powerful floodlights, directing their beams squarely onto the magnificent web, making it shimmer and glow in the encroaching twilight. The transformation was astounding.
With our masterpiece complete, I eagerly called the kids and grandkids, inviting them to come over and witness our Halloween magic. Their excitement was palpable as they turned onto our street. They exclaimed that they could see the web glistening from a block away, a beacon of spooky delight. The sheer joy on their faces, the gasps of awe, and their enthusiastic compliments made every ounce of effort worthwhile. That last-minute decision transformed our yard and reignited the holiday spirit in our home, proving that sometimes, the simplest ideas can yield the most spectacular results.
Why Choose the Saran Wrap Spider Web for Your Halloween Display?
The appeal of the Saran Wrap spider web lies in its incredible blend of simplicity, visual impact, and affordability. Unlike intricate, store-bought decorations that can cost a fortune and take hours to assemble, this DIY project offers a powerful aesthetic statement without breaking the bank or requiring specialized skills. It’s a fantastic solution for those who want to create a truly memorable outdoor display on a tight budget or with limited time. Saran Wrap, an everyday household item, becomes an artistic medium, transforming into shimmering, ghostly strands that catch the light and create an eerie, ethereal effect. Its transparent nature allows it to blend seamlessly into the night, making the web appear almost supernatural. Furthermore, the sheer scale you can achieve with this method is unrivaled by most other DIY options. You’re not limited to small, flimsy webs; you can literally span your entire front yard, creating an immersive, dramatic focal point that will undoubtedly capture the imagination of all who pass by.
Essential Materials for Your Spooky Creation
One of the many beauties of this DIY project is its minimal material requirement. You likely have most of what you need already! Here’s a breakdown of the essentials:
1. Large Roll of Saran Wrap (Plastic Food Wrap): This is the star of our show. Opt for the largest, widest roll you can find. Industrial-sized rolls from wholesale clubs like Costco or Sam’s Club are perfect, as they offer more material and a wider sheet, making the weaving process quicker and more efficient. The wider the wrap, the more substantial and visible your web strands will be.
2. Nails, Hooks, or Rope: These will serve as your anchor points. Nails or small screw-in hooks are ideal for attaching to trees, fences, or porch columns. If you’re hesitant to put holes in your property, consider using strong rope or twine looped around sturdy structures to create the initial framework.
3. Sturdy Anchor Points: Two or more robust anchor points are crucial for giving your web its shape and tension. Trees are perfect, as are porch columns, sturdy fence posts, or even tall garden stakes firmly driven into the ground. Ensure whatever you choose can withstand the tension of the stretched wrap and potential wind.
4. Ladder (Optional but Recommended): For reaching higher anchor points and ensuring your web spans a good vertical distance, a sturdy ladder is invaluable. Safety first!
5. Giant Spider (Highly Recommended): While the web itself is impressive, adding a large, faux spider (available at craft stores or online) instantly elevates the entire display. Positioning it centrally creates a classic, spooky tableau.
6. Floodlights or Spotlights (Optional but Transformative): As my husband Hubs discovered, strategic lighting can take your Saran Wrap web from impressive to absolutely breathtaking. Directing floodlights onto the web at night makes the transparent strands glisten and glow, creating an almost magical, otherworldly effect. Colored lights, especially green or purple, can further enhance the eerie ambiance.
Step-by-Step Guide: How to Construct Your Impressive Spider Web
Creating this giant Saran Wrap spider web is surprisingly straightforward. Follow these steps for a spectacular result:
1. Plan Your Layout: Before you unroll any wrap, envision where your web will go. Identify your main anchor points (e.g., two prominent trees, or a tree and a porch column). Consider the natural landscape and how the web can organically stretch across your yard. A triangular or fan shape often works best.
2. Establish the Radial Spokes (the “Spokes” of the Wheel): Start by securing one end of your Saran Wrap to your first anchor point using a nail, hook, or by tying it off with rope. Unroll a length of wrap and stretch it tightly to your second anchor point, securing it there. This forms your first main “spoke.” Return to your first anchor point, secure another length, and stretch it to a *third* anchor point, or a different spot on your second anchor point, creating a new spoke. Continue this process, radiating multiple strands outwards from your central anchor point, much like spokes on a bicycle wheel. Aim for at least 5-7 spokes for a full, robust web. The key is to keep each strand as taut as possible.
3. Weave the Concentric Rings (the “Circles” of the Web): Once your radial spokes are in place, it’s time to build the iconic circular patterns of the web. Begin from the center or near one of your main anchor points. Take a new length of Saran Wrap and start wrapping it horizontally, circling around your radial spokes. As you encounter each spoke, gently press the Saran Wrap onto it to create a slight adherence. Continue spiraling outwards, creating rings that are roughly 1-2 feet apart. Don’t worry about perfection; the organic, slightly irregular nature adds to the realism. Each time you complete a full circle, you can either break off the wrap and start a new ring, or continue spiraling outwards, creating a continuous strand. The goal is to build up layers of wrap, making the web more visible and sturdy. The more layers you add, the more opaque and impactful your web will become.
4. Secure and Tighten: As you work, periodically check the tension of your web. If any sections are sagging, gently pull and re-secure them. Ensure all ends of the Saran Wrap are firmly attached to your anchor points. You can wrap the ends several times around a nail or branch for extra security.
5. Add Finishing Touches: Once the structure of your web is complete, stand back and assess. You might want to add a few extra, shorter strands in certain areas to fill gaps or enhance the “sticky” appearance. This is also the perfect time to introduce your giant spider, placing it menacingly in the center or along a prominent strand.
Tips and Tricks for a Truly Spectacular Saran Wrap Web
To ensure your Saran Wrap spider web is a showstopper, keep these expert tips in mind:
Optimal Placement: Choose a location that offers natural anchor points and good visibility from the street. An area with some open space allows the web to stretch widely and dramatically. Consider how natural light, and later artificial light, will hit the web.
Achieve Maximum Tension: The success of this project hinges on tautness. Stretch the Saran Wrap as tightly as possible between anchor points. This prevents sagging and gives the web a more defined, impressive structure. Work with a partner to pull from opposite ends for best results.
Layering is Key: Don’t be shy with the Saran Wrap. The more layers you apply, especially for the concentric rings, the more visible and robust your web will be. Thicker strands catch light better and create a more imposing presence.
Embrace Imperfection: Real spider webs aren’t perfectly geometric. Allow for slight irregularities in your rings and spokes. These natural variations can actually make your web look more authentic and organic.
Weather Considerations: Saran Wrap holds up surprisingly well against light rain and dew. However, strong winds can tear it. If a severe storm is predicted, you might consider temporarily removing or reinforcing parts of your web. For longer-lasting results, choose a somewhat sheltered location.
The Power of Lighting: This cannot be stressed enough. Floodlights positioned strategically to illuminate the web at night are a game-changer. They make the otherwise transparent strands glisten and shine, transforming it into a truly magical and spooky spectacle. Experiment with different light colors – a green or purple hue can add an extra layer of eerie atmosphere.
Safety First: When using ladders, always have a spotter and ensure the ladder is stable on level ground. If using nails or hooks, be mindful of tree bark or property damage. Opt for non-damaging alternatives if possible.
Elevating Your Halloween Yard: Beyond the Web
While the giant Saran Wrap spider web is a magnificent standalone decoration, pairing it with complementary elements can create an even more immersive and unforgettable Halloween experience. Think about layering textures and themes:
More Spiders: Don’t just stop at one giant spider. Scatter smaller, faux spiders throughout the web and around its base. A few cocoons made from white fabric or cotton batting with plastic spiders peeking out can add another layer of creepiness.
Fog Machines: Position a fog machine near the base of your web to create an eerie, low-lying mist that drifts through the strands, especially effective when combined with your floodlights.
Sound Effects: A hidden speaker playing subtle creaks, whispers, or the rustling sounds of unseen creatures can greatly enhance the spooky ambiance. Imagine the delightful fright as trick-or-treaters approach!
Additional Lighting: Beyond floodlights, consider stringing orange or purple LED lights along the perimeter of your yard or through nearby bushes. Projection lights that cast swirling ghosts or bats onto your house can perfectly complement the web’s theme.
Tombstones and Skeletons: A few strategically placed faux tombstones or skeletal figures around the base of the web can turn your yard into a full-blown haunted graveyard scene.
Cobwebs and Critters: Extend the cobweb theme with traditional stretchy cobwebs draped over bushes and smaller decor. Add plastic bats, rats, or snakes for extra creepy details.
The Impact: From “Bah Humbug” to Neighborhood Delight
My personal transformation from a Halloween “Bah Humbug” to a proud, festive decorator is a testament to the power of a simple, brilliant DIY idea. The initial hesitation, the stress of renovation, and the fading holiday spirit were all swept away by a single inspired project. Seeing the awe and pure excitement on my grandchildren’s faces, hearing their exclamations of delight as they spotted our shimmering web from a distance, was truly priceless. It wasn’t just about the decoration itself; it was about reclaiming the joy of the holiday, fostering community spirit, and creating cherished memories with loved ones.
This giant Saran Wrap spider web is more than just a last-minute fix; it’s a statement. It proves that you don’t need an extravagant budget or weeks of preparation to create something truly spectacular and memorable. It’s an invitation to embrace the playful, spooky essence of Halloween with minimal fuss and maximum impact. The satisfaction of a successful DIY project, especially one that brings so much joy to your family and neighbors, is unparalleled. It turns out, even when you feel completely “over the hill,” a little creativity and a lot of Saran Wrap can spin up a whole lot of fun!
FAQs About Your DIY Giant Saran Wrap Spider Web
Here are some common questions about creating and maintaining your impressive web:
Q: How durable is the Saran Wrap web in different weather conditions?
A: Saran Wrap is surprisingly resilient! It can withstand light rain, dew, and moderate wind. However, extremely strong gusts or heavy downpours might cause it to tear or sag. For best results, choose a somewhat sheltered location and reinforce connections. You might need to do minor repairs if weather is harsh.
Q: Is it difficult to remove after Halloween?
A: Not at all! Because it’s plastic wrap, it can be gathered and balled up relatively easily. Just unhook it from your anchor points and carefully pull it down. It should come off trees and poles without leaving residue.
Q: How much does it typically cost to make?
A: This is one of the most budget-friendly giant decorations you can create! The main cost will be the large roll of Saran Wrap, which can range from $10-$25 depending on size and brand. Nails/hooks are minimal, and if you already have trees, poles, or a ladder, your additional costs are very low. Adding a giant spider or lights would be extra but optional.
Q: Can I reuse the Saran Wrap for next year?
A: While theoretically possible, it’s generally not recommended to try and neatly re-roll used Saran Wrap, especially after it’s been stretched and exposed to the elements. It’s usually easier and more effective to start with a fresh roll each year for the best appearance and structural integrity.
Q: Will it damage my trees or property?
A: If you use small nails or screw-in hooks, they might leave minor marks on trees or wood. To minimize damage, you can tie off the Saran Wrap directly to branches or use robust rope/twine as initial anchor points, then attach the wrap to the rope. Always consider the health of your trees.
So, this Halloween, if you find yourself feeling the “Bah Humbugs” or facing a last-minute decorating dilemma, remember the incredible power of a simple roll of Saran Wrap. It’s an easy, cost-effective, and fantastically impactful way to embrace the spooky season, delight your family, and become the envy of your neighborhood. Don’t let time constraints dim your holiday spirit. Grab that Saran Wrap, unleash your creativity, and spin a web of Halloween magic that will shine bright all season long!