
Mastering Modern String Art: A Beginner’s Guide to Stunning Wall Decor
Engaging in arts and crafts offers a profoundly rewarding experience, transforming simple materials into cherished works of art. Beyond the tangible results, these hobbies provide a therapeutic escape, a serene journey of creativity that can alleviate stress and foster a deep sense of accomplishment. Imagine the pride in displaying a unique piece, knowing it was brought to life from scratch by your own hands. The benefits extend beyond personal satisfaction; handcrafted items make incredibly thoughtful gifts, imbued with personal meaning, or can even become the foundation for a thriving small business. Truly, the world of crafting is a source of endless discovery and fulfillment.
If you’re searching for an art project that is both incredibly accessible for beginners and results in a captivating, contemporary wall decoration, look no further. String art has surged in popularity, enchanting crafters with its engaging process and the stunning visual impact it delivers. This simple yet elegant craft allows you to express your unique style, creating pieces that are perfectly tailored to your aesthetic. This comprehensive guide will walk you through the creation of a beautiful string wall art project, inspired by the excellent tutorial shared by Canvas on YouTube. Prepare to unleash your inner artist, select designs that speak to you, and create perfect additions that will elevate any room in your home.
The Enduring Appeal of String Art: More Than Just a Craft
String art, with its fascinating blend of geometry and artistry, offers far more than just a decorative outcome. It’s a fantastic activity for developing fine motor skills, enhancing hand-eye coordination, and fostering patience. The repetitive action of wrapping string around nails can be incredibly meditative, providing a calming and focused experience that helps reduce daily stress and anxiety. Moreover, it encourages creative problem-solving as you plan your design, experiment with stringing patterns, and make artistic decisions. The beauty of string art lies in its immense versatility; from crisp geometric shapes and abstract designs to intricate silhouettes and even personalized text, the creative possibilities are truly boundless. It’s also a relatively inexpensive hobby to begin, requiring only a handful of readily available materials, making it accessible to almost anyone. The finished artwork is always a unique conversation starter, a testament to your personal creativity that instantly adds character and charm to your home decor.
Essential Materials: Building Your String Art Toolkit
Before you embark on your string art journey, ensuring you have all the necessary materials is paramount. A well-prepared workspace guarantees a seamless and enjoyable crafting experience. Here’s a detailed breakdown of what you’ll need, along with tips for selecting the best supplies:
- Wooden Block: This serves as the foundation for your string art. Opt for a piece of wood that is sturdy, smooth, and free from major defects like large knots or cracks. Common choices include pine, plywood, or MDF. Consider the desired size of your finished artwork; a larger block allows for more expansive and intricate designs, while smaller pieces are perfect for quick projects, gifts, or creating a series. Ensure the thickness is sufficient (typically 1/2 to 3/4 inch) to securely hold nails without them piercing through the back.
- Roller: A small foam roller is highly recommended for applying an even and smooth coat of paint to your wooden block. This technique helps to avoid visible brush strokes, resulting in a professional and consistent finish. While a regular paintbrush can also work, a roller provides superior coverage for larger, flat surfaces.
- Black Paint: Or any acrylic or chalk paint in your preferred color. Black often provides a dramatic and elegant contrast, making lighter strings truly pop and giving your design depth. When choosing a color, consider the existing decor of the room where the art will be displayed. Dark blues, deep grays, rich greens, or even vibrant reds can create stunning backdrops, allowing for endless customization.
- Hammer: A standard household hammer is essential for driving the nails. Select one that feels comfortable and balanced in your hand, with a good grip to ensure precision and prevent slippage.
- Tape: Painter’s tape or masking tape is incredibly useful for several steps. It can be used to create sharp, clean lines if you’re painting multiple colors or patterns, and it’s also invaluable for temporarily securing your design template to the wooden block before you begin hammering.
- Pencil: A standard graphite pencil, preferably with a fine tip, is perfect for lightly sketching your design onto the wood. Ensure it’s sharp enough to create clear, visible lines that you can easily follow when placing your nails. These lines will eventually be hidden by the string and nails, so they don’t need to be permanent.
- Pliers: Needle-nose pliers or small craft pliers are an indispensable tool for safely gripping and positioning the small nails. They protect your fingers, offer enhanced control for accurate placement, and are crucial for straightening any bent nails or removing misplaced ones.
- String: This is the heart of your artwork! Embroidery floss, crochet thread, or thin yarn are excellent choices. Consider the thickness and texture; thinner strings create delicate, intricate patterns, while thicker strings offer a bolder, more substantial look. A vast array of colors is available, so choose one that contrasts beautifully with your painted background and complements your design. Don’t hesitate to experiment with multiple colors within a single piece for a more dynamic and layered effect.
- White Spray Paint: This is an optional but highly effective material for adding artistic flair. A light dusting of white (or a contrasting color) spray paint on the corners or edges can create subtle gradients, a distressed effect, or a “halo” around your design, adding depth and visual interest. Always use spray paint in a well-ventilated area or outdoors, and protect surrounding surfaces.
- Ruler: A sturdy ruler or straight edge is vital for marking precise lines and measurements, particularly if your chosen design incorporates geometric shapes, requires accurate borders, or involves symmetrical elements.
- Nails: Small, thin nails, often referred to as brads or escutcheon pins, are ideal for string art. They should be long enough (typically 1/2 to 1 inch) to securely penetrate the wood without poking through the other side. The nail head should be small enough to be discreet yet large enough to provide a secure anchor point for your string. Brass or silver nails often look very elegant.
Step-by-Step Directions: Crafting Your String Art Masterpiece
With all your materials meticulously gathered, you’re ready to embark on the exciting journey of transforming a simple wooden block into a captivating piece of string art. Follow these detailed instructions carefully to ensure a smooth and enjoyable crafting process:
Step 1: Workspace Preparation and Organization
Before diving into any creative project, take a moment to prepare your workspace. Ensure it’s clean, well-lit, and organized, with all your materials easily accessible. Lay down old newspapers, a plastic sheet, or a drop cloth to protect your work surface from paint spills or stray hammer marks. This initial setup prevents interruptions and allows you to focus solely on the art of creation.
Step 2: Priming Your Canvas – Painting the Wooden Block
Using your foam roller, apply a thin, even coat of your chosen paint (e.g., black) to one side of the wooden block. Roll smoothly and consistently to ensure full, streak-free coverage, paying particular attention to the edges. Allow the first coat to dry completely, which may take an hour or two depending on the paint type and humidity. For a deeper, more consistent color, apply a second thin coat once the first is dry. This base layer is crucial as it forms the backdrop for your string design, so a smooth, uniform finish is highly desirable. Once the base coat is thoroughly dry, you can add an optional artistic touch. Lightly spray the corners or edges of the wooden block with white spray paint. Hold the can a little further away (about 10-12 inches) for a softer, more subtle mist, creating a beautiful gradient or a subtly aged, distressed effect. This adds depth and visual interest. Ensure this layer also dries completely before proceeding.
Step 3: Defining Your Design – Marking and Sketching
Now it’s time to transfer your artistic vision onto the wooden panel. If you applied a spray paint effect to the corners, you might use your ruler and pencil to mark subtle diagonal lines across these areas. These lines can serve as initial guides for nail placement or simply contribute to the overall aesthetic. Next, carefully sketch your main design onto the wooden panel using a pencil. This could be anything from a simple geometric shape (like a heart, star, or diamond) to a more intricate animal silhouette, an abstract pattern, or even initials. For beginners or complex designs, consider printing a template, taping it to the wood, and marking the nail points directly through the paper. Choose a design that genuinely resonates with your personal style and will bring you joy to create and display. Keep your pencil lines clear but not too dark, as they will be mostly concealed by the nails and string.
Step 4: Setting the Foundation – Precision Nail Placement
This step requires precision and a steady hand. Using your pliers, securely grip a small nail. Carefully position the nail along your pencil marks and gently tap it into the wooden block with your hammer. The pliers are essential here for protecting your fingers and allowing for greater accuracy. Drive the nails straight down to a consistent depth – typically about halfway or two-thirds into the wood, ensuring they are firmly anchored but not poking through the back. The spacing of your nails is a key design element; closer nails will result in a denser, more intricate string pattern, while wider spacing creates a looser, more open design. Take your time with this step, ensuring each nail is precisely where you want it. If a nail bends, carefully remove it with the pliers and replace it with a new one. Accuracy now will pay off in the final aesthetic.
Step 5: The Art of Stringing – Weaving Your Pattern
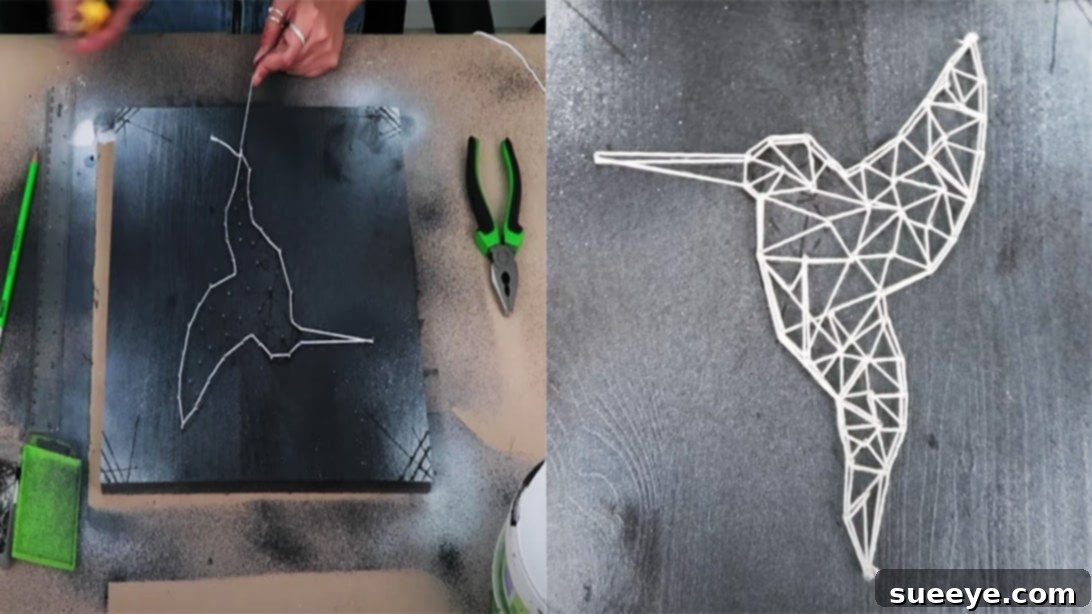
With all your nails securely in place, you’re ready for the most creative and meditative part of the process: stringing your design! To begin, tie a small, tight knot with the end of your chosen string around the base of one of your nails. This is your anchor point. From this starting nail, begin moving the string from nail to nail, wrapping it around each one as you go. There are countless stringing techniques: you can create a dense fill by randomly crisscrossing the string between all nails within the design, connect opposite nails to form geometric patterns, or carefully outline contours for a more defined look. Ensure the string is snug but not pulled so tightly that it dislodges the nails. Experiment with different paths, tensions, and layering. This is where your artistic vision truly comes alive. Don’t be afraid to try various patterns – a denser fill in some areas and a lighter touch in others can create fascinating textures and visual effects. The more you wrap, the more opaque and substantial your design will become. Let your intuition guide you, making each pass a deliberate stroke of color and texture.
Step 6: Finishing Touches – Securing and Admiring Your Creation
Once you are completely satisfied with your string pattern and feel that your design is fully realized, it’s time to secure your masterpiece. For added definition and stability, go around the entire outer perimeter of your design one last time, wrapping the string securely around the outermost nails. This final pass helps to “frame” your artwork and creates a clean, defined edge. When you reach your final nail, tie a very secure double knot (or even a triple knot) to prevent the string from unraveling over time. Carefully trim any excess string close to the knot using sharp scissors for a neat finish. Step back and take a moment to admire your handiwork! Viola! You have successfully created your very first, unique, and stunning piece of string art. It’s now ready to proudly adorn your home or be presented as a heartfelt, handmade gift to someone special.
Tips for Beginners and Expanding Your String Art Horizon
Embarking on a new craft can feel daunting, but string art is remarkably forgiving and incredibly enjoyable. Here are some essential tips to ensure your success and encourage further creative exploration:
- Start Simple: For your initial project, choose a basic, easily recognizable geometric shape such as a heart, a star, a simple letter, or a circle. This allows you to comfortably master the fundamental hammering and stringing techniques without becoming overwhelmed by intricate details.
- Utilize Templates: To ensure accuracy, especially for more complex or symmetrical designs, print out your chosen pattern. Securely tape it onto your wooden block and carefully hammer your nails directly through the paper along the design lines. Once all the nails are in place, gently tear away the paper, leaving your perfect nail outline.
- Experiment with Color Palettes: Don’t limit yourself to a single string color. Gradual color transitions, contrasting hues, or even ombre effects can add incredible depth, vibrancy, and a unique personality to your piece.
- Vary Stringing Patterns: Beyond simple crisscross patterns, explore different techniques. Try outlining the shape first, then filling the interior, or create concentric patterns by stringing between nails in layers. Each approach yields a distinct visual texture and effect.
- Embrace Patience: String art is a meditative process. Avoid rushing; instead, savor each step. If a nail bends or a string gets tangled, take a deep breath and calmly correct it. Imperfections often add to the handmade charm!
- Prioritize Safety: Always use pliers when hammering nails to protect your fingers from accidental strikes. If using spray paint, ensure you work in a well-ventilated area or outdoors to avoid inhaling fumes.
- Thoughtful Display: String art pieces look fantastic hung individually as a focal point, or you can create an eye-catching gallery wall by combining multiple pieces of varying sizes, shapes, and designs. Consider attaching a small picture hook or D-ring to the back of your wooden block for secure and easy hanging.
Beyond the Basics: Advanced String Art Concepts
Once you’ve confidently mastered the foundational techniques of string art, a vast world of creative possibilities opens up. Consider these ideas to challenge yourself and elevate your string art skills to the next level:
- Multi-Layered Designs: Create a sense of depth and dimension by using different string colors and even varying nail heights. You can string one pattern, then add another layer on top with different colors or stringing methods for a rich, multi-dimensional effect.
- Incorporate Mixed Media: Experiment by combining string art with other artistic elements. Integrate painting, decoupage, stenciling, or even small embellishments like beads, sequins, or metal charms into your design for truly unique and textured pieces.
- Large-Scale Projects: Don’t confine yourself to small wooden blocks. Consider creating impressive string art directly onto larger plywood boards for a dramatic statement piece, or even directly onto a wall for a temporary but stunning installation.
- Portraits and Detailed Imagery: With careful planning, a precise template, and a greater number of closely spaced nails, you can achieve surprisingly detailed portraits, intricate landscapes, or complex logos. This requires significant patience and attention to detail.
- Backlighting and Illumination: For an innovative and enchanting twist, consider incorporating LED strip lights behind your finished string art piece. The soft glow filtering through the intricate string patterns can create a mesmerizing effect, especially captivating in a dimly lit room.
String art is more than just a craft; it’s a dynamic avenue for self-expression, a calming form of mindfulness, and a rewarding path to creating beautiful, personalized decor that truly reflects your unique style. Whether you’re crafting a piece for your own home, a thoughtful gift for a loved one, or even exploring its potential as a small business venture, each creation will carry a piece of your dedication, creativity, and artistic spirit. So, gather your materials, let your imagination take flight, and thoroughly enjoy the wonderful journey of mastering modern string art. We encourage you to share your creations and inspire fellow crafters on their artistic journeys!