
Master the No-Mess Paint Pouring Hack: Achieve Flawless Results Every Time
Embarking on a painting project, whether it’s a full home renovation or a small craft update, often brings a mix of excitement and apprehension. While the vision of freshly painted walls or beautifully transformed furniture is inspiring, the reality of potential drips, spills, and messy cleanups can be daunting. I recently moved into a charming old house in Memphis, brimming with character but desperately needing an interior paint refresh. My previous painting attempts in my old house, though ultimately successful in appearance, were plagued by unfortunate pouring messes that turned into tenacious clean-up battles. Paint, once dried on a floor or surface, is notoriously difficult to remove without significant effort or damage.
This past experience fueled my search for a smarter, cleaner way to handle paint. That’s when I stumbled upon an absolute game-changer: the ingenious no-mess paint pouring hack by JBo Airbrush, showcased brilliantly on YouTube. This simple yet revolutionary method promised to eliminate the most frustrating aspect of painting – the unavoidable mess that comes with transferring paint from its can. My excitement was palpable; this time, my painting projects would be executed with precision and cleanliness I’d only dreamed of.
What makes this paint pouring hack truly exceptional is its incredible versatility. While it’s perfect for tackling large-scale projects like painting interior walls and ceilings, its utility extends far beyond. Imagine effortlessly pouring paint for intricate craft projects, smoothly transferring specialized finishes for furniture refinishing, or carefully preparing paints and stains for woodworking endeavors. Essentially, if your project involves pouring paint from a can, this hack is your ultimate ally, ensuring a clean process from start to finish. Say goodbye to sticky rims, unsightly drips down the side of the can, and the constant worry of accidental spills.
The Common Frustration: Why Traditional Paint Pouring Fails Us
Before diving into the elegant solution, let’s acknowledge the common pitfalls of traditional paint pouring. Anyone who has ever attempted to pour paint directly from a can knows the struggle. The thick, viscous liquid often defies gravity, clinging to the rim and inevitably running down the side of the can. This isn’t just an aesthetic issue; it leads to several problems that can hinder your painting efficiency and results:
- Messy Cans: Dried paint on the can’s exterior makes it difficult to re-seal properly, inviting rust and often causing old paint flakes to fall into fresh paint when opened later. This compromises the purity of your paint.
- Wasted Paint: Every drip down the side or spill onto your drop cloth is paint that isn’t making it onto your intended surface. Over time, this waste can add up significantly, impacting your budget and project timeline.
- Difficult Cleanup: Cleaning up spilled paint, especially once it starts to dry, can be a time-consuming and frustrating task, often requiring harsh chemicals or extensive scrubbing that risks damaging surfaces.
- Contaminated Paint: Bits of dried paint from the can’s rim can fall into the fresh paint, leading to an uneven finish or tiny imperfections in your work, which can be particularly frustrating on visible surfaces.
- Lack of Control: Pouring directly often results in a less controlled flow, making it harder to aim precisely into a roller tray or smaller container without overfilling or splashing, causing more mess.
These issues not only add stress to your painting process but can also diminish the quality of your final result. This is precisely why finding a reliable no-mess solution is not just a convenience, but a necessity for any serious DIY enthusiast or professional aiming for a flawless finish.
Essential Materials for the No-Mess Paint Pouring Hack
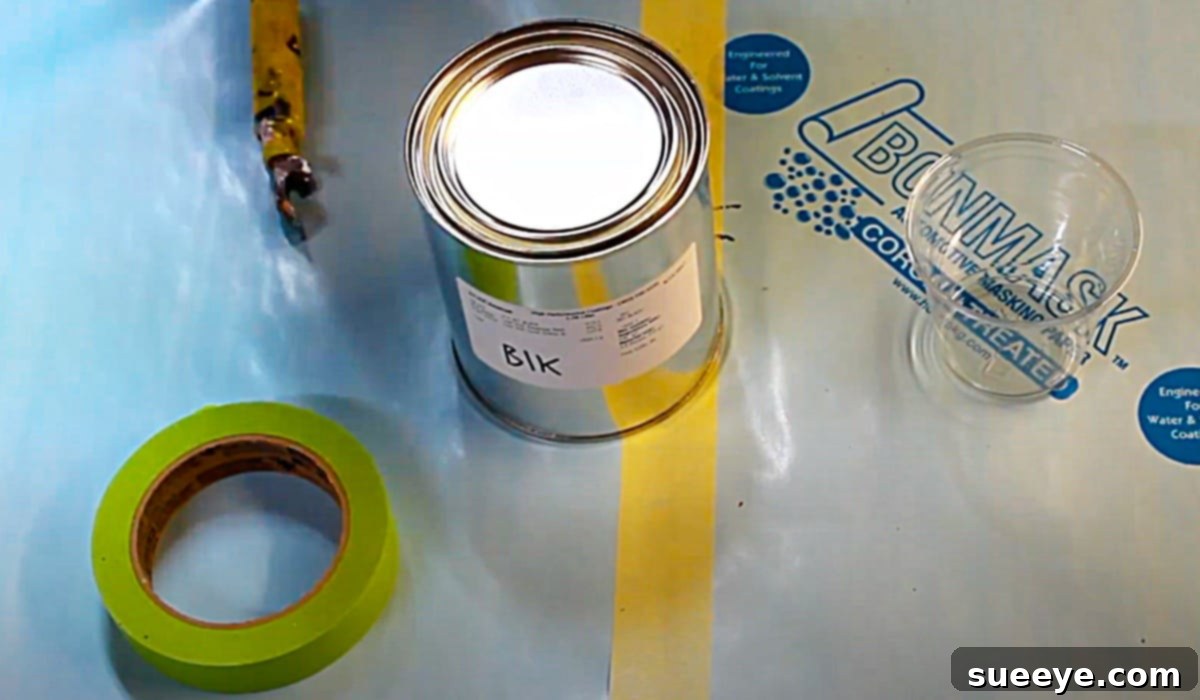
One of the beauties of JBo Airbrush’s ingenious hack is its simplicity, requiring only a few readily available items. You likely have most of these lying around your workshop or home, making it an incredibly accessible solution for any painting project:
- A Can of Paint: The primary component of your project! This method works effectively with various paint types, including latex, oil-based, primers, and even some stains and varnishes.
- Painter’s Tape (or Masking Tape): This is the key component that makes the magic happen. Opt for a good quality painter’s tape that adheres well but removes cleanly without leaving residue. Masking tape can also work in a pinch, but painter’s tape is generally preferred for its clean-release properties and sharper lines. A wider tape (e.g., 1.5 to 2 inches) is often easier to work with, providing a broader channel for the paint.
- Scissors: Essential for precisely cutting your painter’s tape to the desired lengths, ensuring a neat and effective application around the can’s rim.
- A Paint Can Opener: A standard tool for safely and easily prying open paint can lids without damaging the rim. A damaged rim can hinder proper resealing, so this tool is crucial for can longevity.
With these few, simple items in hand, you’re perfectly equipped to transform your painting experience from potentially messy to remarkably tidy, efficient, and enjoyable.
Step-by-Step Directions: Executing the No-Mess Paint Pouring Hack
The brilliance of this painting hack lies in its straightforward application. Follow these easy steps, inspired by the innovative method shared by JBo Airbrush on YouTube, to ensure a pristine pouring process and a consistently clean workspace:
Step 1: Preparing Your Paint Can with Tape
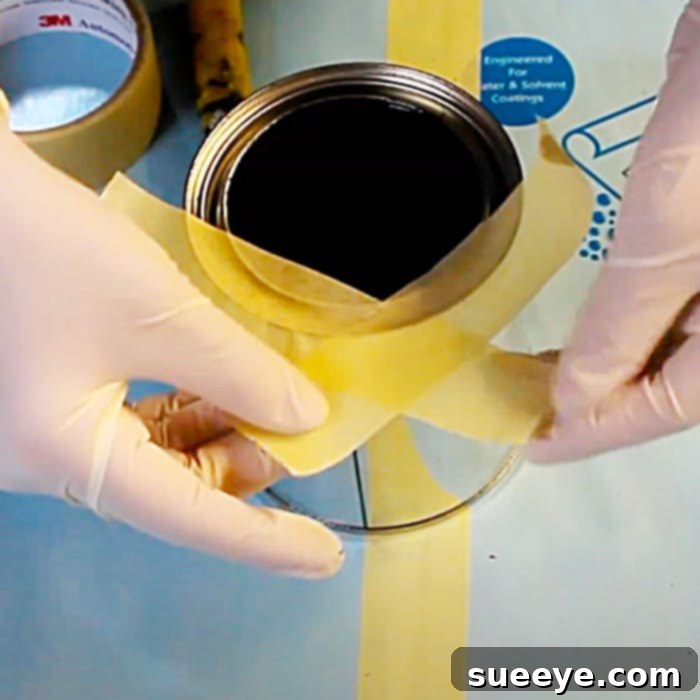
Begin by ensuring your paint can is clean around the rim, free from any old, dried paint or debris. Use your paint can opener to carefully pry open the lid. Once open, take your painter’s tape and apply it strategically around the rim of the can. The goal is to create a channel or spout for the paint to flow through, while simultaneously protecting the can’s metal rim. Start by affixing one end of the tape just inside the can’s rim, allowing it to extend out and over the rim, forming a “bridge” or a small trough. Continue to wrap the tape around the rim in this manner, ensuring a tight, secure seal. You want to create a slightly elevated barrier on one side and a clean, tape-lined spout on the other. The tape should cover the entire rim where paint might otherwise collect, extending slightly inwards and outwards to prevent any drips from escaping the designated channel. This setup effectively creates a temporary, disposable spout and a protective barrier for the can’s edge, safeguarding it from paint residue.
Step 2: The Controlled Pour
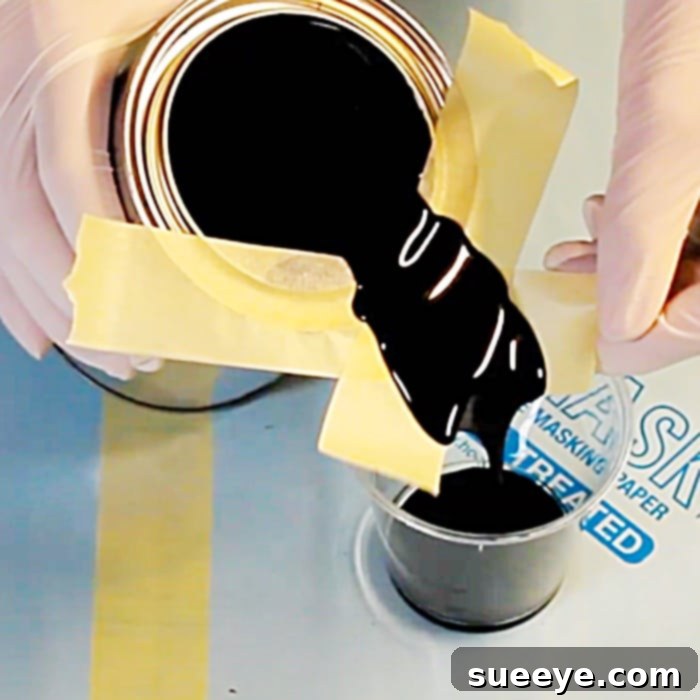
With your tape barrier and spout securely in place, you are now ready to pour the paint. Tilt the paint can gently, allowing the paint to flow slowly and steadily over the tape-lined spout and into your chosen container – be it a roller tray, a smaller paint pot, a craft cup, or a sprayer reservoir. The meticulously placed tape acts as a perfect conduit, guiding the paint precisely where you want it to go, without any of the frustrating drips or splashes that typically accompany direct pouring. This controlled flow gives you greater command over the volume of paint, minimizing waste and ensuring you fill your secondary container to the ideal level without overshooting or creating an unsightly mess around the edges.
Step 3: Effortless Cleanup and Can Preservation
Once you’ve finished pouring the desired amount of paint, simply set the can upright. The true magic of this hack becomes brilliantly evident during cleanup. Instead of scrubbing a paint-covered rim that has accumulated drips, you will just roll up the painter’s tape and dispose of it. All the paint that would have collected on the rim or dribbled down the side of the can is now neatly contained on the tape. This means the side of your paint can remains pristine and free from unsightly drips and dried paint, making it exceptionally easy to store and ensuring a clean seal when you put the lid back on. No more struggling to open a paint-caked lid, worrying about bits of old paint contaminating your fresh supply, or dealing with rust forming on the can’s rim due to trapped moisture.
The Unbeatable Benefits of Adopting This Revolutionary Hack
Implementing the JBo Airbrush no-mess paint pouring hack offers a cascade of advantages that will fundamentally change how you approach painting projects, making them more enjoyable and less stressful:
- Eliminates Mess and Drips: This is the most obvious and perhaps most cherished benefit. No more unsightly paint running down the side of the can, pooling at the bottom, or dripping onto your pristine drop cloths and potentially staining your floors.
- Reduces Paint Waste: By ensuring all the paint goes precisely where you intend it to, this hack significantly cuts down on wasted paint, saving you money and making your valuable supplies last longer.
- Saves Time on Cleanup: The clean removal of the tape means you spend less time scraping and scrubbing dried paint from your can and surrounding surfaces. More painting, less arduous cleaning!
- Preserves Your Paint Cans: A clean can rim facilitates a better, airtight seal when you replace the lid, preventing air from drying out your leftover paint. It also eliminates rust formation on the rim, which often occurs due to dried paint trapping moisture.
- Maintains Paint Quality: Without dried paint chunks falling into your fresh supply, your paint remains pure and free of debris, contributing to a smoother, more professional finish on your project.
- Enhances Control and Precision: The tape creates a defined, clean spout, allowing for a more controlled and accurate pour. This is particularly beneficial for smaller containers, intricate projects, or when mixing precise ratios.
- Boosts Confidence: Knowing you can manage paint without the associated mess frees you to focus on the creative aspects of your project, making painting a more enjoyable and less stressful experience for both novice and seasoned DIYers.
Beyond Walls: Versatile Applications for Every Project
While the initial appeal of this paint pouring hack might be for large home painting tasks, its true genius lies in its adaptability across a vast array of projects. Its clean efficiency makes it indispensable for various creative and practical applications:
- Home Interior and Exterior Painting: For walls, ceilings, trim, doors, and even exterior siding, this hack ensures a clean and precise transfer of paint from gallon or five-gallon buckets into roller trays or smaller containers. This minimizes spills in high-traffic areas.
- Furniture Refinishing and Upcycling: When working with delicate finishes like chalk paint, milk paint, or specialized furniture enamels, a controlled pour is crucial. This hack prevents valuable paint from being wasted and ensures a clean application to smaller detail brushes or spray gun reservoirs, protecting your restored pieces.
- Crafts and Art Projects: From pouring acrylics for canvas art to transferring glazes for pottery or specialty paints for model building, precision is paramount. This hack keeps your workspace clean, your delicate paints unadulterated, and your artistic vision unhindered by accidental spills.
- Woodworking Projects: Applying stains, varnishes, or sealants from larger cans into applicator trays or smaller pots can be incredibly messy due to their thinner consistency. The no-mess pouring hack makes these transfers smooth and efficient, protecting your meticulously crafted wood pieces from accidental drips and smudges.
- Automotive Painting Preparation: For DIY car enthusiasts mixing paints or transferring specialized primers and clear coats, maintaining cleanliness is critical for achieving a flawless, professional-grade finish without contamination.
Regardless of the scale or type of your painting endeavor, this simple painter’s tape trick elevates your process, transforming a potentially messy chore into a clean, precise, and enjoyable part of your creative journey.
General Tips for a Smooth and Professional Painting Experience
While the no-mess pouring hack tackles a major pain point, a successful painting project also relies on broader best practices. Consider these additional tips for a truly smooth and professional finish that stands the test of time:
- Proper Surface Preparation is Key: Always clean your surfaces thoroughly, removing dust, grime, and grease. For walls, patch any holes or cracks and sand rough areas until smooth. A clean, smooth, and dry surface is essential for optimal paint adhesion and a flawless, long-lasting look.
- Prime Where Necessary: Never skip priming, especially when painting over dark colors, new drywall, or surfaces with existing stains or glossy finishes. Primer helps with paint adhesion, provides an even base for your topcoat, and can significantly reduce the number of paint coats needed for full coverage.
- Use Quality Tools: Invest in good quality brushes, rollers, and roller covers. Quality tools hold more paint, provide better coverage, leave a smoother finish, and ultimately save you time and effort while producing superior results.
- Protect Your Workspace Thoroughly: While our hack minimizes pouring mess, general painting can still be messy. Use canvas drop cloths on floors and furniture, and apply high-quality painter’s tape to trim, baseboards, and ceilings for crisp, professional-looking lines.
- Ensure Adequate Ventilation: Always ensure good airflow in your painting area by opening windows and using fans. This helps paint dry faster, disperses potentially harmful fumes, and significantly improves safety and comfort during your project.
- Store Leftover Paint Properly: Once your project is complete and the can is clean (thanks to the hack!), seal the lid tightly. For added security, store cans upside down or with plastic wrap placed under the lid to create an airtight seal, preventing skin from forming and extending the life of your leftover paint for future touch-ups.
- Work in Manageable Sections: For larger areas like walls, work in manageable sections. This technique helps maintain a wet edge, preventing visible lap marks and ensuring a uniform, streak-free finish across the entire surface.
- Follow Manufacturer’s Instructions: Always read the instructions and recommendations on your paint can for specific drying times, recoat times, temperature, and humidity requirements. These guidelines are crucial for achieving the best results and durability.
Embrace the Clean Painting Revolution
The ingenuity of a simple solution like JBo Airbrush’s no-mess paint pouring hack truly stands out in the vast world of DIY and home improvement. It addresses a universally shared frustration with such elegance and ease that it feels revolutionary. By adopting this straightforward yet incredibly effective technique, you’re not just preventing a mess; you’re elevating your entire painting process to a new standard of efficiency and cleanliness. You’re saving precious time, conserving valuable resources, maintaining the pristine quality of your painting materials, and most importantly, significantly reducing the stress associated with what can often be a daunting task.
So, as you prepare for your next creative endeavor, be it transforming a room in your new home, revitalizing a cherished piece of furniture, or embarking on an intricate artistic project, remember and utilize this invaluable tip. Empower yourself with the knowledge and tools to paint smarter, cleaner, and with renewed confidence. Say goodbye to drips, spills, tedious cleanup routines, and the constant worry of paint damage. Instead, welcome a world where every paint pour is precise, efficient, and, finally, truly mess-free. Go forth and paint beautifully, achieving professional results with unprecedented ease!