
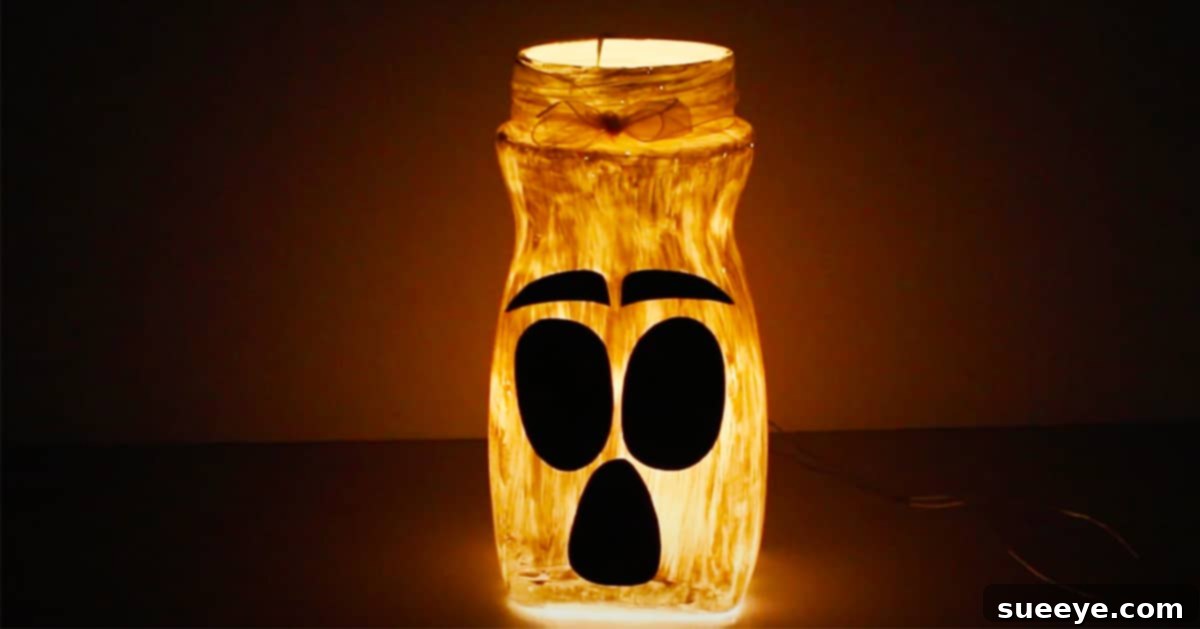
Illuminate Your Home: Easy DIY Mason Jar Lights for Festive Fall & Halloween Decor
As the leaves begin to change and a crispness fills the air, our thoughts naturally turn to the cozy comforts and festive decorations of autumn. With Halloween just around the corner, there’s no better time to infuse your living space with a warm, inviting glow that captures the spirit of the season. Crafting your own decorations is not only a delightful pastime but also a fantastic way to personalize your home without breaking the bank. There’s a unique satisfaction that comes from transforming simple materials into charming decor pieces, and this DIY mason jar light craft is no exception.
This incredibly simple project, inspired by creative tutorials, offers an accessible entry point into seasonal crafting. What makes it particularly appealing is its speed and ease – you can whip up one of these enchanting lights in under 10 minutes, making it perfect for last-minute decorating or for engaging in a fun, quick activity. The versatility is another major draw; these luminous jars can house anything from soft LED fairy lights to flickering flameless candles, creating an ambiance that is both magical and safe. Best of all, you don’t need to splurge on new mason jars. Any clean, clear glass jar you have lying around – be it an old coffee jar, pickle jar, or jam jar – can be repurposed, adding an eco-friendly touch to your crafting efforts. This tutorial guides you through each step, making it easy to follow along and create your own radiant fall and Halloween-themed lights.
Why Choose DIY Mason Jar Lights for Your Seasonal Decor?
The appeal of homemade decorations extends far beyond simple aesthetics. Opting for DIY projects like these mason jar lights brings a host of benefits that enhance both your home and your personal sense of accomplishment. They offer a unique blend of practicality, creativity, and sustainability that store-bought items often lack.
Budget-Friendly Brilliance
One of the most compelling reasons to embrace DIY decor is the significant cost savings. Seasonal decorations can quickly add up, especially when you’re looking to refresh your home’s look for each holiday. This craft utilizes items you likely already have or can acquire very cheaply. Old glass jars, a small amount of acrylic paint, some construction paper, and an inexpensive string of LED lights are typically all you need. This affordability allows you to create multiple pieces without financial strain, enabling you to spread festive cheer throughout several rooms or even as thoughtful handmade gifts.
Unleash Your Creativity
Unlike mass-produced decor, homemade items offer unparalleled opportunities for personalization. With these mason jar lights, your imagination is the only limit. While a spooky ghost is perfect for Halloween, you could easily adapt the design to falling leaves for general autumn charm, a whimsical spiderweb, or even a classic jack-o’-lantern silhouette. This project encourages you to experiment with different colors, themes, and motifs, ensuring that your decorations truly reflect your unique style and the specific mood you want to create for the season. The process itself can be a wonderfully therapeutic creative outlet.
Sustainable Crafting
In an age where environmental consciousness is increasingly important, repurposing materials is a fantastic way to contribute to a greener planet. Every clear glass jar saved from the recycling bin and transformed into a beautiful light fixture is a small step towards reducing waste. This craft highlights the potential for everyday items to gain new life and purpose, promoting a mindful approach to consumption and encouraging others to look at “trash” with a fresh, creative eye. It’s a simple yet impactful way to make your seasonal decorating more eco-friendly.
Quick & Rewarding Project
Not everyone has hours to dedicate to intricate crafting, and that’s perfectly fine. This mason jar light project is designed for efficiency without sacrificing impact. Its quick turnaround time means you can enjoy the immediate gratification of a finished product, making it ideal for busy individuals or families looking for a fun, accessible activity. The simplicity of the steps ensures a high success rate, resulting in beautiful, glowing decor that provides a significant boost of seasonal cheer and a sense of accomplishment.
Essential Supplies for Your Glowing Jar Craft
Gathering your materials is the first exciting step in any DIY project. For these luminous jars, the list is wonderfully short and sweet, comprising items that are either readily available around your home or easily purchased from any craft store. Ensuring you have everything at hand before you begin will make the crafting process smooth and enjoyable.
- Empty Jar or Mason Jar: The star of our show! Any clean, clear glass jar will work perfectly. Consider different sizes and shapes for varied effects.
- Acrylic Paint: Choose colors that align with your theme. White, orange, black, or even frosted clear paints are great for Halloween and fall. Non-toxic acrylics are recommended, especially if crafting with children.
- Paintbrush: A medium-sized brush for covering the jar, and a finer one if you plan on adding small details or outlines.
- Construction Paper: Or cardstock, felt, or even vinyl for creating your silhouettes. Black is traditional for spooky designs, but feel free to experiment with other colors.
- White Glue: Standard school glue or craft glue works well for attaching paper designs. Mod Podge is another excellent option as it acts as both an adhesive and a sealant.
- Ribbon: Optional, but adds a lovely decorative touch around the rim or neck of the jar. Burlap, satin, grosgrain, or even simple twine can elevate the look.
- Mini LED Lights or Flameless Candle: Crucial for the “light” aspect. Battery-operated fairy lights (string lights) or small LED tea lights are ideal for safety and ease of use. Ensure they fit comfortably inside your chosen jar.
Step-by-Step Guide to Crafting Your Festive Mason Jar Lights
With your supplies laid out, it’s time to dive into the creative process. This project is designed to be straightforward, allowing even novice crafters to achieve beautiful results. Follow these simple steps to bring your glowing jar visions to life.
Step 1: Preparing Your Canvas – The Jar Painting Process
The first step sets the foundation for your design. Begin by ensuring your chosen glass jar is sparkling clean and completely dry. Any grease, dust, or moisture can prevent the paint from adhering properly. Once clean, it’s time to apply your acrylic paint. For a classic ghost effect, white paint is perfect. For a general fall ambiance, consider soft oranges, yellows, or even a translucent frosted finish. Apply a thin, even coat of acrylic paint to the exterior of the jar using your paintbrush. You might find that two or three thin coats yield a more opaque and professional finish than one thick coat.
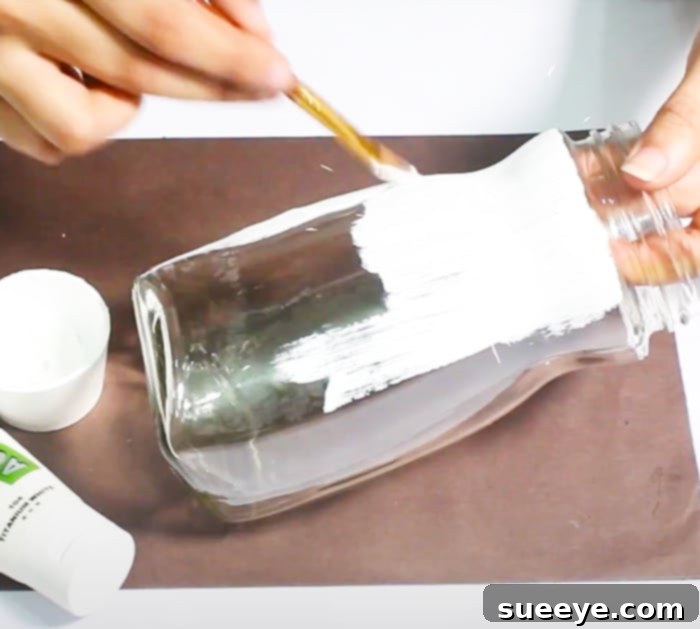
Allow each coat to dry completely before applying the next. This is crucial for a smooth, non-streaky finish. Depending on the paint and humidity, drying can take anywhere from 15 minutes to an hour per coat. Patience here will pay off. If you’re going for a more rustic or distressed look, you can gently scuff the dried paint with fine-grit sandpaper after it’s fully cured.
Step 2: Designing Your Seasonal Silhouette
Once your painted jar is bone dry, it’s time to add your chosen design. This is where your jar truly transforms into a themed decoration. Using construction paper or cardstock, sketch out your desired silhouette. For Halloween, popular choices include friendly ghosts, spooky bats, intricate spiderwebs, or grinning jack-o’-lantern faces. For a general fall theme, consider maple leaves, acorns, or stylized trees. Precision isn’t overly critical, as the handmade charm is part of the appeal. Carefully cut out your design using scissors or a craft knife (adult supervision for craft knives is essential).
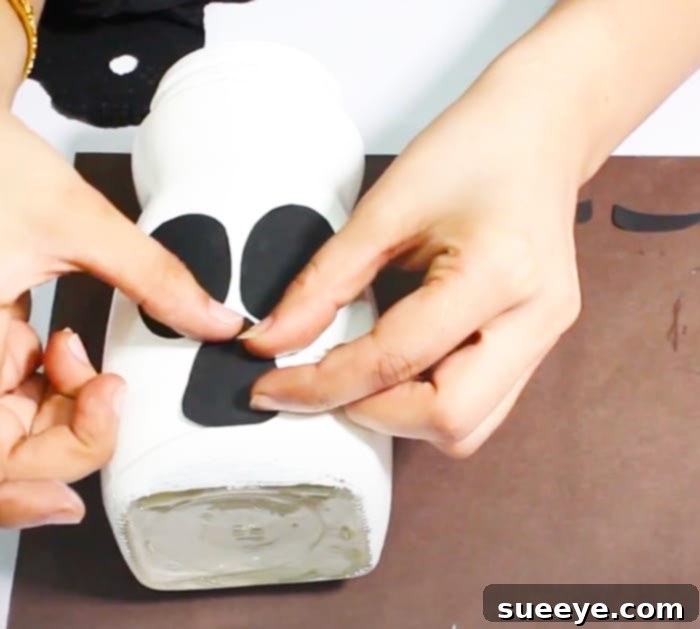
Apply a thin, even layer of white glue to the back of your cut-out design. Carefully position the design onto the painted surface of your jar. Press firmly but gently to ensure good adhesion, smoothing out any air bubbles or wrinkles. If you’re using Mod Podge, you can apply a thin coat to the jar first, press your paper design on, and then apply another thin coat over the design to seal it and provide a uniform finish. Allow the glue to dry completely before moving on. This step is where your ghost takes shape, or your pumpkin grins, adding character and visual interest to your illuminated craft.
Step 3: Adding the Finishing Touches – Ribbon & Lights
With your design securely in place, it’s time to finalize your mason jar light. This often involves adding a decorative ribbon and, of course, the light source itself. Choose a ribbon that complements your design and color scheme. For fall, burlap or jute twine can add a lovely rustic touch, while satin ribbons in autumn hues (like deep red, orange, or gold) can offer a more elegant feel. Wrap the ribbon around the neck or rim of the jar and secure it with a small knot or a dab of hot glue. You can even tie a small bow or attach a tiny embellishment like a faux leaf or miniature spider to enhance the theme.
Finally, carefully place your chosen light source inside the jar. If using string fairy lights, gently coil them and lower them into the jar, ensuring the battery pack remains accessible at the top or can be discreetly hidden behind the jar. For flameless LED tea lights, simply drop them into the bottom. These battery-operated options are highly recommended for safety, especially if the jars will be placed in areas accessible to children or pets, or near flammable materials. Once the lights are in, switch them on and watch your DIY creation come to life, casting a warm and inviting glow that perfectly captures the spirit of the season.
Creative Variations & Placement Ideas for Your Mason Jar Lights
The beauty of this mason jar light craft lies in its incredible adaptability. Once you’ve mastered the basic technique, you’ll find countless ways to customize and display your illuminated creations, making them suitable for various occasions and settings.
Beyond Halloween & Fall
While perfect for Halloween and autumn, these jars aren’t limited to one season. Imagine crafting jars with festive snowflakes, pine trees, or reindeer silhouettes for Christmas. In spring, delicate flower or butterfly designs could adorn them, bringing a touch of nature indoors. For summer, nautical themes like anchors or seashells, or even simple frosted blue jars, could evoke a beachy vibe. You can even create year-round decor by using abstract patterns, geometric shapes, or simply leaving the jar frosted or painted a solid, elegant color. The core technique remains the same, but the theme can be completely transformed with different paper cut-outs and paint colors.
Where to Display Your Illuminated Creations
These versatile lights can enhance almost any area of your home, both indoors and in covered outdoor spaces. Consider placing them as a stunning centerpiece on your dining table, creating an inviting focal point for family meals or gatherings. They look equally charming lined up along a mantelpiece, brightening a bookshelf, or adorning a window sill to welcome guests. In bedrooms or bathrooms, they can serve as gentle nightlights or add a touch of ambient glow for relaxation. For outdoor use, position them on a covered front porch, back patio, or deck to add a festive welcome. You could even hang them from sturdy tree branches (ensure the lights are weatherproofed if exposed to elements) to create a magical atmosphere for an evening party. They also make fantastic additions to special events like weddings, baby showers, or birthday parties, providing soft, personalized lighting.
Safety Considerations
While beautiful, it’s important to keep safety in mind, especially with lighting elements. Always prioritize battery-operated LED fairy lights or flameless candles. These options eliminate the risk of open flames, making them safe for homes with children, pets, or in areas where flammable materials might be present. If you opt for real candles, ensure they are secured in appropriate holders that fit snugly within the jar, and never leave them unattended. Always place real candles on a stable, heat-resistant surface, away from curtains or other combustible items. For outdoor placements, particularly if battery packs are exposed, ensure they are protected from moisture to prevent damage and potential hazards.
The Joy of Homemade Decor
Embarking on a DIY project like these mason jar lights is more than just a means to an end; it’s an experience that enriches your home and soul. The process of handcrafting something beautiful provides a unique sense of accomplishment and creative satisfaction that store-bought items simply cannot replicate. Each glowing jar becomes a testament to your personal touch, adding character and warmth that tells a story.
Beyond the personal reward, homemade decor fosters a deeper connection with your living space. When you invest time and creativity into decorating, your home transforms into a reflection of your personality and passions. It’s an invitation to infuse your surroundings with love, care, and a distinctive charm that makes every corner feel more inviting and uniquely yours. Don’t hesitate to explore other DIY crafts once you’ve successfully completed these jar lights; the world of handmade decor is vast and endlessly rewarding.
So, as the days grow shorter and the festive season draws near, take a moment to embrace your inner crafter. Gather your supplies, unleash your creativity, and watch as simple glass jars are transformed into captivating beacons of fall and Halloween spirit. These easy DIY mason jar lights are a perfect way to add that personal, glowing touch to your home, making it feel cozy, festive, and utterly enchanting. Happy crafting!