
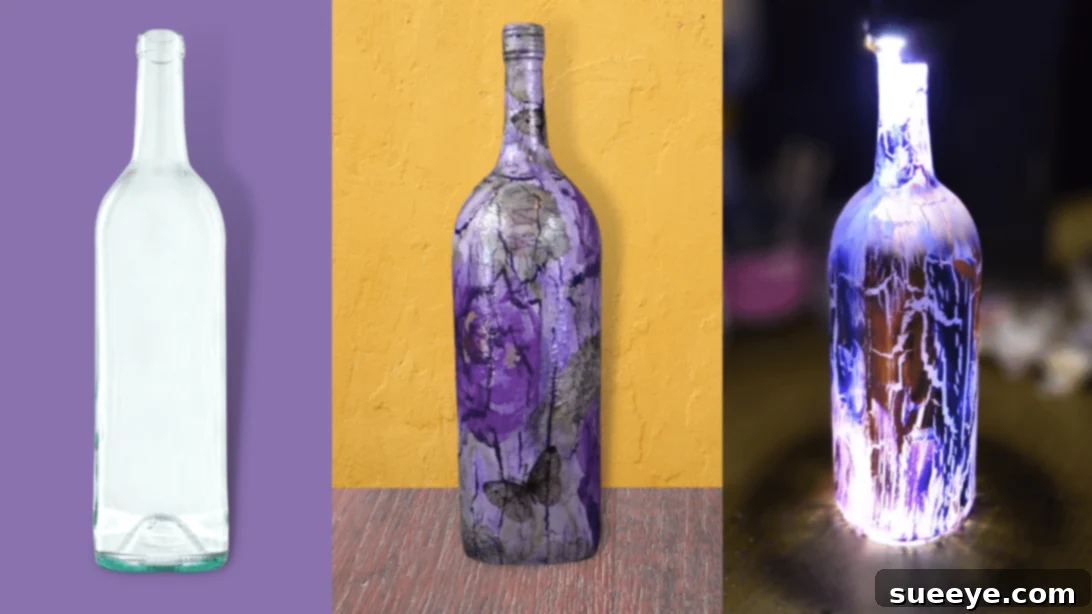
Do you have a collection of empty wine bottles gathering dust, waiting for their next life? Transform these humble glass vessels into breathtaking, one-of-a-kind home decor pieces with a touch of creativity and a few simple supplies! This engaging DIY craft project, inspired by the innovative ideas from DIYNoNeedToCry on YouTube, will guide you through creating stunning rustic or vintage-style decorations using the art of decoupage and a captivating crackle effect. Imagine turning what was once considered waste into charming accent pieces that perfectly complement your home’s aesthetic. Who would guess these elegant adornments began their journey as everyday wine bottles, intricately decorated with delicate paper napkins?
Upcycling empty jars and bottles is not just an eco-friendly practice; it’s also a fantastic way to unleash your artistic side and personalize your living space. This versatile project allows for endless customization. Experiment with a spectrum of acrylic paint colors – from soft pastels to vibrant hues – and a myriad of napkin designs to match any season, holiday, or room theme. The possibilities are truly boundless. Furthermore, if you choose to leave the bottom portion of your bottle clear, these beautifully crafted pieces can double as enchanting lamps, casting a warm, ambient glow to set a perfect mood in the evenings. Dive into this rewarding craft today and follow these detailed instructions to create your own bespoke wine bottle art!
Materials Needed for Your DIY Decoupage Project:
Gathering the right tools and materials is the first step towards a successful and enjoyable crafting experience. Most of these items are readily available at craft stores, ensuring you can start your creative journey without delay. Here’s what you’ll need to transform those empty wine bottles:
- One or more empty wine bottles (clean and labels removed)
- Acrylic paints (matte white for primer, plus a selection of colors like purple pansy, lilac mist, and clover fields for base and accent)
- Sealer polyacrylic spray (for protection and durability)
- Mod Podge (a versatile adhesive, sealer, and finish)
- Elmer’s glue or any standard white school glue (crucial for the crackle effect, specifically *not* Mod Podge for this step)
- Pouncer brushes or regular paint brushes (for paint application)
- Soft and stiff bristle paint brushes (specifically for achieving the crackle effect)
- Fan or hair dryer (essential for controlled drying and crackle formation)
- Paper napkins (with designs you wish to decoupage)
- Scissors (for precise cutting of napkin designs)
- Crumpled piece of plastic wrap (for smoothing napkins)
Step-by-Step Instructions for Wine Bottle Decoupage and Crackle Effect:
Step 1: Preparing Your Wine Bottle and Applying Base Coats
The foundation of any beautiful craft project lies in thorough preparation. Begin by ensuring your empty wine bottle is spotlessly clean and completely dry. Any residue or moisture can hinder paint adhesion and compromise the final finish. Once clean, it’s time to prime the bottle. Using a pouncer brush or a regular paintbrush, apply an even coat of matte white acrylic paint over the entire surface of the bottle. This white primer serves multiple purposes: it creates a uniform base, helps subsequent colors appear more vibrant, and provides an ideal surface for the crackle effect. Allow this coat to dry completely. To expedite the drying process, place the bottle in front of a fan. Once the white primer is dry, apply a second coat using a darker acrylic paint color. This dark base coat is pivotal, as it’s the color that will elegantly peek through the cracks, creating that distinctive aged look. Let this dark coat dry thoroughly as well. If your intention is to create a decorative lamp with a clear base, you may skip these initial two coats of paint entirely and proceed directly to Step 3, leaving the lower portion of the bottle unpainted to allow light to shine through.
Step 2: Crafting and Preparing Your Napkin Designs
While your dark base paint is drying, turn your attention to preparing the paper napkins that will bring life and character to your bottle. Carefully select and cut out all the designs you intend to use from your chosen napkins. For intricate or detailed patterns, precision scissors will be your best friend. However, for a more authentic rustic or organic aesthetic, consider a different approach for the less detailed parts: use a thin paintbrush dipped in water to “paint” around the edges of the design, then gently tear the wet paper. This method creates soft, feathery edges that blend seamlessly into the bottle’s surface, avoiding harsh, solid cut-out shapes that can look less natural. Once your designs are separated, gently wet your fingertips and delicately press the napkin between them to remove the multiple plies of paper. Most decorative napkins have two or three layers; you only need the top layer with the printed design. Removing the excess plies makes the napkin thinner, more flexible, and easier to adhere smoothly to the curved surface of the bottle, resulting in a more professional and integrated appearance.
Step 3: Mastering the Art of the Crackle Effect
Now for the exciting part: creating the captivating crackle effect that gives your wine bottle a truly vintage appeal. For this step, you’ll need both a soft and a stiff bristle brush, along with your white school glue (Elmer’s or similar). Working in manageable sections, swiftly apply a medium, even coat of white school glue to a portion of the bottle using your stiff brush. Speed is critical here; you want to ensure the glue remains wet and tacky before you apply the final layer of paint. Avoid applying too much glue, which can result in thick, gloopy cracks, or too little, which may prevent cracks from forming altogether. Aim for just the right amount to cover the surface evenly. Immediately after applying the glue to a section, switch to your soft brush, load it generously with your chosen top-coat acrylic paint (this could be a lighter color contrasting the dark base). Lightly brush the paint over the wet glue in one direction. Do not overwork the paint or brush back and forth, as this can disturb the glue layer and prevent proper cracking. Once the brush is no longer gliding smoothly, reload it with paint. The moment the paint is applied, immediately place the wine bottle in front of a fan or use a hair dryer on a cool setting. The rapid, forced drying is crucial for the crackle effect to occur; faster drying times typically yield more defined and abundant cracks. Air drying simply will not work for this technique. Continue this process, section by section, until the entire bottle is covered in the desired crackle pattern, ensuring each section is dried rapidly before moving to the next.
Step 4: Decoupage Application and Final Touches for a Vintage Look
With the crackle effect beautifully formed, it’s time to add your chosen paper napkin designs to the bottle. This process, known as decoupage, requires patience and a light touch. Using a clean brush, apply a thin layer of Mod Podge to the specific area of the bottle where you plan to place your first napkin design. Carefully position the prepared napkin design onto the wet Mod Podge. To gently smooth out any wrinkles or air bubbles, take a crumpled piece of plastic wrap and lightly dab and press over the napkin, working from the center outwards. This technique is far gentler than using your fingers and helps prevent tearing the delicate napkin. Once the design is positioned and smoothed, apply another thin layer of Mod Podge over the top of the napkin, sealing it in place. Again, work from the center outwards to ensure even coverage and smooth out any remaining imperfections. Repeat this decoupage method for all your desired designs, but crucially, allow each individual design to dry completely before applying the next. This prevents designs from shifting or tearing as you work. Once all designs are dry, take three paint colors that complement or subtly match the hues within your napkin designs. Randomly and lightly smudge these colors around the bottle using a dry brush technique. This step adds depth, blends the designs into the crackle background, and further enhances the aged, vintage aesthetic. After this layer of smudged paint has dried, finalize your creation by applying several coats of polyacrylic sealer spray. This protective layer will seal the entire bottle, safeguarding your artwork from moisture, dust, and general wear, ensuring your beautiful, upcycled wine bottle decor lasts for years to come.
Creative Variations and Tips for Your Decoupage Wine Bottles:
This “Easy Wine Bottle Decoupage Project” is wonderfully adaptable, offering countless ways to express your personal style. Don’t limit yourself to just wine bottles; this technique works beautifully on other glass jars, vases, or even ceramic items. Consider using different bottle shapes and sizes to create a diverse collection. For instance, tall, slender bottles make elegant lamp bases, while shorter, wider jars can become charming candle holders or unique storage containers. Experiment with various themes for your napkins – think seasonal motifs for holidays, floral patterns for spring, or abstract designs for a modern twist. The color palette is also entirely yours to control; choose vibrant colors for a cheerful look or muted tones for a more sophisticated, understated elegance.
If you encounter any challenges, remember that practice makes perfect. Air bubbles under napkins can often be remedied by gently pricking them with a fine needle and smoothing. Uneven crackle patterns can sometimes be adjusted by varying glue thickness or drying speed in different areas. These bottles also make incredibly thoughtful and personalized gifts for friends and family. Imagine a custom-designed bottle as a housewarming present, a unique centerpiece for a special event, or simply a charming addition to someone’s home decor. By embracing this DIY spirit, you’re not just creating an object; you’re crafting a story, transforming something ordinary into an extraordinary piece of art that reflects your passion and creativity. Enjoy the process of turning everyday items into cherished treasures!