
Master the Ohio Trail Quilt Block: An Easy Guide for Stunning Patchwork
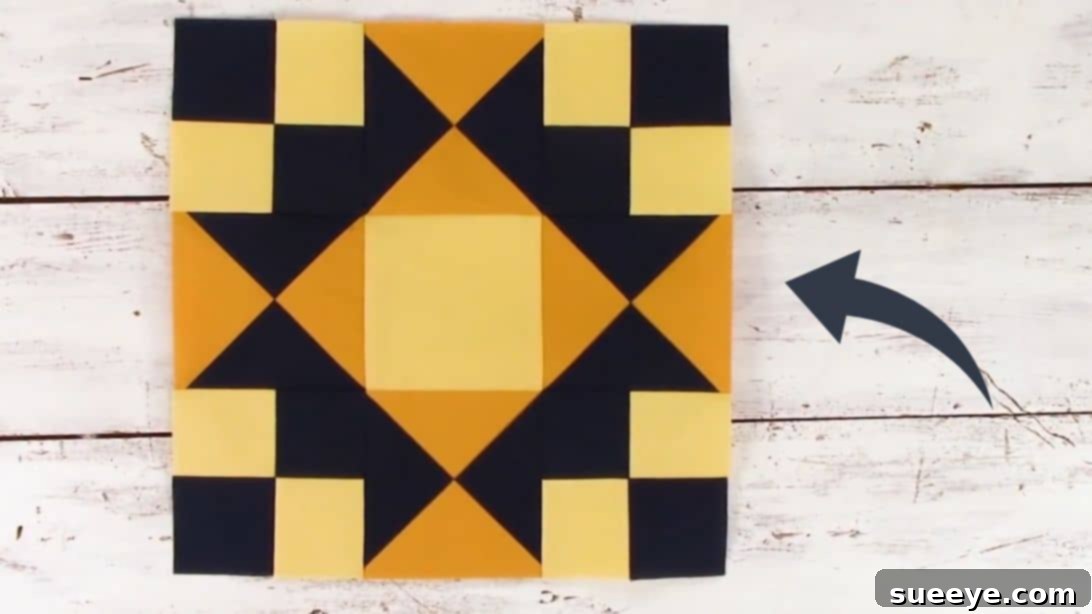
Embark on a delightful quilting journey with the Ohio Trail Quilt Block – a design that perfectly blends classic appeal with a touch of playful charm. This stunning block, famously showcased by Nancy’s Notions, is renowned for its captivating central Ohio Star motif, beautifully framed by traditional Four-Patch blocks in the corners. The result is an intricate-looking yet surprisingly accessible pattern that promises to add a vibrant focal point to any quilting project. Don’t be fooled by its sophisticated appearance; the Ohio Trail Block is a fantastic opportunity for quilters of all levels to create something truly special.
RELATED: Windmill Quilt Tutorial
Many quilters might initially perceive this design as complex or intimidating, but we’re here to reveal its underlying simplicity. A closer look at the Ohio Trail Quilt Block reveals that it is ingeniously constructed from just two fundamental components: the versatile hourglass block and the foundational four-patch block. If you’ve already familiarized yourself with these essential building blocks of quilting, you’ll find tackling the Ohio Trail Quilt Block an incredibly rewarding and straightforward experience. Even if you’re new to these techniques, our comprehensive guide, complemented by clear visuals, will empower you to master this beautiful pattern with confidence. Get ready to transform carefully chosen fabrics into a masterpiece!
Why Choose the Ohio Trail Quilt Block for Your Next Project?
The Ohio Trail Quilt Block stands out for several compelling reasons, making it a popular choice among quilters. Its timeless design incorporates elements that are both visually appealing and structurally interesting. The iconic Ohio Star at its heart provides a dynamic visual anchor, drawing the eye and adding a sense of movement. The corner Four-Patch blocks offer a perfect balance, creating a cohesive framework that enhances the star’s brilliance. This versatility means the Ohio Trail Block can be adapted for various projects, from charming throw pillows and wall hangings to larger bed quilts. Its construction, relying on simple units, makes it an excellent skill-builder for beginners looking to expand their repertoire, while experienced quilters will appreciate its potential for creative fabric play and efficient piecing.
Essential Quilting Tools for a Seamless Experience
Before diving into the creation of your stunning Ohio Trail Quilt Block, ensure you have a few essential quilting tools on hand. Having the right equipment makes the process smoother, more accurate, and ultimately more enjoyable. You’ll need a reliable sewing machine in good working order, equipped with a fresh needle and good quality thread. A rotary cutter, self-healing mat, and various quilting rulers (especially a square ruler for trimming) are indispensable for precise fabric cutting. Don’t forget sharp fabric scissors for smaller cuts and trimming threads. Ironing is crucial in quilting, so a good iron and ironing board are non-negotiable for pressing seams open or to one side. Basic sewing notions like pins or fabric clips, a seam ripper (just in case!), and a fabric marking tool (such as a chalk pencil or disappearing ink pen) will complete your toolkit, setting you up for success in crafting beautiful blocks.
Mastering Your Fabric Choices for a Vibrant Ohio Trail Quilt
The magic of any quilt lies significantly in its fabric selection, and the Ohio Trail Quilt Block is no exception. Thoughtful color and print choices can elevate your block from simple to sensational. For this pattern, where the Ohio Star and Four-Patch blocks interact, strong contrast is often key to making the design pop. Consider using a vibrant “first color” that stands out against a more subdued “second color,” perhaps a solid or a subtle tone-on-tone print. The “third color” can introduce another layer of interest, either complementing or contrasting with the first two. Experiment with light, medium, and dark values to create depth and definition. Pre-washing your fabrics is always a good practice to prevent shrinkage and color bleeding, especially if you’re mixing different fabric types or dyes. Lay out your chosen fabrics before cutting to visualize how they will interact and ensure they create the eye-catching design you envision for your finished Ohio Trail Quilt.
Easy Ohio Trail Quilt Block Materials
Gathering your materials precisely is the first step toward a perfect Ohio Trail Quilt Block. The following cutting guide provides the exact measurements you’ll need. Remember, accuracy in cutting translates directly to accuracy in sewing, so take your time and measure carefully.
- 2 1/2″ squares – (8) first color and (8) second color
- 4 1/2″ colored square for the center square – (1) second color
- 5 1/2″ squares – (2) first color and (2) third color
How to Make the Ohio Trail Quilt Block
Follow these detailed instructions to construct your beautiful Ohio Trail Quilt Block. A consistent 1/4″ seam allowance is crucial throughout all sewing steps for the block to come together accurately.
Step 1: Constructing the Four-Patch Blocks
Begin by creating the foundational four-patch blocks that will adorn the corners of your Ohio Trail design. Select four individual 2 1/2″ squares: two from your “first color” fabric and two from your “second color” fabric. Arrange these four squares into a classic checkerboard pattern, ensuring that the colors alternate both horizontally and vertically. Once you’re satisfied with the arrangement, sew these squares together into two pairs, then sew the two pairs together to form a complete 4-patch unit. Press your seams either open or to one side, aiming for consistency. Repeat this process with your remaining 2 1/2″ squares until you have a total of four perfectly pieced four-patch blocks. These units should measure 4 1/2″ square after trimming, if necessary.
Step 2: Crafting the Hourglass Blocks (AKA Quarter Square Triangles)
Next, we will create the dynamic hourglass blocks that contribute to the Ohio Star’s distinct points. Take two 5 1/2″ squares, ensuring they are in different colors (one first color, one third color). Place these squares right sides together, aligning all edges precisely. Using a fabric marking tool, draw a diagonal line from one corner to the opposite corner. Now, sew 1/4″ away from both sides of this drawn line. Once sewn, cut directly along your initial diagonal line. Press each piece open, revealing two half-square triangles. Repeat this layering and sewing process with these two new units: place them right sides together, making sure that the colors of the fabrics are *not* touching along the center seam line, and that the seam lines themselves are perfectly aligned (nesting seams can help here). Draw a new diagonal line, this time in the opposite direction of the existing seam line, creating an “X” shape across the block. Sew 1/4″ away from both sides of this new line. Finally, cut directly on this second diagonal line, and press each piece open. You will now have four hourglass units from these initial two squares. Trim each hourglass unit to 4 1/2″ square for perfect accuracy.
Repeat the entire hourglass block creation process one more time with your remaining two 5 1/2″ squares (one first color, one third color). By the end of this step, you should have a total of four beautifully constructed hourglass pieces, each perfectly trimmed to 4 1/2″ square. These form the points of your magnificent Ohio Star.
Step 3: Assembling the Ohio Trail Quilt Block
Now that all your components are ready, it’s time to bring them together to form the complete Ohio Trail Quilt Block. Lay out your pieced units on a flat surface, arranging them just like the diagram below. The single 4 1/2″ center square (second color) goes in the very middle. The four hourglass blocks will surround it, forming the points of the Ohio Star. Finally, the four four-patch blocks will be placed in each of the four corners of the entire block. Take a moment to ensure all pieces are oriented correctly, paying close attention to the direction of your hourglass units to create the star points.
Once you are satisfied with your layout, begin sewing the blocks together in rows. Start by sewing the three units in the top row together. Then, sew the three units in the middle row, and finally, the three units in the bottom row. Press the seams for each row, alternating the direction of the seam allowance for easier nesting when you join the rows. Finally, sew the three completed rows together, carefully matching up all seam intersections. Press your finished block, and stand back to admire your stunning Ohio Trail Quilt Block!
Tips for a Flawless Finish
- Precision is Key: Use a consistent 1/4-inch seam allowance. A quarter-inch foot on your sewing machine can be incredibly helpful.
- Pressing Matters: Pressing seams after each sewing step ensures flat, accurate blocks. Decide whether to press seams open or to one side and stick with it for consistency. Nesting seams where possible helps reduce bulk and achieve perfect points.
- Trim to Perfection: After creating your four-patch and hourglass units, use a square ruler to trim them to their exact specified dimensions (4 1/2″). This ensures all your components fit together without struggle.
- Starch Your Fabric: Applying a light starch to your fabric before cutting can add stability, making it easier to cut and sew accurately, especially with smaller pieces.
- Chain Piecing: For efficiency, especially when making multiple blocks, try chain piecing. This involves sewing several units one after another without lifting the presser foot, simply by feeding the next units under the needle.
Beyond the Block: Project Ideas for Your Ohio Trail Quilt Blocks
Once you’ve mastered the creation of a single Ohio Trail Quilt Block, a world of creative possibilities opens up. These striking blocks can be combined in numerous ways to form larger, more intricate quilting projects. For a simple yet impactful project, consider making four blocks and arranging them to create a charming table runner or a decorative placemat set. Expand further by making nine blocks to assemble a cozy throw pillow cover or a small wall hanging that adds personality to any room. For a full-sized quilt, repeat the process to create as many Ohio Trail blocks as needed, then join them with sashing (strips of fabric between blocks) to create a larger design. Experiment with different fabric themes – seasonal, modern, or traditional – to see how the Ohio Trail pattern transforms. This block is an excellent foundation for exploring various quilt layouts and really making your mark as a quilter.
The Joy and Satisfaction of Quilting
Quilting is more than just sewing; it’s an art form, a hobby, and often a passion that brings immense satisfaction. The process of transforming flat pieces of fabric into a three-dimensional, functional, and beautiful object is incredibly rewarding. Each stitch, each perfectly matched point, and each carefully chosen fabric tells a story and carries the maker’s care and creativity. The Ohio Trail Quilt Block, with its blend of classic elements and approachable construction, is a testament to the enduring appeal of patchwork. It offers a wonderful sense of accomplishment and the joy of creating something truly unique, whether for yourself or as a heartfelt gift for a loved one. So, grab your fabrics, fire up your machine, and immerse yourself in the wonderful world of quilting!
Your Beautiful Ohio Trail Quilt Block Awaits!