
There’s an undeniable magic that a beautifully decorated Christmas tree brings to any home during the festive season. More than just a centerpiece, it’s a reflection of joy, tradition, and personal style. While store-bought ornaments are readily available, there’s a unique charm and satisfaction that comes from adorning your tree with handmade decorations. DIY Christmas ornaments not only add a distinctive touch but also offer a wonderful opportunity for creativity, budget-friendly decorating, and even a fun family activity.
If you’re looking to infuse your holiday decor with character and originality without breaking the bank, you’re in the right place. Crafting your own ornaments allows you to tailor every detail to your tree’s specific theme and color scheme, ensuring a cohesive and stunning display. Best of all, many handmade projects utilize common household items or inexpensive craft supplies, transforming everyday materials into dazzling festive accents.
Renowned crafter and DIY enthusiast, Katia Nikolajew, is a master at turning simple items into extraordinary decorations. She shares a plethora of brilliant ideas for handmade ornaments that are not only quick and simple to make but also incredibly affordable. What makes her approach particularly appealing is the emphasis on using materials you might already have lying around in your storage, promoting sustainability and resourcefulness. You have complete creative freedom to design these ornaments, ensuring they perfectly complement your Christmas tree’s unique theme and overall aesthetic.
Katia’s comprehensive tutorial features eight distinct ornament designs, each offering a fresh perspective on holiday decorating. To get you started on your crafting journey, we’ve meticulously broken down the steps for three of her most captivating projects. Prepare to unleash your inner artisan and transform your Christmas tree into a personalized masterpiece with these inspiring DIY ideas!
Handmade Christmas Ornament #1: The Elegant Thumbtack Sparkler
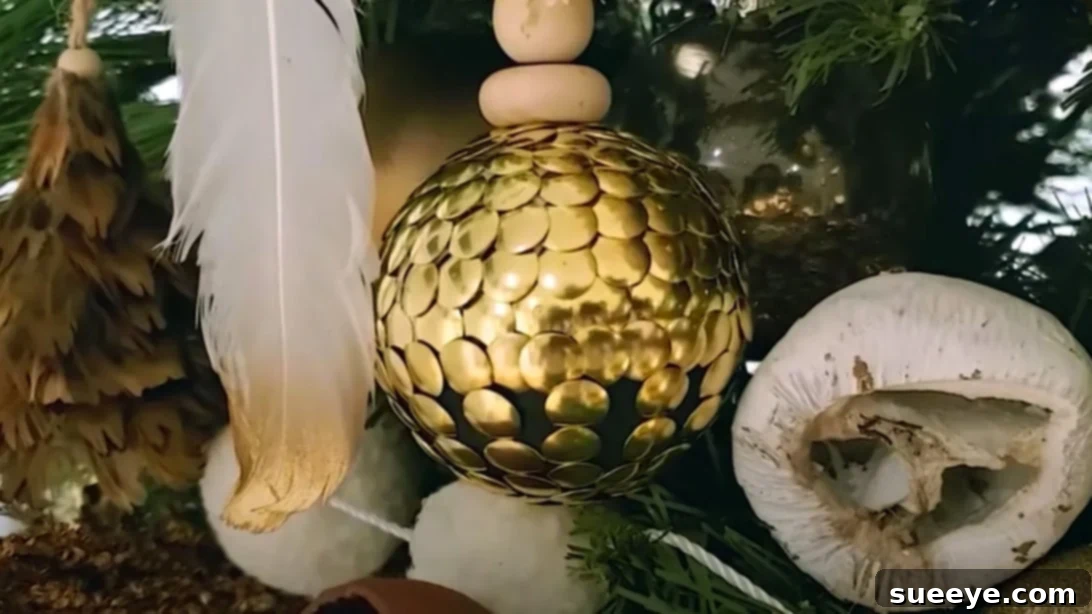
This exquisite ornament combines industrial chic with festive sparkle, creating a unique focal point for your tree. The contrast between the metallic thumbtacks and the textured painted surface offers a sophisticated, modern aesthetic that will impress your guests.
Supplies:
- Styrofoam ball: Choose a medium to large size (e.g., 3-4 inches diameter) as this will provide ample surface for detailing.
- Gold thumbtacks: Opt for standard office thumbtacks with a flat, round head. The gold finish adds a touch of luxury, but silver or rose gold could also work depending on your theme.
- Black acrylic paint: A versatile craft paint that provides a strong, opaque base.
- Baking soda: Essential for adding texture and a matte, almost ceramic-like finish to the paint.
- Craft wire rope: A flexible, thin wire suitable for creating hanging loops.
- Wooden beads: Small, natural wooden beads (e.g., 6-8mm) to adorn the hanging loop, adding an organic touch.
- Small paintbrush: For precise application of the paint mixture.
- Optional: Craft glue for extra security, protective gloves.
Directions:
-
Prepare Your Styrofoam Base: Begin by taking your Styrofoam ball. Carefully cover approximately half of its surface with gold thumbtacks. Press them in firmly and evenly, ensuring they are close together to create a dense, shimmering texture. Imagine a clear dividing line down the middle of the ball; one hemisphere will be dedicated to the metallic sheen of the thumbtacks. This step requires patience to ensure neatness and a uniform appearance, as the thumbtacks will form the glamorous half of your ornament.
-
Create the Textured Paint Mixture: In a small bowl or on a palette, mix your black acrylic paint with a generous amount of baking soda. The baking soda is key here; it transforms the smooth paint into a thicker, textured paste, giving it a unique, almost stone-like finish when dry. Stir thoroughly until you achieve a consistent, slightly gritty paste. You can adjust the amount of baking soda to achieve your desired level of texture.
-
Paint the Uncovered Half: Using your small paintbrush, meticulously apply the baking soda and black paint mixture to the remaining uncovered half of the Styrofoam ball. Work carefully to create a clean line where the thumbtacks meet the painted surface. Allow this layer to dry completely. For any small, unpainted edges or gaps near the thumbtacks that your brush couldn’t easily reach, insert another layer of thumbtacks to fully cover these areas, ensuring a seamless transition and full coverage.
-
Add Vertical Thumbtack Details: Once the painted half is dry, turn your attention to this section. Using individual thumbtacks, carefully create vertical lines that converge towards the center of the painted hemisphere. These lines add visual interest and a subtle geometric pattern, enhancing the ornament’s sophisticated design. You can experiment with the number and spacing of these lines to create different effects.
-
Craft the Hanging Loop: Take a length of your craft wire rope. Form a secure loop at one end – this will be the hanger for your ornament. Twist the wire several times at the bottom of the loop to secure it firmly. Before completing the twist, thread a few wooden beads onto the wire just below the twisted loop. These beads add a natural, rustic counterpoint to the metallic and painted textures. Once the beads are in place, continue twisting the wire to secure them.
-
Attach the Hanger: Carefully puncture the twisted end of your craft wire rope (the part with the beads) into the top center of your Styrofoam ball, ideally on the painted side or at the junction of both halves. Ensure it’s inserted deeply enough to be secure and support the ornament’s weight when hanging. If desired, a small dab of strong craft glue at the insertion point can provide extra reinforcement.
-
Final Touches: Step back and admire your unique creation! This ornament offers a striking blend of textures and finishes, making it a standout piece on any Christmas tree. Consider making a set with varying thumbtack patterns or paint colors for a truly personalized collection.
Handmade Christmas Ornament #2: The Botanical Elegance Sphere
Embrace nature’s beauty with this charming ornament featuring dried flowers. It’s a fantastic way to incorporate organic elements into your holiday decor, creating a soft, ethereal, and utterly unique look. This ornament brings a touch of rustic sophistication and delicate artistry to your tree, perfect for a nature-inspired or whimsical theme.
Supplies:
- Styrofoam ball: A clean, smooth Styrofoam ball of your preferred size (smaller balls create more delicate ornaments, larger ones make a bolder statement).
- Dried flowers: Assorted small dried flowers or petals. Think tiny lavender buds, small statice blooms, delicate baby’s breath, or even crushed dried rose petals. The variety of colors and textures will add depth.
- Craft wire rope: A thin, flexible wire for the hanging mechanism.
- Wooden beads: Small beads to embellish the hanger.
- Acrylic paint: A neutral or complementary color (e.g., white, cream, light green, or even a metallic gold) to subtly brush over the dried flowers for a frosted or aged effect.
- Flat head pin: Also known as a headpin in jewelry making, this small pin with a flat base will be used to secure the hanging loop.
- Strong craft glue: A quick-drying, clear-drying craft glue (e.g., Tacky Glue or E6000) for attaching the flowers and securing the pin.
- Tweezers: Extremely helpful for precisely placing delicate dried flowers.
- Small paint brush: For applying the acrylic paint to the flowers.
Directions:
-
Prepare the Floral Base: Begin by covering the entire surface of your Styrofoam ball with your chosen dried flowers. This step requires a delicate touch and a good quality craft glue. Apply glue to small sections of the Styrofoam ball at a time, then carefully press the dried flowers onto the glued area. Use tweezers for precise placement, especially with smaller petals or buds. The goal is to completely obscure the white Styrofoam, creating a rich, textured floral surface. Ensure there are no visible gaps or white parts sticking out, aiming for full and even coverage.
-
Construct the Hanging Loop: Take a length of your craft wire rope. Thread a few wooden beads onto the wire. Then, create a loop at one end that is large enough to comfortably hang on a tree branch. Secure the loop by twisting the wire tightly several times beneath the beads. At the very end of the twisted wire, create a small knot or a tiny loop and thread a flat head pin through it. The flat head of the pin should rest against the twisted wire, creating a secure anchor point.
-
Secure the Hanger: Apply a generous dab of strong craft glue to the flat head of the pin you just prepared. Carefully insert the pin into the top center of the Styrofoam ball, pushing it deeply into the material until it feels secure. The glue will help to bond the pin firmly in place, ensuring the ornament can hang without issues. Hold the pin in place for a moment to allow the glue to begin setting.
-
Add Finishing Touches with Paint: For a truly enchanting final look, lightly brush the dried flowers with a small amount of acrylic paint. You can choose a very light hand, aiming for a “frosted” effect with white paint, or a subtle color enhancement with a complementary shade. This step can soften the natural colors of the dried flowers, add an antique feel, or provide a delicate shimmer depending on your paint choice. Allow the paint to dry completely before handling or hanging the ornament.
-
Admire Your Botanical Masterpiece: Once dry, this ornament will be a testament to your patience and creativity. Its organic beauty makes it perfect for a rustic, vintage, or nature-themed Christmas tree. You can experiment with different types of dried flowers and paint colors to create a diverse collection.
Handmade Christmas Ornament #3: The Leafy Texture Ball
This ornament draws inspiration directly from nature, using dried leaves to create a striking, organic pattern. It’s a wonderful way to bring the beauty of the outdoors indoors and offers a truly unique texture that will stand out on your Christmas tree. Ideal for a woodland, rustic, or natural holiday theme.
Supplies:
- Styrofoam ball: A sturdy Styrofoam ball as the base for your leafy creation.
- Long dried leaves: Collect various types of long, slender dried leaves. Think eucalyptus leaves, bay leaves, or even thin, elongated silk leaves for a more controlled look. Ensure they are clean and fully dried to prevent mold.
- Wooden beads: For a charming, natural accent on the hanger.
- Brown acrylic paint: To provide a cohesive base color that blends naturally with the dried leaves.
- Craft wire rope: For creating a secure and aesthetic hanging loop.
- Strong craft glue: Essential for firmly attaching the leaves to the Styrofoam ball.
- Small paintbrush: For even application of paint.
Directions:
-
Prepare the Base Color: Begin by thoroughly covering your entire Styrofoam ball with brown acrylic paint. This step serves two important purposes: it eliminates any visible white Styrofoam, and it provides a natural, earthy base color that beautifully complements the dried leaves you’ll be attaching. Ensure a smooth, even coat and allow the paint to dry completely before proceeding. You may need two coats for full opacity.
-
Attach the Primary Leaves: Once the paint is dry, start attaching your long dried leaves. Apply a small amount of strong craft glue to both the top and bottom ends of each leaf. Carefully position and press these leaves onto the central ends of the Styrofoam ball, arranging them so they radiate outwards or create a pleasing pattern. It’s important to leave a small, consistent space between each leaf; this spacing allows for the addition of inverted leaves in the next step and creates a more dynamic visual effect. Work methodically to ensure even distribution and secure adhesion.
-
Add Inverted Leaf Margins: After the primary leaves are in place and the glue has dried sufficiently, it’s time to fill in the margins. Take additional dried leaves and glue them in an inverted position (pointing the opposite direction) into the spaces you left between the primary leaves. This layering technique creates a fuller, more intricate texture and ensures the entire ball is covered in a beautiful, naturalistic pattern. The inverted placement adds depth and visual interest to the ornament.
-
Craft the Hanging Mechanism: Prepare the hanging piece for your ornament using the craft wire rope. Create a sturdy loop at one end, which will serve as the hanger. Before twisting the wire to secure the loop, thread one or more wooden beads onto the wire just below the loop. These beads add a touch of rustic charm. Twist the wire several times below the beads to ensure they are securely in place and the loop is firm.
-
Attach the Hanger: Carefully puncture the twisted end of the wire (the part with the beads) into the top center of the Styrofoam ball. Make sure to insert it deeply enough so it is firmly anchored and can support the ornament’s weight. A small dab of glue at the insertion point can further enhance stability.
-
Final Embellishment: To add delightful finishing touches, you can paint your wooden beads. Use a contrasting color (e.g., gold, silver, or a brighter festive hue) or simply apply a clear varnish for a subtle shine. This small detail can elevate the overall look of the ornament and tie it into your tree’s color scheme. Allow the paint on the beads to dry completely.
-
Display Your Natural Art: Your leafy texture ball is now complete! This ornament is a celebration of natural elements and craftsmanship, offering a unique tactile and visual experience. It’s a testament to how simple materials can be transformed into stunning holiday decor.
There you have it! These are just three of the eight incredible, creative, and budget-friendly DIY Christmas ornament ideas that Katia Nikolajew generously shares in her comprehensive tutorial. Each project offers a chance to personalize your holiday decor, express your creativity, and potentially even create cherished family memories. The joy of hanging a handmade ornament on your tree, knowing the effort and love that went into it, is truly incomparable.
These projects demonstrate that beautiful Christmas decorations don’t have to be expensive or complicated. With a few basic supplies, a little time, and a dash of imagination, you can transform your home into a festive wonderland. So, why wait? Head over to Katia Nikolajew’s tutorial on YouTube to explore all eight designs and embark on your own crafting adventure. Start crafting today and make this Christmas truly special with unique, handmade ornaments that tell your story!
8 Creative DIY Christmas Tree Ornaments: Explore Katia Nikolajew’s Full Tutorial