
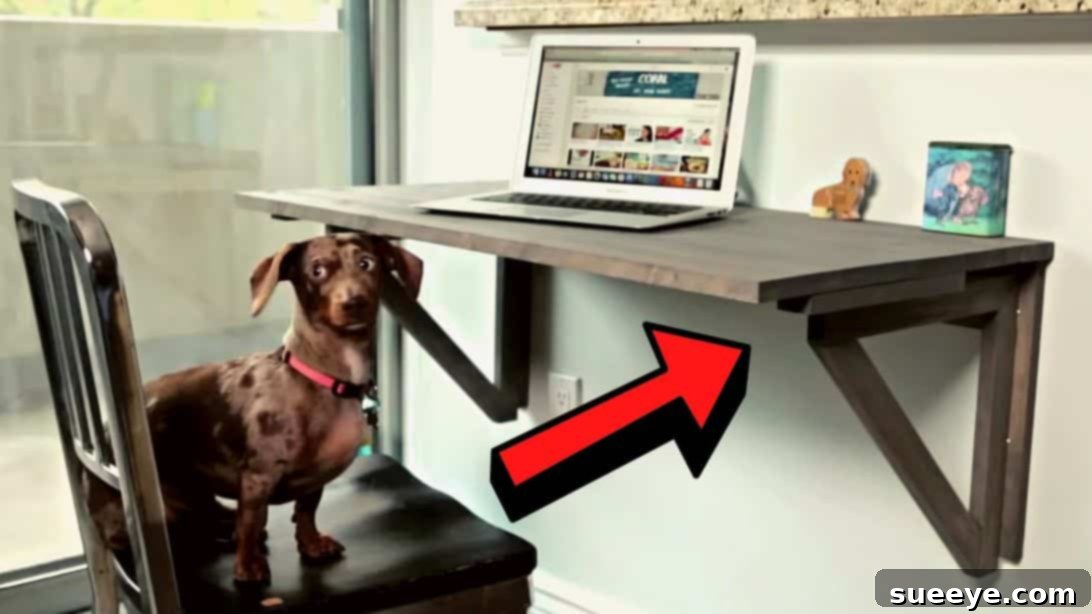
In today’s dynamic world, whether you’re working remotely, a student needing a dedicated study spot, or simply seeking a flexible workspace within your home, the challenge of limited space is a common hurdle. Traditional desks can often feel bulky, consuming valuable floor area even when not in use. This is where the ingenuity of a space-saving foldable desk truly shines, offering an elegant solution to maximize your living environment.
Inspired by an ingenious project from Coral on YouTube, this comprehensive guide will walk you through building a sturdy, practical, and aesthetically pleasing foldable desk. This design not only provides a robust surface for your work or hobbies but also seamlessly folds away, returning precious space to your room when you no longer need it. It’s an accessible DIY project, perfect for beginners and seasoned crafters alike, and while entirely achievable solo, a helping hand can certainly accelerate the process.
Craft Your Own Space-Saving Foldable Desk: A Complete DIY Tutorial
Imagine a desk that appears when you need it and vanishes when you don’t. This isn’t magic; it’s smart design, and you can build it yourself. Our focus will be on creating a desk that is not only functional but also built to last, making efficient use of every inch of your space. Let’s dive into the world of practical woodworking and transform your room!
Why Choose a Foldable Desk? The Benefits of Smart Space Utilization
A foldable desk is more than just a piece of furniture; it’s a strategic investment in flexible living. Here are some compelling reasons why this DIY project is a game-changer for many households:
- Unparalleled Space Efficiency: Ideal for small apartments, dorm rooms, or multi-purpose areas where a permanent desk would be impractical. When folded, it frees up floor space for other activities, exercise, or simply an uncluttered look.
- Versatile Functionality: Perfect for a home office, a crafting station, a temporary dining table, a homework nook for kids, or even a compact workbench. Its adaptability makes it invaluable in dynamic living spaces.
- Clutter Reduction: A designated foldable workspace encourages you to clear your desktop after use, naturally leading to a more organized and tidy environment.
- Cost-Effective Solution: Building your own desk from scratch is often significantly more affordable than purchasing a custom-designed space-saving desk from a retailer.
- Customization Opportunities: When you build it yourself, you have complete control over dimensions, materials, finishes, and additional features, ensuring it perfectly matches your specific needs and decor.
- Sense of Accomplishment: There’s immense satisfaction in creating something useful with your own hands, especially a piece of furniture that enhances your daily life.
Essential Materials for Your Foldable Desk Project
Before you begin, gather all the necessary materials. Choosing the right components is crucial for the desk’s stability, durability, and aesthetic appeal. Pine is an excellent choice for beginners due to its affordability and ease of workability.
- 20″ x 30″ Pine Shop Shelving: This will serve as your primary desktop surface. Its pre-cut dimensions make it convenient, but you can adjust these to fit your space.
- 1″ x 4″ x 8′ Pine Lumber Board: While the original specifies “3″”, an 8-foot board gives you flexibility for cuts and minimizes waste. This will form the main structural elements of your desk’s frame and support.
- 1″ x 2″ x 8′ Pine Lumber Boards (x2): These narrower boards are vital for creating the L-brackets and additional support braces, contributing to the desk’s overall sturdiness.
- 4 Mini L-Brackets (Metal): These small metal brackets provide robust corner reinforcement, ensuring the frame connections are secure and stable.
- 7 Small Hinges: Essential for the folding mechanism. You’ll need hinges to connect the desktop to the wall-mounted frame and for the foldable support legs. Opt for sturdy hinges that can bear weight.
- Wood Screws: A variety of lengths will be useful – shorter screws for attaching hinges and brackets, and longer ones for assembling the main wood frame. Ensure they are suitable for wood.
- Wood Glue (Optional but Recommended): For extra strong joints, especially on the frame connections.
- Wood Stain or Paint (Optional): To protect the wood and customize the desk’s appearance to match your interior decor.
Tools You’ll Need: Equipping Your DIY Workspace
Having the right tools makes any DIY project smoother, safer, and more precise. Here’s a list of tools that will be indispensable for building your foldable desk:
- Tape Measure: For accurate measurements of your space and wood pieces. “Measure twice, cut once” is the golden rule.
- Marking Pencil: To clearly mark all your cutting and drilling points on the lumber.
- Miter Saw (or Circular Saw/Hand Saw with Miter Box): Essential for making precise, straight, and angled cuts on your lumber. A miter saw offers the most accuracy for repetitive cuts.
- Drill and Drill Bits: For pre-drilling holes (to prevent wood splitting) and driving screws. Have a range of bit sizes, including pilot bits for screws.
- Clamps (at least 2): Crucial for holding wood pieces securely in place while drilling and screwing, ensuring accurate assembly and safety.
- Safety Glasses: Always wear eye protection when cutting, drilling, or sanding.
- Hearing Protection: Recommended when operating power tools like miter saws.
- Sander (Orbital or Sanding Block): For smoothing edges and surfaces before finishing, ensuring a professional look and feel.
- Level: To ensure your desk is perfectly horizontal when installed, especially if wall-mounted.
- Stud Finder (if wall-mounting): Absolutely necessary to locate wall studs for secure attachment, preventing the desk from pulling away from the wall.
- Screwdriver Set: Manual screwdrivers can be useful for fine-tuning or for screws in tight spots.
Step-by-Step Directions: Building Your Space-Saving Foldable Desk
Follow these detailed instructions to construct your very own versatile foldable desk. Take your time with each step, prioritizing precision and safety.
Step 1: Planning, Cutting, and Frame Assembly
1.1 Measure and Plan Your Desk’s Placement and Dimensions
Before making any cuts, thoroughly measure the exact space where you intend to install your foldable desk. Consider not only the width and depth of the desk when open but also the clearance needed for it to fold up and down. Think about ergonomics – what height will be comfortable for you to work at? The ideal desk height is typically between 28-30 inches (71-76 cm) from the floor. Ensure the desktop size (e.g., 20″ x 30″) is suitable for your needs without being too cumbersome. Sketching your design can help visualize the final product.
1.2 Cutting Your Lumber Pieces
Based on your measurements, begin cutting the pine lumber boards. For this specific project, the 1x4x8′ lumber will form the main structural frame, and the 1x2x8′ boards will be used for the L-brackets and additional braces. If you’re following the original design’s approximate measurements for the frame, you’ll need two pieces of the 1×4 lumber cut to 36 inches long (for the horizontal supports of the frame that will attach to the wall, or act as the main base if freestanding) and two pieces of the 1×2 lumber cut to 14 inches long (for the vertical side supports). Always wear safety glasses and use clamps to secure your wood when operating a miter saw for clean, precise cuts.
1.3 Assembling the Primary Frame
Begin constructing the robust base frame. Lay out your cut 1×4 pieces. If you’re building a rectangular frame, you’ll join the longer 1x4s with shorter 1x2s (or additional 1x4s if you prefer a wider frame). Use clamps to hold the pieces firmly in place, ensuring they are perfectly square before drilling. Pre-drill pilot holes at each joint – this is crucial to prevent the wood from splitting, especially with softer woods like pine. Then, drive wood screws to securely fasten the pieces together. For maximum strength, consider applying wood glue to the joint surfaces before screwing them together.
1.4 Attaching the Desktop to the Base Frame
Position your 20″ x 30″ pine shop shelving desktop onto your newly assembled frame. Ensure it is centered and flush. Once again, use clamps to hold it in position. Carefully pre-drill holes from underneath the frame into the desktop to prevent screws from coming through the top. Secure the desktop to the frame using wood screws. This connection forms the solid working surface of your desk.
1.5 Installing the Hinges for Folding Action
This step is critical for the desk’s foldable functionality. The hinges allow the desk to articulate and fold away. You’ll need to strategically place these hinges. Typically, hinges are attached to the underside of the desktop and to the structural frame that will be either wall-mounted or serve as the static base. Use at least three hinges evenly spaced along the longer edge where the desk will fold. Pre-drill small pilot holes for each hinge screw to ensure a clean and strong attachment. Ensure the hinges operate smoothly before proceeding.
Step 2: Enhancing Stability, Finishing, and Installation
2.1 Crafting and Attaching the L-Brackets for Robust Support
The L-brackets are vital for providing firm support to the desk when it’s in its open, working position. Take your remaining 1×2 lumber boards. Measure and cut the ends at a 45-degree angle to create the “L” shape. You’ll typically need two such pieces per L-bracket, joining them at the mitered edge. Pre-drill holes and use screws (and wood glue for extra strength) to securely attach these two angled pieces together to form a strong corner. Once you have your four mini L-brackets assembled, attach them to the underside of the desk. These will serve as the foldable legs or support arms that swing out to hold the desk up. Their placement is key to the desk’s overall load-bearing capacity.
2.2 Reinforcing the Desk Structure with Braces and Brackets
To further enhance the desk’s sturdiness, consider adding small braces underneath the desktop, especially along the edges where the L-brackets will connect, and potentially connecting the desktop to the main frame at additional points. These small, unobtrusive additions distribute weight more effectively and prevent any wobbling. Similarly, small metal brackets can be used at various stress points to reinforce wood-to-wood connections. Think about where the most force will be applied when the desk is in use and add reinforcement there.
2.3 Sanding, Staining, or Painting Your Desk
Now that the structural assembly is complete, it’s time for the finishing touches. Thoroughly sand all surfaces and edges of your desk. Start with a coarser grit sandpaper (e.g., 100-120 grit) to smooth out any rough spots or imperfections, then move to a finer grit (e.g., 180-220 grit) for a silky-smooth finish. This step is crucial for both aesthetics and durability. Once sanded and all dust removed, you can apply wood stain to bring out the natural grain, or paint it to match your room’s color scheme. Always apply in thin, even coats, allowing adequate drying time between coats. A clear protective topcoat (like polyurethane or lacquer) is highly recommended to protect the wood from scratches and spills.
2.4 Final Installation: Wall-Mounting or Freestanding Setup
Finally, it’s time to integrate your desk into your space. If you designed it as a wall-mounted unit, use a stud finder to locate the wall studs where the back frame of your desk will be attached. Attaching the desk frame directly into studs is absolutely essential for safety and stability. Use long, sturdy wood screws or lag bolts for this. Use a level to ensure the desk is perfectly horizontal before making final attachments. If your design is freestanding but foldable, ensure its base is stable and the folding mechanism works perfectly. Test the desk’s stability by gently pressing down on it and ensuring the L-brackets provide adequate support.
Tips for a Successful DIY Foldable Desk Project
- Measure Twice, Cut Once: This woodworking adage cannot be overstated. Precision in measurement saves time and materials.
- Pre-Drill All Holes: Always drill pilot holes smaller than your screw diameter to prevent wood from splitting and ensure screws drive in straight.
- Use Wood Glue: For permanent joints, a good quality wood glue in addition to screws dramatically increases the strength and longevity of your desk.
- Don’t Rush the Finish: Sanding and finishing are what give your project a professional look. Take your time with these steps.
- Safety First: Always wear appropriate personal protective equipment (safety glasses, hearing protection) and understand how to safely operate all your tools.
- Test Functionality: Before final finishing or permanent installation, do a dry run of the folding mechanism to ensure everything operates smoothly.
Customization Ideas: Make It Uniquely Yours
One of the greatest advantages of DIY is the ability to customize. Here are a few ideas to personalize your foldable desk:
- Varying Desktop Materials: Instead of pine shelving, consider plywood with a veneer, butcher block for a rustic look, or even an old door for a unique, reclaimed aesthetic.
- Integrated Storage: Add a small, shallow drawer underneath the desktop, or incorporate a slim shelf above the desk, also foldable, for small items.
- Cable Management: Drill discreet holes for cables and add cable clips or ties to keep your workspace tidy.
- Decorative Finishes: Experiment with different paint colors, distressed looks, wood burning art, or even stenciling to match your personal style.
- Lighting Solutions: Integrate a small LED strip light under a shelf or within the desk’s structure for ambient or task lighting.
- Magnetic Strips: Attach magnetic strips to the wall or desk surface to hold small metal tools or stationery.
Maintenance and Care for Your Foldable Desk
To ensure your handcrafted desk remains functional and beautiful for years to come, a little maintenance goes a long way:
- Regular Cleaning: Wipe down the desktop with a damp cloth to remove dust and spills. For tougher grime, use a mild wood cleaner.
- Check Fasteners: Periodically inspect all screws and hinges to ensure they remain tight. Re-tighten any loose screws to maintain stability.
- Inspect Hinges: Ensure hinges are free of debris and operating smoothly. A drop of lubricant (like silicone spray) can keep them moving freely if they start to stick.
- Reapply Finish: If your desk sees heavy use, the protective topcoat might wear down over time. Reapply a fresh coat of polyurethane or lacquer every few years to protect the wood.
- Avoid Overloading: While your desk is sturdy, be mindful of its weight limits. Avoid placing excessively heavy items on it, especially when extended.
Conclusion: Enjoy Your Functional & Flexible Workspace
Congratulations! By following this guide, you’ve not only built a beautiful and highly functional piece of furniture but also reclaimed valuable space in your home. This DIY space-saver foldable desk is a testament to clever design and practical craftsmanship, offering a versatile solution for modern living.
Whether it becomes your go-to home office, a dedicated crafting corner, or a temporary study spot, your new foldable desk will serve you well, adapting to your needs with ease. Embrace the flexibility it offers, and enjoy the satisfaction of having created something truly useful with your own hands. We extend our sincere gratitude to Coral via YouTube for the original inspiration behind this fantastic project!
Start building today and transform your space!
*These amazing images are all credited to Coral via YouTube. Check their other content and follow for more!