
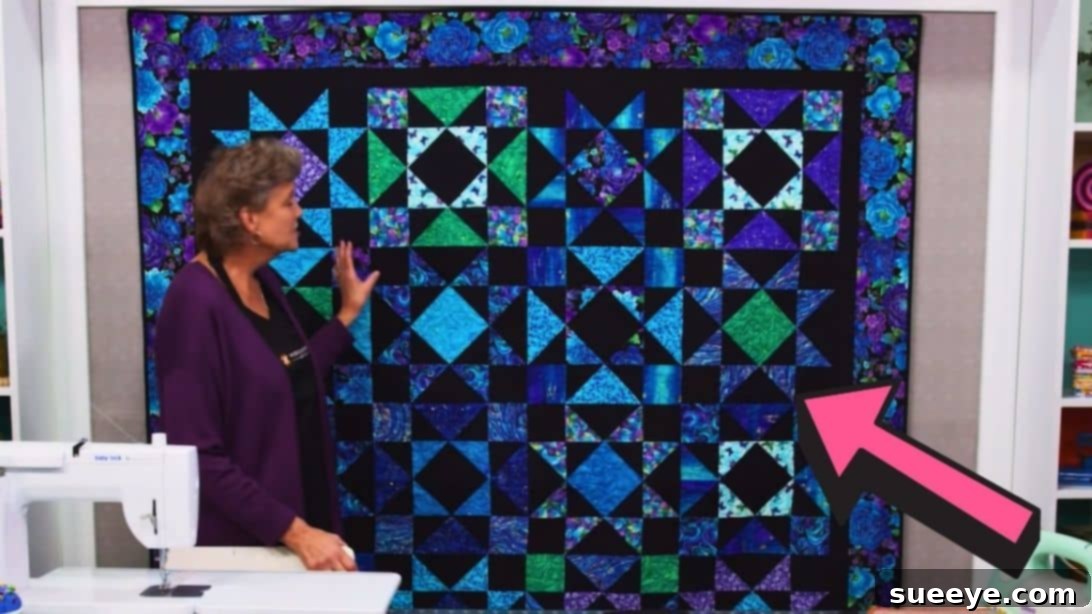
Mastering the Forest Light Quilt: A Beginner’s Guide to Half-Square Triangles with the Easy Eight Method
Embark on a delightful quilting journey with the captivating Forest Light Quilt, a truly eye-catching piece that promises to illuminate any space. This project, championed by experts like Missouri Star Quilt Company, is not only stunning but also remarkably accessible for quilters of all skill levels, especially beginners. Its secret lies in the clever “Easy Eight” technique, a time-saving method that allows you to construct eight perfect half-square triangles (HSTs) from just two fabric squares at once. Imagine the efficiency and ease! If you’re eager to transform a stack of lovely 10-inch fabric squares into a masterpiece, this comprehensive guide will walk you through every step. For a visual demonstration, make sure to watch the full instructions provided in the video linked above.
The Forest Light Quilt design is celebrated for its intricate appearance, which belies its simple construction. By mastering the fundamental half-square triangle unit, you unlock a world of quilting possibilities. This tutorial focuses on precision, clear instructions, and tips to ensure your first, or even tenth, Forest Light Quilt is a resounding success. Let’s gather our supplies and prepare to create something truly magical.
Essential Materials for Your Forest Light Quilt Project
Before diving into the exciting world of cutting and sewing, it’s crucial to have all your materials ready. The right tools and fabrics will ensure a smooth and enjoyable quilting experience. Here’s what you’ll need to assemble your beautiful Forest Light Quilt:
- One Pack of 10″ Printed Squares: Often referred to as “Layer Cakes” in the quilting world, these pre-cut fabric squares offer a convenient and cohesive collection of prints. The variety of designs will bring the “forest light” effect to life in your quilt blocks.
- One Pack of 10″ Background Squares: This pack should ideally consist of a solid or subtle tone-on-tone fabric that contrasts beautifully with your printed squares. The background fabric will make your printed HSTs pop and define the intricate star patterns within the quilt.
- 3/4 Yard for Inner Border: The inner border acts as a frame for your quilt center, creating a visual break and enhancing the overall design. Choosing a fabric that complements both your printed and background squares will tie everything together elegantly.
- 1 1/2 Yards for Outer Border: The outer border provides a substantial finish to your quilt, adding size and a grander presence. This fabric should harmonize with the inner border and the quilt top, offering a beautiful edge to your finished project.
- 5 3/4 Yards for Backing Fabric: The backing is the foundation of your quilt, providing stability and a cozy feel. Ensure you choose a fabric that is wide enough or prepare to piece multiple widths together to accommodate the quilt’s dimensions. Comfort and aesthetic appeal are key here.
- Squaring Tool: An essential item for any quilter, a squaring tool (like a rotary cutter and mat with a quilting ruler) ensures all your blocks are trimmed to exact measurements. Precision in this step is vital for perfectly aligned seams and a flat, beautiful quilt top.
- Basic Sewing Supplies: Don’t forget your sewing machine, thread (matching your fabrics), fabric scissors, pins or wonder clips, and an iron for pressing seams.
Having these materials organized and ready before you begin will streamline your process and help you maintain focus on the creative aspects of quilting.
Step-by-Step Guide to Crafting Your Forest Light Quilt
Now that your materials are all laid out, let’s dive into the core of our project: creating the intricate blocks that form the heart of the Forest Light Quilt. We’ll be utilizing the incredible “Easy Eight” technique, which is a fantastic method for producing multiple half-square triangles (HSTs) quickly and accurately. This technique is particularly beloved by beginners for its simplicity and efficiency.
Step 1: Preparing Your Fabric for Half-Square Triangles (HSTs)
Begin by selecting one vibrant printed 10-inch square and one coordinating 10-inch background square. Place the printed square right-side up, then layer the background square directly on top, right-side down. This creates a “fabric sandwich” with right sides facing each other. Using a fabric-friendly marking pen or pencil and a long ruler, draw a diagonal line from one corner to the opposite corner. Repeat this process to draw a second diagonal line, intersecting the first, from the remaining two corners. You should now have an “X” marked across your top square. These lines will serve as guides for your cutting later.
Next, it’s time to sew. With your sewing machine, stitch a line a quarter of an inch away from each side of both drawn diagonal lines. You will effectively be sewing four parallel lines, two on each side of the central “X.” This means you’ll have 1/4-inch seam allowances on both sides of each diagonal. Precision here is key for perfectly sized HSTs, so take your time and maintain a consistent seam allowance.
Step 2: Cutting Your Half-Square Triangles
Once all four stitching lines are complete, it’s time to unleash the magic of the “Easy Eight” method. Using your rotary cutter and a reliable quilting ruler, carefully cut the fabric sandwich in half vertically down the center. Then, cut it in half horizontally through the center. This will result in four smaller squares. Finally, cut each of these four smaller squares along the previously drawn diagonal lines. When you’re done, you’ll have eight triangular units from your initial two 10-inch squares. This innovative cutting technique ensures that each seam is securely sewn before the unit is separated, preventing fraying and making the process much more manageable.
Step 3: Pressing Your Half-Square Triangles
Now that you have your eight triangular units, it’s time to transform them into crisp, flat half-square triangles. Take each unit and carefully open it up. A crucial step for any quilter is pressing seams properly. For this project, with the dark fabric (printed square) on top, gently press the seam allowance towards the darker fabric. This technique, known as “pressing to the dark side,” helps to nest seams later when joining blocks, creating flatter intersections and a more professional finish. These neatly pressed HSTs will form the “legs” of your stars within the quilt blocks.
Step 4: Creating Center Half-Square Triangles
The Forest Light Quilt features distinct star patterns, and for each star, you’ll need additional HSTs to form its vibrant center. To create these, simply repeat the precise steps 1 through 3. This means you will take another set of one printed 10-inch square and one background 10-inch square, mark them, sew them, cut them, and then press them to yield another eight half-square triangles. From this batch, set aside four of these HSTs. These specific four will be used to construct the distinct center of two of your star blocks. Keep them separate from your “leg” pile to avoid confusion.
Step 5: Trimming for Perfect Blocks
Consistency in block size is paramount for a professional-looking quilt. Each of your newly formed half-square triangles needs to be trimmed to a uniform 4 1/2″ square. This step, while sometimes tedious, is absolutely essential for achieving perfectly aligned seams and a flat quilt top. Place your squaring ruler over each HST, ensuring the 45-degree line on your ruler aligns precisely with the seam running through the center of your HST. Trim off any excess fabric from all four sides. Take your time with each block, as accuracy here will save you frustration later during assembly. A well-trimmed block is the foundation of a beautiful quilt.
Step 6: Assembling the Star Legs
With your meticulously trimmed HSTs ready, let’s start constructing the star “legs.” From your pile of HSTs designated for legs, select two pairs. Each pair should consist of two HSTs. Arrange one pair so that when sewn, the background fabric forms a continuous line in the middle, creating a larger triangle shape. The printed fabrics will form the outer edges. Sew these two HSTs together along the shared edge with a consistent 1/4-inch seam allowance. Repeat this process to create a total of four such units. Once sewn, carefully press all these units open. This pressing step ensures your seams are flat and that your units will lay neatly when combined into larger blocks.
Step 7: Constructing the Center Four-Patch
Now, retrieve the four half-square triangles you set aside specifically for the star centers. Lay them out on your work surface. Arrange them so that the printed portions of the fabric come together to form a striking diamond shape in the middle, with the background fabrics framing it. Once you are happy with the visual arrangement, sew these four HSTs together, two by two, to create two pairs. Then, sew these two pairs together to form a cohesive four-patch block. This central diamond will be the focal point of your star block, so ensure your seams are pressed neatly to minimize bulk.
Step 8: Creating Block A – The First Star Block
With the legs and the center four-patch complete, it’s time to assemble Block A, a primary component of your quilt. Lay out your components on a flat surface in a 3×3 grid. Place your carefully constructed four-patch (from Step 7) in the very center. Then, position the four “leg” units (from Step 6) on each side of the center four-patch, forming the points of your star. For the four corners of this 3×3 grid, you will use four pieces of plain 4 1/2 inch background squares. These background squares will allow the star to truly shine. First, sew the middle row together, joining the leg unit, the four-patch center, and another leg unit. Then, sew the top row, which consists of a background square, a leg unit, and another background square. Repeat for the bottom row. Once you have three complete rows, sew these rows together to form Block A. Press all seams thoroughly with an iron, being careful not to stretch the fabric. This star block is a fundamental unit, and you will be making many of them!
Step 9: Creating Block B – The Alternating Star Block
To add variety and the mesmerizing “forest light” effect to your quilt, you’ll need an alternating Block B. While Block A features a background square at its corners, Block B introduces more printed fabric for a different visual impact. For Block B, you will need four printed squares (these will be 4 1/2 inch squares cut from your printed fabric, not HSTs), eight pieces of the star legs (prepared in Step 6), and four half-square triangles for the middle (prepared in Step 7 for the center diamond). The assembly process for Block B follows a similar logic to Block A. Lay out your components in a 3×3 grid. The key difference is that the corners will be filled with the 4 1/2 inch printed squares, and the center will be your four-patch. The legs will still radiate outwards from the center. Carefully arrange these elements and sew them together in rows, then sew the rows together to form Block B. Press your finished Block B, ensuring all seams are flat and neat. Creating both Block A and Block B will allow you to generate the stunning alternating pattern that gives the Forest Light Quilt its distinctive charm.
Step 10: Assembling the Quilt Top Rows
With a healthy stack of both Block A and Block B, it’s time to bring your quilt top to life. You will need to create five horizontal rows for your quilt. Each row will consist of four blocks. The beauty of the Forest Light Quilt lies in its alternating block pattern. For each row, you will alternate between Block A and Block B. For example, a row might be A-B-A-B, or B-A-B-A. Carefully lay out your blocks on the floor or a large design wall to ensure you like the arrangement and that the alternating pattern is consistent. Pin your blocks together along their shared edges, then sew them with a precise 1/4-inch seam allowance. Press the seams for each row in opposite directions (e.g., press seams to the left for Row 1, to the right for Row 2, and so on). This “nesting” technique will allow your seams to interlock when you join the rows, creating perfectly matched points and a beautifully flat quilt top.
Step 11: Adding the Borders
The borders provide a finishing touch, framing your beautiful quilt top and adding to its overall size and appeal. First, attach the inner border. Cut strips of your inner border fabric to 2 1/2 inches wide. Measure the length of your quilt top and cut two strips to that exact length. Attach these to the sides of your quilt top. Then, measure the new width (including the first two border strips) and cut two more 2 1/2 inch strips to this length, attaching them to the top and bottom. This method, often called “measure-as-you-go,” ensures your borders fit perfectly without wavy edges. Press seams outwards towards the border. Next, repeat this process for your outer border using 6-inch wide strips. This wider outer border provides a substantial frame, enhancing the visual impact of your quilt. Once both borders are attached, give your entire quilt top a final pressing. You now have a magnificent Forest Light Quilt top, ready for batting, backing, quilting, and binding!
Finishing Your Enchanting Forest Light Quilt
Congratulations on completing your Forest Light Quilt top! The careful selection of fabrics, combined with the precise execution of the “Easy Eight” method and block assembly, has resulted in a truly stunning piece. This quilt showcases a harmonious balance of patterns and a captivating depth that evokes the subtle beauty of light filtering through a forest canopy. Remember, quilting is a journey of patience and precision, and every stitch contributes to the unique story of your creation.
While this tutorial focused on the quilt top, the next steps typically involve layering your quilt top with batting and backing fabric, securing it with basting, and then machine or hand quilting it to hold all layers together. Finally, a carefully applied binding finishes the raw edges, completing your Forest Light Quilt. We encourage you to personalize your quilt further by experimenting with different quilting designs or exploring alternative fabric choices for future projects.
We hope this detailed guide empowers you to confidently create your own Forest Light Quilt, an heirloom in the making that will surely be cherished for years to come. Happy quilting!