
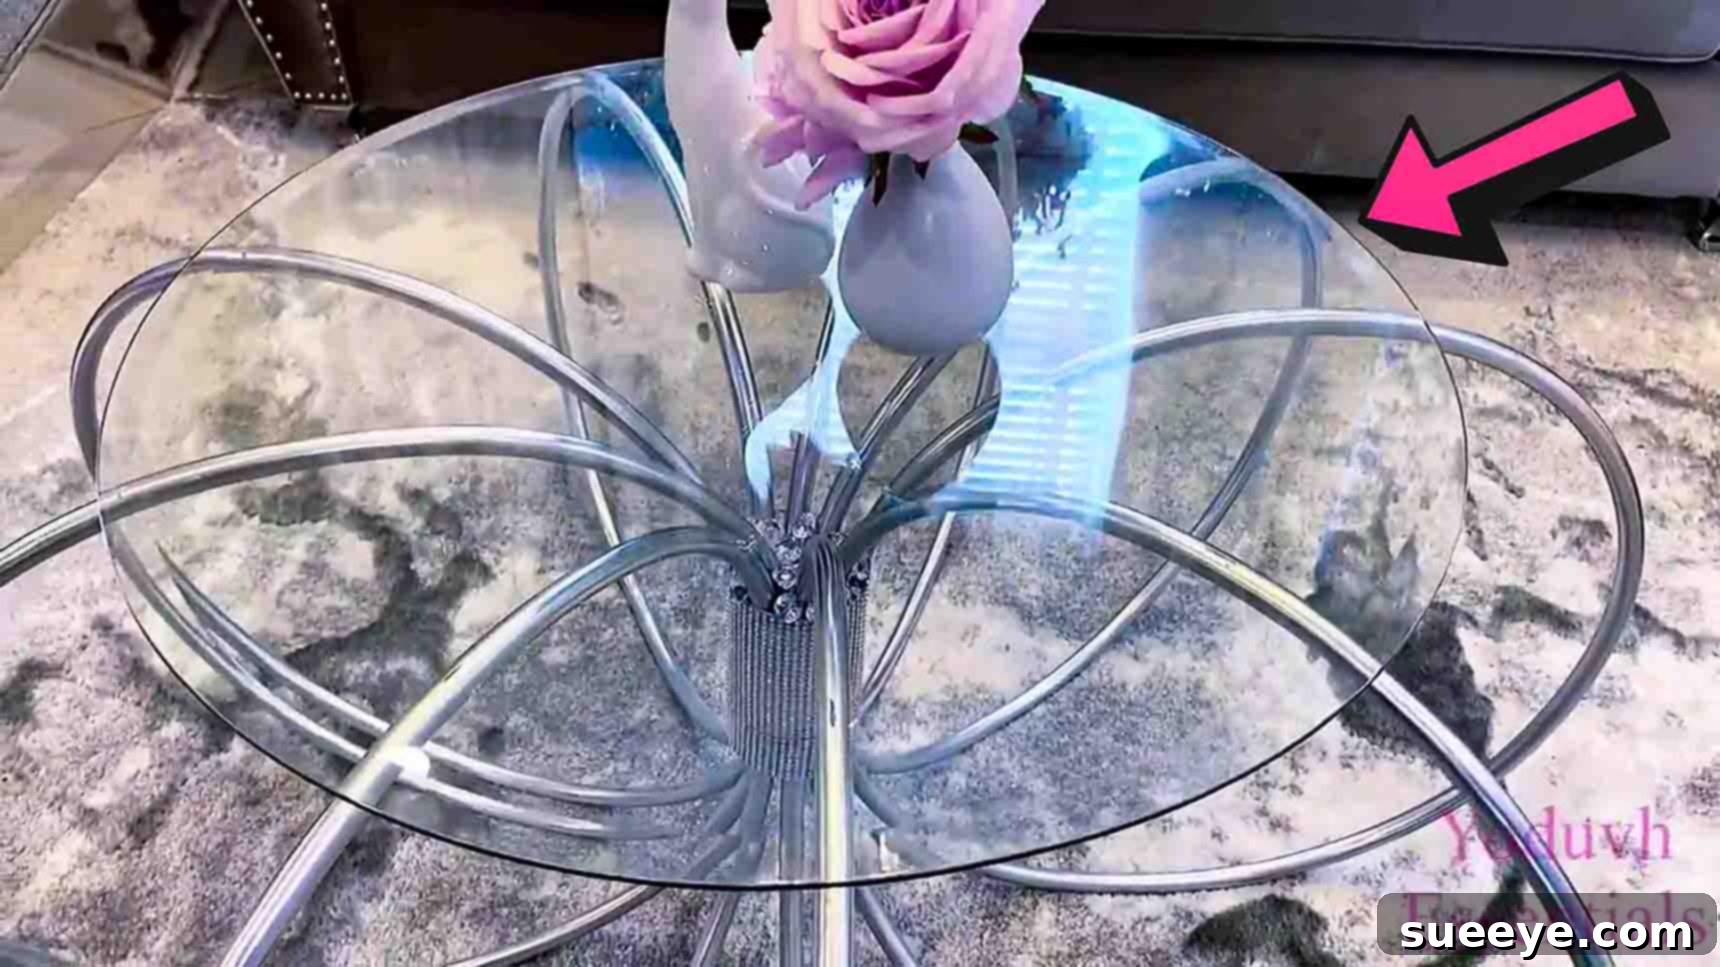
Are you yearning to infuse a touch of elegance and uniqueness into your living space without breaking the bank? Picture this: a stunning, designer-inspired coffee table that becomes the focal point of your living room, sparking conversations and admiration from every guest. What if we told you that this exquisite piece of furniture could be crafted by your own hands, using materials as unexpected as humble hula hoops? That’s right! Gone are the days of settling for generic, mass-produced furniture when you can create something truly special and reflective of your personal style.
Many of us find ourselves looking around our homes, wishing for an upgrade to dated furniture pieces. A coffee table, often the centerpiece of a living room, is a prime candidate for a refresh. While the immediate thought might be to browse furniture stores, the world of DIY offers an incredibly rewarding alternative. Not only does it save you money, but it also allows for unparalleled customization and the immense satisfaction of creating something beautiful from scratch. Today, we’re diving into a project that perfectly encapsulates this spirit: a magnificent DIY coffee table made almost entirely from hula hoops. This isn’t just a craft project; it’s an opportunity to transform simple, everyday items into a sophisticated and functional piece of home decor that defies its humble origins. Inspired by the brilliant creators at yoduvh Essentials on YouTube, this project promises a high-end look with surprisingly simple supplies. Prepare to be amazed by how something so playful can be turned into something so chic. Let’s embark on this creative journey together!
Why Choose This Hula Hoop Coffee Table Project?
In an era where conscious consumption and personal expression are highly valued, DIY projects like this hula hoop coffee table stand out. This particular craft offers a multitude of benefits:
- Budget-Friendly Elegance: Forget the hefty price tags of designer furniture. This project uses affordable materials, turning them into a luxurious-looking piece.
- Sustainable & Upcycled: Repurposing hula hoops gives them a new life, contributing to a more sustainable lifestyle and reducing waste.
- Unleash Creativity: From spray paint colors to embellishments, every step allows for personal touches, ensuring your table is truly one-of-a-kind.
- Beginner-Friendly: You don’t need advanced carpentry skills to tackle this project. The steps are straightforward, making it accessible for DIY novices and seasoned crafters alike.
- High-Impact Decor: Despite its simple construction, the finished table has an impressive, eye-catching aesthetic that will elevate any room.
Ready to turn simple hula hoops into a stunning piece of furniture? Let’s gather our supplies and get started on creating a coffee table that will leave everyone wondering where you bought it!
Materials: Crafting Your Hula Hoop Masterpiece
The beauty of this project lies in its simplicity and the readily available nature of its materials. While the core items remain consistent, there’s always room for personal adaptation to truly make the table your own. Here’s a detailed look at what you’ll need:
- 9 pieces 22″ hula hoops: The foundation of your coffee table. The 22-inch diameter provides a good size for a stylish accent table. You can often find these at dollar stores, toy shops, or online retailers. Ensure they are sturdy enough to hold their shape once assembled. For a larger table, you might opt for more hoops or slightly larger diameters, though this will alter the overall scale.
- 8″ zip ties: These smaller zip ties will be crucial for the initial, precise attachment of individual hoops, creating a tight and uniform structure. Look for strong, durable ties that won’t easily snap.
- 11″ zip ties: Longer zip ties are essential for securing larger sections of the hula hoop assembly, particularly for reinforcing the outer structure and ensuring stability. Having a mix of sizes allows for greater flexibility during construction.
- Silver spray paint: This is where the magic truly happens, transforming plastic hoops into what appears to be sleek metal. While silver creates a sophisticated, modern look, don’t hesitate to experiment with other metallic shades like gold, rose gold, or even a matte black for a different vibe. Choose a paint suitable for plastic surfaces and opt for a high-quality brand for better coverage and durability.
- Bling wrap: Also known as rhinestone mesh or diamond wrap, this adds a touch of glamour and covers the central structural elements. It comes in rolls and can be easily cut to size. Silver is a classic choice, but gold or iridescent options could also create a unique effect.
- Strong adhesive: Essential for securely bonding the hula hoops together in the center and attaching the bling wrap and gems. Consider E6000, Gorilla Glue, or a strong clear epoxy for long-lasting results. Ensure it dries clear if you’re worried about visible residue.
- Gems: These decorative elements will elevate the table’s luxurious appeal. Choose acrylic gems in various shapes and sizes to create an intricate pattern or a simple, elegant scattering. Clear, iridescent, or colored gems can be used to match your decor.
Additional Tools & Safety Gear:
To ensure a smooth and safe crafting experience, consider having these on hand:
- Craft knife or sharp scissors: For cutting zip ties, poster board, and bling wrap cleanly.
- Cutting mat: Protect your work surface when using a craft knife.
- Measuring tape or ruler: For precise cutting and placement of materials.
- Pencil or marker: For marking cut lines.
- Drop cloth or old newspapers: Absolutely essential for protecting your work area during spray painting.
- Nitrile gloves: Protect your hands from paint and adhesive.
- Respirator mask: Crucial for respiratory protection when using spray paint in a well-ventilated area.
- Clamps (optional): Small clamps can help hold hula hoops together while adhesive dries, ensuring a tighter bond.
Having all your materials and tools organized before you begin will streamline the process and allow you to focus on the creative aspects of building your stunning new coffee table.
Directions: Your Step-by-Step Guide to a DIY Coffee Table
Step 1: Assembling the Hula Hoops – Building the Foundation
This initial step is critical for the stability and aesthetic appeal of your coffee table. The goal is to create a sturdy, uniform base that looks professional.
Begin by laying out your nine 22-inch hula hoops on a clean, flat surface. The first part of the assembly involves attaching them sequentially. Take one hula hoop and place another directly next to it. Use an 8-inch zip tie to firmly attach the two hoops together at a single point where they touch. Pull the zip tie as tight as possible, ensuring there’s no slack, and trim any excess tail. Repeat this process, adding each subsequent hula hoop one after the other, forming a long, somewhat flexible chain. The 8-inch zip ties are ideal here for creating tight, individual connections.
Once you have all nine hoops connected in a line, it’s time to bring them together to form a circular structure. Gently bend the chain of hoops to connect the first and last hoops. Use the longer 11-inch zip ties for this final closure, as they offer more reach and leverage to pull the entire structure taut. Again, tighten these zip ties securely and trim the excess. This will create a large, somewhat flat, circular ring made of connected hula hoops.
Now, the core stability comes into play. You need to glue all the hoops together in the middle. Carefully align all the hula hoops so they are as evenly spaced and flush as possible. Apply a generous amount of strong adhesive, such as E6000 or a similar industrial-strength glue, to all the points where the hula hoops touch each other in the center of the structure. Work methodically to ensure every contact point receives adhesive. You might find it helpful to place a heavy object in the center or use clamps around the circumference to apply gentle pressure while the glue dries. Allow the adhesive to cure completely according to the manufacturer’s instructions. This might take several hours, or even overnight, but patience here will ensure a robust and durable coffee table base.
Step 2: Finishing Touches – Paint, Bling, and Glass
With the hula hoop structure solidly assembled, it’s time to transform its appearance from playful plastic to sophisticated decor.
First, address the central opening created by the hula hoops. You’ll need to cover this middle part to create a solid surface for embellishment and to conceal the internal structure. A piece of poster board, cardboard, or even a thin wooden disc cut to size will work perfectly. Simply trace the inner circumference of your hula hoop assembly onto your chosen material and cut it out. Secure this piece firmly into the center using additional strong adhesive, ensuring it sits flush with the top edge of the hula hoops. This creates a uniform surface for the next step.
Now, move to a well-ventilated area, preferably outdoors or in a garage with open doors. Lay down a drop cloth or old newspapers to protect your surroundings. Carefully place your hula hoop assembly on the protected surface. Holding the silver spray paint can approximately 8-12 inches away, begin to apply thin, even coats across the entire hula hoop structure. Don’t try to cover it all in one thick coat; this will lead to drips and an uneven finish. Instead, apply multiple light passes, allowing each coat to dry to the touch before applying the next. Rotate the table to ensure complete coverage, paying attention to all angles and crevices. This process will take some time, but patience will reward you with a smooth, metallic finish that truly mimics real metal. Once you’re satisfied with the coverage, allow the paint to cure completely for at least 24 hours, or as recommended by the paint manufacturer, to ensure maximum durability and prevent tackiness.
After the spray paint has fully dried, it’s time to add the “bling.” Take your bling wrap and carefully measure the circumference of the central covered area. Cut the bling wrap to fit perfectly. Apply strong adhesive evenly to the poster board in the center, then carefully press the bling wrap onto the surface, smoothing out any bubbles or wrinkles. Ensure the edges are firmly secured. For extra dazzle, apply individual gems to the open, painted parts of the hula hoops. You can create a specific pattern, cluster them, or scatter them randomly for a starry effect. Use a small amount of adhesive for each gem to ensure they stay in place.
To complete your stunning coffee table, the final touch is to place a glass top onto the hula hoop structure. You can use a pre-cut circular glass top (tempered glass is recommended for safety and durability) that rests on the top ring of the hula hoops. Alternatively, for a truly integrated look, you could have a custom glass piece cut to precisely fit the inner circle of the hula hoops, resting on the central poster board. This creates a flush, seamless surface. If the glass top feels unstable, you can use small, clear adhesive bumpers or silicone dots on the hula hoops before placing the glass to prevent it from sliding. And there you have it – a magnificent, high-end coffee table crafted with your own hands!
Pro Tips for a Flawless Hula Hoop Coffee Table
Achieving a professional-looking finish with any DIY project often comes down to attention to detail and a few clever tricks. Here are some pro tips to help you create an exceptional hula hoop coffee table:
- Prep is Key: Before spraying, gently wipe down the hula hoops with rubbing alcohol to remove any oils or residue. This ensures better paint adhesion and a smoother finish.
- Ventilation and Safety: Always spray paint in a well-ventilated area, preferably outdoors. Wear a respirator mask and gloves to protect yourself from fumes and paint contact.
- Multiple Thin Coats of Paint: This cannot be stressed enough. Instead of one heavy coat, which often leads to drips and unevenness, apply several light, even coats. Allow adequate drying time between each coat. This technique builds up color gradually, creating a durable and flawless finish.
- Reinforce Zip Ties: For extra security, after tightening and trimming the zip ties, you might add a tiny dab of strong adhesive over the zip tie ‘head’ where it locks. This prevents any accidental loosening over time.
- Consider a Primer: If your hula hoops are made of a very slick plastic, a plastic-specific spray primer before your silver paint can drastically improve adhesion and durability.
- Bling Wrap Application: When applying bling wrap, ensure the surface is clean and dry. Use a roller or a flat edge (like a credit card) to gently press down the wrap, smoothing out any air bubbles as you go.
- Gem Placement Strategy: Before permanently gluing gems, arrange them in your desired pattern to visualize the final look. Take a photo to remember your design before applying adhesive.
- Glass Top Stability: If your glass top is prone to sliding, use clear silicone bumpers or small, clear rubber feet on the hula hoop surface where the glass rests. This adds grip and protects the hula hoop’s finish.
- Level Surface: Ensure you are assembling and painting your table on a level surface. This prevents any structural imbalances or uneven paint application.
Customization Ideas: Make It Uniquely Yours
While the silver and bling design is undeniably glamorous, this project offers a fantastic canvas for your personal style. Here are some ideas to customize your hula hoop coffee table:
- Color Palette: Instead of silver, consider gold, rose gold, matte black, or a vibrant metallic blue. You could even use a pastel shade for a more whimsical look.
- Textured Finishes: Explore spray paints that mimic stone, hammered metal, or even a distressed look for an industrial or rustic aesthetic.
- Alternative Embellishments:
- Rope or Twine: Wrap the hula hoops in jute rope or thick twine for a bohemian or coastal vibe.
- Fabric Strips: Use strips of colorful fabric or ribbon to wrap the hoops, creating a softer, textured appearance.
- Natural Elements: Attach dried flowers, small shells, or polished stones for an organic feel, especially under a clear glass top.
- Different Top Surfaces:
- Acrylic Sheet: Lighter and more shatter-resistant than glass, an acrylic top can be cut into custom shapes.
- Wooden Round: For a rustic touch, place a thin, stained wooden circle on top, perhaps with a small lip to hold it in place.
- Mosaic Tiles: For the truly ambitious, create a mosaic pattern on the central board before adding the glass top.
- Lighting Integration: Discreetly weave a strand of battery-operated LED fairy lights through the inner rings of the hula hoops before attaching the glass top for a magical glow.
- Size and Shape Variation: Experiment with different sizes of hula hoops or even different numbers of hoops to create larger or smaller tables, or even multi-tiered designs for a unique display.
Care and Maintenance for Your DIY Coffee Table
To ensure your beautiful hula hoop coffee table remains a stunning centerpiece for years to come, a little care goes a long way:
- Cleaning: For general cleaning, simply wipe down the painted hula hoops and glass top with a soft, damp cloth. Avoid abrasive cleaners or harsh chemicals, as they can damage the paint finish and potentially loosen the adhesive holding the gems.
- Dusting: Regular dusting with a microfiber cloth will prevent dust buildup, especially in the crevices of the hula hoops and around the gems.
- Protect the Finish: Use coasters for drinks and placemats for decor items to protect the glass and painted surfaces from scratches and moisture rings.
- Handle with Care: While the table is sturdy, it’s still a DIY piece. Avoid placing excessively heavy items on it or allowing children to climb on it, as this could strain the structure.
- Adhesive Checks: Periodically check if any gems or parts of the bling wrap have loosened. Reapply strong adhesive as needed to keep everything secure.
Safety First: Important Considerations
Working on DIY projects is rewarding, but safety should always be your top priority:
- Ventilation: Always use spray paint and strong adhesives in a well-ventilated area to avoid inhaling harmful fumes. Open windows, use fans, or work outdoors.
- Personal Protective Equipment (PPE): Wear gloves to protect your skin from paint and adhesive. A respirator mask is highly recommended when spray painting.
- Sharp Tools: Exercise caution when using craft knives or scissors to cut zip ties, poster board, or bling wrap. Always cut away from your body and use a cutting mat.
- Adhesive Curing Time: Allow all adhesives to fully cure as per manufacturer instructions before handling or placing items on the table. Incomplete curing can lead to instability and chemical off-gassing.
- Glass Handling: Be extremely careful when handling the glass top. Tempered glass is strong but can shatter into small pieces if dropped or hit hard. Always wear gloves and safety glasses when positioning it.
- Supervision: If children are involved in the crafting process, ensure constant adult supervision, especially when using sharp tools, spray paint, or adhesives.
DIY Coffee Table Using Hula Hoops: Your New Home Decor Statement
You’ve successfully transformed simple hula hoops into a stunning piece of functional art! This DIY coffee table is more than just a place to set your coffee cup; it’s a testament to your creativity, ingenuity, and ability to see potential in unexpected places. The elegant design, the shimmering silver finish, and the dazzling gems combine to create a statement piece that rivals high-end designer furniture, all achieved with a modest budget and your own two hands.
This project proves that you don’t need a professional workshop or years of experience to create something truly magnificent for your home. It’s an invitation to explore the world of upcycling, to personalize your living space, and to experience the immense satisfaction that comes from bringing a vision to life. So, proudly display your new hula hoop coffee table and enjoy the compliments that are sure to come your way. For a visual guide and additional insights, be sure to watch the full tutorial from yoduvh Essentials on YouTube. Happy crafting, and enjoy your beautiful new addition!