
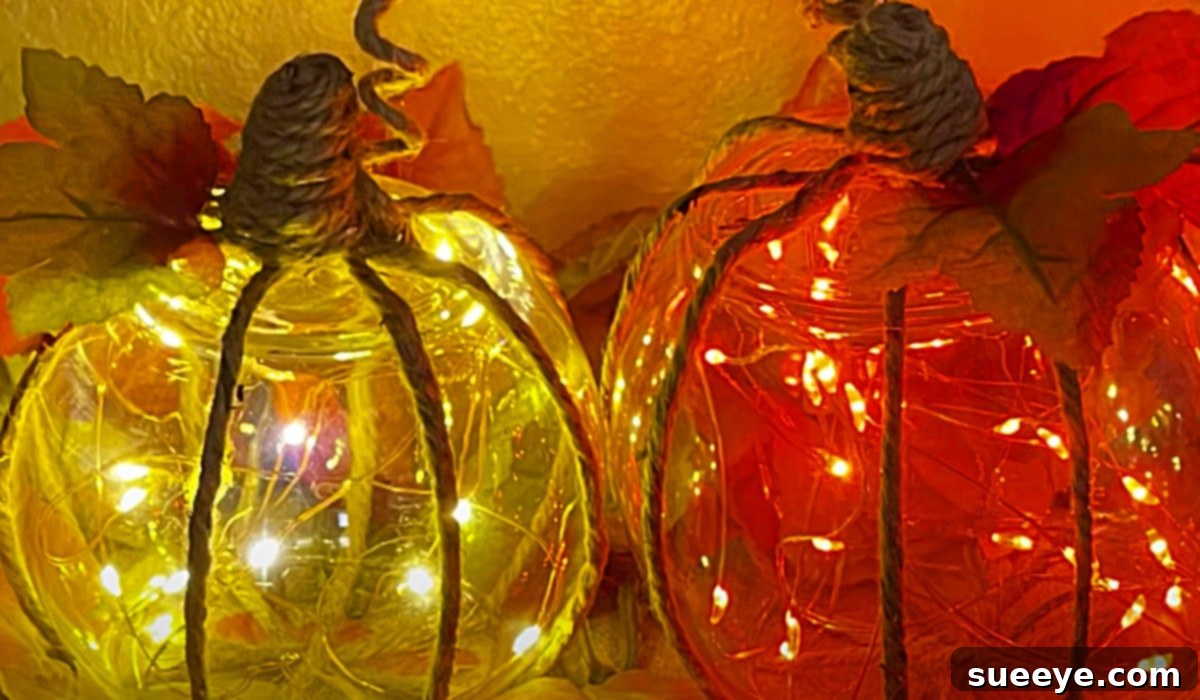
Transform Your Home: Easy DIY Dollar Tree Fall Luminaries and Pumpkin Lights Tutorial
As the leaves begin to change and a crispness fills the air, there’s no better time to infuse your home with the warm, inviting spirit of autumn. Decorating for Fall doesn’t have to break the bank, especially when you discover the incredible potential hidden within your local Dollar Tree. Lately, I’ve been absolutely captivated by the vast array of affordable DIY materials available there, inspiring countless creative projects.
The internet, particularly YouTube, is a treasure trove of innovative crafting ideas. Recently, I stumbled upon a truly brilliant Dollar Tree lighting video tutorial by the talented Mama Can Make It on YouTube. This simple yet stunning concept for Fall luminaries instantly sparked my imagination, and I knew these beautiful DIY Dollar Tree Pumpkin Lights would be the perfect addition to my Autumn display table. What makes this project even more appealing is its incredible ease and the incredibly low cost of materials, making it accessible for even the most novice crafters.
In this comprehensive guide, we’ll delve into recreating these enchanting Fall luminaries. We’ll explore why Dollar Tree is a DIY paradise, walk through each step with detailed instructions, and offer creative tips to personalize your unique autumn decor. Get ready to transform ordinary items into extraordinary Fall masterpieces!
The Magic of Dollar Tree DIY: Affordable and Accessible Decor
Dollar Tree has become a beloved destination for budget-conscious crafters and home decorators alike. The sheer volume of items available for just a dollar provides an unparalleled opportunity to unleash creativity without financial strain. This accessibility means you can experiment with various styles, colors, and textures, allowing you to refresh your home decor seasonally or whenever inspiration strikes.
For Fall decorating, Dollar Tree truly shines. From faux leaves and miniature pumpkins to ribbons and glass vases, the possibilities are endless. These affordable supplies empower you to create high-end looking decor pieces at a fraction of the cost you’d find at specialty craft stores. This not only saves money but also encourages a more hands-on, personalized approach to home styling, resulting in truly unique pieces that reflect your taste.
Setting the Scene: Why Fall Lighting is Essential
Fall is synonymous with coziness, warmth, and a comforting ambiance. As the days shorten and evenings grow longer, strategic lighting becomes crucial in creating that inviting autumn atmosphere. Soft, glowing lights can instantly transform any space, making it feel more intimate and welcoming.
Our DIY Dollar Tree Fall Luminaries are designed to cast a gentle, warm glow, reminiscent of flickering candlelight but with the safety and convenience of battery-operated fairy lights. They add a rustic charm with their twine-wrapped vases and a touch of seasonal elegance with carefully placed fall foliage. Whether adorning a mantelpiece, brightening a dining table, or welcoming guests on a sheltered porch, these luminaries are more than just lights; they are mood setters, encapsulating the very essence of autumn’s beauty.
Gathering Your Supplies: Materials for Your DIY Dollar Tree Fall Luminaries
One of the most appealing aspects of this project is the simplicity and affordability of the required materials, all easily found at Dollar Tree or similar discount stores. Before you begin, gather everything you need to ensure a smooth crafting process.
- Fishbowl Style Glass Vases: These clear glass vases, often found in the floral or home decor section, are the perfect blank canvas. Their wide opening makes them easy to work with, and their classic shape provides a stable base for your design. Consider picking up a few for a cohesive display.
- A Hot Glue Gun and Glue Sticks: Essential for securing the twine and any additional decorations. A good quality hot glue gun ensures strong adhesion and quick drying, making your crafting efficient. Always exercise caution when using a hot glue gun to avoid burns.
- Twine: Natural jute twine or cotton twine adds a beautiful rustic texture to your luminaries. It instantly transforms the plain glass vase into something warm and earthy, perfectly complementing Fall aesthetics. You might find various thicknesses; a medium thickness is ideal for easy wrapping and good coverage.
- A Lighter: Used carefully, a lighter helps to seal the ends of the twine, preventing fraying and giving your finished project a neat, professional look. Always have adult supervision if children are involved and keep flammable materials away.
- Some Fall Leaves (or other Fall decorations): This is where you can truly infuse the autumn spirit. Look for realistic-looking faux maple leaves, oak leaves, or even small berry sprigs. Dollar Tree often has bags of assorted fall foliage. Other ideas include miniature faux pumpkins, acorns, small pinecones, or dried potpourri that aligns with Fall colors.
- Battery-Operated Fairy Lights: The heart of your luminary! Opt for fairy lights with white, gold (warm white), or even subtle red hues to enhance the autumnal glow. Battery-operated lights are crucial as they offer flexibility in placement without the need for an electrical outlet. Ensure you have fresh batteries on hand.
Optional Materials for Enhanced Personalization:
- Acrylic Craft Paint (Matte White or Frosted): For a softer, diffused glow, you might consider painting the inside or outside of the vase with frosted spray paint or a thin layer of matte white acrylic paint before adding twine.
- Glitter or Metallic Paint: A touch of gold or copper glitter, or metallic paint accents, can add an elegant sparkle to your leaves or twine.
- Cinnamon Sticks or Dried Orange Slices: For a delightful sensory experience, these can be tucked among your decorations, adding a natural fragrance.
- Burlap Ribbon or Raffia: To add another layer of rustic texture or a contrasting element.
Step-by-Step Directions: Crafting Your DIY Dollar Tree Fall Luminaries
This project is designed for ease and enjoyment. Follow these simple steps, inspired by Mama Can Make It’s excellent tutorial, to create your stunning Fall luminaries.
Step 1: Preparing Your Vase – The Twine Transformation
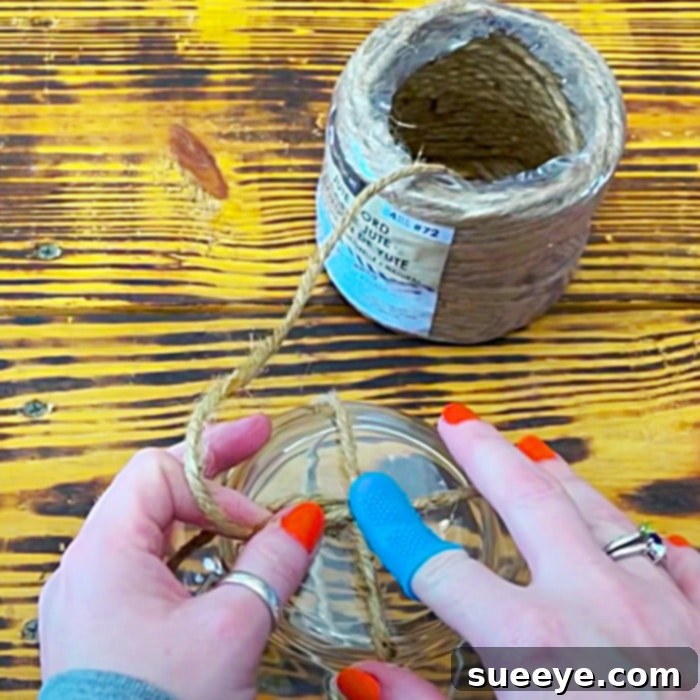
Begin by giving your fishbowl-style glass vase a thorough cleaning to ensure optimal adhesion for the hot glue. Once dry, prepare your hot glue gun. You will start wrapping the twine around the vase, securing it with hot glue as you go. Apply a small dot of hot glue near the base of the vase and firmly press the end of your twine into it. Hold it in place for a few seconds until it sets.
Continue to wrap the twine tightly around the vase, working your way upwards. After every few wraps, or whenever you feel it needs more stability, apply another small bead of hot glue to secure the twine. This prevents it from unraveling later. Maintain a consistent tension as you wrap to ensure an even and neat appearance. You can choose to cover the entire vase or leave a glass section at the top for a different aesthetic. Once you reach your desired height, cut the twine, leaving a small tail. Apply a final dot of hot glue to secure the end, pressing it down firmly. For an extra neat finish, carefully use a lighter to quickly singe and seal any frayed ends of the twine (use extreme caution and do this in a well-ventilated area, away from flammable materials).
Step 2: Illuminating Your Creation – Adding Fairy Lights
Now it’s time to add the magical glow! Carefully uncoil your battery-operated fairy lights. Gently place the battery pack inside the vase, trying to position it subtly at the bottom or along the inside rim where it won’t be overly visible. Begin to arrange the string of lights inside the twine-wrapped vase. You want to distribute them evenly to ensure a consistent and captivating glow. Twist them around, tucking them into the curves of the vase, allowing some strands to drape higher and others to sit lower.
Consider the color of your fairy lights. Warm white or amber lights will provide a soft, inviting radiance, perfect for a cozy Fall evening. If you’ve chosen a festive red or orange, ensure they complement your other decorations. Test the lights by turning them on to see if you’re happy with the distribution before moving to the next step.
Step 3: Embellishing for Autumn – The Decorative Touch
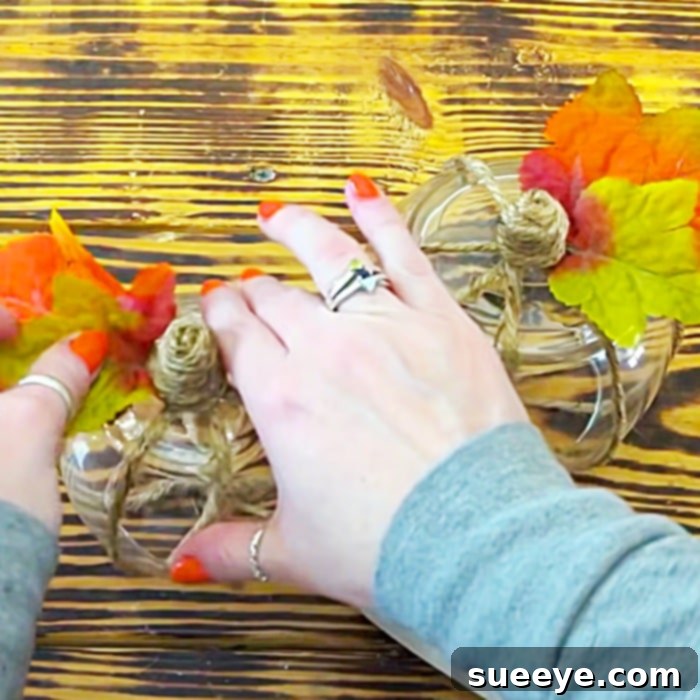
This is where your luminaries truly come to life with the essence of Fall. Take your chosen Fall decorations – whether they are faux leaves, small berries, mini pumpkins, or acorns – and begin to artfully arrange them inside the vase, nestled amongst the fairy lights. You can also carefully glue some elements to the twine on the outside of the vase for added texture and dimension.
Think about creating layers and visual interest. Place larger leaves or berries first, then fill in with smaller elements. Don’t overcrowd the vase; allow the fairy lights to shine through and the rustic twine to remain a prominent feature. If you have different colors of leaves, arrange them to create a pleasing autumn palette. The goal is to evoke the beauty of the season, creating a miniature autumn landscape within your luminary. Use small dots of hot glue to secure any decorations that you want to stay firmly in place, especially if the luminaries will be moved frequently.
Step 4: The Grand Reveal & Placement
With all your elements in place, it’s time for the exciting part! Turn on your battery-operated fairy lights and watch your DIY Dollar Tree Fall Luminary come to life. The soft glow filtering through the twine and illuminating the fall decorations will instantly create a cozy and magical atmosphere.
Consider where these beautiful lights will make the biggest impact in your home. They are perfect as a centerpiece on your dining room table, adding a warm ambiance to family meals. Place them on a mantelpiece alongside other Fall decor for a focal point, or group several together on an entryway table to welcome guests with an autumnal charm. They can also brighten up a bookshelf, a console table, or even a sheltered outdoor space like a covered porch or patio, extending your Fall decor beyond the indoors. Experiment with different arrangements and enjoy the serene beauty these handmade pieces bring to your living space.
Tips for Personalizing and Enhancing Your Fall Luminaries
While the basic design is wonderfully charming, there are many ways to make your Dollar Tree Fall Luminaries uniquely yours:
- Vary the Vessel: Don’t limit yourself to just fishbowl vases. Dollar Tree often has different shapes of glass vases, jars, or even clear plastic containers that can be wrapped in twine. A mix of shapes and sizes can create a dynamic display.
- Introduce Scent: For an extra layer of sensory delight, tuck a few cinnamon sticks, star anise, or dried orange slices among the decorations. You can also lightly spray the faux leaves with a Fall-scented room spray or essential oil blend (ensure non-flammable application).
- Add a Pop of Color: Instead of traditional brown twine, consider using colored twine or adding a thin ribbon in a contrasting Fall color like deep burgundy, burnt orange, or forest green.
- Glitter and Shine: A light dusting of fine gold or copper glitter on some of the leaves or the twine can add an elegant sparkle, especially beautiful when illuminated by the fairy lights.
- Thematic Variations: Adapt the project for other seasons or holidays. For Halloween, use spooky-themed decorations like small spiders or web accents. For winter, switch to frosted branches, faux snow, and cool-toned fairy lights.
- Paint Effects: Before wrapping, consider painting the inside of the glass vase with a translucent amber or orange glass paint for a deeper color glow, or a white frosted spray paint for a softer, more diffused light.
- Stencils and Decals: If you leave a clear section of the glass, you could use Fall-themed stencils (like a pumpkin silhouette or “Harvest”) with etching cream or paint to add intricate details.
Maintenance and Care for Long-Lasting Beauty
Your DIY Dollar Tree Fall Luminaries are designed to bring joy throughout the season and for years to come with minimal care.
- Battery Replacement: Keep spare batteries for your fairy lights on hand. When the glow begins to dim, it’s a simple fix to swap them out.
- Cleaning: If the glass gets dusty, gently wipe the exterior with a soft, dry cloth. Avoid getting the twine wet, as it may loosen or stain.
- Storage: At the end of the Fall season, carefully store your luminaries in a dry, safe place. You can wrap them individually in tissue paper or bubble wrap and place them in a sturdy box to protect them from dust and damage until next autumn. Remove batteries during long-term storage to prevent corrosion.
Conclusion: Illuminate Your Autumn with Dollar Tree DIY
The beauty of DIY lies in its ability to transform simple materials into something truly special and personal. These easy-to-make DIY Dollar Tree Fall Luminaries are a testament to that principle. What started as an inspiring idea from Mama Can Make It has blossomed into a project that offers both aesthetic appeal and profound satisfaction.
By leveraging the affordability and accessibility of Dollar Tree items, you can create stunning autumn decor that rivals much more expensive store-bought alternatives. The rustic charm of the twine, combined with the gentle twinkle of fairy lights and the vibrant hues of faux fall foliage, creates a captivating piece that will undoubtedly enhance your home’s seasonal ambiance.
So, gather your supplies, unleash your creativity, and embark on this delightful crafting journey. We encourage you to try this project and experience the joy of making something beautiful with your own hands. Don’t forget to share your creations and inspire others to embrace the magic of Dollar Tree DIY this Fall!