
How To Shorten A Zipper: Your Ultimate DIY Guide for Perfect Customization
Have you ever found yourself immersed in a new sewing project, only to realize the zipper you have on hand is too long, or the standard lengths available at your local fabric store simply don’t align with your precise design? Perhaps you’re keen to maximize your existing stash of sewing supplies and avoid an extra trip to the store? Whatever your reasons, mastering the surprisingly simple art of shortening a zipper is an invaluable skill for any tailor, crafter, or DIY enthusiast. This technique is not only a time and money-saver but also unlocks a world of customization possibilities for your garments and various creative projects.
This comprehensive guide will walk you through the precise steps to adjust a zipper to your exact desired length, drawing inspiration from expert tutorials, such as those demonstrated by Professor Pincushion on YouTube. We’ll demystify each stage, ensuring you can confidently tackle this common sewing challenge and achieve professional-looking results. Prepare to transform ill-fitting zippers into perfectly tailored fasteners for all your future creative endeavors, adding a touch of bespoke perfection to everything you make!
Why Shorten a Zipper? The Practical Reasons Unveiled
The necessity to shorten a zipper arises far more frequently than one might initially imagine. While manufacturers produce zippers in a variety of standard lengths, custom sewing projects often demand a level of precision that off-the-shelf options simply cannot match. Understanding these common scenarios will highlight why this particular sewing skill is so crucial:
- Custom Garment Creation: When designing and constructing unique apparel—be it a bespoke dress, a tailored skirt, a specialized jacket, or a pair of custom-fit trousers—the exact zipper length is paramount for both aesthetic appeal and optimal functionality. A zipper that is even slightly too long can result in unsightly bulk, an awkward fit, or interfere with the garment’s intended drape and silhouette. Shortening allows for seamless integration into your design.
- Repairs and Alterations: Breathing new life into an existing garment often involves replacing a worn-out or broken zipper. If you possess a zipper that’s a bit too long, the ability to shorten it means you can complete the repair efficiently without the added expense and time of purchasing a new, perfectly sized one. Similarly, when altering clothing to achieve a better fit, the original zipper might also require length adjustment to match the garment’s new dimensions.
- Bag Making and Accessories: For crafting custom handbags, stylish pouches, functional backpacks, or decorative wallets, the zipper length plays a critical role in both the design and the security of the closure. Shortening a zipper provides the ultimate flexibility, allowing you to perfectly match the specific requirements of your pattern and vision.
- Home Decor Projects: Items like decorative cushion covers, elegant pillow shams, and various other home furnishings frequently benefit from discreet, custom-length zippers. These allow for easy removal for cleaning and maintain a tidy, professional appearance without excess zipper material.
- Cost-Effectiveness and Resourcefulness: Instead of purchasing a brand-new zipper for every single project, especially if you have an ample supply of longer zippers, shortening them is a wonderfully budget-friendly alternative. This approach reduces material waste and maximizes the utility of your existing sewing supplies, making your hobby more sustainable.
- Addressing Limited Availability: There are times when locating a zipper in the exact color, specific style, and precise length you require can be a frustrating and time-consuming endeavor. Learning how to shorten a zipper empowers you to adapt readily available options to your unique project needs, circumventing supply chain limitations.
- Upcycling and Repurposing Initiatives: Giving discarded fabrics or garments a second life often calls for creative solutions. A perfectly good, longer zipper salvaged from an old item can be brilliantly repurposed for a new creation once it’s expertly shortened to the appropriate size, promoting eco-friendly crafting.
Understanding these diverse applications underscores why this seemingly minor skill holds such significant practical value and creative potential within the expansive world of sewing and crafting.
Essential Materials For Shortening A Zipper: Gather Your Tools
Before embarking on your zipper shortening journey, it’s wise to gather all the necessary supplies. Most of these items are standard components of a well-equipped sewing kit and should be readily accessible:
- A Zipper: Naturally, this is the central component you intend to modify. This particular shortening method is most effective and easiest to apply to nylon coil zippers or plastic molded zippers. While metal zippers can also be shortened, they typically demand specialized tools for the removal and reattachment of their metal stops, making the process slightly more complex for beginners.
- A Fabric Marker or Tailor’s Chalk: Crucial for making precise, visible, and temporary marks on your zipper tape, indicating the exact point where you want your zipper to end. Ensure it’s a type that will disappear with washing or gentle rubbing.
- A Ruler or Flexible Measuring Tape: Absolutely essential for obtaining accurate measurements and ensuring your new zipper length is precisely what your project requires. Precision here prevents costly mistakes later on.
- A Hand Sewing Needle: Opt for a sharp, sturdy needle that can comfortably pierce through the relatively dense fabric of the zipper tape. An all-purpose sewing needle should work well.
- Strong Thread: Select a durable polyester or cotton thread that either closely matches the color of your zipper tape or the fabric into which the zipper will be sewn. Using a double strand of thread for the stopper will enhance its strength and ensure longevity.
- A Sharp Pair of Fabric Scissors: Invest in a good pair of fabric scissors exclusively for cutting textiles. Sharp blades will make a clean, precise cut through the zipper tape, minimizing fraying and providing a neat finish. Avoid using dull scissors, as they can damage the fabric and make the task harder.
Step-by-Step Directions: How to Shorten a Zipper with Ease
This method focuses on creating a robust new “stopper” at your desired length using hand-stitched thread, which then allows you to safely trim away the excess zipper material. It’s a highly reliable and straightforward technique suitable for most common zipper types.
Step 1: Precisely Determine and Mark Your Desired Length
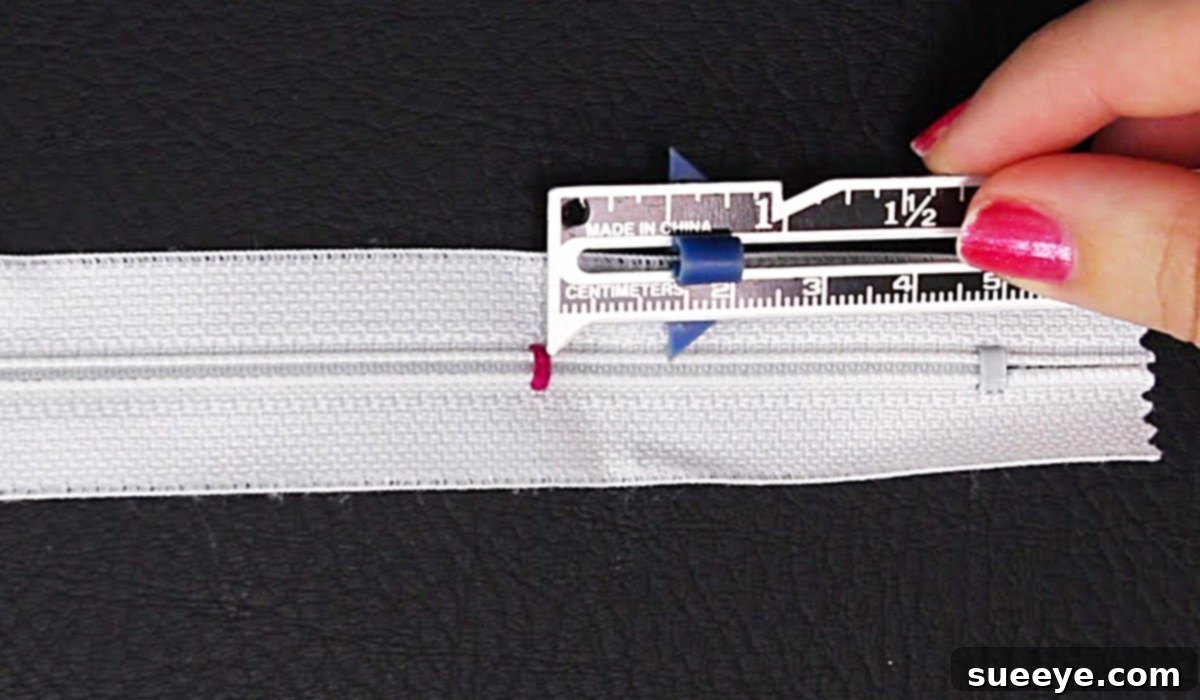
Begin by laying your zipper out flat on a clean, stable surface. Using your trusty ruler or flexible measuring tape, carefully measure from the very top stop of the zipper (the metal or plastic piece that prevents the slider from coming off at the top) down to the exact point where you want your zipper to terminate. This measurement should correspond precisely to the required length specified by your sewing pattern or project needs. Once you’ve identified this precise point, use your fabric marker or tailor’s chalk to make a clear, visible mark extending across both sides of the zipper tape. This distinct mark will serve as the crucial reference point for the top edge of your new, hand-stitched stopper.
Step 2: Create a Robust New Zipper Stopper Using Thread
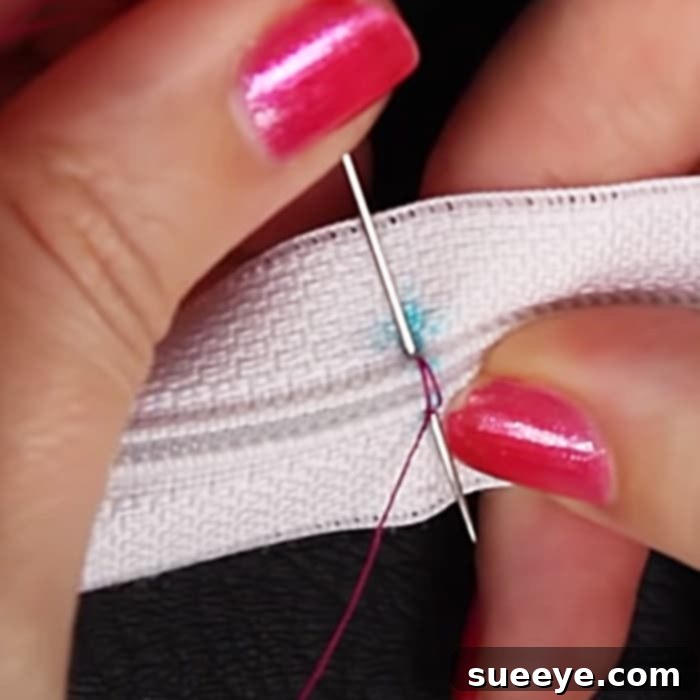
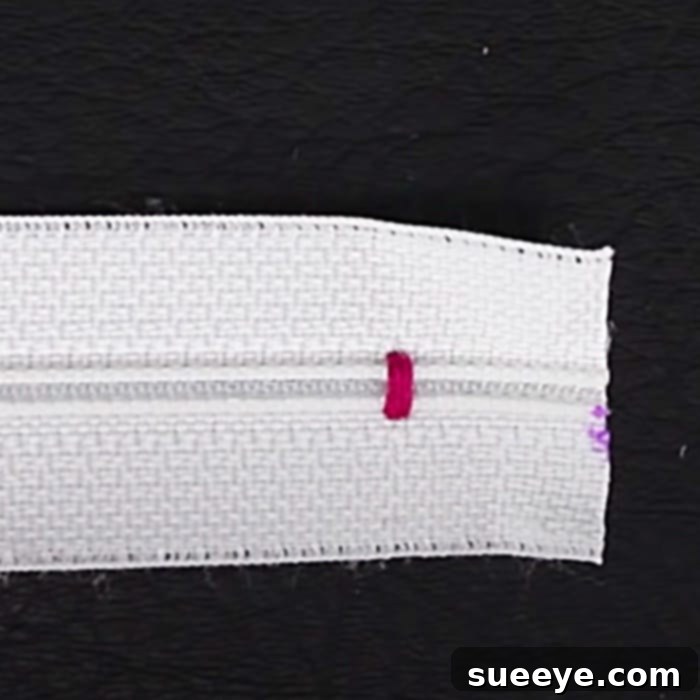
This is arguably the most critical step in the entire process, as its primary function is to prevent the zipper pull (slider) from detaching at the newly shortened end. Thread your hand sewing needle with a strong, double strand of thread. Doubling the thread significantly enhances the durability and strength of your new stopper. Starting from the underside of one side of the zipper tape, bring your needle up just slightly below the mark you made in Step 1. Then, meticulously begin to wrap the thread multiple times around both sides of the zipper teeth, forming a tight, dense, and impenetrable barrier. Envision yourself creating a solid, compact block of thread that sits directly across the zipper chain, effectively blocking the slider’s path. Aim for approximately 1/4 to 1/2 inch (about 0.6 to 1.25 cm) of tightly packed loops. Utilize a whip stitch, a blanket stitch, or a simple yet secure wrapping technique, ensuring that with each pass, you go through the fabric of the zipper tape itself to anchor the stitches firmly. Once you are thoroughly satisfied with the thickness, density, and tightness of your new thread stopper, knot off your thread securely on the underside of the zipper tape. This meticulously hand-stitched bar will now serve as an effective and reliable stopper for the zipper slider.
Step 3: Mark and Carefully Trim the Excess Zipper Tape
With your new thread stopper firmly and securely in place, take your fabric marker once more and make another distinct mark approximately 1 inch (or 2.5 cm) below the very bottom edge of your newly sewn stopper. This additional inch of zipper tape isn’t just arbitrary; it serves a practical purpose by providing a sufficient seam allowance, which makes it considerably easier to sew the zipper securely into your garment or project. It also helps to prevent excessive unraveling of the zipper tape’s raw end over time. Now, taking your sharp fabric scissors, carefully and precisely cut straight across the zipper tape at this 1-inch mark. Strive for a clean, even cut to ensure a professional and neat finish.
Congratulations! Your zipper is now perfectly tailored and ready to be sewn into your project at its new, customized length! The resilient new thread stopper will reliably prevent the slider from detaching, and the strategically left excess tape below provides ample material for secure and professional attachment within your design.
Pro Tips for a Flawless Zipper Shortening Experience
While the fundamental steps for shortening a zipper are straightforward, incorporating a few expert tips can significantly enhance your results, ensuring both durability and a professional finish:
- Select the Ideal Thread: Always prioritize using strong, high-quality, and durable thread for constructing your new stopper. A polyester all-purpose thread is typically an excellent choice due to its strength and resistance to breakage. Whenever possible, endeavor to match the thread color to your zipper tape or the fabric into which the zipper will be sewn. This subtle detail ensures a more seamless and aesthetically pleasing final look.
- Reinforce the Stopper Generously: Do not hesitate to be liberal with your stitches when creating the stopper. The more securely and densely you wrap and stitch the thread, the more robust and reliable your new stopper will ultimately be. For an extra layer of security, particularly if the zipper is destined for heavy use, consider applying a tiny drop of fray check or clear fabric glue over the completed thread stopper once it has fully dried.
- Always Test Before You Commit to the Cut: Before making that final, irreversible cut, gently pull the zipper slider down the length of the zipper until it reaches your newly created thread stopper. Verify that it halts firmly, without any snagging, hesitation, or attempt to slide past the stitches. If you detect any weakness or slippage, immediately add more stitches and wraps to reinforce the stopper until it feels absolutely secure.
- Understand Different Zipper Types: This specific hand-stitching method is most ideally suited for nylon coil zippers and plastic molded zippers, which are generally easier to manipulate. For metal zippers, the process is inherently more involved as it typically requires specialized pliers to meticulously remove the existing metal teeth and bottom stops, often followed by the attachment of new metal stops. If you’re working with a metal zipper, be prepared for a slightly different approach and potentially additional tools.
- Utilize Exclusively Sharp Fabric Scissors: The importance of using sharp fabric scissors cannot be overstated. Dull scissors can mercilessly fray the delicate zipper tape, making it considerably harder to work with and potentially leading to unraveling or an untidy finish. To maintain their pristine sharpness, dedicate a specific pair of scissors solely for cutting fabric and avoid using them on paper or other materials.
- Consider Finishing the Cut Edge: Although leaving an extra inch of zipper tape provides a practical buffer, for projects where the zipper end might be exposed, or if the fabric of the tape itself is particularly prone to fraying, consider an extra finishing step. Applying a small amount of fray check to the raw edge, or meticulously using a zigzag stitch on your sewing machine along the trimmed edge of the zipper tape, can provide an even more polished and durable finish.
The Enduring Benefits of Mastering Zipper Shortening
Beyond the immediate practicality of fitting a zipper to a specific project, becoming proficient in the skill of shortening zippers offers a wealth of long-term advantages for any dedicated sewing enthusiast or aspiring crafter:
- Unleashed Creative Freedom: You are no longer constrained by the limitations of standard zipper lengths. This newfound skill grants you complete design freedom, enabling you to bring even the most unique and intricate custom projects and garments to life without compromise.
- Significant Financial Savings: The ability to purchase zippers in bulk, utilize those you already own, or repurpose zippers from older items—rather than continuously buying specific, precise lengths—can lead to substantial cost savings accumulated over time, making your hobby more economical.
- Contribution to Waste Reduction: By expertly altering and adapting existing zippers, you actively contribute to a more sustainable and environmentally conscious crafting practice. This simple act minimizes textile waste and promotes resourcefulness within your creative pursuits.
- Enhanced Empowerment and Self-Sufficiency: Acquiring this valuable skill means you are better equipped to tackle a wider array of complex alterations, repairs, and design challenges independently. This undoubtedly boosts your confidence in your overall sewing abilities and makes you a more capable maker.
- Superior Problem-Solving Prowess: You’ll be well-prepared and empowered to handle unexpected challenges and minor hiccups that frequently arise in sewing projects. What might once have been a frustrating dilemma can now be transformed into an easy and gratifying fix.
- Attaining a Professional-Grade Finish: A perfectly sized and seamlessly integrated zipper contributes immensely to the overall polished, professional, and high-quality appearance of any handmade item. It’s often these small, precise details that elevate a project from homemade to handcrafted masterpiece.
Applications Beyond Garments: Versatile Uses for Shortened Zippers
While often primarily associated with clothing and fashion, the versatile skill of shortening zippers extends its utility to an impressive array of other creative projects and practical applications:
- Pouches and Wallets: Craft beautifully custom-sized closures for small, bespoke bags, functional coin purses, and elegant wallets, ensuring a perfect fit every time.
- Pencil Cases: Design and create personalized pencil cases or organizers for school supplies or various craft tools, guaranteeing the ideal length for maximum utility.
- Tool Rolls and Organizers: Keep your valuable tools and implements securely organized with precisely measured zipper closures, preventing them from scattering or getting lost.
- Pet Beds: Effortlessly replace or create brand-new zippers for washable pet bed covers, making maintenance and cleaning a breeze for pet owners.
- Sleeping Bags: Apply this technique for essential repairs or thoughtful custom modifications to sleeping bags, enhancing their functionality and longevity.
- Tents and Outdoor Gear: While often requiring heavier-duty, specialized zippers, the fundamental principle of creating a new, secure stop can be intelligently adapted for repairs or custom additions to tents and other outdoor equipment.
- Costumes and Cosplay: Achieve incredibly exact specifications and intricate details for elaborate costume designs and complex cosplay projects, where precision is often key to authenticity.
The sheer versatility and broad applicability of this technique solidify its position as a fundamental and indispensable skill within any crafter’s comprehensive toolkit.
Conclusion: Master This Simple Sewing Hack and Elevate Your Craft!
As we’ve explored, the process of shortening a zipper is far from the daunting or intimidating task it might initially appear to be. In reality, it’s a straightforward, highly practical, and incredibly empowering technique for anyone who cherishes the art of sewing. No longer will your creative vision be constrained by predetermined zipper lengths, nor will you need to expend valuable time and money tirelessly searching for that elusive “perfect” size. With just a few basic tools, a clear understanding of the steps, and a touch of patience, you now possess the knowledge and ability to customize zippers to fit any project, achieve a remarkably professional finish, and significantly expand your creative horizons.
This simple yet profoundly effective sewing hack, expertly demonstrated by reliable resources like Professor Pincushion, truly makes a tangible difference in the overall quality, customizability, and satisfaction derived from your handmade items. We highly encourage you to give it a try on your very next sewing project. You’ll quickly discover just how effortlessly rewarding it is to consistently have perfectly sized zippers, elevating your craft one precise stitch at a time!