
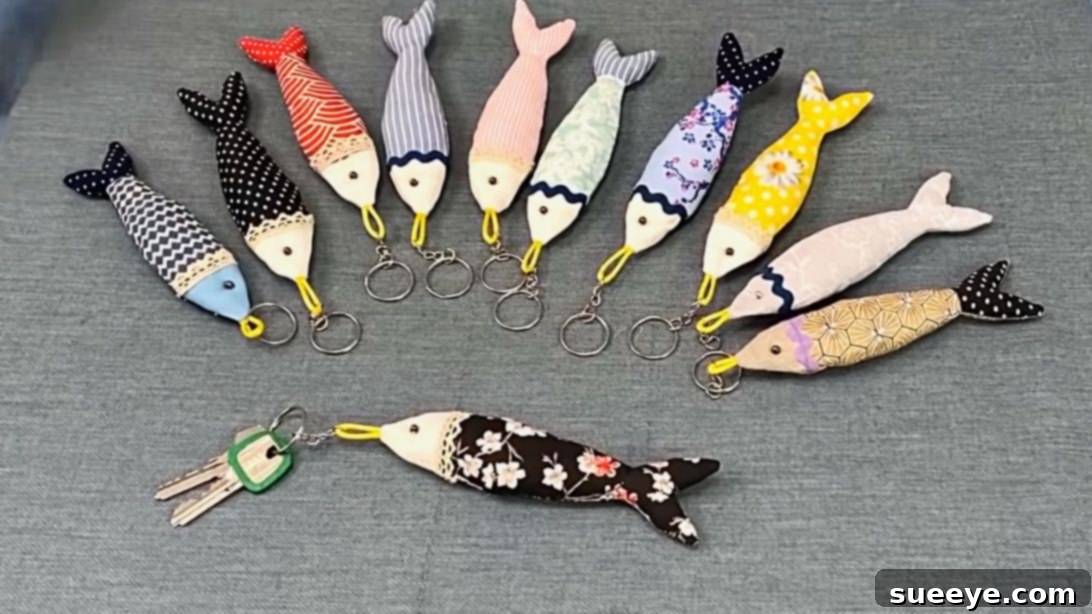
In a world increasingly focused on sustainability and creative expression, the art of upcycling fabric scraps has gained immense popularity. Far more than just discarded remnants, these small pieces of textile hold boundless potential for crafting unique and charming accessories. From stylish bags and intricate bracelets to custom belts and various decorative items, your imagination is the only limit when working with fabric scraps. Even with just basic sewing skills and a spark of creativity, you can transform these overlooked materials into delightful treasures.
Among the myriad of possibilities, this particular guide presents an irresistibly charming and surprisingly simple project: the fabric sardine keychain. Drawing inspiration from the ingenious tutorial by Estadistica Datos del Mundo, we’ll walk you through crafting these adorable keychains, perfect for adding a whimsical touch to your keys, bags, or even as delightful zipper pulls. This project is incredibly beginner-friendly, making it an ideal entry point for anyone looking to dip their toes into the world of sewing. Imagine the joy of gifting a handmade sardine keychain to friends and family, a testament to your thoughtfulness and skill. Beyond personal enjoyment, these unique creations also hold significant potential as marketable items. Platforms like Etsy or eBay offer fantastic avenues to showcase and sell your handmade sardine keychains, allowing you to turn your crafting passion into a profitable venture. To truly make your keychains stand out, consider experimenting with a vibrant array of fabric designs and textures, transforming each sardine into a miniature work of art. Dive into the following comprehensive instructions to begin your journey into crafting these delightful fabric sardine keychains.
Why Make Your Own Fabric Sardine Keychains?
Beyond the sheer joy of crafting, making your own fabric sardine keychains offers a multitude of benefits, making this project particularly rewarding:
- Embrace Sustainability and Upcycling: This project is a fantastic way to utilize leftover fabric scraps that might otherwise be discarded. By transforming these remnants into something beautiful and functional, you contribute to a more sustainable lifestyle, reducing waste and giving new life to forgotten materials.
- Unleash Your Creativity: With an endless array of fabric patterns, colors, and textures available, each sardine keychain you create can be a unique expression of your personal style. Experiment with different combinations to craft a truly bespoke collection.
- Perfect for Beginners: The steps involved are straightforward and don’t require advanced sewing techniques, making it an ideal project for those new to sewing. It’s a great way to practice basic stitching, turning, and stuffing skills.
- Heartfelt Handmade Gifts: A handmade gift carries a special sentiment that store-bought items simply cannot replicate. These sardine keychains make charming, thoughtful presents for friends, family, teachers, or anyone who appreciates a touch of handmade whimsy.
- Potential for Passive Income: For the entrepreneurial crafter, these keychains present an excellent opportunity to generate income. With their unique appeal and relatively low material cost, they can be a popular item on online marketplaces like Etsy, at local craft fairs, or through custom orders.
- Customizable and Versatile: Not limited to just keychains, these fabric sardines can be adapted into bag charms, zipper pulls for jackets or backpacks, decorative ornaments, or even cat toys (ensure all small parts are securely sewn if making for pets).
Essential Materials for Your Fabric Sardine Keychain
Gathering all your supplies before you begin will ensure a smooth and enjoyable crafting process. Here’s a detailed list of what you’ll need to create your charming fabric sardine keychains, along with some tips for selection:
- Fish Sardine Pattern: This is your template for the sardine shape. You can find printable patterns online or create your own unique design. Ensure it’s roughly 2.4 inches in width for consistency with the fabric strip sizes.
- Fabric Scraps (preferably cotton or cotton blends for ease of sewing):
- 2 pieces of Fabric A (e.g., solid white or a subtle contrasting color): Approximately 2.4″ x 2.4″ squares. These will form the “head” section of your sardine.
- 2 pieces of Fabric B (e.g., a vibrant patterned design): Approximately 2.4″ x 4.1″ rectangles. This will be the main “body” segment of your sardine, offering a great opportunity to showcase interesting prints.
- 2 pieces of Fabric C (e.g., a charming polka dot or another complementary pattern): Approximately 2.4″ x 2.6″ rectangles. This piece will form the “tail” section, adding another layer of visual interest.
- Tip: Choose fabrics that complement each other in color and pattern for a cohesive look. Cotton is highly recommended for beginners due to its stability and ease of handling.
- Wave Ribbon: Approximately 2 pieces of 2.8″ length. This decorative trim adds a delightful touch, mimicking the rippled edge of a sardine can or simply providing visual flair. Experiment with different colors to match your fabric choices.
- Rope (or sturdy cord/twine): Approximately 2.4″ length. This will form the loop for attaching the keyring, so choose something durable yet flexible enough to sew through.
- Microfiber Padding (or poly-fill stuffing): This soft, resilient material is used to give your sardine keychain its plump, three-dimensional shape. Ensure you have enough to firmly stuff both keychains.
- Small Beads: 2 beads per keychain. These will serve as the eyes for your sardine, bringing it to life. Black beads are traditional, but you can use any color that complements your fabric.
- Keyring: 1 per keychain. The essential component that transforms your fabric creation into a functional keychain.
Essential Tools You’ll Need:
Beyond the raw materials, a few basic sewing tools will make this project significantly easier and more enjoyable:
- Sewing Machine (or Hand Sewing Needle): While a sewing machine speeds up the process and provides neater stitches, this project is entirely doable by hand for those who prefer or don’t have access to a machine.
- Matching Thread: Select a polyester thread that matches or subtly contrasts with your fabrics for strong, inconspicuous seams.
- Fabric Scissors: Sharp scissors are crucial for precise cutting, especially when working with small pieces and curves.
- Iron and Ironing Board: Essential for pressing seams open and flat, which contributes significantly to a professional finish.
- Pins: To secure fabric pieces together before sewing, preventing shifting.
- Fabric Marker or Chalk: For accurately tracing your sardine pattern onto the fabric.
- Ruler or Measuring Tape: For accurately cutting fabric pieces and measuring allowances.
- Tweezers or Hemostat: Invaluable for turning small fabric pieces right side out and for stuffing the padding into tight spaces.
Step-by-Step Guide to Crafting Your Fabric Sardine Keychains
Now that you have all your materials and tools ready, let’s dive into the creative process. Follow these detailed instructions carefully, and you’ll soon have a collection of charming fabric sardine keychains. Remember, precision in each step will lead to a beautifully finished product.
Step 1: Preparing Your Fabric Strips
Begin by taking one piece of Fabric A, one piece of Fabric B, and one piece of Fabric C. These three distinct fabric pieces will form one side of your sardine. Place Fabric A and Fabric B right sides together, aligning one of their 2.4-inch edges. Secure them with a few pins to prevent any shifting. Using your sewing machine (or needle and thread for hand sewing), stitch along this aligned edge with a precise 0.4-inch seam allowance. This allowance is crucial for maintaining the intended size and shape of your sardine.
Next, take the sewn Fabric A-B unit and place Fabric C right sides together with the unsewn 2.4-inch edge of Fabric B. Again, align the edges carefully and pin them securely. Sew this seam with the same 0.4-inch allowance. Once both seams are sewn, you will have a long, rectangular strip composed of your three fabric pieces. To ensure a professional finish, carefully open each seam allowance and press them flat with a hot iron. This step is vital for creating a crisp, neat surface and preventing bulkiness, which will be important when turning the fabric later. Repeat this entire process for the second set of Fabric A, B, and C to create the other side of your sardine keychain.
Step 2: Adding Decorative Wave Ribbon
With your two long fabric rectangles prepared, it’s time to add a distinctive decorative element. Cut two pieces of your wave ribbon, each precisely 2.8 inches in length. This length is designed to span across the seam joining Fabric A and Fabric B, providing an eye-catching detail. Take one of your assembled fabric rectangles and carefully position one wave ribbon strip over the seam line that connects Fabric A (the “head” section) and Fabric B (the “body” section). Ensure the ribbon is centered horizontally across the seam, creating a symmetrical look.
Pin the wave ribbon securely in place along both long edges. Then, using a matching thread, carefully sew along both longitudinal edges of the wave ribbon to attach it firmly to the fabric rectangle. A small, neat stitch close to the ribbon’s edge will yield the best results. Repeat this process for the second fabric rectangle, attaching the second piece of wave ribbon in the exact same manner. These decorative ribbons not only enhance the visual appeal of your sardine keychains but also add a touch of texture, making each piece truly unique.
Step 3: Tracing the Sardine Pattern and Preparing for Sewing
Now, take both of your decorated fabric rectangles. Place one rectangle right side down (this means the patterned side or side with the wave ribbon should be facing your work surface, and the wrong side of the fabric should be facing up). Carefully position your fish sardine pattern template on this wrong side of the fabric. Using a fabric marker or tailor’s chalk, trace the outline of the sardine pattern precisely onto the fabric. Pay close attention to the details of the shape.
Before you remove the pattern, make sure to mark a crucial 1.4-inch gap along the top or bottom straight edge of the sardine, which will later serve as the opening for stuffing. This gap is essential, so double-check its placement. Repeat this tracing process for the second fabric rectangle, ensuring the pattern is mirrored if your design requires it, or simply identical if not. Once both patterns are traced, place the two fabric rectangles right sides together, aligning the traced outlines as perfectly as possible. Secure the layers firmly with multiple pins around the entire traced outline, paying special attention to the areas around the mouth and tail. This meticulous pinning prevents the fabric from shifting during the sewing process, ensuring a clean and accurate final shape.
Step 4: Attaching the Loop and Sewing the Sardine Shape
Before sewing the two sardine halves together, we need to insert the rope loop for the keyring. Take your 2.4-inch piece of rope and fold it precisely in half, creating a loop. Now, carefully insert the folded rope between the two pinned fabric pieces, positioning the raw ends of the rope exactly at what will be the mouth of the fish. The loop itself should extend inwards, safely tucked between the fabric layers, while the raw ends are flush with the edge you’re about to sew. Pin the rope ends in place to ensure they don’t shift during sewing.
With the rope secured, it’s time to sew the sardine shape. Starting from one end of the marked 1.4-inch gap, begin sewing directly along the traced lines, carefully following the curves and contours of the sardine pattern. Continue sewing all the way around the fish until you reach the other end of the marked gap. Crucially, remember to leave that 1.4-inch gap unsewn; this opening is vital for turning your sardine right side out and for stuffing it later. Once your sewing is complete, carefully cut out the fish shape. When cutting, leave a consistent 0.2-inch seam allowance around the entire sewn edge, except for the unsewn gap. For the gap, leave a slightly larger 0.4-inch allowance. This difference in allowance will make it easier to turn and finish the opening neatly.
Step 5: Turning, Stuffing, and Closing the Sardine
With the sardine shape sewn and cut, it’s time for some important finishing touches. Before turning the fabric right side out, make small snips or notches into the seam allowance around all the curved edges of your sardine. Be very careful not to cut through your stitch line. These small cuts will help the curves lay smoothly and prevent puckering once the fabric is turned. Once notched, gently reach into the 1.4-inch unsewn gap and carefully pull the entire fabric sardine right side out. Take your time with this step, especially with the smaller areas like the tail and nose. Use a blunt tool, like a chopstick or the back of a pen, to gently push out all the seams and curves, ensuring a perfectly formed sardine shape.
Now comes the fun part: stuffing! Take small tufts of microfiber padding (or poly-fill) and, using a pair of tweezers or a hemostat, begin to carefully fill the sardine through the opening. Distribute the padding evenly throughout the entire shape, pushing it firmly into the tail, head, and body sections. The goal is to achieve a plump, firm, yet soft sardine. Avoid overstuffing, which can distort the shape, or understuffing, which leaves it floppy. Once you are satisfied with the firmness and shape of your sardine, it’s time to close the opening. Neatly fold the raw edges of the 0.4-inch seam allowance inwards at the gap. Using a needle and thread, hand-sew the opening closed with an invisible stitch (also known as a ladder stitch or blind stitch). This creates a seamless finish, making the opening practically disappear.
Step 6: Adding the Eyes and Final Assembly
Your fabric sardine is almost complete! The final touches will bring it to life. Take your two small beads, which will serve as the sardine’s eyes. Using a strong needle and matching thread, carefully sew one bead onto each side of the sardine’s “head” section. Position the beads symmetrically and in a place that looks natural for eyes. Make sure to secure them firmly with several stitches so they don’t come loose with daily use. You might consider knotting the thread discreetly inside the sardine to hide the ends.
Finally, retrieve your keyring. The rope loop you embedded in Step 4 now becomes functional. Simply thread the keyring through this rope loop at the top of the sardine. With that last step, your charming, handmade fabric sardine keychain is officially complete! Take a moment to admire your craftsmanship. These adorable keychains are not just practical accessories but also fantastic conversation starters and heartfelt gifts. You’ve successfully transformed simple fabric scraps into a delightful piece of art!
Tips for Perfecting Your Fabric Sardine Keychains
To ensure your fabric sardine keychains turn out beautifully and stand the test of time, consider these helpful tips:
- Choose Quality Fabrics: While using scraps, try to select cotton or linen fabrics that are not too thin or stretchy. These materials are easier to work with, hold their shape better, and will result in a more durable keychain.
- Pressing is Key: Don’t skip the ironing steps! Pressing seams open and flat after each sewing stage creates crisp lines and a professional finish, preventing bulkiness and making subsequent steps easier.
- Accurate Cutting and Tracing: Precision in cutting your fabric pieces and tracing the sardine pattern is paramount. Small inaccuracies can accumulate and affect the final shape. Use sharp fabric scissors and a fine-tipped fabric marker.
- Reinforce Stress Points: When sewing the rope loop into the mouth of the sardine, it’s a good idea to backstitch a few times over the rope ends to reinforce that area. This ensures the loop can withstand the wear and tear of holding keys.
- Even Stuffing: Take your time when stuffing the sardine. Distribute the microfiber padding evenly to avoid lumps and bumps, and ensure the sardine is firm but not overly stiff. Tweezers are your best friend here for reaching into tight spots like the tail.
- Invisible Stitch for Closing: Mastering the ladder stitch (or blind stitch) for closing the opening is a skill worth developing. It creates a virtually invisible seam, giving your finished sardine a polished look.
- Experiment with Embellishments: Beyond wave ribbon, consider adding other small embellishments. Tiny buttons, embroidered details, or even a touch of fabric paint can personalize your sardines even further.
Creative Variations and Beyond the Keychain
Once you’ve mastered the basic sardine keychain, don’t stop there! This project is wonderfully adaptable, inviting you to explore countless creative variations:
- Size Adaptations: Scale the pattern up or down to create different sized sardines. Larger ones could become playful throw pillows or pin cushions, while smaller ones could be miniature charms.
- Fabric Play: Experiment with different fabric types – denim scraps for a rustic look, silk for a luxurious feel, or even felt for a no-fray edge. Just be mindful of how different fabrics handle during sewing and stuffing.
- Embellishment Extravaganza: Instead of simple beads for eyes, consider embroidered French knots, small buttons, or even googly eyes for a comical touch. Add fabric paint details, tiny patches, or even a touch of glitter for extra sparkle.
- A Different Finish: Instead of a rope loop, you could sew a small fabric loop directly into the seam for a more integrated look, or attach a small metal chain for a classic keychain feel.
- Scented Sachets: Fill your fabric sardines with fragrant potpourri or dried lavender instead of microfiber padding to create charming scented sachets for drawers or closets.
The journey of crafting with fabric scraps is incredibly rewarding, transforming humble remnants into cherished items. This delightful fabric sardine keychain project is just one example of the magic you can create with a needle, thread, and a little imagination. Whether you’re making them as thoughtful gifts, unique accessories for yourself, or even a charming product for your small business, each sardine carries a story of creativity and sustainability. So, gather your scraps, ignite your sewing machine, and dive into the satisfying world of handmade crafts. We encourage you to share your creations and inspire others to embark on their own fabric scrap adventures!