
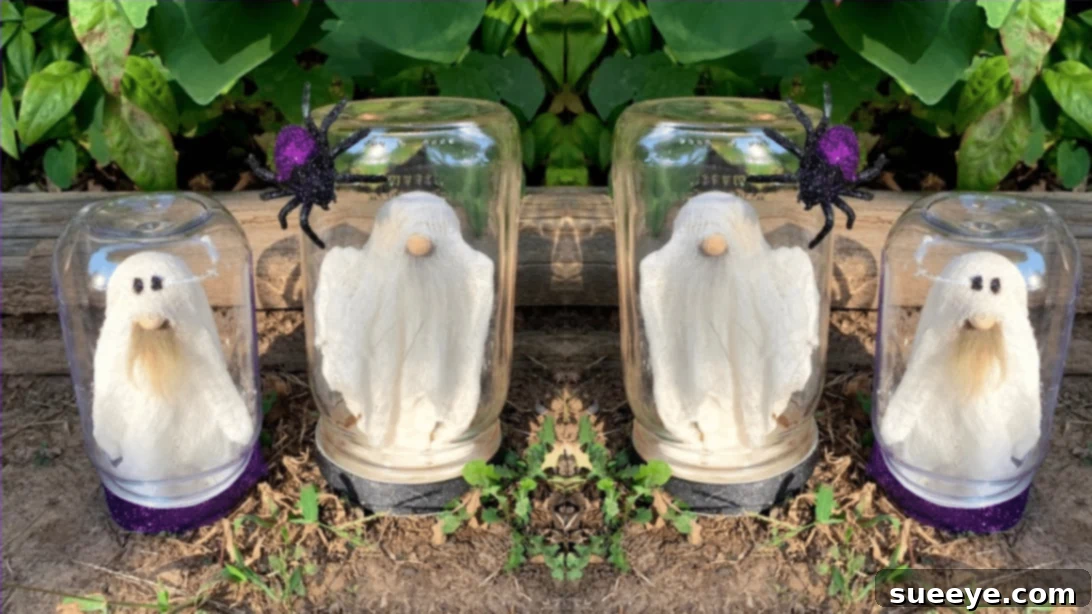
DIY Ghost Gnome in a Jar: The Ultimate Halloween Decor Tutorial
As the air turns crisp and spooky season approaches, there’s no better time to infuse your home with delightful, handmade Halloween charm. Forget the store-bought, mass-produced decorations; this year, let’s create something truly unique and incredibly adorable! We’re talking about the DIY Ghost Gnome in a Jar—a project so irresistibly cute, it promises to become the centerpiece of your festive displays. Imagine these tiny, ethereal gnomes gracing your living room mantel, kitchen counter, or bedside table, casting a whimsical spell on everyone who sees them.
This charming craft offers a perfect blend of spooky and sweet, making it suitable for families and crafters of all skill levels. It’s a fantastic way to personalize your Halloween ambiance, adding a touch of homemade warmth that mass-produced items simply can’t replicate. Whether you’re a seasoned DIY enthusiast or new to the crafting world, this project from Tenderfoot Village on YouTube is designed to be straightforward and immensely rewarding. Dive into this tutorial to craft your own ghostly companions and transform your home into a haven of handmade Halloween joy.
Materials You’ll Need for Your Ghost Gnome
Gathering your supplies is the first exciting step in bringing your ghost gnomes to life. Most of these items are readily available at craft stores, dollar stores, or even around your home. The beauty of this project lies in its flexibility, allowing for creative substitutions where needed. Here’s a comprehensive list of what you’ll require:
- 32 oz Glass Mason Jar or 16 oz Plastic Mason Jar: The choice between glass and plastic depends on your preference and desired size. Glass offers a classic look, while plastic is safer for homes with children or pets.
- Cheesecloth: This light, airy fabric is essential for creating the ghostly drape. Look for it in the baking or craft section of your store.
- Liquid Starch: Used to stiffen the cheesecloth, giving your ghost its defined shape. A common laundry item, it can also be found in craft stores.
- 1 1/2 Inch Dowel End Caps: These form the heads of your gnomes, providing a solid base for the cheesecloth.
- Wood Doll Pins: An alternative to skewers for larger jars, these create a wider “shoulder” effect for the ghost.
- Wooden BBQ Skewers or Small 6-inch Dowel Rod: These provide the vertical structure for your ghost gnome. Skewers are ideal for smaller jars, while dowel rods offer more stability for larger ones.
- Wooden Spools: These act as a base to secure the skewer or dowel rod to the jar lid.
- Small Wooden Beads for the Nose: A key element for the gnome’s characteristic look. Choose a size proportionate to your gnome.
- Faux Fur: This will become the gnome’s iconic beard, adding texture and charm. Select a color that complements your overall decor.
- Hot Glue Gun and Hot Glue Sticks: Your primary tool for quick and strong adhesion. Always exercise caution when using a hot glue gun.
- Craft Glue (e.g., Tacky Glue): Useful for less critical adhesion points or for specific materials that hot glue might damage.
- Black Craft Paint: For adding minimalist facial features or detailing.
- Scissors: For cutting cheesecloth, faux fur, and ribbon.
- Ribbon (Optional): Perfect for decorating the jar lid, adding a festive touch. Choose Halloween-themed colors or patterns.
- Fake Spiders (Optional): For an extra spooky embellishment inside or on the jar.
Step-by-Step Guide to Crafting Your Ghost Gnome
Let’s get crafting! Follow these detailed instructions to create your adorable ghost gnomes. Take your time with each step, and don’t be afraid to add your personal touch.
Step 1: Prepare the Cheesecloth
Begin by taking your cheesecloth and carefully folding it. The goal here is to create four distinct layers, which will provide the necessary volume and opacity for your ghost. Once folded, use your scissors to cut the layered cheesecloth into a neat square. The size of this square will depend on the intended size of your ghost gnome, so ensure it’s large enough to drape over your chosen structure while still allowing for trimming. Set these prepared squares aside for now.
Step 2: Construct the Inner Support Structure
This step establishes the internal framework for your ghost. Apply a generous amount of craft glue to the center of your wooden spool. Carefully press this spool onto the center of the mason jar lid, ensuring it’s securely attached. This will serve as the stable base for your ghost’s body. Next, insert your wooden skewer deeply into the center hole of the spool. For those using larger glass jars and aiming for a ghost with “arms,” use wooden doll pins instead of skewers. Secure them to the spool. Additionally, cut three-inch sections from the wooden skewers and glue these horizontally to the sides of the main skewer or doll pin assembly. These will create the subtle outward extensions that give your ghost its charming, arm-like silhouette.
Step 3: Determine Your Ghost’s Height
With your jar ready, it’s time to decide how tall your ghost gnome will be. Place your glass jar directly beside the skewer setup. Visually assess the desired height of your ghost, considering how much space it will occupy within the jar and how much ‘float’ you want it to have. Once you’ve determined the ideal height, use your scissors or wire cutters to carefully trim the wooden skewer to that measurement. This precision ensures your gnome fits perfectly and looks proportional inside its jar home.
Step 4: Form the Gnome’s Body
Now, we’ll give our ghost gnome its head and shoulders. Take one of your 1 1/2 inch dowel end caps. Apply a strong dab of hot glue to the flat center of the cap. Carefully insert the top end of your trimmed wooden skewer into this glued center. The dowel end cap will serve as the ghost’s head and upper body, providing a rounded shape that the cheesecloth will eventually drape over. Hold it firmly until the glue sets to ensure a stable connection.
Step 5: Drape and Shape the Ghostly Form
This is where your ghost truly takes shape! First, take one layer of your square cheesecloth and drape it over the dowel end cap. This helps you get a final visual of its length. Trim any excess if it appears too long, remembering that it will hang more once stiffened. Next, take one of your cheesecloth squares and fully submerge it in a bowl of liquid starch. Ensure the fabric is thoroughly saturated. Gently squeeze out the excess starch, but leave it damp enough to be pliable. Carefully straighten the cheesecloth and drape it over the top of your assembled body structure (dowel cap and skewer/pins). Allow the fabric to fall naturally. If you used the doll pins in Step 2, the cheesecloth will naturally form charming little “arms” or a more defined shoulder line, enhancing the ghost-like appearance. Adjust the folds and drapes until you are satisfied with the ethereal look. The liquid starch will help hold this shape as it dries.
Step 6: Add the Gnome’s Nose
Now, let’s give our ghost gnome its distinguishing feature: the nose! With a small pair of scissors, snip a tiny, half-inch incision right in the middle of the back of your draped cheesecloth, near where the head would be. This will create a small opening. Apply a small dot of hot glue to one side of this cut and gently press your small wooden bead into the opening, positioning it slightly to the front as if peeking out from under the cheesecloth. This creates the illusion of a nose emerging from the fabric. Ensure it’s securely glued and allow it to dry completely before moving on, as any shifting could alter the gnome’s face.
Step 7: Attach the Faux Fur Beard
Every good gnome needs a fluffy beard! Take your faux fur and snip a small, triangular piece from it, ensuring the cut is clean and the fur fibers are not overly disturbed. The size of this piece should be proportional to your gnome’s head. Apply a line of hot glue directly above the wooden bead you just attached. Carefully position the faux fur onto the glued area, ensuring the fur drapes downwards, creating a full, natural-looking beard. Press firmly to ensure good adhesion. This step is crucial for defining your ghost gnome’s character. Once the beard is attached, it’s vital to let it dry completely, ideally for a full day, to ensure it’s firmly set and won’t detach when handled.
Step 8: Final Touches and Decoration
Your ghost gnome is nearly complete! Now it’s time to add those finishing touches that truly make it shine. Take your chosen ribbon and tie it around the rim of the mason jar lid, creating a festive bow or simple elegant wrap. This adds a pop of color and personality. Carefully place your ghost gnome assembly into the jar, ensuring it stands upright. If desired, you can use a small dab of hot glue to secure the base of the gnome structure to the bottom of the jar for added stability, though it’s often charming to leave it free-standing. For an extra touch of spooky fun, consider gluing a few fake spiders to the outside or inside of the glass jar, creating a playful Halloween scene around your gnome. You can also use black craft paint to dab tiny eyes onto your gnome’s cheesecloth head, if you prefer a more defined facial expression.
Why DIY Halloween Decor Is the Best
There’s a special magic that comes with handmade decorations, especially for a holiday as playful as Halloween. Crafting your own ghost gnomes isn’t just about saving money (though it certainly can be more cost-effective!); it’s about infusing your home with personality and warmth. Each gnome you create will carry a piece of your effort and creativity, making your Halloween display truly one-of-a-kind. DIY projects are also a wonderful way to spend quality time with family, creating lasting memories as you snip, glue, and drape together. Plus, the sense of accomplishment you feel when admiring your finished, adorable ghost gnomes is simply unmatched.
Tips for a Perfect Ghost Gnome
- Patience with Starch: Allow ample drying time for the cheesecloth after soaking it in liquid starch. This ensures your ghost holds its shape perfectly.
- Hot Glue Safety: Always supervise children when using a hot glue gun, and use caution yourself to avoid burns.
- Customize Your Gnome: Feel free to experiment with different sizes of wooden beads for the nose or various colors of faux fur for the beard to create unique characters.
- Secure the Base: If your gnome feels wobbly, add a larger blob of hot glue or a small weight to the base inside the jar for extra stability.
- Test Before Committing: Before applying glue for the cheesecloth, drape it dry to get an idea of the length and how it will fall.
Creative Customization Ideas for Your Ghost Gnomes
While the basic tutorial provides a fantastic foundation, don’t shy away from personalizing your ghost gnomes! Here are a few ideas to spark your creativity:
- Expressions: Use black craft paint to add tiny, simple eyes, or even small ‘O’ mouths for a classic ghost look.
- Accessories: Give your gnomes tiny witch hats, miniature broomsticks, or even tiny pumpkin accents glued to their hands (if using doll pins).
- Lighting: Place a small battery-operated tea light candle inside the jar behind the gnome for a soft, eerie glow that truly brings your ghost to life, especially in the evening.
- Jar Decorations: Beyond ribbons and spiders, you can paint the outside of the mason jar with spooky silhouettes, attach twine, or fill the bottom with faux leaves or tiny decorative pebbles.
- Group Display: Create a family of ghost gnomes in varying heights and jar sizes for a dynamic and charming display.
Displaying Your Spooky Creations
Once your DIY Ghost Gnomes are complete, the fun continues with showcasing them! They are incredibly versatile and can enhance almost any area of your home. Place a pair on your entryway table to greet guests with whimsical charm, or line a few up on your dining room buffet for a festive meal backdrop. They also make enchanting additions to a Halloween-themed tiered tray or nestled amongst books on a shelf. For a truly magical effect, consider grouping them with other subtle Halloween elements like mini pumpkins, faux cobwebs, or flickering LED candles. These gnomes are perfect for adding that subtle, heartwarming Halloween spirit without being overtly scary, making them suitable for all ages.
Conclusion: Embrace the Spirit of Handmade Halloween
Creating your own DIY Ghost Gnome in a Jar is more than just a craft project; it’s an invitation to embrace the joyful, creative spirit of Halloween. With a few simple materials and some enthusiastic crafting, you can transform ordinary items into extraordinary, personalized decor that tells a story. We hope this comprehensive guide has inspired you to grab your supplies and start making these adorable little specters. Share your creations, enjoy the process, and let your handmade ghost gnomes bring an extra dose of charming spookiness to your home this Halloween season!