
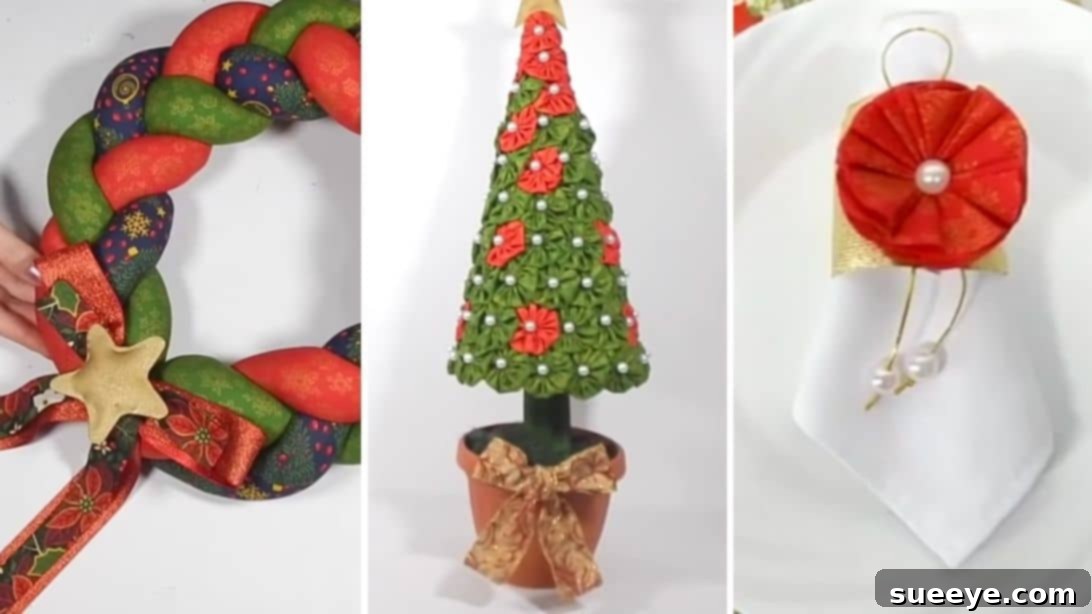
The holiday season brings with it a magical atmosphere, and what better way to embrace its spirit than by infusing your home with unique, handmade decorations? If the thought of sewing Christmas-themed projects feels intimidating, rest assured, you’re about to discover how wonderfully accessible and rewarding it can be. As I was putting the final touches on my own festive preparations—from planning delightful meals to perfecting table settings—I stumbled upon an inspiring compilation by Showofcrafts on YouTube. Their easy-to-follow tutorials presented such charming and simple sewing crafts that I couldn’t wait to share them. These projects are not only perfect for beginners but also offer a fantastic opportunity to personalize your holiday decor, creating cherished pieces that truly reflect your style. Get ready to add an extra special, handcrafted touch to your Christmas celebrations!
Why Sew Your Own Christmas Decorations?
Diving into DIY Christmas decor offers a multitude of benefits beyond just saving money. Each stitch you make imbues your decorations with a personal story and a unique charm that mass-produced items simply can’t replicate. It’s an opportunity to select fabrics that perfectly match your existing color scheme or to experiment with new festive patterns. Handmade decor also makes for thoughtful, heartfelt gifts for loved ones. Plus, the process itself can be incredibly therapeutic, allowing you to unwind and unleash your creativity during a bustling time of year. These projects, specifically curated for their simplicity, ensure that even those new to sewing can achieve beautiful, professional-looking results, making your holiday parties truly unforgettable.
Project 1: Charming Fabric Wreath – A Festive Welcome
A wreath is often the first festive greeting visitors receive, and a handmade fabric wreath offers a soft, inviting alternative to traditional evergreen designs. This project allows for endless customization, letting you choose fabrics that perfectly complement your home’s aesthetic. Imagine a medley of cheerful plaids, shimmering metallics, or classic holiday prints adorning your door or wall.
Materials:
- 110cm x 12cm Fabric (consider using 3 different coordinating fabrics for variety)
- Fiberfill (polyester stuffing)
- Jute twine
- Ribbons (various widths and textures)
- Thin worbla sheet (or stiff felt/cardboard for star patterns)
- Gold Spray Paint (if using worbla/cardboard)
- Fabric Glue
- Hot Glue Gun and Glue Sticks
- A pair of sharp scissors
- Needle and coordinating thread
Step-by-Step Directions:
- Prepare Fabric Strips: Take each fabric piece and fold it in half lengthwise, ensuring the wrong sides are facing out. Press firmly to create a crisp fold.
- Sew the Tubes: Starting about 1 cm (approx. 0.4 inches) from the raw edge, sew along the open side, creating a tube. Remember to leave one end of each tube completely unsewn—this opening will be crucial for turning and stuffing. Repeat this process for all fabric pieces you plan to use (the tutorial suggests three).
- Turn and Stuff: Carefully turn each fabric tube right side out. Using a chopstick or turning tool can make this easier. Once turned, generously stuff each tube with fiberfill. Ensure the stuffing is evenly distributed and firm enough to give the tube shape without being overly rigid.
- Join the Tubes: Take the open ends of your stuffed fabric tubes and align them. Neatly stack and sew these open ends together, securely closing off one side of your future braid.
- Braid the Fabric: Begin braiding the three stuffed fabric tubes tightly. Maintain consistent tension throughout the braiding process to ensure an even and attractive weave. Once braided to the desired length, sew the remaining open ends securely together to prevent unraveling.
- Form the Wreath Shape: Gently twist the braided fabric into a circular shape, bringing the sewn ends together. Overlap the ends slightly and hand-sew them firmly in place to create a seamless, sturdy wreath base.
- Add the Hanging Loop: Cut a length of jute twine, form a loop, and securely attach it to the back top of the wreath using strong fabric glue or by sewing it in place. This will be your hanger.
- Decorate with Ribbons: Select your chosen ribbons and artfully arrange them on the front lower part of the wreath. Secure them in place with hot glue, ensuring a neat and lasting finish.
- Craft Worbla Stars (Optional Embellishment): Trace and cut two star patterns from your thin worbla sheet. Glue these two star cutouts together, inserting a small amount of fiberfill before sealing to give them a slight dimension. Spray paint the stars with gold for a festive shimmer. Once dry, gently curve the pointy edges of the stars for a more organic look.
- Final Touches: Attach your gold worbla stars to the center of the ribbon arrangement on your wreath using hot glue. Ensure all elements are securely fastened.
Project 2: Adorable Fabric Christmas Tree – A Tabletop Delight
Move over, miniature plastic trees! This fabric Christmas tree brings a unique charm and warmth to any tabletop, mantelpiece, or desk. It’s a wonderful alternative for small spaces or as an additional decorative accent in larger rooms. The process of creating individual fabric rounds that mimic foliage is both meditative and satisfying, resulting in a lush, textured tree.
Materials:
- Green Fabric (various shades can add depth)
- Beads or pearls (for hiding stitches)
- Sturdy Cardboard (for cone and stand)
- Masking Tape or strong adhesive tape
- Fabric Glue or Hot Glue Gun
- Small Flowerpot (for the base)
- Craft Clay or floral foam (for weight)
- Old Newspaper or scrap paper
- Decorative Ribbon (for the pot)
- Thin worbla sheet (or stiff felt for star topper)
- Hot Glue Gun and Glue Sticks
- A pair of sharp scissors
- Needle and coordinating thread
Step-by-Step Directions:
- Create Fabric “Leaves”: Using a small round object (like a coin or cup rim) as a template, trace and cut numerous small circular patterns from your green fabric. The more you make, the fuller your tree will be!
- Form Gathered Rounds: Sew a running stitch around the seam edge of each fabric circle. Gently pull the thread tightly to gather the fabric, effectively closing the seam and forming a small, puckered fabric ball. Secure the stitch.
- Embellish with Beads: To neatly hide the gathering stitch and add a decorative touch, sew a bead or attach a pearl to the center of each gathered fabric piece. Repeat for all your fabric “leaves.”
- Construct the Cardboard Cone: Cut a 62cm x 62cm (approximately 24.4 x 24.4 inches) square from sturdy cardboard. Fold it diagonally into a triangle. From the pointed end, trace a smooth arc on one side, then carefully cut along this line. Unfold the cardboard and shape it into a cone, securing the edges firmly with strong tape. This will form the body of your tree.
- Build the Tree Stand: Roll another piece of cardboard into a sturdy cylinder, taping it securely. This will serve as the core of your tree’s stand.
- Assemble the Tree Structure: Cut a thick strip of cardboard and wrap it around the top portion of the cylindrical stand, securing it with tape. Insert this enhanced stand into the cardboard cone, adjusting it until it’s stable and centered. Glue it firmly in place inside the cone.
- Cover the Cone: Completely cover the cardboard cone with green fabric, securing it with fabric glue. Ensure the fabric is smooth and taut, providing a clean base for your decorations.
- Attach Fabric Rounds: Starting from the bottom edge of the fabric-covered cone, begin attaching your small, round, beaded fabric pieces. Overlap them slightly in rows as you work your way up the cone, creating a lush, leafy effect. Continue until the entire cone, up to the top edge, is covered.
- Prepare the Base: Place some craft clay (covered in plastic to prevent crumbling) or a heavy object into the flowerpot for stability. Fill the remaining space with scrunched newspaper and top with green threads or shredded paper to simulate grass or moss.
- Decorate the Pot: Wrap a festive ribbon around the front of the flowerpot, securing it with glue for an elegant touch.
- Final Assembly: Carefully insert the finished fabric tree into the prepared flowerpot, ensuring it stands upright.
- Add the Star Topper: Create a small, fiber-filled star from fabric or worbla (similar to the wreath project) and attach it securely to the very top of your fabric Christmas tree.
Project 3: Elegant Fabric Napkin Holder and Table Mat – For a Refined Setting
Elevate your holiday dinner table with these sophisticated, coordinated fabric accessories. A beautifully set table enhances the dining experience, and these handmade napkin holders and table mats add a touch of bespoke elegance that guests are sure to appreciate. They’re perfect for both formal Christmas dinners and casual festive brunches.
Materials:
- Wide decorative ribbon (approx. 5 inches / 12.7 cm long for each napkin holder)
- Gold string or thin metallic cord
- Beads or pearls (various sizes)
- Coordinating Fabric (for small cutouts and table mat)
- Garter elastic (approx. 0.5 inches / 1.25 cm wide)
- Sturdy Cardboard (for table mat insert)
- Hot Glue Gun and Glue Sticks
- A pair of sharp scissors
- Needle and coordinating thread
Step-by-Step Directions for Fabric Napkin Holder:
- Form the Ribbon Base: Cut a piece of wide decorative ribbon approximately 5 inches (12.7 cm) long. Bring the two short ends together to form a loop, then sew them securely to create the base of your napkin ring.
- Create Beaded String Embellishment: Take a length of gold string and thread several beads or pearls onto it. Once adorned, tie a knot at each end of the string to secure the beads. Form the beaded string into a small loop.
- Attach Beaded String: Attach the looped gold string with beads to the middle of the ribbon loop using hot glue or by carefully sewing it in place.
- Craft Fabric Flower Petals: Cut several small, identical round shapes from your coordinating fabric. For each round, fold it in half, then fold one side to the front and the other to the back, creating a petal shape with a pointed base.
- Assemble the Fabric Flower: Repeat the petal-folding process for all your fabric cutouts. Begin sewing the pointed bases of these petals together, edge-to-edge, until you have formed a full, circular fabric flower.
- Embellish and Attach Flower: Sew a bead or pearl onto the very center of your fabric flower to hide the stitches and add a refined touch. Secure the back of the fabric flower with a strip of hot glue to ensure the petals hold their shape. Finally, hot glue the finished fabric flower to the center of your ribbon napkin holder, over the beaded string.
Step-by-Step Directions for Fabric Table Mat:
- Cut Fabric Circle: Cut a large round piece of fabric, approximately 41cm (16.1 inches) in diameter.
- Prepare Casing: Fold the edges of the fabric inward by about half an inch (1.25 cm) all around the circumference. Press to create a crisp fold.
- Sew the Casing: Sew around the fabric near the folded seam edges, leaving a small gap (approximately 1-2 inches) open. This gap will be used to insert the garter elastic.
- Insert Garter Elastic: Thread a piece of garter elastic through the opening in the casing, guiding it all the way around the mat until it emerges from the other side of the gap. Pull the garter tightly to gather the fabric, creating a ruffled edge.
- Secure Garter: Once the fabric is gathered to your liking, cut off any excess garter elastic and securely sew the ends of the garter together, and then sew the gap in the casing shut.
- Prepare Cardboard Insert: Cut a round piece of sturdy cardboard, approximately 35cm (13.8 inches) in diameter. This cardboard will provide structure and flatness to your table mat.
- Final Assembly: Carefully insert the cardboard circle into the gartered fabric mat. The elasticized edge will hold the cardboard snugly in place, creating a firm and attractive table mat.
General Tips for Successful Christmas Sewing
- Fabric Choice is Key: Don’t be afraid to mix and match patterns and textures. Cotton fabrics are generally easy to work with for beginners, but consider adding touches of velvet, satin, or glitter fabric for extra festive sparkle.
- Measure Twice, Cut Once: Accuracy in cutting your fabric and cardboard pieces will make the assembly process much smoother and ensure a polished final product.
- Safety First: Always exercise caution when using sharp scissors and a hot glue gun. Supervise children closely if they are helping with these crafts.
- Practice Makes Perfect: If you’re new to sewing, practice your stitches on scrap fabric before working on your main project. Don’t worry if your first attempt isn’t flawless; handmade items have character!
- Personalize Your Projects: Feel free to customize these ideas! Add small bells, beads, sequins, or embroidered details to make each piece uniquely yours. Consider adding initials or dates for a memorable touch.
- Involve the Family: These projects are fantastic for family crafting sessions. Assign different tasks to various family members based on their skill levels. It’s a wonderful way to create holiday memories together.
Unleash Your Inner Crafter This Christmas
As you can see, sewing beautiful and festive Christmas decorations doesn’t have to be a daunting task. With these three easy projects from Showofcrafts, you have everything you need to transform your home into a personalized winter wonderland. From the welcoming charm of a fabric wreath to the delightful elegance of a tabletop tree and a sophisticated table setting, each piece you create will carry the warmth and love of a handmade item. So gather your materials, put on some festive tunes, and embark on a joyful journey of holiday crafting. The satisfaction of seeing your handmade decor adorning your home, creating lasting memories, is truly the best gift of all. Happy sewing!