
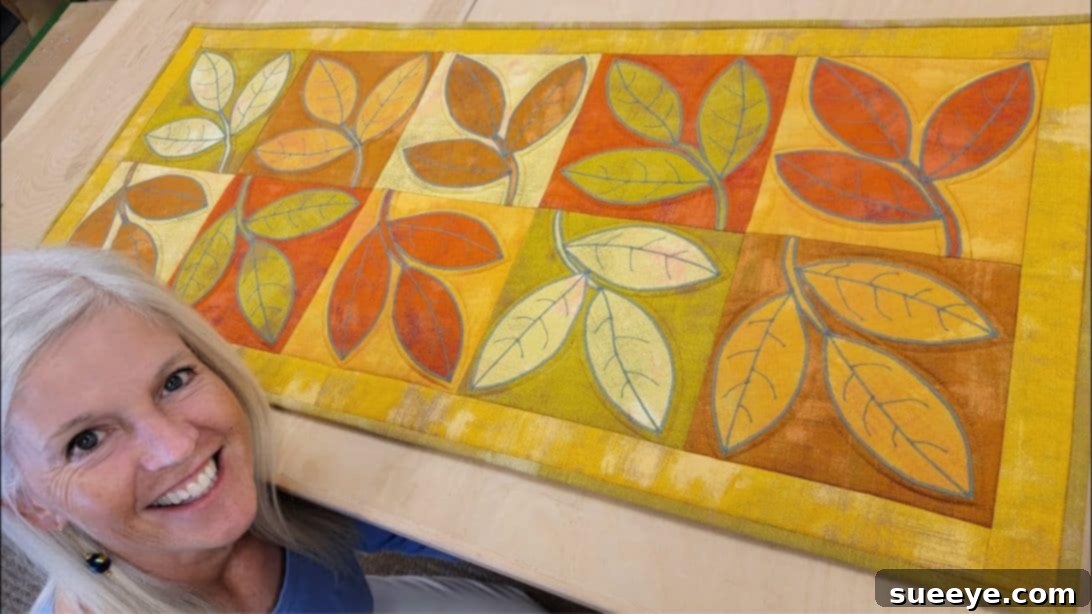
Lovely Leaf Applique Table Runner Quilt Tutorial: Your Guide to Seasonal Home Decor
Transform your dining space or coffee table with a touch of handmade elegance! This beautiful quilted table runner, inspired by the talented creators at Jordan Fabrics, features charming appliqued leaves and is perfect for adding a cozy, fall-themed ambiance to your home. While traditionally designed with rich autumn colors, this versatile pattern allows you to experiment with any fabric colors imaginable, making it adaptable for every season and holiday throughout the year. Imagine pastel leaves for spring, vibrant greens for summer, or even glittering whites for winter! This detailed tutorial will guide you through each step, ensuring a successful and rewarding DIY sewing project.
Creating your own quilted table runner is more than just a craft; it’s an opportunity to personalize your home decor, unleash your creativity, and produce a unique piece that reflects your style. Whether you’re an experienced quilter or a enthusiastic beginner, this project offers clear instructions and a free pattern to help you achieve a professional-looking finish. Not only will you learn valuable applique and quilting techniques, but you’ll also create a cherished item that can be admired for years to come or given as a heartfelt, handmade gift.
Materials You’ll Need:
Before diving into the creative process, gather all your supplies. Having everything ready will make your crafting experience smooth and enjoyable.
- 10 fat quarters or quarter yards of quilting cotton fabric. Choose 5 contrasting colors for your background blocks and 5 coordinating colors for your leaf appliques.
- Heat ‘n Bond Lite Adhesive Iron-On Fusible, or your preferred brand of fusible webbing. This is crucial for securing your applique pieces.
- 24″ x 48″ of quilt batting. A good quality cotton or cotton-blend batting will give your runner a beautiful drape and feel.
- Fray check, optional but highly recommended. This liquid sealant prevents fabric edges from fraying, especially important for applique.
- Fabric marking pen or pencil. Essential for transferring your leaf patterns accurately.
- Sharp fabric scissors or a rotary cutter and a self-healing cutting mat. Precision cutting is key in quilting.
- Sewing machine. Any standard sewing machine capable of a zig-zag stitch will work perfectly.
- Needle and thread. Select a good quality polyester or cotton thread that complements your fabrics. Consider contrasting thread for applique stitching to make your leaves pop.
- Iron and ironing board, for pressing and fusing. Regular pressing throughout the project ensures flat seams and crisp appliques.
- Leaf and Stem Pattern (click here to download and print the free pattern). Make sure to print this at 100% scale for accurate sizing.
Step-by-Step Guide to Your Leaf Applique Table Runner:
Step 1: Fabric Preparation and Applique Tracing
The foundation of any beautiful quilt lies in careful fabric preparation. Begin by selecting your fabrics: pick five distinct colors that will serve as the background for your leaf blocks, and five complementary or contrasting colors for the actual leaf and stem appliques. For instance, if you’re aiming for a fall theme, choose warm oranges, reds, and yellows for leaves, and earthy browns, creams, or deep greens for backgrounds. Once selected, take the time to iron and steam press all ten fat quarters until they are perfectly flat and wrinkle-free. This step is crucial for accurate cutting and sewing.
Next, you’ll prepare your background squares. From your five chosen background fat quarters, cut two 8-inch squares from each, resulting in a total of ten 8-inch squares. These will form the canvas for your appliqued leaves. Now, it’s time to prepare the applique pieces. Cut ten 8-inch squares of fusible webbing. Place one piece of fusible webbing, paper-side up, over your printed leaf and stem pattern. Using your fabric marking pen or pencil, carefully trace the shapes of three leaves and one stem onto the paper backing of the fusible webbing. Repeat this process for all ten pieces of fusible webbing. This will give you ten sets of three leaves and one stem traced on fusible webbing, totaling thirty leaves and ten stems. Once all shapes are traced, roughly cut out each traced shape, leaving a small border (about 1/8 to 1/4 inch) around the drawn line. This rough cut makes it easier to handle the pieces.
Now, pair your roughly cut fusible shapes with your applique fabrics. Decide which applique fabric you want to use for each leaf and stem. Place the fusible webbing piece onto the wrong side of your chosen applique fabric, ensuring the adhesive side is facing the fabric. Lightly iron the fusible webbing onto the fabric, following the manufacturer’s instructions. This will temporarily bond the fusible to the fabric. Once cooled, meticulously cut along the precise drawn lines of each leaf and stem. With all your pieces cut, carefully peel off the paper backing from each appliqued shape, revealing the adhesive on the back. You should now have thirty beautifully cut leaves and ten stems, each with exposed adhesive, ready for placement.
Step 2: Applique Application and Decorative Stitching
With your background squares and applique pieces ready, it’s time to bring your designs to life. Take one 8-inch background square. Arrange three leaves and one stem onto the square, experimenting with their placement. Move each leaf slightly to create a dynamic, natural look—some overlapping, some pointing in different directions. Once you are happy with the arrangement, firmly press the applique pieces onto the background square with a hot iron, following the fusible webbing instructions. This fuses the shapes permanently to the fabric. Repeat this process for all ten background squares, creating ten unique appliqued blocks.
Now for the stitching! To ensure your applique stitching is smooth and prevents puckering, place a piece of tear-away or wash-away stabilizer paper underneath each block before you begin sewing. This stabilization is particularly helpful when working with dense stitches. Load your sewing machine with a thread color that either subtly matches your applique fabric or boldly contrasts, depending on the effect you desire. For a clean, finished edge, use a satin stitch or a very tight, narrow zig-zag stitch around the entire perimeter of each leaf and stem. Take your time, moving slowly and carefully to maintain an even stitch line. Once the outlines are complete, switch to a slightly smaller stitch width or a straight stitch to add the delicate leaf veins. These small details will give your leaves a realistic and intricate appearance.
To further secure your stitches and prevent fraying, especially at the start and end points, apply a tiny drop of Fray Check to each spot where your stitching began and ended. Allow it to dry completely. After all stitching is done and Fray Check is dry, carefully trim any excess threads from both the top and bottom of your block. Then, gently remove the stabilizer paper from the back of each block. Repeat this detailed applique and stitching process for all ten blocks. The consistency and care you put into each block will contribute to the overall beauty of your table runner.
Step 3: Assembling Your Quilt Top and Finishing
Once all ten individual appliqued blocks are meticulously stitched and trimmed, it’s time to assemble your table runner top. Lay out your ten completed blocks in a 2×5 setting (two rows of five blocks each) on a flat surface. This arrangement will give you a table runner approximately 16 inches wide by 40 inches long (before adding borders). Experiment with the order of your blocks until you achieve a visually pleasing sequence of colors and leaf orientations. Once satisfied, carefully stitch the blocks together using a 1/4-inch seam allowance. First, sew the blocks within each row together. Then, press your seams open or to one side to reduce bulk. Finally, join the two long rows, carefully aligning your seams for a neat finish.
Now, let’s add the border. The border frames your design and adds a polished touch. Measure the length and width of your assembled quilt top. Cut two border strips for the long sides and two for the short sides from a coordinating border fabric. A typical border width might be 2 to 4 inches, depending on your preference. Attach the side borders first, pressing seams towards the border. Then, attach the top and bottom borders. This completes your quilt top!
The next step is to create the “quilt sandwich.” Lay your chosen backing fabric (it should be about 4-6 inches larger than your quilt top on all sides) wrong side up on a clean, flat surface, securing it with tape. Place your batting (also 4-6 inches larger than the quilt top) smoothly on top of the backing. Finally, center your quilt top right side up on top of the batting. Carefully baste all three layers together using safety pins, basting spray, or long hand stitches. This prevents the layers from shifting while you quilt.
Quilting is the process of stitching through all three layers to hold them together and add texture. You can choose simple straight lines, stitch-in-the-ditch (quilting along the existing seams), or free-motion quilting if you’re feeling adventurous. Once quilted, trim the excess batting and backing fabric, squaring up your table runner to your desired finished size.
The final touch is the binding, which provides a clean and durable edge. Cut strips of binding fabric (usually 2.5 inches wide) and join them to create a continuous strip long enough to go around the entire perimeter of your table runner plus an extra 10-12 inches. Fold this strip in half lengthwise and press. Attach the raw edge of the binding to the raw edge of your quilt top, machine stitching with a 1/4-inch seam. Once attached, fold the binding over to the back of the runner and either hand-stitch it down for an invisible finish or machine-stitch it for efficiency. For a comprehensive visual guide on assembly, quilting, and binding techniques, make sure to watch the full video tutorial by Jordan Fabrics.
Essential Tips for a Flawless Finish:
- Pressing is Your Best Friend: Never underestimate the power of a good iron. Pressing after every seam and step ensures your project stays flat and your measurements remain accurate.
- Sharp Tools Matter: Use a fresh rotary cutter blade and sharp scissors. Dull tools can lead to inaccurate cuts and frayed edges.
- Test Your Stitches: Before applique stitching on your actual blocks, always do a test run on a scrap piece of fabric with fusible webbing. This allows you to adjust your sewing machine’s zig-zag width and length for the perfect satin stitch.
- Stabilizer for Applique: Don’t skip the tear-away or wash-away stabilizer for applique. It prevents fabric distortion and gives your stitches a professional look.
- Patience and Precision: Quilting and applique are crafts that reward patience. Take your time, measure twice, and don’t be afraid to unpick stitches if something isn’t quite right.
- Thread Choice: For applique, a 40 or 50-weight polyester thread is durable and comes in a vast array of colors.
Customize Your Creation: Seasonal Variations and Beyond
One of the most exciting aspects of this leaf applique table runner is its incredible versatility. While perfect for autumn, don’t limit your imagination! Here are some ideas to customize your runner for any season or occasion:
- Spring Refresh: Choose pastel fabrics like soft pinks, light blues, and delicate greens for your leaves, paired with crisp white or cream backgrounds. You could even adapt the pattern to feature flower shapes!
- Summer Vibrance: Opt for bright, bold primary colors or tropical hues. Imagine lime green leaves on a sunny yellow background, bringing a cheerful summer vibe.
- Winter Wonderland: Create a sophisticated winter runner with silver and gold leaves on deep navy or rich burgundy backgrounds. You could even incorporate white or light blue fabrics and use glittery thread for a frosty effect.
- Holiday Themes: Red and green leaves for Christmas, or even tiny heart shapes for Valentine’s Day. The possibilities are endless!
- Different Shapes: Don’t feel confined to leaves! Use the same applique technique with different patterns: stars, hearts, pumpkins, or even simple geometric shapes to match your home’s aesthetic.
- Size Adaptations: This design can easily be scaled. Make fewer blocks for a smaller placemat or add more for a longer runner that spans a large dining table. You could even make individual coasters!
Care and Maintenance for Your Quilted Table Runner:
To ensure your beautiful handmade table runner lasts for many years, proper care is essential. Generally, quilted items should be washed gently. Machine wash on a delicate cycle with cold water and a mild detergent. Avoid harsh chemicals or bleach. Tumble dry on low heat or, for best results, lay flat to air dry. If needed, a light press with a warm iron can smooth out any wrinkles. Always test a small, inconspicuous area first if you are unsure about a specific cleaning product.
Creating this lovely leaf applique quilted table runner is a truly rewarding experience. From selecting fabrics to the final binding stitch, each step allows you to infuse your creativity into a functional and beautiful piece of home decor. We hope this comprehensive tutorial empowers you to craft a stunning table runner that brings joy and warmth to your home for seasons to come. Happy quilting!
*All image credit belongs to Jordan Fabrics via YouTube. Follow and subscribe to her channel for more inspiring sewing tutorials!