
The enchanting autumn season brings with it a bounty of beautiful pumpkins, often leaving us with a delightful dilemma: what to do with the leftovers once the carving is done or the decorations come down? Far too often, these versatile gourds end up in the trash, which is a missed opportunity for culinary delights, creative projects, and sustainable living. This comprehensive guide will transform your perception of “leftover” pumpkins, turning them into a valuable resource for your kitchen, home, and even your garden.
Instead of letting your beautiful pumpkins wither away, let’s unlock their full potential. From hearty meals to festive beverages and even eco-friendly uses, there’s a myriad of ways to give your pumpkins a second life. Prepare to be inspired by delicious recipes recommended by culinary experts like Tasty, alongside innovative DIY projects that will surprise and delight. Get ready to embrace the true spirit of autumn by making the most of every pumpkin you encounter.
One of the most popular ways to utilize pumpkin flesh is through baking. Imagine the comforting aroma of freshly baked pumpkin bread filling your home. For instance, the Cheesecake Pumpkin Bread Ring offers a delightful twist on a classic, combining the earthy sweetness of pumpkin with the creamy indulgence of cheesecake. And don’t forget the often-discarded seeds! They can be transformed into something equally delicious, like a vibrant Pumpkin Seed Pesto, perfect for elevating any dish. These recipes are not only incredibly tasty but also surprisingly easy to prepare, requiring only simple ingredients you likely already have on hand.
RELATED: How to Carve Your Pumpkin Easily
Beyond these featured creations, the world of pumpkin-infused desserts is vast and inviting. If you’re looking to expand your baking repertoire, consider trying some other irresistible treats. Pumpkin Fudge offers a rich, melt-in-your-mouth experience, while Chewy Pumpkin Snickerdoodles provide a comforting, spiced bite. For a truly decadent breakfast or brunch, nothing beats Soft Pumpkin Cinnamon Rolls. Each of these recipes is absolutely worth the effort and promises to be a crowd-pleaser. But pumpkins aren’t just for eating; Tasty also suggests a fantastic way to turn your leftover pumpkin into a festive Pumpkin Keg, ideal for adding a unique touch to any autumn gathering or party.
Creative Ways to Utilize Leftover Pumpkins: Culinary Delights and DIY Projects
Whether you have a single pumpkin or a whole patch of them, there are endless possibilities to prevent food waste and enjoy the rich flavors and festive spirit they offer. Let’s delve into specific instructions for some of the most exciting ways to repurpose your post-holiday gourds.
Recipe 1: Decadent Cheesecake Pumpkin Bread Ring
This recipe combines the best of two worlds: the comforting warmth of pumpkin bread and the luxurious creaminess of cheesecake. It’s perfect for a brunch, dessert, or a cozy afternoon treat.
Step 1: Prepare Your Pumpkin
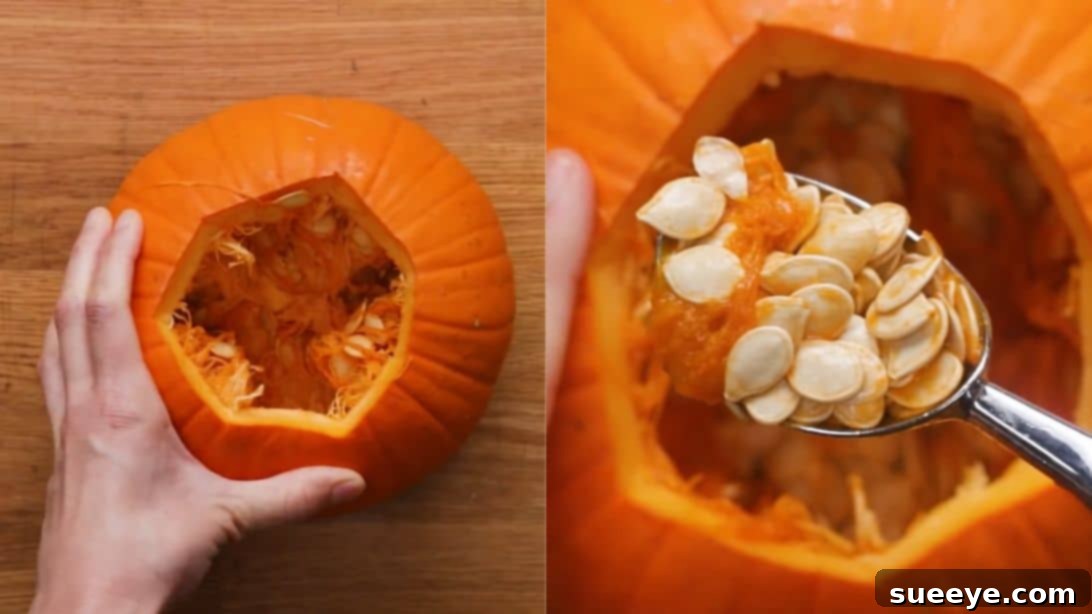
Begin by carefully cutting off the top portion of your pumpkin, creating a lid. Using a sturdy spoon or an ice cream scoop, thoroughly remove all the seeds, strings, and fibrous material from the inside. This ensures you get clean pumpkin flesh for roasting. Don’t discard the seeds; separate them from the pulp and rinse them well under cold water. Pat them dry and set them aside for later use in our pesto recipe or as a standalone roasted snack.
Step 2: Roast the Pumpkin Flesh
Once cleaned, cut the pumpkin into manageable quarters or smaller pieces. Line a baking sheet with parchment paper to prevent sticking and make cleanup easier. Arrange the pumpkin pieces on the sheet, skin-side down. Drizzle a generous amount of olive oil over the flesh, ensuring an even coating, then season with a pinch of salt and freshly ground black pepper. Roast in a preheated oven at 375°F (190°C) for approximately 1 hour and 15 minutes, or until the flesh is tender enough to be easily pierced with a fork.
Step 3: Create Smooth Pumpkin Puree
Allow the roasted pumpkin to cool slightly. Once cool enough to handle, scoop the soft, sweet flesh away from the skin. Transfer the roasted pumpkin flesh to a food processor. Blend until you achieve a silky-smooth puree, free of any lumps. This puree forms the heart of our pumpkin bread. Measure out 16 oz for this recipe, reserving any extra for other delightful pumpkin creations.
Step 4: Prepare the Cream Cheese Filling
In a medium-sized mixing bowl, combine 8 ounces of softened cream cheese (ensure it’s at room temperature for easy blending), 1 teaspoon of fresh lemon juice (which adds a bright counterpoint to the richness), 1 teaspoon of pure vanilla extract for aromatic depth, and 4 tablespoons of maple syrup for natural sweetness. Stir vigorously with a spatula or whisk until the mixture is completely smooth and free of any lumps. Set this creamy filling aside.
Step 5: Combine Dry Ingredients
In a separate, large bowl, sift together 2 1/2 cups of all-purpose flour. Sifting ensures a lighter texture and prevents clumps. Add 1 cup of packed brown sugar, 1 teaspoon of ground cinnamon, 1/8 teaspoon of allspice, 1/4 teaspoon of freshly grated nutmeg, 1/4 teaspoon of ground ginger, 1/8 teaspoon of ground cloves (these spices create that quintessential fall flavor profile), 1 teaspoon of baking soda, 1 teaspoon of baking powder (these leavening agents ensure a perfect rise), and 1/2 teaspoon of salt to balance the flavors. Whisk until all the dry ingredients are thoroughly combined and evenly distributed.
Step 6: Mix Wet and Dry Ingredients
Get another large mixing bowl, if you haven’t already used it, and add the 16 ounces of pumpkin puree you prepared earlier. Pour in 3/4 cup of vegetable oil (or another neutral oil like canola oil) for moisture, 1/4 cup of water, and 2 teaspoons of pure vanilla extract for an extra boost of flavor. Whisk these wet ingredients together until well combined. Gradually add this wet mixture to the bowl of dry ingredients, mixing gently after each addition until just combined. Be careful not to overmix, as this can lead to a tough bread.
Step 7: Assemble the Bread Ring
Lightly grease and flour a 10-cup Bundt pan. Transfer exactly half of the pumpkin bread mixture into the prepared Bundt pan, spreading it evenly across the bottom. Next, carefully dollop spoonfuls of the cream cheese mixture on top of the pumpkin bread layer, creating a distinct creamy layer. Finally, gently spread the remaining pumpkin bread mixture over the cream cheese layer, ensuring it covers the filling completely without disturbing it too much.
Step 8: Bake and Serve
Place the Bundt pan in your preheated oven at 350°F (175°C). Bake for approximately 45 minutes, or until a wooden skewer inserted into the center comes out clean. Once baked, carefully remove the pan from the oven. Place the cake, still in its pan, on a wire cooling rack and let it rest for a full 15 minutes. This crucial step allows the cake to firm up and prevents it from sticking when inverted. After 15 minutes, carefully invert the cake onto the cooling rack, remove the pan, and allow it to cool completely before slicing and serving. A dusting of powdered sugar or a light glaze can add a beautiful finishing touch.
Recipe 2: Zesty Pumpkin Seed Pesto
Don’t toss those pumpkin seeds! They are nutritional powerhouses and can be transformed into a vibrant, flavorful pesto that’s a fantastic alternative to traditional pine nut pesto. This pesto is incredibly versatile, perfect for pasta, sandwiches, or as a dip.
Step 1: Roast the Pumpkin Seeds
Line a baking sheet with parchment paper. Spread your cleaned and dried pumpkin seeds in a single layer. Drizzle them generously with olive oil, then season with a pinch of salt and a dash of black pepper. Mix everything thoroughly with your hands to ensure each seed is coated. Bake in a preheated oven at 375°F (190°C) for about 20 minutes, stirring the seeds halfway through to ensure even roasting and prevent burning. They should be golden brown and delightfully crunchy when done. Allow them to cool completely.
Step 2: Blend Your Pesto
In the bowl of a food processor, combine 2 cups of fresh arugula (for a peppery kick), 2 cups of fresh basil leaves (the classic pesto herb), 1/3 cup of your freshly roasted pumpkin seeds, 1 clove of garlic (or more if you love garlic), 1/3 cup of high-quality olive oil (plus an additional tablespoon for consistency), 2 tablespoons of water (to help achieve a smooth texture), and 1/2 teaspoon of salt. Process the ingredients until the mixture reaches your desired consistency – smooth and creamy, or slightly chunkier if you prefer more texture. Taste and adjust seasoning as needed. You now have a unique and incredibly delicious pumpkin seed pesto!
DIY Project: The Ultimate Pumpkin Keg
Looking for a fun, creative, and memorable way to serve beverages at your next fall gathering? A pumpkin keg is a fantastic conversation starter and surprisingly easy to make. It’s perfect for cider, punch, or any cold drink.
Instructions for Crafting Your Pumpkin Keg:
First, select a large, sturdy pumpkin with a relatively flat bottom. Carefully cut a circular opening at the top of the pumpkin, large enough to easily access the interior. Using a scoop, completely remove all the seeds, strings, and pulp from the inside. Scrape the walls thoroughly to ensure a clean interior, as any lingering pulp can affect the taste of your beverage. Once cleaned, pat the inside dry with paper towels.
Next, choose the location for your spigot. This should be on the middle part of the pumpkin, ensuring it’s low enough to allow most of the liquid to dispense but high enough from the very bottom to avoid sediment. Hold the spigot against the pumpkin and trace its diameter with a marker. Using a sharp knife, carefully cut out the traced circle. Ensure the hole is slightly smaller than the spigot’s threading for a snug fit. Insert the spigot firmly into the hole, twisting gently until it’s securely in place and watertight. Most spigots come with a locking nut or gasket on the inside; tighten this to ensure there are no leaks. Finally, pour your desired chilled juice, cider, or punch into your pumpkin keg. Place it on a sturdy surface, perhaps elevated on a stand or surrounded by ice to keep the beverage cold, and let the party begin!
Beyond the Recipes: Exploring More Ways to Use Leftover Pumpkin
The culinary possibilities for leftover pumpkin extend far beyond the featured recipes. Its versatility makes it a fantastic ingredient for a wide array of dishes. Pumpkin puree, for example, is a wonderful base for creamy pumpkin soups, lending a rich, velvety texture and subtly sweet flavor. It can also be incorporated into savory dishes like risotto or chili, adding depth and nutrition. For breakfast lovers, a scoop of pumpkin puree can elevate your morning oatmeal, pancakes, or smoothies, infusing them with autumnal spice and healthy fiber. And of course, no fall baking is complete without classic pumpkin pie or festive pumpkin lattes!
Creative Uses for Pumpkin Seeds
As demonstrated with the pesto, pumpkin seeds are far too valuable to discard. Beyond pesto, they can be simply roasted with a dash of salt for a healthy, crunchy snack. Experiment with different seasonings: try cinnamon sugar for a sweet treat, smoked paprika and chili powder for a spicy kick, or even a savory blend of garlic powder and herbs. These roasted seeds, also known as pepitas when hulled, are excellent as salad toppings, in granola, or mixed into trail mix.
Pumpkin for Skincare and Home Decor
The benefits of pumpkin aren’t limited to the kitchen. Pumpkin is rich in vitamins A and C, as well as antioxidants, making it a fantastic ingredient for DIY skincare. Create a simple pumpkin face mask by mixing puree with honey and a touch of milk for a nourishing and brightening treatment. For home decor, smaller pumpkins can be transformed into elegant painted decorations, or their hollowed shells can serve as charming natural planters for autumnal flowers or candles. Even the sturdy stems can be saved and incorporated into wreaths or other fall crafts.
Sustainable Garden and Pet Uses
Embracing a zero-waste philosophy, consider your garden. If your pumpkin is past its prime for eating or decorating, it makes an excellent addition to your compost pile. As it decomposes, it will enrich your soil, providing valuable nutrients for future plantings. You can also break it into smaller pieces and bury them directly in your garden bed for a slow release of nutrients. For pet owners, small amounts of plain, cooked pumpkin (without added sugar or spices) can be a healthy dietary supplement for dogs and cats, aiding digestion due to its fiber content. Always consult your vet before introducing new foods to your pet’s diet, and ensure it’s given in moderation.
Final Thoughts on Pumpkin Repurposing
Ultimately, a leftover pumpkin is not merely waste; it’s an opportunity. An opportunity to explore new culinary horizons, engage in creative DIY projects, promote sustainability in your home, and even enrich your garden. By taking a few extra steps, you can transform this iconic symbol of fall into a source of joy, flavor, and resourcefulness throughout the season and beyond. So, the next time you find yourself with an abundance of pumpkins, remember these ideas and embark on a delicious and creative journey, making the most of every beautiful gourd!