
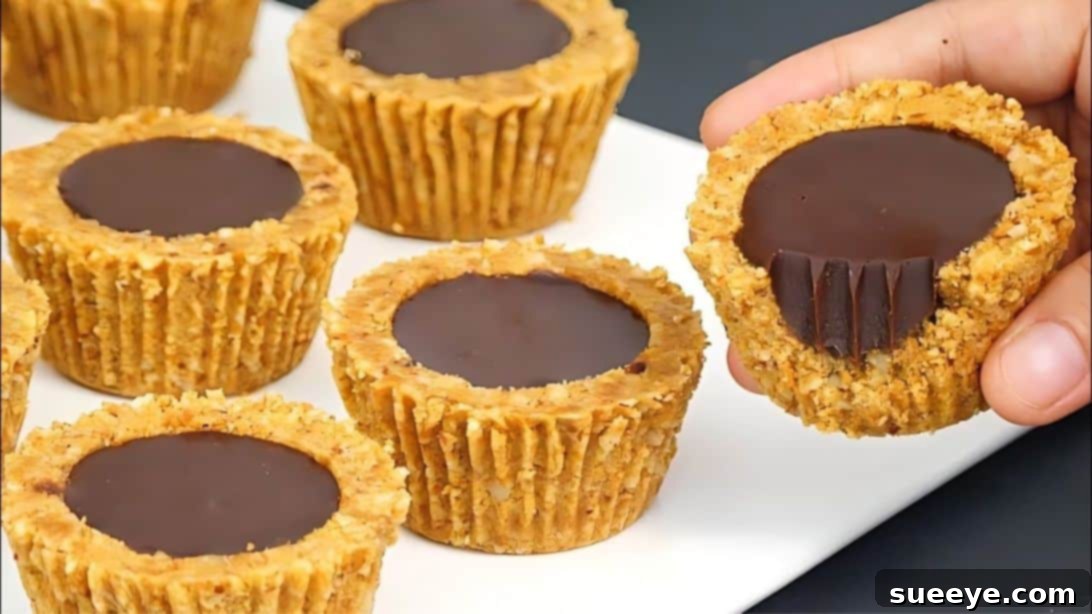
Decadent & Easy No-Bake Chocolate Ganache Tart: Your Ultimate Sweet Indulgence
Are you ready to surrender to your sweet tooth? This incredibly easy no-bake chocolate ganache tart recipe, inspired by the culinary brilliance of Delmira Cooking, is a game-changer for anyone craving a luxurious dessert without the fuss. Imagine a perfectly crumbly, buttery crust paired with a rich, silky-smooth chocolate ganache filling – all created with just a handful of ingredients and minimal effort. This isn’t just a dessert; it’s an experience, promising to be an instant favorite that you’ll want to revisit again and again. Its delightful contrast of textures – the crispness of the base giving way to the molten chocolate heart – makes it utterly irresistible. Whether you’re a seasoned baker or a complete novice, prepare to impress yourself and your loved ones with this simple yet sophisticated treat. Dive into the full instructions below and discover the joy of making this exquisite chocolate tart from scratch.
Why This No-Bake Chocolate Ganache Tart Will Be Your New Go-To Dessert
In a world full of complex recipes, sometimes the simplest creations yield the most profound satisfaction. This chocolate ganache tart embodies that philosophy. Its “no-bake” nature makes it perfect for warm weather or for days when you just don’t want to turn on the oven. The short ingredient list means less shopping and more immediate gratification, ideal for busy schedules or spontaneous dessert urges. Furthermore, the combination of a crunchy biscuit and almond base with a rich, melt-in-your-mouth chocolate ganache is a classic pairing that never fails to delight. It’s elegant enough for a dinner party, yet easy enough for a spontaneous weeknight treat. Get ready to elevate your dessert game effortlessly with a recipe that delivers maximum flavor with minimal stress.
Essential Ingredients for Your Perfect Chocolate Ganache Tart
The beauty of this recipe lies in its simplicity and the quality of its core components. Choosing good quality ingredients will significantly impact the final flavor and texture of your tart. Precision in measurement is also key, so gather your tools and get ready to create something wonderful. Here’s what you’ll need to create this delightful dessert:
For the Irresistible Tart Crust:
- 7 oz (approximately 200g) of Biscuits: Digestive biscuits are a popular choice for their subtle sweetness and excellent crumbly texture, forming a stable and flavorful base. However, you can also experiment with graham crackers for a honeyed note, shortbread for extra butteriness, or even chocolate sandwich cookies (like Oreos, crushed with their filling) for a double-chocolate delight. The key is a firm, dry biscuit that crumbles well.
- 2.8 oz (approximately 80g) of Roasted Almonds: Roasting the almonds beforehand intensifies their nutty flavor, adding a layer of depth and a pleasing crunch that beautifully complements the chocolate. You can buy them pre-roasted or quickly toast raw almonds in a dry pan over medium heat for 5-7 minutes, stirring constantly, until fragrant and lightly golden.
- 7 tablespoons (approximately 100g) of Unsalted Butter: Melted butter is the crucial binding agent that holds the biscuit and almond crumbs together, ensuring the crust sets firmly and has a rich, decadent taste. Using unsalted butter allows you to control the overall saltiness of the dessert, which is important when pairing with sweet chocolate.
For the Velvety Chocolate Ganache Filling:
The ganache is the star of the show, a luxurious and smooth emulsion of chocolate and cream. Its richness and smooth texture are what truly make this tart special and utterly indulgent.
- 3/4 cup (approximately 170g) of High-Quality Chocolate: For the best results and a truly decadent flavor, use good quality semi-sweet or dark chocolate (around 50-70% cocoa solids) in chip or bar form. Better chocolate melts smoother, offers a more complex flavor profile, and results in a superior ganache. While milk chocolate can be used for a sweeter, milder ganache, it may require slightly less cream due to its higher fat content.
- 3 oz (approximately 85g) of Heavy Whipping Cream: The high fat content of heavy whipping cream (typically 35% butterfat or more) is essential for creating a stable, luscious, and beautifully emulsified ganache. It provides the necessary liquid and fat to combine seamlessly with the melted chocolate, creating that signature silky texture.
- 1/2 tablespoon (approximately 7g) of Unsalted Butter: A small amount of unsalted butter added to the ganache at the very end serves a few purposes: it gives the ganache an extra sheen and a silkier mouthfeel, enhancing its luxurious appeal, and helps prevent it from seizing or becoming dull as it cools and sets.
Step-by-Step Guide to Crafting Your Chocolate Ganache Tarts
Follow these detailed instructions carefully to ensure your tarts turn out perfectly every time. Precision, patience, and a little bit of love are your best friends in creating this delightful dessert, guaranteeing a show-stopping result.
Step 1: Preparing the Crumb Base
Begin by creating the crucial foundation of your tart. Take your chosen biscuits and break them into smaller pieces. Place these biscuit pieces into the bowl of a food processor. Add the roasted almonds to the processor. Pulse and blend these ingredients together on high speed until they form fine, even crumbs. The consistency should resemble coarse sand, with no large chunks remaining, ensuring a uniform crust. If you don’t have a food processor, you can place the biscuits and almonds in a strong, sealable plastic bag (like a Ziploc bag) and crush them thoroughly using a rolling pin or the bottom of a heavy pot until finely crushed.
Step 2: Melting the Butter for the Crust
Measure out the 7 tablespoons of unsalted butter and place them in a small, heatproof bowl. You have a couple of convenient options for melting: either set the bowl over a pot of gently simmering hot water (creating a double boiler effect, ensuring indirect heat) or melt it in a microwave. If using a microwave, heat in 20-30 second intervals, stirring well in between each interval, until the butter is fully liquefied and clear. Be careful not to overheat the butter, as this can cause it to brown or separate, which isn’t ideal for the crust.
Step 3: Combining Crust Ingredients
Once the butter is perfectly melted, pour it directly into the biscuit and almond crumbs in your food processor bowl (if still in there) or transfer the crumbs to a separate mixing bowl. Stir thoroughly with a spoon or spatula, or pulse again briefly in the food processor, until all the crumbs are evenly moistened and coated with the butter. The mixture should feel like wet sand and hold together when gently pressed between your fingers. This thorough coating is essential for ensuring your crust will be firm, cohesive, and won’t crumble apart when you slice or serve your tarts.
Step 4: Preparing Your Tart Molds
This recipe yields individual tarts, which are delightful for portion control and presentation. Line a standard 12-cup muffin tin with paper liners or foil liners. This makes for incredibly easy removal and serving once the tarts are set. If you prefer to make a single, larger tart, you can press the entire mixture into a 9-inch (23 cm) tart pan with a removable bottom. Lightly grease the tart pan with butter or cooking spray if you’re not using individual liners, to prevent sticking.
Step 5: Forming and Chilling the Tart Crusts
Divide the buttery crumb mixture evenly among the prepared muffin liners or press it firmly and uniformly into your chosen tart pan. For the individual tarts, use the bottom of a shot glass, a small jar, or even your clean fingers to press the crumbs firmly and evenly against the bottom and slightly up the sides of each liner, creating a neat well in the center. The goal is a compact, uniform, and sturdy crust. For a large tart, press the mixture firmly into the bottom and up the sides of the tart pan. Once all the crusts are formed, place the muffin tin or tart pan into the refrigerator for at least 30 minutes. This chilling time is absolutely crucial for the butter to solidify, setting the crust and making it stable and easy to handle without falling apart.
Step 6: Crafting the Silky Chocolate Ganache
While your crusts are chilling, prepare the luscious chocolate ganache. Start by finely slicing your chosen chocolate into small, uniform pieces or ensure you’re using small chocolate chips. Place the chocolate in a clean, dry, heatproof bowl. In a separate small saucepan, gently heat the heavy whipping cream over low to medium heat until it just begins to simmer around the edges – do not let it come to a rolling boil. Immediately pour the hot cream over the prepared chocolate pieces in the bowl. Let it sit undisturbed for 2-3 minutes to allow the heat from the cream to melt the chocolate thoroughly. Then, add the 1/2 tablespoon of unsalted butter to the mixture. Begin stirring gently from the center outwards with a whisk or spatula until the mixture is completely smooth, glossy, and beautifully emulsified. You should have a rich, uniform chocolate sauce with no lumps. If any chocolate pieces remain, you can place the bowl over a very gently simmering pot of water for a few seconds, stirring constantly, to fully melt them, being careful not to overheat the ganache as this can cause it to separate.
Step 7: Assembling and Chilling the Tarts
Carefully retrieve your chilled tart crusts from the refrigerator. Slowly and evenly pour the warm (but not hot) chocolate ganache mixture into each well of the crusts. Fill them to your desired level, leaving a small lip if preferred for a cleaner edge. For a large tart, pour the ganache evenly over the entire crust, spreading it gently with a spatula if needed. Once all the tarts are filled, gently transfer the muffin tin or tart pan back to the refrigerator. Allow them to chill for a minimum of 2 hours, or ideally until the chocolate ganache is completely set and firm to the touch. This crucial step ensures the ganache has the perfect, sliceable texture and doesn’t run when served, delivering that satisfying snap upon the first bite.
Step 8: Serving Your Divine Chocolate Ganache Tarts
Once the tarts are thoroughly chilled and set, carefully remove them from their paper liners. If using a large tart pan, remove the removable sides and gently slide the tart onto a serving plate. You can serve them as is, allowing their natural beauty to shine, or add a touch of elegance with a dusting of cocoa powder, a sprinkle of flaky sea salt (which beautifully enhances the chocolate flavor), a few fresh berries like raspberries or strawberries for a burst of color and tartness, or a dollop of freshly whipped cream. These tarts are best served slightly cool but not ice-cold, so consider letting them sit at room temperature for 10-15 minutes before serving to achieve the perfect, melt-in-your-mouth ganache texture. Enjoy every decadent bite, savoring the delightful contrast of textures and flavors!
Expert Tips for a Flawless No-Bake Chocolate Ganache Tart
Achieving a bakery-quality chocolate ganache tart is easier than you think, especially with these insider tips:
- Quality Matters: Always invest in good quality chocolate for your ganache. The better the chocolate, the richer, smoother, and more flavorful your final product will be. Cheap chocolate can result in a grainy or less appealing texture.
- Don’t Rush the Chill: The chilling steps for both the crust and the ganache are absolutely non-negotiable. They ensure your tarts hold their shape beautifully and have the ideal, firm yet tender texture. Patience here will be rewarded with perfection.
- Gentle Ganache Technique: When melting chocolate with hot cream, avoid aggressive stirring initially. Let the heat from the cream do its work for a few minutes before gently whisking to emulsify. Over-stirring or excessive heat can cause the ganache to split or become oily.
- Biscuit Choice Flexibility: While digestives are a classic, feel free to experiment! Graham crackers offer a lovely honeyed note, and crushed Oreos (with their cream filling!) make for an ultra-decadent chocolate-on-chocolate crust that’s incredibly rich.
- Toasting Nuts is Key: Don’t skip roasting the almonds. This simple step brings out a deeper, more complex nutty flavor that significantly enhances the overall taste and aroma of the crust.
- Perfect Cream Temperature: Ensure your cream is hot enough to melt the chocolate but not vigorously boiling. Boiling cream can scorch the chocolate and negatively affect the ganache’s texture and flavor.
- Preventing Air Bubbles: When whisking the ganache, try to keep the whisk submerged to minimize the incorporation of air bubbles. If bubbles do appear, gently tap the bowl on the counter a few times to release them before pouring the ganache into the crusts for a smoother finish.
- Clean Bowl for Ganache: Ensure your bowl and utensils for the ganache are completely clean and dry. Even a drop of water can cause chocolate to seize.
Delicious Variations and Customizations for Your Tart
While this classic chocolate ganache tart is perfect as is, feel free to unleash your creativity and personalize it with these delightful variations and toppings:
- Flavor Infusions for the Ganache:
- Coffee Lover’s Dream: Add a teaspoon of instant espresso powder or strong brewed coffee to the hot cream for a sophisticated mocha-flavored ganache that enhances the chocolate’s depth.
- Zesty Citrus Twist: Infuse the cream with orange or lemon zest while heating for a bright, refreshing counterpoint. Strain out the zest before pouring the cream over the chocolate.
- Liqueur Lift: A splash of your favorite liqueur like Grand Marnier (orange), Kahlúa (coffee), Frangelico (hazelnut), or even a good quality rum or brandy can add sophisticated depth. Add it after the ganache has been formed and is cooling slightly.
- Minty Freshness: A few drops of pure peppermint extract (to taste) create a festive, refreshing ganache perfect for holidays or a cool treat.
- Crust Adventures:
- Nutty Variations: Substitute the almonds with other nuts like pecans, walnuts, hazelnuts, or even pistachios for different flavor profiles and beautiful colors. Ensure they are roasted for best flavor.
- Cookie Swap: Experiment with different types of cookies for the crust. Try ginger snaps for a spicy kick, vanilla wafers for a lighter flavor, or speculoos biscuits for a European-inspired spice blend.
- Exciting Toppings and Garnishes:
- Fresh Fruit: Fresh berries such as raspberries, strawberries, blueberries, or sliced kiwi and mango provide a beautiful contrast in color, texture, and tartness, cutting through the richness of the chocolate.
- Whipped Cream: A generous dollop of lightly sweetened freshly whipped cream is a classic and heavenly pairing that adds lightness.
- Nuts & Seeds: Sprinkle with chopped pistachios, candied pecans, toasted coconut flakes, or a mix of crunchy seeds for added texture and flavor.
- Chocolate Shavings/Curls: Create beautiful chocolate shavings or curls from a chocolate bar for an extra touch of chocolatey elegance.
- Sea Salt Flakes: A light sprinkle of flaky sea salt on top beautifully elevates the chocolate flavor, providing a sophisticated salty-sweet balance.
- Powdered Sugar or Cocoa: A delicate dusting of powdered sugar or unsweetened cocoa powder creates an elegant and simple finish.
Storage and Make-Ahead Tips for Convenience
One of the many benefits of this no-bake tart is its excellent storage capability, making it an ideal make-ahead dessert for entertaining or simply to enjoy throughout the week. Planning ahead ensures you always have a delightful treat ready!
- Refrigerator Storage: Store leftover tarts in an airtight container in the refrigerator for up to 3-4 days. The crust will remain delightfully crisp, and the ganache will retain its perfect, firm yet creamy consistency. For best flavor and texture, allow them to sit at room temperature for 10-15 minutes before serving.
- Freezer-Friendly Option: For longer storage, individual tarts can be beautifully frozen. Once completely set and firm from their initial chilling, wrap each tart tightly in plastic wrap, then place them in an airtight freezer-safe container or bag. They can be stored in the freezer for up to 1 month. To serve, thaw them in the refrigerator overnight or for a few hours at room temperature until softened to your desired consistency.
- Ideal Make-Ahead Dessert: This tart is an excellent candidate for making a day or two in advance of an event or gathering. Simply follow all the steps, chill thoroughly, and store in the refrigerator until ready to serve. This allows the flavors to meld beautifully and significantly reduces stress on the day of your event, letting you focus on other preparations.
Indulge in Homemade Decadence!
You’ve now mastered the art of creating a truly spectacular no-bake chocolate ganache tart. This recipe proves that you don’t need complex techniques, an oven, or a long list of exotic ingredients to achieve bakery-quality results right in your own kitchen. The satisfying crunch of the almond-biscuit crust and the luxurious melt of the rich chocolate ganache will undoubtedly make this dessert a cherished favorite among your family and friends. It’s a testament to simple pleasures, the magic of chocolate, and the joy of creating something beautiful and delicious with your own hands.
We hope you thoroughly enjoyed preparing and, most importantly, devouring this simple yet incredibly rewarding dessert. If you’re eager to explore more amazing and easy-to-follow recipes that are sure to inspire your culinary adventures, make sure to check out Delmira Cooking on YouTube. They offer a treasure trove of creative and delicious ideas that you will absolutely love. Happy baking (or rather, happy no-baking)!