
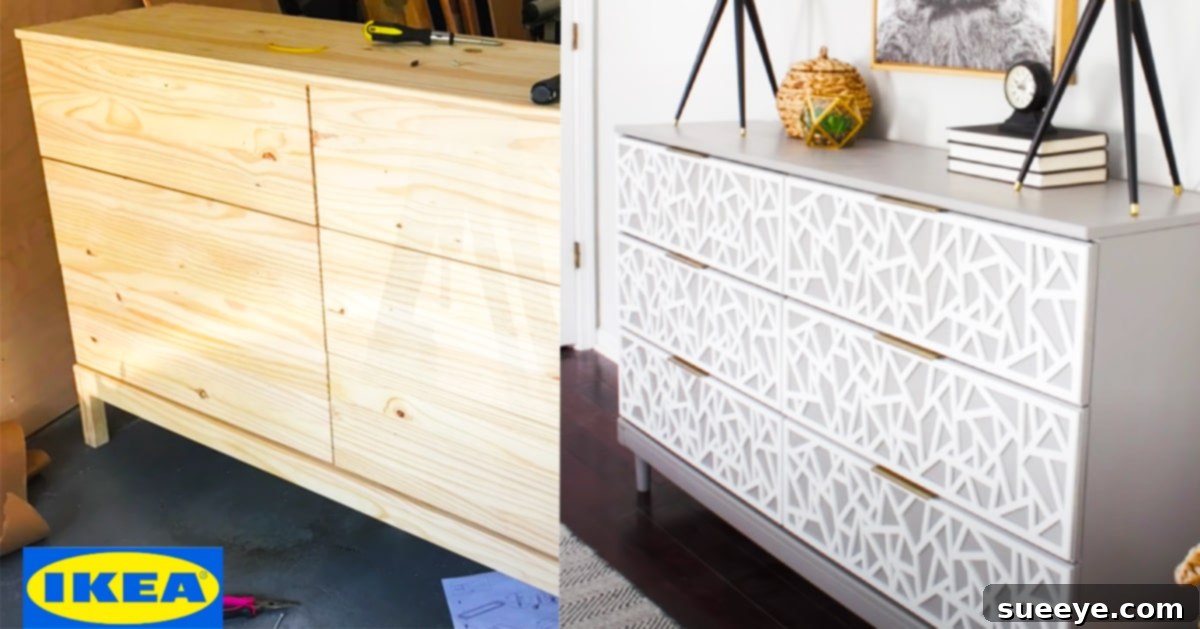
Are you looking to infuse your home with classic style without breaking the bank? The world of furniture upcycling offers an incredible opportunity to transform basic, mass-produced pieces into bespoke treasures. Among the most popular targets for such makeovers is the versatile IKEA Tarva dresser, a blank canvas awaiting your creative touch. This comprehensive guide will walk you through the process of converting a simple IKEA Tarva dresser into a sophisticated, mid-century modern masterpiece, proving that high-end aesthetics are well within reach for the DIY enthusiast. Get ready to embark on a rewarding journey that will not only enhance your living space but also empower you with valuable crafting skills.
Embracing the Mid-Century Modern Aesthetic with a DIY Makeover
The allure of mid-century modern design lies in its clean lines, organic curves, minimalist forms, and emphasis on functionality. Originating from the mid-20th century, this style continues to captivate with its timeless elegance and warm, inviting character. Achieving this look often comes with a hefty price tag when purchasing new furniture. However, with a clever IKEA Tarva hack, you can replicate this coveted aesthetic for a fraction of the cost.
Our transformation journey is inspired by talented DIY creators like Erin Spain, whose ingenious tutorials demonstrate just how achievable these projects are. Erin Spain’s approach to furniture reconstruction and room makeovers is both detailed and accessible, making daunting tasks seem enjoyable. Her step-by-step guidance on revitalizing an IKEA Tarva dresser serves as an excellent starting point for anyone eager to delve into furniture refinishing. By following such expert advice, you’ll not only achieve a stunning result but also gain confidence in your DIY capabilities.
Why DIY Your Furniture? The Benefits of Upcycling
Beyond the significant cost savings, choosing to DIY your furniture offers a multitude of benefits:
- Personalization: Tailor the piece to perfectly match your unique decor and color scheme, creating something truly one-of-a-kind.
- Sustainability: Give an existing item a new lease on life, reducing waste and contributing to a more eco-friendly lifestyle.
- Skill Development: Learn new techniques in sanding, painting, and assembly, building valuable skills for future projects.
- Sense of Accomplishment: There’s immense satisfaction in looking at a beautiful piece of furniture and knowing you created it with your own hands.
- Quality Control: By doing it yourself, you ensure that every step meets your standards for durability and finish.
This IKEA Tarva dresser makeover is an ideal project for beginners and seasoned DIYers alike. While it requires patience and attention to detail, the process is straightforward, and the transformation is dramatic.
Essential Materials for Your Mid-Century Modern Tarva Dresser Hack
Before diving into the transformation, gathering all necessary materials is crucial. Quality materials will ensure a durable and professional-looking finish. Here’s a detailed list of what you’ll need to achieve that desired high-end look:
- IKEA TARVA Large Dresser: The foundational piece for our makeover. Its untreated pine wood is perfect for customization.
- Mid-Century Style Furniture Legs from Pretty Pegs: These are key to achieving the distinctive elevated look of mid-century furniture. Consider the “Carl 120” model for a sleek profile.
- Paintable Wood Filler: Essential for patching any imperfections, screw holes (if repurposing), or gaps for a seamless surface.
- High-Quality Primer (e.g., Zinsser): A crucial step for proper paint adhesion, especially on untreated wood or if you’re covering knots that might bleed through.
- Premium Interior Satin Paint (e.g., BEHR Marquee Interior Satin paint in “Elephant Skin”): A satin finish offers a subtle sheen and is durable. The “Elephant Skin” color provides a sophisticated, neutral base that complements the mid-century aesthetic beautifully.
- Minwax Polycrylic in Satin finish: A protective topcoat to guard against scratches and wear, ensuring your beautiful finish lasts for years. Satin provides a lovely, low-sheen look.
- O’verlays in the Danika Pattern (1/4″ thickness): These decorative panels add intricate detail and texture, instantly elevating the dresser’s visual appeal. The Danika pattern offers a geometric touch that aligns well with mid-century design.
- Sanding Block or Electric Sander: For smoothing surfaces and ensuring optimal paint adhesion. Various grits might be needed, from medium to fine.
- Paintbrush and/or Roller: Depending on the desired finish and coverage. A good quality brush for edges and a roller for larger flat surfaces typically yield the best results.
- Saw (Miter Saw or Hand Saw): For cutting the O’verlays if they require custom sizing to fit your dresser drawers perfectly.
- Loctite Construction Adhesive or strong wood glue: For securely attaching the O’verlays to the drawer fronts.
- Rubber Gloves: To protect your hands during painting and sealing.
- Brass Finger Pulls (x6): Six elegant brass finger pulls will provide the perfect hardware accent, adding a touch of sophisticated gleam without overpowering the design.
- Small Chisel (optional): Useful for small adjustments or cleaning up excess adhesive.
- Dremel Micro (optional): Handy for precise trimming of O’verlays or detailing work, though not strictly essential if you’re careful with other tools.
Step-by-Step Guide: Transforming Your IKEA Tarva Dresser
This project, while detailed, is incredibly satisfying. By following these directions, you’ll transform a basic wooden dresser into a high-end, stylish piece.
1. Assembly and Initial Preparation
- Assemble the Tarva Dresser: Follow IKEA’s instructions to assemble the dresser frame and drawers, but do not attach any original hardware or drawer pulls.
- Clean and Sand: Thoroughly clean all wooden surfaces to remove any dust or factory residue. Lightly sand all exterior surfaces (frame and drawer fronts) with a medium-grit sanding block (e.g., 120-150 grit) to create a smooth surface for primer adhesion. Follow up with a fine-grit sandpaper (220 grit) for an even smoother finish. Wipe away all sanding dust with a tack cloth or damp cloth.
- Fill Imperfections: Use paintable wood filler to repair any dents, scratches, or holes. Allow it to dry completely, then sand smooth.
2. Priming for a Flawless Finish
- Apply Primer: Using your chosen primer (like Zinsser), apply an even coat to all surfaces that will be painted – the dresser frame and the drawer fronts. Primer is crucial for blocking wood tannins, ensuring consistent color, and promoting better paint adhesion, especially on porous pine.
- Dry and Lightly Sand: Allow the primer to dry according to the manufacturer’s instructions. Once dry, lightly sand the primed surfaces with a fine-grit sanding block (220 grit) to smooth out any brush strokes or imperfections. Wipe clean.
3. Painting the Dresser
- First Coat of Paint: Apply your chosen BEHR Marquee interior satin paint in “Elephant Skin” to all primed surfaces. Use a high-quality paintbrush for edges and a roller for large flat areas to achieve a smooth, streak-free finish.
- Drying Time: Allow the first coat to dry completely. This can take several hours depending on humidity and paint type.
- Second Coat (and potentially Third): Apply a second coat of paint. If necessary, apply a third coat for full, even coverage and depth of color. Lightly sand between coats with very fine-grit sandpaper (320-400 grit) for an ultra-smooth finish, wiping away dust each time.
4. Adding the O’verlays
- Measure and Cut: Measure your drawer fronts precisely. If the O’verlays (Danika pattern) aren’t pre-cut to your exact drawer dimensions, carefully cut them using a miter saw or a sharp utility knife against a straight edge. Ensure all cuts are clean and precise.
- Adhere O’verlays: Apply a thin, even layer of Loctite Construction Adhesive or strong wood glue to the back of each O’verlay panel. Carefully position each panel onto the center of its corresponding drawer front. Press firmly and hold in place, or use painter’s tape to secure until the adhesive cures. Wipe away any excess glue immediately with a damp cloth.
- Cure Time: Allow the adhesive to cure fully, as recommended by the manufacturer, before proceeding.
5. Installing the Mid-Century Modern Legs
- Attach Legs: Flip the dresser frame upside down (carefully!). Using the hardware provided with your Pretty Pegs furniture legs, securely attach them to the underside of the dresser frame. Ensure they are evenly spaced and stable. This step instantly gives the dresser its distinctive mid-century modern profile.
6. Applying the Protective Topcoat
- Apply Polycrylic: Once the paint and O’verlays are dry and cured, apply a thin, even coat of Minwax Polycrylic in a satin finish to all painted surfaces. Polycrylic offers excellent durability and protection against daily wear and tear.
- Multiple Coats: For maximum protection, apply two to three thin coats of polycrylic, allowing each coat to dry completely and lightly sanding with very fine-grit sandpaper (400 grit) between coats. This ensures a super smooth, professional feel.
7. Installing the Brass Hardware
- Mark and Drill: Carefully measure and mark the placement for your brass finger pulls on each drawer front. Drill pilot holes slightly smaller than the screws provided with your pulls.
- Attach Pulls: Securely attach the six brass finger pulls. These simple yet elegant pulls perfectly complement the geometric pattern of the O’verlays and the overall mid-century modern aesthetic, providing functionality without distraction.
8. Final Assembly
- Insert Drawers: Once all components are dry and secure, carefully slide the transformed drawers into the dresser frame.
Tips for a Successful Furniture Makeover
- Patience is Your Best Friend: Rushing steps, especially drying times, can lead to imperfections. Allow adequate time for each coat of paint and sealer to dry.
- Work in a Well-Ventilated Area: This is crucial for your health when working with primers, paints, and adhesives.
- Test on Scraps: If unsure about a technique or color, test it on a piece of scrap wood or an inconspicuous area first.
- Invest in Good Quality Tools: High-quality brushes and rollers make a significant difference in the final finish.
- Cleanliness: Keep your workspace clean and free of dust, which can easily ruin a smooth paint finish.
Unleash Your Inner Designer
Watching a piece of plain furniture transform into something truly spectacular is incredibly refreshing. This project demonstrates how an affordable, basic IKEA Tarva dresser can be elevated to a statement piece that rivals high-end designer furniture. The combination of the sleek mid-century legs, the subtle elegance of the “Elephant Skin” paint, the intricate “Danika” O’verlays, and the simple brass finger pulls creates a harmonious and sophisticated look.
This style of furniture effortlessly fits into various home decor themes, from bohemian to minimalist, adding character and warmth. The significant savings compared to purchasing a new, already-made mid-century modern dresser make this DIY approach an incredibly smart choice for budget-conscious decorators. So, if you’ve been looking for a project to ignite your creativity and beautify your home, this IKEA Tarva dresser makeover is your perfect starting point. Gather your materials, prepare your workspace, and get ready to create a piece of furniture you’ll be proud to display!