
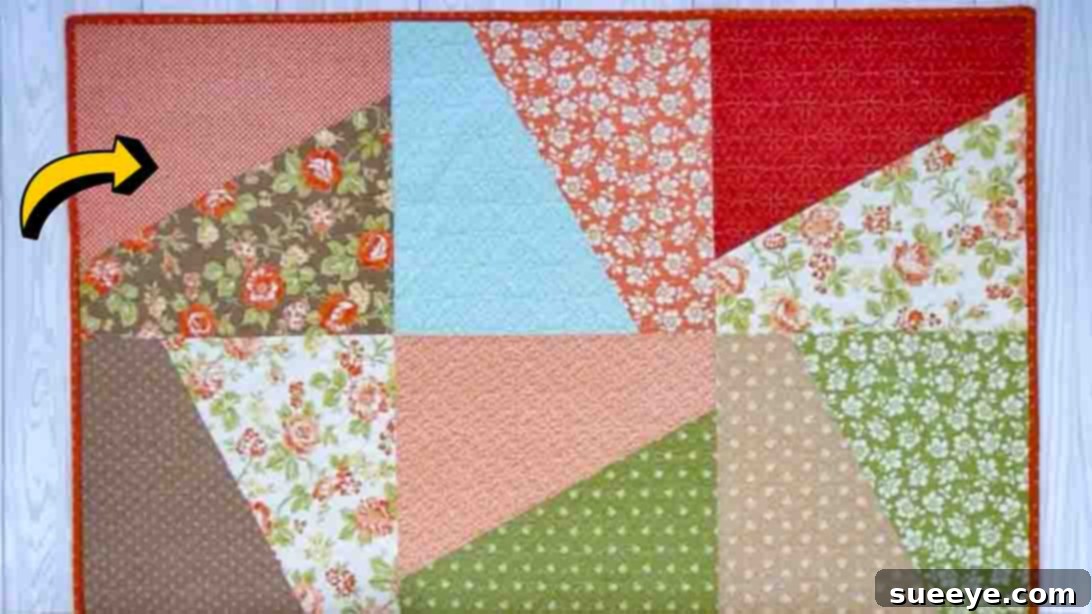
Are you searching for an engaging yet straightforward quilting project that yields beautiful results? Look no further! This innovative Slice and Dice Fat Quarter Quilt tutorial, inspired by the creative minds at Fat Quarter Shop on YouTube, offers an incredibly fun and satisfying experience. Whether you’re a seasoned quilter or a complete beginner picking up your rotary cutter for the first time, this project is designed for success. It’s not just easy; it’s surprisingly quick, allowing you to craft a stunning quilt top in a fraction of the time you might expect, often in just an hour! Perfect for last-minute gifts, cozy home decor, or simply honing your quilting skills.
RELATED: Discover Another Delightful Project: The Creaky Cabin Fat Quarter Quilt Pattern
The allure of this quilt lies in its captivating pattern, which, despite its intricate appearance, is deceptively simple to construct. It has become a personal favorite for its speed and the joy it brings when creating unique, personalized gifts. Imagine the delight of presenting a handmade quilt that looks complex and professionally made, yet was incredibly enjoyable and quick to create. This comprehensive guide, drawing inspiration from the original video, will walk you through each step, ensuring you achieve a flawless finish. Get ready to transform a few fat quarters into a masterpiece you’ll be proud to share!
Why the Slice and Dice Fat Quarter Quilt is Your Next Must-Do Project
In the vast world of quilting, patterns range from simple patchwork to complex appliqué. The “Slice and Dice” technique stands out for its unique blend of visual complexity and construction simplicity. This method cleverly uses pre-cut fat quarters, which are ideal for quilters due to their convenient size (typically 18″ x 22″). By strategically cutting and reassembling these fabric pieces, you create dynamic designs that appear much more challenging than they are. It’s an excellent way to use up your fabric stash or to experiment with new color palettes without committing to large yardage.
This pattern is particularly beneficial for beginners. It introduces fundamental quilting skills such as precise cutting with a rotary cutter, accurate 1/4-inch seam allowances, and efficient pressing techniques, all within a forgiving framework. The repetition of the block construction helps build muscle memory and confidence, preparing you for more intricate projects down the line. Moreover, the quick turnaround time means you get to experience the satisfaction of a finished quilt top much faster, keeping your motivation high. This project offers a fantastic balance of skill-building and immediate gratification.
Understanding and Selecting Your Fat Quarters
Fat quarters are a quilter’s best friend. They are essentially a quarter-yard of fabric, cut “fat” (approximately 18 inches by 22 inches) rather than “skinny” (9 inches by 44 inches), offering a more versatile piece of fabric for various projects. For this Slice and Dice Quilt, you will need 12 fat quarters. The beauty of this project lies in the opportunity to play with different fabric collections, themes, and color schemes.
When selecting your fat quarters, consider the overall aesthetic you wish to achieve. For a vibrant, energetic quilt, mix bold patterns and contrasting colors. If you prefer a more serene or sophisticated look, opt for coordinating solids, blenders, or fabrics from the same collection that share a common color story. Remember that the “slice and dice” method creates an intriguing interplay of fabrics, so even subtle differences in prints can create a stunning effect. Don’t be afraid to experiment with light, medium, and dark values to add depth and dimension to your finished quilt. Pre-washing your fabrics is optional but recommended if you’re concerned about fabric shrinkage or color bleeding, especially with darker hues.
Essential Materials for Your Quilt Project
Gathering your tools before you begin ensures a smooth and enjoyable quilting process. For this Slice and Dice Fat Quarter Quilt, you’ll need the following:
- 12 Fat Quarters: Your chosen fabrics, selected for their color and pattern to create a cohesive or eclectic look.
- Quilting Rulers: Essential for precise measurements and straight cuts. A 6″ x 24″ ruler is incredibly versatile for cutting larger pieces, and a smaller square ruler (like 6.5″ or 12.5″) can also be helpful for trimming blocks accurately.
- Rotary Cutter: A sharp rotary cutter (45mm or 60mm) is crucial for efficient and accurate cutting of multiple fabric layers simultaneously. Always use a fresh blade for the cleanest, most precise cuts.
- Cutting Mat: Protects your work surface and provides a non-slip base for your rotary cutter. Ensure it’s large enough to accommodate your cutting ruler and fabric pieces comfortably.
- Iron and Ironing Board: For pressing seams flat and crisp. A good steam iron is invaluable for achieving professional-looking results and ensuring flat, accurate blocks.
- Pins: Quilting pins are used to hold fabric layers together securely before sewing, ensuring alignment and preventing shifting, particularly important on bias edges.
- Sewing Machine: A basic sewing machine capable of sewing a straight stitch is all you need. Ensure it’s in good working order, regularly cleaned, and threaded correctly with a fresh needle.
- Thread: High-quality 100% cotton thread that complements your fabrics. A neutral color like white or light gray is often a good choice for piecing.
- Basic Sewing Supplies: Keep a pair of fabric scissors, a seam ripper (for those inevitable “oops” moments), and extra bobbins handy.
Step-by-Step Directions to Craft Your Slice and Dice Quilt
Step 1: Preparing Your Fabrics and Making the Initial Cuts
Preparation is key in quilting, and this project is no exception. Begin by giving all 12 of your fat quarters a good press with your iron. This will remove any wrinkles or creases, ensuring your measurements and cuts are as accurate as possible. Flat fabric is foundational for perfectly squared quilt blocks.
Next, you will work with your fat quarters in sets. Take four fat quarters and stack them neatly, aligning the selvage edges (the tightly woven edges that run along the length of the fabric) and squaring up any uneven sides. Using your quilting ruler and rotary cutter, trim these stacked fabrics into precise 17 1/2-inch squares. Precision here is paramount for the success of your blocks, so take your time and ensure your ruler is perfectly aligned.
Once you have your 17 1/2-inch squares, it’s time for the “slice” part of our quilt. On one of your stacked squares (which represents all four layers), make two marks with a fabric marker or pencil:
- Measure 4 inches from the top-left corner along the top edge and place a clear mark.
- Now, go to the bottom-right corner and measure 4 inches inwards along the bottom edge, placing a second distinct mark.
Line up your quilting ruler to connect these two marks – the 4-inch mark on the top-left edge and the 4-inch mark on the bottom-right edge. Carefully cut along this line with your rotary cutter, slicing through all four layers simultaneously. This diagonal cut will create unique triangle pieces from each fat quarter.
Repeat this cutting process for all 12 fat quarters. You will essentially be creating three sets of four stacked fat quarters, resulting in twelve 17 1/2-inch squares, each then diagonally sliced. Once all your pieces are cut, the fun begins! It’s time to mix and match the resulting triangle pieces. Play with different combinations of fabrics and colors until you find pairings that are visually appealing and balanced. This creative mixing is where the personality of your quilt truly shines, so enjoy the process of arranging and rearranging until you’re satisfied with your block components.
Step 2: Constructing Your Quilt Blocks with Precision
Now that your fabrics are sliced and artfully mixed, it’s time to bring them together into individual quilt blocks. From your curated mix-and-match stash, select two fabric pieces that you want to join to form a single block. Place them right sides together, ensuring the raw edges align as perfectly as possible. A crucial detail for this specific pattern is to create an intentional offset: allow the top piece to overhang by 1/4 inch at one end of the seam, and leave a corresponding 1/4-inch gap at the other end. This slight offset is key to achieving the distinctive “slice and dice” effect and ensuring the block squares up correctly once trimmed.
Carefully pin the two fabric pieces all the way down the edge you intend to sew. Pins help prevent the fabric from shifting, especially when working with bias edges that can stretch easily. Using your sewing machine, sew these pieces together with a precise 1/4-inch seam allowance. Consistency in your seam allowance is vital for accurate block construction, so take your time and, if needed, practice on scrap fabric first to achieve a perfect 1/4-inch seam. A 1/4-inch presser foot can be a huge asset here.
After sewing, take your block to the ironing board. Press the seam nicely and flat first, which is known as “setting the stitches.” Then, press the seam allowance to one side. For most quilting projects, pressing seams to one side (usually towards the darker fabric to prevent show-through) helps create a crisper, flatter finish and reduces bulk where seams intersect. Once pressed, return to your cutting mat. You will now trim the assembled block down to 16 1/2 inches square. This trimming step is essential for squaring up your blocks and correcting any minor discrepancies that may have occurred during sewing, ensuring all your blocks are uniform and ready for assembly.
Repeat these sewing, pressing, and trimming steps until you have a total of 12 completed quilt blocks. Each block will showcase the unique “slice and dice” design, with the diagonal seam creating a dynamic visual element. As you complete each block, stack them neatly, ready for the final assembly phase. This repetition allows you to refine your technique and build confidence with each successful block.
Step 3: Assembling Your Quilt Top
With all 12 of your beautiful Slice and Dice blocks now complete and squared, the next exciting step is to assemble them into a cohesive quilt top. Lay out your 12 blocks on a design wall, the floor, or any large flat surface that allows you to view the entire arrangement. Arrange them into three rows of four blocks each. Take your time with this step, stepping back frequently to view your layout from a distance. This allows you to assess the color distribution, pattern flow, and overall balance of your design. You might want to rotate some blocks to achieve different visual effects or swap blocks between rows and columns until you are completely satisfied with the arrangement.
Once you’re happy with your layout, begin sewing the blocks together within each row. Take the first two blocks of a row, place them right sides together, carefully aligning all raw edges. Pin generously along the seam line, then sew them with a consistent 1/4-inch seam. Continue adding the remaining blocks to complete each row. After sewing each row, press the seams within that row. For easier alignment when joining rows, press the seams of odd-numbered rows in one direction (e.g., to the right) and even-numbered rows in the opposite direction (e.g., to the left). This technique, known as “nesting seams,” helps reduce bulk and ensures perfect points when you join the rows together.
Finally, join your three completed rows. Place row 1 and row 2 right sides together, carefully aligning all intersecting seams and pinning generously at these intersections and along the entire length of the row. Sew with a consistent 1/4-inch seam. Repeat this process to attach row 3 to your joined row 1 and 2. Press your final quilt top seams open or to one side, whichever you prefer and which creates the flattest result for your quilting. Congratulations, you’ve just created a stunning and unique Slice and Dice quilt top, ready for the next phase of your quilting journey!
Beyond the Quilt Top: Finishing Your Project
While the Slice and Dice Quilt tutorial primarily focuses on creating the quilt top, a complete quilt involves a few more crucial steps to transform it into a functional and durable textile:
- Batting: This is the soft, insulating layer sandwiched between your quilt top and backing. Choose a batting type that suits your needs – cotton, wool, or blends are popular, each offering different levels of warmth, drape, and texture.
- Backing: Select a fabric for the back of your quilt. This can be a coordinating print, a solid color that highlights the quilt top, or even a pieced backing made from leftover fabrics for an extra creative touch.
- Quilting: This is the process of stitching through all three layers (quilt top, batting, backing) to hold them together, add stability, and create texture. You can choose simple straight lines, meandering free-motion designs, hand quilting for a classic look, or professional longarm quilting for intricate patterns.
- Binding: The final step involves attaching strips of fabric around the edges of the quilt to encase the raw edges, provide durability, and give it a clean, polished, and finished look.
Each of these steps adds to the durability, warmth, and overall beauty of your finished quilt, transforming your quilt top into a cherished heirloom or a beloved practical item for daily use.
Tips for Success in Your Quilting Journey
To ensure your Slice and Dice Fat Quarter Quilt project goes smoothly and yields the best possible results, keep these essential quilting tips in mind:
- Maintain a Sharp Rotary Blade: A dull blade can snag fabric, leading to inaccurate cuts, frayed edges, and unnecessary frustration. Change your blade regularly for crisp, clean cuts.
- Measure Twice, Cut Once: This age-old adage is especially true in quilting. Double-check all measurements before making a cut; precision at the cutting stage saves headaches later.
- Consistent 1/4-inch Seam: Invest in a 1/4-inch presser foot for your sewing machine or mark your machine bed with painter’s tape to ensure consistent seam allowances. This is absolutely crucial for blocks to fit together perfectly.
- Press, Don’t Iron: When joining fabric, “press” (lift and place the iron) rather than “iron” (slide the iron back and forth). This prevents stretching and distortion of your fabric and seams.
- Take Breaks: Quilting should be an enjoyable and relaxing hobby! If you feel frustrated, tired, or your precision starts to slip, step away from your machine and return with fresh eyes and renewed energy.
- Organize Your Pieces: Keep your cut pieces and assembled blocks organized. Using a design wall or simply stacking them in order can prevent confusion and mistakes.
Your Finished Slice and Dice Fat Quarter Quilt: A Testament to Creativity!
By following these detailed instructions, you will create a beautiful and unique Slice and Dice Fat Quarter Quilt that belies its simple construction. This project is a fantastic way to develop your quilting skills, experiment with color and pattern, and produce a meaningful handmade item that can be both decorative and functional. Whether it’s draped elegantly over a sofa, used as a cozy lap quilt on chilly evenings, or given as a heartfelt, personalized gift, your quilt will be a cherished testament to your creativity, precision, and effort. So, gather your fat quarters, fire up your sewing machine, and embark on this rewarding quilting adventure today – you’ll be amazed at what you can create!