
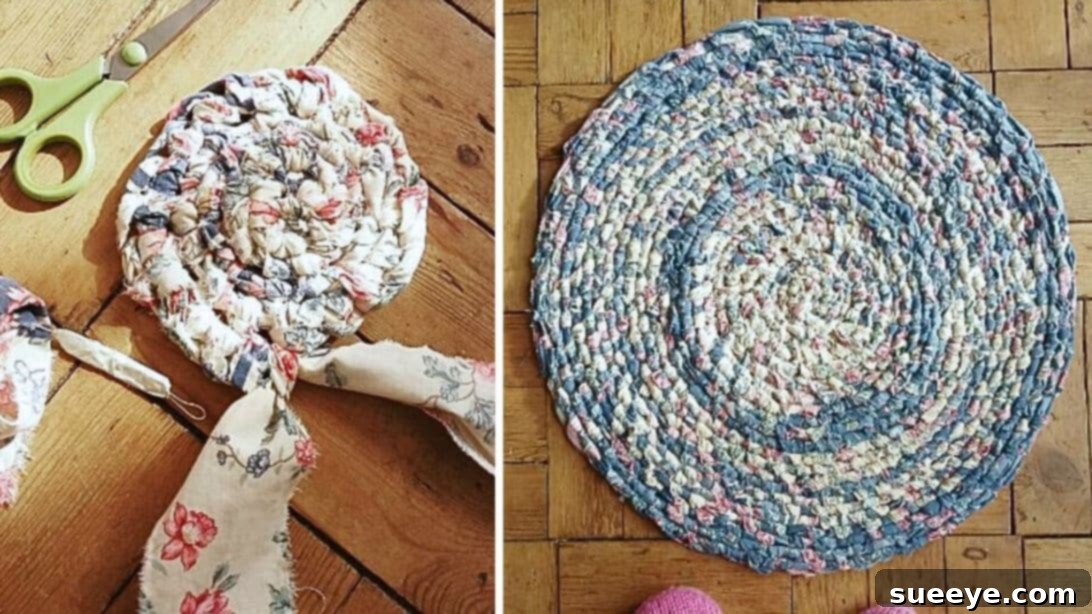
Transforming old textiles into beautiful, functional home decor is a satisfying and sustainable endeavor. Instead of discarding worn-out sheets, duvet covers, or even old clothing, breathe new life into them by creating unique, handcrafted rag rugs. This project centers around the traditional Amish Knot Rug, also affectionately known as a “toothbrush rug” due to the simple needle used in its creation. It’s an ideal weekend craft: straightforward, incredibly beginner-friendly, and remarkably cost-effective, requiring no expensive tools or materials beyond what you likely already have around the house.
The beauty of this project lies in its versatility. You can customize your rug to any size, shape, and color palette imaginable. While a single-color rug can be elegantly minimalist, we highly recommend experimenting with fabrics of varying colors, patterns, and textures. The true magic unfolds as you work, with each knot contributing to an evolving tapestry of color and design. The exciting uncertainty of the final pattern makes the process even more engaging and rewarding, resulting in a truly one-of-a-kind piece that reflects your personal style and creativity.
Crafting an Amish knot rug is more than just making a floor covering; it’s an act of upcycling that reduces waste and adds a cozy, handmade touch to any room. These rugs are not only durable and practical but also imbued with the charm of homemade items. They make excellent bath mats, bedside rugs, entryway accents, or even decorative wall hangings. Plus, the tactile nature of working with fabric strips and the rhythmic motion of knotting can be incredibly therapeutic, offering a mindful escape from daily stresses.
RELATED: Easy DIY Braided Rug Tutorial
As highlighted, this project prides itself on its accessibility. You won’t need specialized equipment. The most unique tool you’ll encounter is the toothbrush rug needle itself. While these can be readily purchased at craft stores or online, a truly DIY spirit will appreciate that you can easily fashion one at home from common household items. This resourceful approach perfectly aligns with the ethos of the Amish knot rug tradition. For a comprehensive guide on how to both create your own needle and master the knotting technique, Barri-Jayne Makes on YouTube offers excellent step-by-step instructions in the video tutorial linked below.
Why Choose an Amish Knot Rug?
- Sustainable Crafting: Repurpose old linens, reducing landfill waste and giving new life to forgotten fabrics.
- Cost-Effective: Utilizes materials you already own, eliminating the need for expensive purchases.
- Unique Home Decor: Create a personalized rug that perfectly complements your interior design, unmatched by store-bought alternatives.
- Durable and Practical: The tightly knotted structure results in a sturdy rug that can withstand daily wear and tear.
- Beginner-Friendly: Requires no complex stitches or specialized skills, making it perfect for novice crafters.
- Mindful Activity: The repetitive motion of knotting can be meditative and relaxing, offering a creative outlet.
Essential Amish Knot Rug Materials
Gathering your materials is the first exciting step in bringing your rug to life. The beauty of this craft is its simplicity and reliance on repurposed items.
- Old Sheets or Duvet Covers: The primary material for your rug. Cotton or cotton-blend fabrics work best due to their softness, durability, and ease of ripping. Consider combining different colors and patterns for a visually dynamic rug. The quantity needed will depend on your desired rug size; a queen-sized sheet can often yield enough strips for a small to medium-sized rug.
- Wire: A sturdy piece of wire, about 3 inches long, is needed for crafting your DIY toothbrush needle. A medium-gauge wire, such as that found in coat hangers or electrical wiring (stripped), works well.
- Wire Cutters: Essential for precisely cutting the wire to the required length.
- Painter’s Tape (or Masking Tape): Used to secure the loops of your homemade needle, ensuring it holds together during the knotting process.
How to Craft a Beautiful Round Amish Knot Rug
Follow these detailed steps to create your very own handmade rug. Pay close attention to the technique, especially when forming the initial knots and expanding your rug, as these are key to achieving a flat, round shape.
Step 1: Constructing Your DIY Toothbrush Needle
The heart of the “toothbrush rug” technique lies in its unique needle. If you’re not purchasing one, making your own is simple. Begin by cutting a piece of sturdy wire approximately 3 inches (or about 7.5 cm) in length using your wire cutters. Carefully fold both ends of the wire inward towards the center, creating two small, opposing loops. These loops should be just large enough for a fabric strip to pass through. Once the loops are formed, gather the central straight sections of the wire and wrap them securely with a piece of painter’s tape or masking tape. This taping not only keeps the loops stable but also provides a comfortable grip for your fingers, preventing the wire ends from poking you as you work.
Step 2: Preparing Your Fabric Strips
This step is crucial for the overall look and feel of your rug. Take your old sheets or duvet covers and prepare them by cutting them into long strips. A consistent width of 1 ½ inches (approximately 3.8 cm) is recommended for a balanced rug texture. While you can cut the strips with scissors, a traditional and often more efficient method, especially for cotton, is to make a small snip at one end and then rip the fabric all the way to the other end. Ripping creates strips with slightly frayed, natural edges that add to the rustic charm of the rug and often results in more uniform widths than cutting freehand. After ripping, gently pull along the length of each strip to remove any excessive loose threads or fraying, which will give your finished rug a cleaner appearance and prevent tangling during the knotting process. Accumulate a significant pile of these strips, as you’ll need many to complete a rug of any substantial size.
Step 3: Connecting Your Fabric Strips Securely
To create continuous lengths of fabric for knotting, you’ll need to join your individual strips together. This method creates a strong, flat connection that blends seamlessly into the rug. Take two fabric strips. At one end of the first strip, fold it over slightly and cut a small slit or hole through both layers, about a half-inch from the end. Repeat this process for one end of the second fabric strip. Now, insert the un-slitted end of the second strip through the hole of the first piece. Next, take the un-slitted end of the *first* strip and insert it through the hole of the *second* piece. Carefully pull both ends until the loops created by the holes interlock and “lock” the two strips together. This forms a secure, unobtrusive knot. Repeat this process whenever you run out of fabric, creating long, continuous lengths that will allow for uninterrupted knotting.
Step 4: Initiating the Rug’s Central Coil
This is where your rug truly begins to take shape. Thread the working end of a fabric strip through one of the loops of your homemade toothbrush needle. Hold the needle with the fabric strip trailing from it. Now, fold the working strip across itself to create a small loop, approximately the size of your index finger. Insert your needle through this new loop. As you pull the fabric through with the needle, use your index finger to hold the initial loop firmly, ensuring it doesn’t loosen. Repeat this motion, but this time use your ring finger to hold the newly formed loop while you pull the next one. Continue this rhythmic process, alternating fingers to maintain tension and control, until you have created a total of six interconnected loops or “holes.” These six initial holes form the foundational core of your circular rug. Maintaining even tension during this stage is vital for a flat, stable center.
Step 5: Expanding and Continuing Your Round Rug
Once your initial six-hole core is complete, you’ll begin to build out the rug. Turn your piece over so that the toothbrush needle is on the left side (assuming you are right-handed). You will now be working counter-clockwise. Take the two ends of the holes you just created and gently pull them together, aligning them to form a continuous circle. Locate your very first hole. Insert the needle through this first hole, making sure to push it through *underneath* the other fabric strip that forms the loop. Pull the fabric strip all the way through, creating a new knot that connects to the previous row. This action forms the next “stitch” in your rug.
Continue this process, inserting the needle through each subsequent hole from the previous row and creating a new knot. As you work your way around, you will notice that the holes from the previous row might start to appear larger, or your rug might begin to “cup” (curve upwards) if you only put one knot per hole. To keep your rug flat and allow it to expand into a larger circle, you’ll need to periodically make “increases.” If your rug starts to cup, or if the holes become significantly spaced out, make two loops (two knots) into a single hole from the previous row. This effectively adds more fabric and widens your rug, preventing it from curling. The frequency of these increases will depend on your fabric thickness and tension, so pay attention to how your rug is laying flat. Don’t be afraid to experiment to find the right rhythm for your increases. Continue knotting and increasing until your rug reaches the desired size. If you run out of fabric during this process, simply refer back to Step 3 to connect a new strip.
Tips for Success with Your Amish Knot Rug
- Consistent Tension: Maintaining even tension throughout the knotting process is key to a flat, uniform rug. If your tension is too loose, the rug might be floppy; too tight, and it could curl up.
- Fabric Choice: While old sheets are excellent, other sturdy cotton fabrics like denim, T-shirts, or even old towels (cut thinly) can also be used. Experiment with different textures for unique results.
- Color Planning: Plan your color changes for interesting patterns like spirals, concentric circles, or random bursts of color. You can introduce new colors simply by joining a new strip as described in Step 3.
- Finishing Your Rug: Once your rug reaches the desired size, simply tie off the last fabric strip securely with a knot to an adjacent loop on the rug. Trim any excess fabric close to the rug.
- Cleaning Your Rug: Most fabric rag rugs can be machine washed on a gentle cycle with cold water and air-dried flat to maintain their shape and integrity.
- Troubleshooting: If your rug starts to buckle or “ruffle,” you might have too many increases. If it cups, you might not have enough. Adjust your increases as you go to correct the shape.
Round Amish Knot Rug Video Tutorial
For visual learners, watching the process can clarify many of the steps. The video below provides an excellent walkthrough to accompany these written instructions, ensuring you master the technique with ease.
With these detailed instructions and a little patience, you’ll soon have a beautiful, handmade Amish knot rug that’s not only a functional piece of decor but also a testament to your creativity and commitment to sustainable living. Enjoy the process of transforming humble beginnings into a cherished home item!