
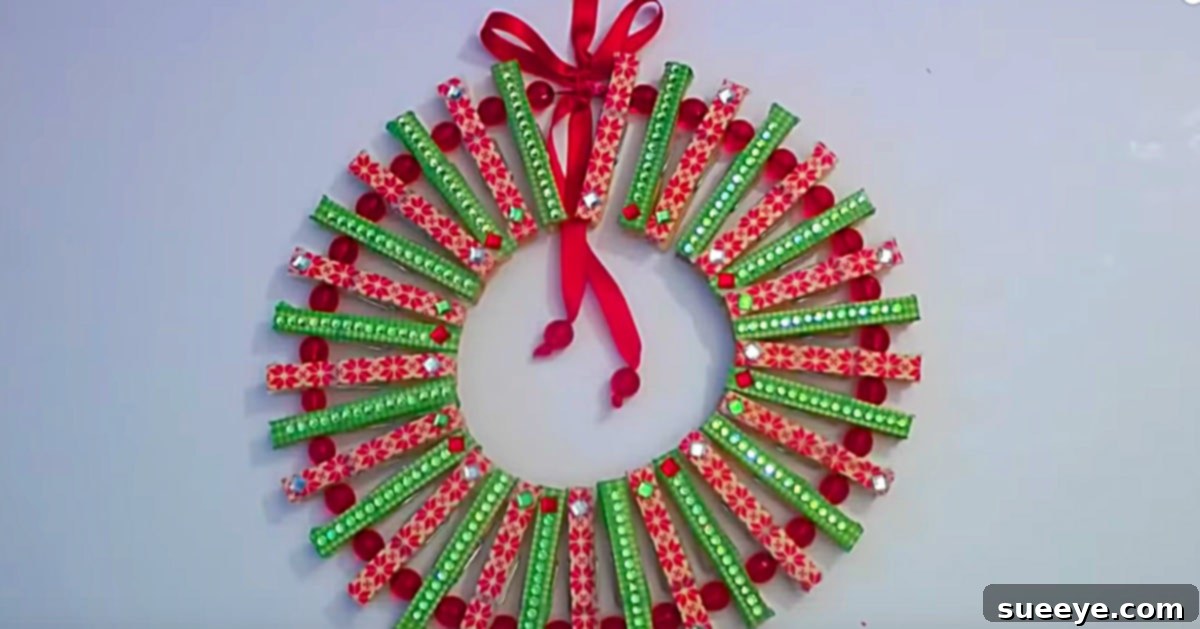
Craft Your Own Festive Magic: The Ultimate DIY Christmas Clothespin Wreath Guide
Are you searching for captivating DIY project ideas that won’t break the bank or consume all your precious free time? As a passionate crafter, I often find myself falling into the trap of overspending on supplies, only to realize there are countless inexpensive, yet equally beautiful, alternatives waiting to be discovered. This realization sent me on a quest for budget-friendly craft inspiration. While exploring various craft stores and dollar stores, many ideas seemed either too complex or simply not quite what I was looking for.
Then, a truly remarkable find emerged: an incredibly charming Clothespin Christmas Wreath tutorial on YouTube. What instantly captivated me was its ingenious use of a simple bag of clothespins – often available for just a dollar! I knew instantly that this was the perfect project for my upcoming weekend. It promised creativity, simplicity, and affordability, everything a crafter could wish for. This isn’t just another craft; it’s an opportunity to create a unique piece of holiday decor that truly reflects your personal style without the hefty price tag.
Why Choose a DIY Clothespin Wreath This Christmas?
In a world filled with mass-produced holiday decorations, there’s something incredibly special about a handmade wreath. A DIY Christmas Clothespin Wreath stands out for several compelling reasons. Firstly, its affordability is unmatched. With most materials sourced from a dollar store or existing craft stash, you can create a truly stunning piece for a fraction of the cost of store-bought alternatives. Secondly, its simplicity makes it an ideal project for crafters of all ages and skill levels, from beginners to seasoned DIY enthusiasts. The steps are straightforward, and the result is consistently impressive.
Beyond the practical advantages, crafting this wreath offers a wonderful opportunity for personalization. You’re not just making a decoration; you’re creating a unique expression of your holiday spirit. Whether you prefer traditional reds and greens, a modern minimalist look, or a whimsical theme, this project adapts beautifully to your vision. It’s a fantastic way to spend a cozy afternoon, either alone or with family and friends, making memories while making something beautiful.
Gathering Your Festive Supplies: What You’ll Need
One of the most appealing aspects of this DIY Christmas Clothespin Wreath is the accessibility of its materials. You likely have some of these items already, and the rest are readily available at any dollar store, craft store, or even a local supermarket. Here’s a detailed breakdown of what you’ll need to transform simple items into a dazzling holiday centerpiece:
- 32-35 Wooden Clothespins: These are the stars of our show! Standard wooden clothespins work best as they provide a smooth surface for decoration. You can typically find a large bag for a very low price.
- Washi Tape (Christmas Themed): This decorative adhesive tape is incredibly versatile. Choose patterns and colors that align with your desired Christmas theme. From classic plaid to shimmering snowflakes, the options are endless. Washi tape is easy to apply and peel, making it perfect for this project. Alternatively, you could use craft paint, glitter, or even small fabric scraps.
- Decorative Beads: A small assortment of beads will add sparkle and act as elegant spacers between your clothespins. Opt for colors that complement your washi tape – silver, gold, red, green, or pearlescent beads all work wonderfully. Size-wise, aim for beads that are large enough to be noticeable but not so big they overpower the clothespins.
- 60 cm (approx. 24 inches) Craft Wire: A medium-gauge craft wire (like 20 or 22 gauge) is ideal. It needs to be flexible enough to bend easily but sturdy enough to hold the circular shape of your wreath. Floral wire is also an excellent choice. The 60 cm length provides a good base for a standard-sized wreath; adjust as needed for larger or smaller projects.
- Decorative Ribbon: Choose a beautiful ribbon that complements your overall design. This will be used to create a hanging loop and a decorative bow. Satin, grosgrain, or even burlap ribbon can add texture and charm. Consider a wired ribbon for bows that hold their shape better.
- A Pair of Pliers: Essential for bending, cutting, and securing the craft wire. Needle-nose pliers or jewelry pliers are particularly useful for precision work.
- Self-Adhesive Crystals or Jewels: These small, sparkly embellishments are perfect for adding extra festive bling to your clothespins. They come in various shapes and sizes and are incredibly easy to apply, instantly elevating the wreath’s elegance.
- (Optional) Hot Glue Gun: While not strictly necessary, a hot glue gun can be useful for securing ribbon ends, attaching larger embellishments, or ensuring your washi tape edges are perfectly flush.
Once you have all your materials gathered, you’re ready to embark on this delightful crafting journey!
Step-by-Step Guide to Crafting Your Clothespin Christmas Wreath
Now that you have all your supplies ready, let’s dive into the fun part: assembling your unique Christmas wreath. Follow these simple steps to bring your vision to life:
Step 1: Personalize Your Clothespins
This is where your chosen theme truly begins to shine! Take your decorative Christmas-themed washi tape and begin meticulously applying it to each clothespin. The goal is to cover the entire outer surface of each clothespin, ensuring the festive patterns are front and center. For a polished look, carefully trim the tape at the edges and press down firmly to prevent lifting. If you prefer painting, now is the time to apply your chosen acrylic colors, allowing ample drying time before proceeding. This initial decorating step is crucial as it sets the aesthetic tone for your entire wreath.
Step 2: Stringing Your Wreath Base
With your clothespins beautifully adorned, it’s time to create the circular base of your wreath. Take your 60 cm craft wire and begin stringing the decorated clothespins onto it. For an appealing visual rhythm, alternate between a clothespin and a decorative bead. The beads serve not only as charming accents but also help to create consistent spacing between each clothespin, allowing their individual designs to be appreciated. Ensure the clothespins are threaded with the decorative side facing outwards. Continue this pattern until all your clothespins and desired number of beads are strung onto the wire, forming a beautiful garland.
Step 3: Forming the Perfect Circle
Once all your elements are strung, it’s time to transform your linear arrangement into a festive circle. Carefully bring the two ends of the craft wire together. Using your pliers, securely twist and wrap the wire ends around each other, forming a sturdy, continuous loop. Ensure the connection is tight enough to hold the weight of the clothespins without sagging. For an extra neat finish, you can conceal this join by wrapping a small piece of your Christmas-themed washi tape around the twisted wire, blending it seamlessly into the design. This step establishes the foundational shape of your wreath.
Step 4: Adding Sparkling Embellishments
Now for the dazzling details! Take your self-adhesive crystals or jewels and begin carefully applying them to your washi tape-covered clothespins. This step allows for immense creativity – you can place one crystal on each clothespin, create small clusters, or arrange them in specific patterns. The self-adhesive backing makes this process incredibly simple, instantly adding a touch of sparkle and sophistication. Experiment with different colors and sizes of jewels to create varied textures and light reflections, making your wreath truly unique and eye-catching.
Step 5: The Grand Finale – Bow and Display
The final touch that ties your entire wreath together is a beautiful decorative bow. Use your chosen ribbon to create an elegant bow and attach it securely to the top of your wreath. You can use a small piece of extra wire or a dab of hot glue for this. Ensure the bow is positioned beautifully, complementing the overall design. Once the bow is in place, you can also create a small loop from the same ribbon or a separate piece of wire at the back for easy hanging. And just like that, your magnificent DIY Christmas Clothespin Wreath is complete and ready to grace your front door, mantle, or any space that needs a touch of festive cheer!
Unleash Your Creativity: Customization Ideas
While the basic instructions provide a fantastic starting point, the beauty of the DIY Christmas Clothespin Wreath lies in its endless customization possibilities. Don’t hesitate to let your creativity soar and make this wreath truly your own:
- Theme Variations: Instead of traditional Christmas themes, consider a “Winter Wonderland” with silver and blue washi tape, white beads, and snowflake embellishments. Or perhaps a “Rustic Charm” wreath using burlap ribbon, natural-toned clothespins (maybe stained lightly), and small pinecones or twigs.
- Color Palettes: Experiment beyond red and green. A chic monochromatic wreath in gold or silver would be stunning. Pastels can create a whimsical, softer look, while vibrant, unexpected colors can make a bold statement.
- Additional Embellishments: Think beyond crystals. Small bells can add a delightful jingle. Miniature ornaments, glitter spray, small artificial berries, or even tiny personalized tags can enhance the wreath’s character. A light dusting of artificial snow can also create a magical frosted effect.
- Scented Elements: For a sensory experience, consider adding a few drops of essential oils (like pine or cinnamon) to non-visible parts of the clothespins, or tuck in a few dried orange slices or cinnamon sticks.
- Size and Shape: Adjust the length of your wire and the number of clothespins to create wreaths of different sizes, from mini ornaments to larger door displays. You could even experiment with different wire shapes, though a circle is generally easiest for a first project.
The Joy and Pride of a Handmade Holiday
I must admit, over the many holiday seasons, I’ve had the pleasure of displaying some truly stunning wreaths. However, this DIY Christmas Clothespin Wreath holds a special place in my heart. It’s not just adorable and unique; it embodies the spirit of homemade charm and personal touch that so many store-bought decorations lack. The process itself was immensely enjoyable – a delightful escape into creativity that felt neither rushed nor complicated. The reactions from everyone who has seen it have been overwhelmingly positive, filled with compliments on its originality and festive appeal.
This project is genuinely enjoyable for crafters of all ages and skill levels. Whether you’re an experienced artisan or just starting your DIY journey, you’ll find immense satisfaction in creating something so beautiful and impactful with such simple means. It’s more than just a decoration; it’s a conversation starter, a source of pride, and a testament to the joy of making. Imagine the delight of giving one of these handcrafted wreaths as a thoughtful, personalized gift to a loved one!
Conclusion: Craft Your Own Holiday Masterpiece
So, if you’re looking for a simple, affordable, and incredibly rewarding way to add a unique touch to your holiday decor this year, look no further than the DIY Christmas Clothespin Wreath. It’s a testament to how humble materials can be transformed into something truly spectacular with a dash of imagination and a little effort. Gather your supplies, embrace your inner crafter, and create a festive masterpiece that will surely bring warmth and cheer to your home throughout the holiday season. Happy crafting!