
Easy Ladybug and Bumblebee Painted Rocks: A Beginner’s Guide to DIY Rock Art
Embarking on the delightful hobby of rock painting is a fantastic way to unleash your creativity and connect with nature. Unlike flat canvases, the unique contours and varied textures of rocks offer an imaginative playground for artists of all skill levels. If you appreciate incorporating natural elements into your home or garden decor, transforming ordinary pebbles into charming insects like ladybugs and bumblebees is an exceptionally rewarding project.
This comprehensive guide will walk you through the process, drawing inspiration from talented creators like Kristyona on YouTube, who beautifully demonstrates how to paint these whimsical creatures on spherical stones. Whether you’re a seasoned crafter or just starting your journey into the world of DIY rock art, this step-by-step tutorial is designed to be easy to follow, ensuring a fun and successful experience.
The Allure of Rock Painting: Why This Hobby Rocks!
Rock painting has surged in popularity, captivating enthusiasts globally with its simplicity, accessibility, and the sheer joy it brings. It’s more than just a craft; it’s a therapeutic activity that allows you to unwind, focus, and express yourself. The tactile experience of working with natural stones, combined with the vibrant possibilities of acrylic paints, makes for a truly engaging pastime. Beyond personal enjoyment, painted rocks often become cherished keepsakes, thoughtful gifts, or even part of a community-wide kindness rock project, spreading smiles one painted stone at a time.
One of the greatest advantages of rock painting is its low barrier to entry. You don’t need expensive supplies or extensive artistic training. Just a few basic materials and a willingness to explore are all it takes to transform a humble stone into a miniature work of art. It’s an ideal activity for individuals seeking a relaxing outlet, families looking for a creative project to share, or anyone eager to add a personalized, natural touch to their surroundings.
Gathering Your Essential Materials for Rock Painting
Before diving into the creative process, gathering the right materials will set you up for success. Each item plays a crucial role in achieving vibrant, durable, and beautiful painted rocks. Here’s what you’ll need for your ladybug and bumblebee masterpieces:
- Smooth, Clean Rocks: The foundation of your art. Look for rocks that are relatively flat or rounded with smooth surfaces, as these are easier to paint on. Avoid porous or crumbling rocks. A good rinse and scrub with soap and water, followed by complete drying, is essential to remove dirt and ensure paint adhesion.
- Painter’s Acrylics (Various Colors): Acrylic paints are ideal for rock painting because they are water-based, dry quickly, and offer excellent coverage and vibrant colors. For our insect designs, you’ll definitely need white (for priming and details), black (for outlines and spots), bright red (for ladybugs), and sunny yellow (for bumblebees). Having a range of other colors on hand for future projects is always a good idea.
- Assorted Paint Brushes: A variety of brush sizes will allow for both broad strokes and fine details. A medium-sized flat or round brush is perfect for applying base coats, while very fine-tipped brushes (like a detail brush or liner brush) are indispensable for creating intricate lines, eyes, and antennae.
- Palette or Mixing Surface: A plastic palette, a ceramic plate, or even a piece of wax paper works well for dispensing and mixing your paints.
- Water Container: Essential for rinsing your brushes between colors. Keep a separate container for cleaning dirty brushes to avoid contaminating your paint colors.
- Paper Towels or Cloth Rags: For dabbing excess water from brushes and cleaning up any spills.
- Protective Sealant (Optional but Recommended): To protect your finished artwork from the elements, especially if they will be displayed outdoors. Both spray-on and brush-on sealants are available in glossy or matte finishes.
- Workspace Protection: A newspaper, old tablecloth, or craft mat will protect your table from paint splatters.
Preparing Your Workspace for Creative Flow
A well-organized workspace enhances the enjoyment of any craft project. Find a comfortable spot with good lighting. Lay down your protective covering, arrange your paints within easy reach, set up your water rinsing station, and have your brushes and rocks ready. This preparation ensures a smooth and interruption-free creative session, allowing you to fully immerse yourself in the art of rock painting.
Step-by-Step Guide: Crafting Charming Ladybug Rocks
1. The Essential Primer: White Base Coat
Begin by applying a thin, even coat of white acrylic paint over the entire surface of your chosen rock. This white primer serves multiple crucial purposes: it creates a clean, uniform canvas, helps subsequent colors appear more vibrant and true to shade, and ensures better paint adhesion, especially on darker or unevenly colored rocks. Make sure to cover the rock completely. Allow this first coat to dry thoroughly – typically 10-15 minutes, or until it’s dry to the touch. For optimal coverage and color vibrancy, consider applying a second thin white coat after the first has dried.
2. Bringing Red to Life: The Ladybug’s Shell
Once your white primer is completely dry, it’s time to introduce the iconic red hue of the ladybug. Using a bright red acrylic paint and a medium-sized brush, carefully paint over the entire white surface of the rock. Aim for smooth, consistent coverage. The white base coat beneath will make your red incredibly vivid and opaque. Ensure there are no patchy areas, and allow this vibrant red layer to dry fully before proceeding to the next step. Patience during drying prevents smudges and ensures crisp details.
3. Crafting the Ladybug’s Distinctive Details
With the red base perfectly dry, switch to a finer, detail brush and black acrylic paint. This is where your ladybug truly comes to life:
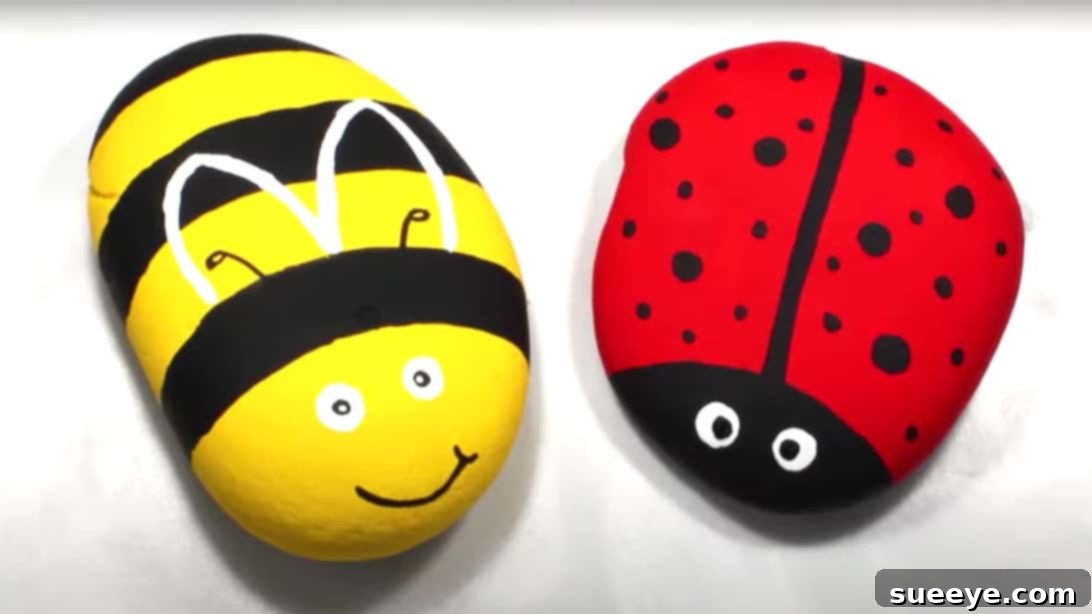
- Head and Central Line: Carefully draw a black semicircle at one end of the rock to represent the ladybug’s head. From the base of this semicircle, draw a straight black line down the center of the red body, dividing it into two wing covers. A steady hand is key here.
- Signature Spots: Using the same fine brush or the back of a small paintbrush handle for perfectly round dots, add a few black splotches or spots onto the red body. Ladybugs typically have varying numbers and sizes of spots, so feel free to make them your own.
- Expressive Eyes: For the eyes, dip your fine brush in white paint and carefully place two small white circles on the black head area. Try to make them relatively symmetrical. Once the white circles are dry, use your fine brush and black paint to add tiny black dots in the center of each white circle, creating the pupils. This simple detail adds so much character!
4. Final Drying and Protection
Allow all the black and white details to dry completely. This might take a few more minutes, especially if you applied the paint a bit thicker for the eyes. Once everything is dry, you’ve officially created an adorable ladybug rock! To ensure your charming ladybug withstands the test of time and weather, especially if placed outdoors, apply a clear protective sealant. This step will be detailed further below.
Step-by-Step Guide: Creating Buzz-worthy Bumblebee Rocks
1. The White Foundation for Vibrancy
Similar to the ladybug, begin your bumblebee rock by applying a smooth, even layer of white priming paint onto another clean, rounded rock. This step is crucial for making the vibrant yellow base coat truly pop. Ensure full coverage and allow this white layer to air-dry completely before moving on. Patience here will prevent your colors from blending or looking dull.
2. Laying Down the Sunny Yellow Base
Once the white primer is dry, pick up your sunny yellow acrylic paint and a medium-sized brush. Cover the entire white surface of the rock with a generous, even coat of yellow. Aim for full opacity, ensuring the white base is no longer visible. This bright yellow will form the main body of your bumblebee. Let this yellow layer air dry thoroughly for a few minutes. If needed, apply a second thin coat after the first has dried for a richer, more uniform color.
3. Detailing the Bumblebee’s Charm
With your yellow base completely dry, it’s time for the intricate details that transform your rock into an adorable bumblebee. Grab your small, fine-tipped brush and black acrylic paint:
- Head and Stripes: Start by painting a black semicircle at one end of the rock for the bumblebee’s head. Then, using steady strokes, paint several black stripes across the yellow body. Bumblebees typically have 2-3 distinct stripes. Vary their thickness slightly for a more natural look, leaving enough yellow space in between.
- Facial Expressions: Add a cheerful grin beneath the head with a thin black line. For the antennae, draw two small, thin lines extending upwards from the top of the head, perhaps with tiny dots at the ends for a realistic touch.
- Expressive Eyes: Just like with the ladybug, use white paint for two small circles on the black head. Once these are dry, add tiny black dots in the center for the pupils, giving your bumblebee a friendly gaze.
- Delicate Wings: With a clean, fine paintbrush and white paint, carefully draw two delicate, oval or teardrop-shaped wings on either side of the bumblebee’s body, slightly above the stripes. You can make them semi-transparent by applying a very thin layer or make them opaque. Let the wings dry out completely.
4. Final Drying for Your Bumblebee Masterpiece
Take your time and allow all the black, white, and wing details to dry perfectly. Once every layer is fully cured, your charming bumblebee rock is complete! As with the ladybug, a protective sealant is highly recommended for longevity and durability.
Protecting Your Painted Rocks: The Sealing Process
Once your beautiful ladybug and bumblebee rocks are completely dry, the final, crucial step is to apply a protective sealant. This ensures your artwork is durable, resistant to scratches, fading from UV rays, and impervious to moisture, especially if you plan to display them outdoors.
There are generally two types of sealants suitable for painted rocks:
- Spray Sealants: These are easy to apply and provide a smooth, even finish. Hold the can about 8-12 inches away from the rock and apply several light, even coats, allowing each coat to dry according to the manufacturer’s instructions (usually 15-30 minutes) before applying the next. Work in a well-ventilated area.
- Brush-on Sealants: These offer a thicker, more durable coating and are ideal for more precise application. Apply with a soft brush, again in thin, even layers, allowing each to dry completely.
Both types come in various finishes, including glossy (which enhances color vibrancy and gives a polished look), matte (for a more natural, subtle appearance), or satin (a balance between glossy and matte). Choose the finish that best suits your aesthetic preference. For outdoor display, look for sealants specifically labeled as “outdoor” or “UV resistant” for maximum protection against the elements.
Displaying Your Adorable Insect Rock Art
Now that you have created these delightful insect painted rocks, the fun continues with finding the perfect spots to showcase them! Their versatility makes them suitable for a wide array of display options, both indoors and outdoors.
- Indoor Decor: Place them on shelves, window sills, or mantels to add a whimsical touch to any room. Use them as charming paperweights on your desk, or nestle them among your indoor potted plants for a burst of color and nature-inspired artistry. They are sure to get people talking and bring a smile to anyone’s face.
- Garden Accents: If properly sealed, these rocks are fantastic additions to your garden. Arrange them in flowerbeds, along pathways, or at the base of trees to create a magical, enchanting landscape. Ladybug and bumblebee rocks blend beautifully with natural surroundings, inviting a sense of playfulness into your outdoor spaces.
- Thoughtful Gifts: Hand-painted rocks make incredibly personal and unique gifts for friends and family. A set of ladybug and bumblebee rocks could be a wonderful present for a gardener, a nature lover, or a child’s birthday.
- The Kindness Rocks Project: Participate in a global phenomenon by painting positive messages or designs on rocks and leaving them in public places for others to find. Your ladybug and bumblebee rocks could bring unexpected joy to a stranger, encouraging them to keep the rock, or re-hide it for someone else to discover.
Beyond the Canvas: Benefits of Rock Painting for Well-being
Engaging in creative hobbies like rock painting offers more than just a beautiful end product; it provides numerous benefits for your mental and emotional well-being:
- Mindfulness and Stress Relief: The focused act of painting can be incredibly meditative. It allows you to quiet your mind, reduce stress, and practice mindfulness, bringing you into the present moment.
- Boosting Creativity: This hobby encourages you to experiment with colors, designs, and techniques, thereby stimulating and nurturing your creative muscles.
- Developing Fine Motor Skills: The precise movements required for detailing, especially with fine brushes, can help improve hand-eye coordination and fine motor skills, making it beneficial for both children and adults.
- Connecting with Nature: From finding the perfect rock outdoors to painting nature-inspired designs, rock painting deepens your appreciation for the natural world.
- Sense of Accomplishment: Completing a painted rock project, no matter how simple, provides a wonderful sense of achievement and boosts self-esteem.
Tips for Beginners on Your Rock Painting Journey
Starting a new craft can sometimes feel daunting, but rock painting is incredibly forgiving and fun. Here are some tips to help beginners enjoy the process and achieve great results:
- Start Simple: Don’t try to create a masterpiece on your first attempt. Begin with basic designs like our ladybugs and bumblebees, or simple patterns and colors.
- Practice Makes Perfect: If you’re nervous about painting directly on your chosen rock, practice your strokes and designs on a piece of paper or an inexpensive scrap rock first.
- Embrace Imperfection: Hand-painted items have character. Don’t worry if your lines aren’t perfectly straight or your dots aren’t perfectly round. These unique touches make your art special.
- Thin Coats are Better: Apply multiple thin layers of paint rather than one thick coat. Thin coats dry faster, prevent cracking, and create a smoother finish.
- Patience is Key: Allow each layer of paint to dry completely before applying the next. Rushing can lead to smudges and muddy colors.
- Experiment with Tools: Besides brushes, try using cotton swabs, toothpicks, or the non-brush end of a paintbrush for different dot and line effects.
- Clean Your Brushes Promptly: Acrylic paint dries quickly and can ruin brushes if not cleaned immediately after use.
Conclusion: Your Journey into Wonderful Rock Art
You now possess the knowledge and inspiration to transform ordinary rocks into enchanting ladybugs and buzzing bumblebees. This project is not just about painting; it’s about embracing creativity, enjoying a calming hobby, and adding a touch of personalized beauty to your environment. The satisfaction of holding a smooth stone that you’ve brought to life with vibrant colors and intricate details is truly unmatched.
We hope this comprehensive guide has empowered you to pick up your brushes and start your own collection of painted insect rocks. Whether they adorn your garden, brighten your office, or become part of a heartwarming community art project, these little treasures are sure to spark joy and conversation. So, gather your supplies, find your perfect rocks, and let your imagination take flight!