
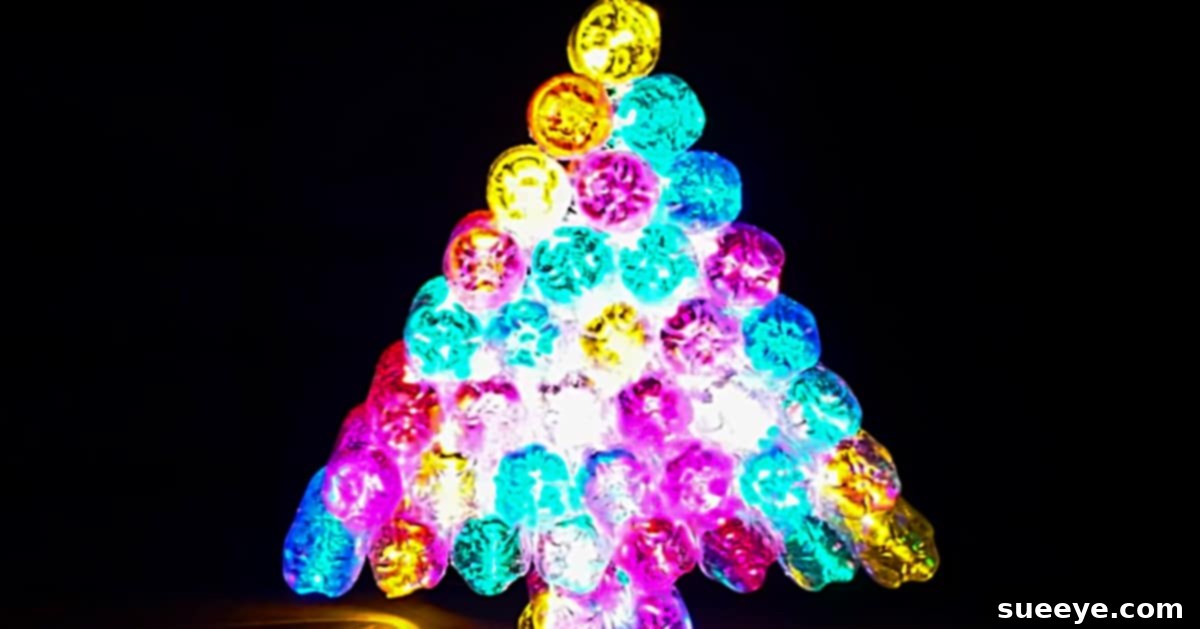
DIY Water Bottle Christmas Tree Luminary: Illuminate Your Holidays Sustainably
The holiday season brings with it a desire for warmth, light, and festive cheer. But what if you could achieve all of that while also making a positive impact on the environment and your wallet? We’re thrilled to share a brilliant project that does exactly that: the DIY Water Bottle Christmas Tree Luminary. This innovative craft transforms ordinary, discarded plastic water bottles into a dazzling display of light, perfect for adding a unique, eco-conscious glow to your home. Say goodbye to mass-produced decor and hello to a personalized, sustainable masterpiece.
Our journey into creating this captivating luminary began with a passion for recycling and a love for creative DIYs. The moment we stumbled upon the concept of a light tree made from plastic bottles, we knew it was a project we had to try. What made it even more exciting was the realization that we already had most of the materials on hand – a bin full of empty water bottles and last year’s Christmas lights. This truly was a “no trip to the craft store, no cash outlay” kind of project, making it even sweeter!
This comprehensive guide will walk you through every step of crafting your own stunning Water Bottle Christmas Tree Luminary. From gathering your materials to the final illuminated display, we’ll provide all the tips and tricks to ensure your project is a resounding success. Get ready to embrace the spirit of upcycling and create a holiday decoration that’s both beautiful and meaningful.
Why Choose an Upcycled Water Bottle Christmas Tree?
Opting for a DIY recycled Christmas tree luminary offers a multitude of benefits, extending far beyond just aesthetic appeal. It’s a choice that reflects a conscious effort towards sustainability, creativity, and community.
Environmental Impact: Giving Plastic a Second Life
Plastic waste is a growing global concern, with millions of plastic bottles ending up in landfills or polluting our oceans each day. By choosing to craft a DIY Water Bottle Christmas Tree Luminary, you actively divert these materials from waste streams. This project exemplifies upcycling at its best, transforming potential trash into a treasured piece of decor. It’s a small yet significant step towards reducing your carbon footprint and promoting a circular economy, demonstrating how everyday items can be reimagined with a little creativity.
Cost-Effectiveness: A Budget-Friendly Holiday Solution
Holiday decorations can often be a significant expense. This project offers an incredibly budget-friendly alternative. The primary material – plastic water bottles – is something most households accumulate regularly. Coupled with existing Christmas lights, this DIY can be practically free! It’s an ideal solution for those looking to decorate beautifully without breaking the bank, proving that stunning holiday decor doesn’t require a hefty investment.
Unique Aesthetic: A Dazzling and Personalized Glow
Unlike generic store-bought decorations, your Water Bottle Christmas Tree Luminary will be truly one-of-a-kind. The translucent nature of the plastic bottles, when illuminated, creates a soft, diffused glow that is both enchanting and warm. Each bottle acts as a mini-diffuser, scattering light in a unique way that conventional light strings cannot replicate. This personalized touch not only enhances your holiday ambiance but also serves as a fascinating conversation starter, showcasing your ingenuity and commitment to sustainable living.
Family-Friendly Project: Fun for All Ages
This project is wonderfully accessible for crafters of all ages. Gathering and cleaning bottles, peeling labels, and even helping with the gluing (under adult supervision) can be fun tasks for children. It’s an excellent opportunity to teach younger family members about the importance of recycling and the joy of creating something beautiful from repurposed materials. Spending time together on a meaningful craft fosters family bonding and creates lasting holiday memories.
Versatility in Design and Placement
While designed as a Christmas tree, the luminary’s basic structure allows for remarkable versatility. You can adjust the size by using more or fewer bottles, choose different light colors to match various themes, or even embellish it further with ribbons or glitter (applied carefully after construction). It’s suitable for indoor use as a captivating centerpiece or, with outdoor-rated lights and proper weather protection, can illuminate your porch or garden. Its unique charm transcends the holiday season, making it a potential year-round decorative piece.
Gathering Your Materials: What You’ll Need
One of the most appealing aspects of this project is how few specialized tools or materials you need. Most items are likely already in your home or easily acquired. Here’s a detailed list to get you started on your DIY Water Bottle Christmas Tree Luminary:
- Plastic Water Bottles (Approx. 40-50): Clear plastic bottles work best for optimal light diffusion. The exact number will depend on the desired size of your tree. We recommend collecting uniform sizes for a neater appearance, typically 16.9 oz (500ml) bottles. Ensure they are thoroughly cleaned and dry, with all labels removed.
- Christmas Lights (One String): A standard string of LED Christmas lights is ideal. LED lights are energy-efficient, produce very little heat, and are durable. The length of the string should correspond to the number of bottles you’re using. Multi-colored lights create a vibrant display, while warm white lights offer a classic, elegant glow.
- Hot Glue Gun and Plenty of Glue Sticks: This will be your primary bonding agent. A good quality hot glue gun with multiple glue sticks will ensure a strong and lasting hold for your bottles.
- Stabilizer/Support for the Base (Optional but Recommended): The original project used two sections of 2×4 pieces of wood. You can use similar wooden scraps, sturdy cardboard, or even a heavy-duty plastic cutting board to provide a stable, level surface for your first row of bottles. This helps prevent slipping during construction.
- Scissors or Utility Knife: For any minor adjustments or opening light holes if necessary (though our method aims to avoid this).
- Marker: For marking bottle placement if desired.
- Protected Work Surface: Lay down newspaper, cardboard, or a craft mat to protect your table from hot glue drips.
Step-by-Step Guide: Crafting Your Luminary Tree
Now that you have all your materials ready, let’s dive into the fun part: assembling your magnificent DIY Water Bottle Christmas Tree Luminary. Follow these steps carefully for the best results.
Step 1: Preparation is Key – Cleaning and Delabeling Your Bottles
The foundation of a beautiful luminary begins with properly prepared bottles. Start by collecting approximately 40-50 plastic water bottles. The exact quantity will depend on how large you want your luminary to be. Once collected, ensure each bottle is completely empty and rinse them thoroughly to remove any residue. The next crucial step is to peel off all labels and any adhesive residue. Soaking them in warm, soapy water for a few minutes can make this process much easier. Once clean, allow the bottles to dry completely, both inside and out. A dry bottle ensures better adhesion for the glue.
Step 2: Building the Foundation – The First Row
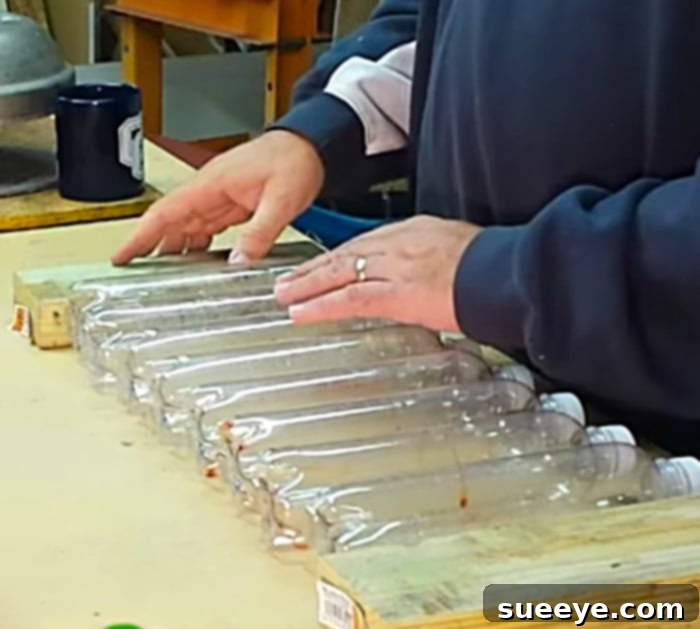
With your bottles prepped, it’s time to create the base of your tree. On your protected work surface, lay down your chosen stabilizer, such as the two sections of 2×4 wood mentioned in the original project. This creates a secure, non-slip area for your first row. Carefully arrange eight of your prepared plastic bottles in a straight line across this support. Ensure they are snug against each other and perfectly aligned. This initial row will dictate the width and stability of your entire tree, so take your time to get it right.
Step 3: Securely Gluing Your Bottles Together
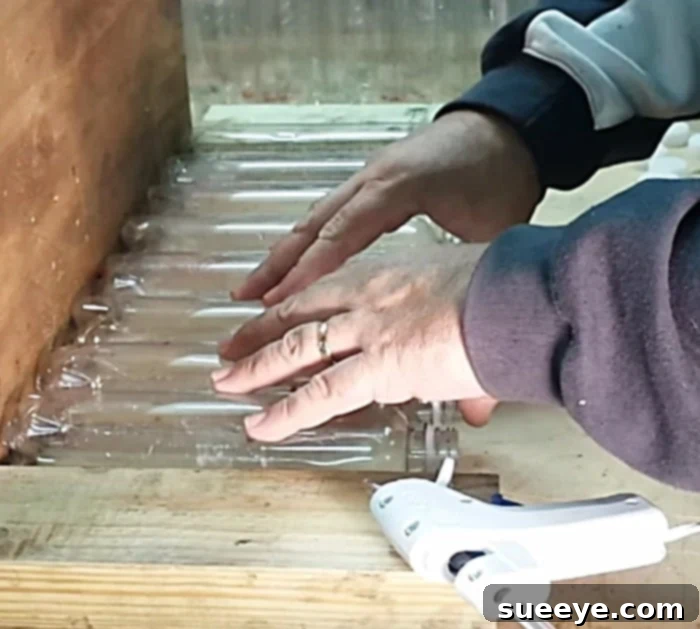
Once your first row of bottles is perfectly aligned, it’s time to secure them. Using your hot glue gun, apply a bead of glue along the side of one bottle where it touches its neighbor. Press the bottles firmly together and hold them in place for a few seconds until the glue sets. Repeat this process for all the bottles in the first row, gluing them to each other along their touching sides. You might also want to add a small dab of glue to the bottom of each bottle where it meets your wooden supports, just for extra stability. Remember to remove all bottle caps before you start gluing the rows together, as you’ll need the open tops for the lights later.
Step 4: Creating the Pyramid Shape – Stacking the Rows
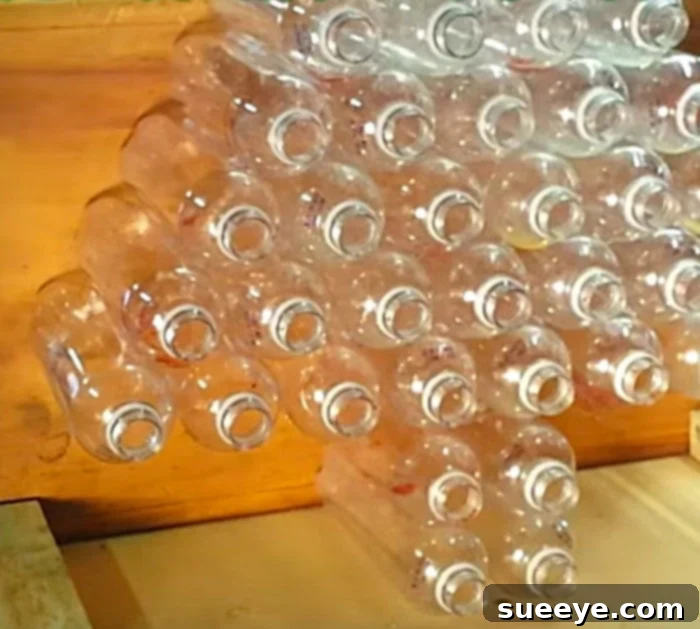
Now you’ll begin building upwards, creating the classic pyramid shape of a Christmas tree. For the second row, you will use one less bottle than the previous row (so seven bottles for the second row, if your base had eight). Place these seven bottles on top of the first row, centering them so that each bottle in the new row rests snugly in the “valleys” created by the two bottles below it. This staggered arrangement provides excellent stability. Once positioned, glue the bottles in the second row to each other, and then glue the bottles in the second row to the bottles in the first row where they touch. Continue this process, reducing the number of bottles by one for each subsequent row (e.g., 6, 5, 4, 3, 2, 1), until you reach the apex of your tree. Maintain consistent gluing for a robust structure.
Step 5: Adding the Tree Trunk for Support
To give your Water Bottle Christmas Tree Luminary a complete look and provide additional stability, you’ll now add a “trunk.” Take four additional plastic bottles and glue them together in a square formation (two by two). Once these are securely bonded, attach this bottle trunk firmly to the center of the base of your main tree structure using ample hot glue. Ensure it is centered and adheres well to the bottom row of bottles, providing a sturdy foundation for your illuminated creation.
Step 6: Illuminating Your Creation with Christmas Lights
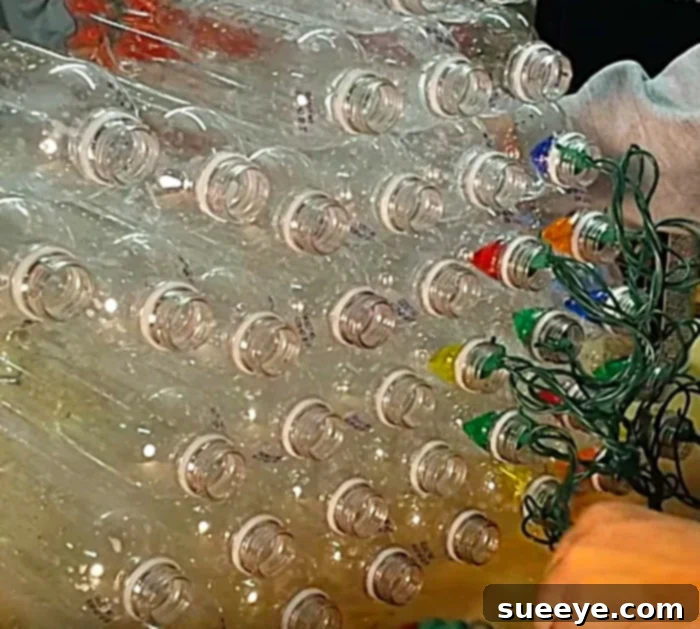
The final and most magical step is adding the lights! Take your string of Christmas lights and gently push one bulb into the opening of each plastic bottle. The beauty of this method is that no glue is required to hold the lights in place; the bottle openings will typically hold the bulbs securely enough. Distribute the lights evenly throughout the tree for a balanced and brilliant glow. We used multi-colored lights for a festive pop, but warm white or cool white lights would also create a stunning effect. An excellent advantage of this method is that you can easily remove the lights at the end of the season to use them on another project, making this luminary incredibly versatile and truly reusable.
Tips for a Perfect Water Bottle Christmas Tree Luminary
To ensure your DIY project is as successful and beautiful as possible, consider these additional tips:
- Bottle Uniformity: While you can use slightly varied bottle sizes, using bottles of the same brand and size will result in a more uniform and visually appealing tree structure.
- Thorough Cleaning: Any residue or smudges on the bottles can detract from the clarity and light diffusion. Ensure they are sparkling clean and completely dry before gluing.
- Glue Application: Don’t be afraid to use a generous amount of hot glue where bottles meet, especially for the lower rows and the trunk. Strong bonds ensure stability. However, avoid excessive visible globs.
- Patience is a Virtue: Allow the hot glue to cool and set completely before moving on to the next row or handling the structure extensively. Rushing can lead to bottles coming apart.
- Consider LED Lights: As mentioned, LED lights are highly recommended due to their low heat emission, energy efficiency, and longer lifespan, making your luminary safer and more sustainable.
- Embellishments: For extra sparkle, you can lightly mist the outside of your finished tree with spray adhesive and sprinkle fine glitter. Alternatively, wrap tinsel or ribbon around the outside for added flair. Ensure any embellishments don’t block the light too much.
- Safety First: Always supervise children when using a hot glue gun. For outdoor use, ensure your light string is rated for exterior conditions and protect the luminary from heavy rain or strong winds.
- Storage: If you plan to store your luminary, consider how it will fit. Its sturdy construction means it can likely be stored as a whole piece. Alternatively, you can carefully remove the lights and store the bottle structure in a large box.
Beyond Christmas: Other Uses for Your Luminary
While designed as a festive Christmas tree, the enchanting glow of your Water Bottle Luminary makes it versatile enough for year-round enjoyment. Imagine it as a whimsical garden accent for summer evenings, a unique party decoration, or even a soft, ambient light in a child’s bedroom. Its ability to reuse materials makes it a sustainable choice for any occasion, proving that creativity has no seasonal limits. Repurposing it keeps the spirit of eco-friendly crafting alive throughout the year.
Conclusion
Creating your own DIY Water Bottle Christmas Tree Luminary is an incredibly rewarding experience. It’s a cheap, easy, quick, and super fun project that goes together rapidly and looks absolutely fantastic once illuminated. More than just a beautiful decoration, it’s a testament to the power of imagination and the importance of sustainable living. By transforming something as simple as discarded plastic bottles into a dazzling centerpiece, you’re not only adding a unique touch to your holiday decor but also actively contributing to a greener planet.
We encourage you to embark on this eco-friendly crafting adventure. Gather your materials, follow our steps, and prepare to be amazed by the glowing beauty you can create with your own hands. This holiday season, let your creativity shine brightly and inspire others to embrace the joy of upcycling. Happy crafting and happy holidays!
Frequently Asked Questions About the DIY Water Bottle Christmas Tree Luminary
Q: How many water bottles do I really need for this project?
A: For a tree similar in size to the one described (starting with 8 bottles in the base row), you will need approximately 40-50 standard 16.9 oz (500ml) plastic water bottles. However, you can scale the project up or down by adjusting the number of bottles in your base row. A larger base will require more bottles overall.
Q: Can I use different sized or shaped bottles?
A: Yes, you can. However, using bottles of a uniform size and shape will generally make the assembly process easier and result in a more stable and aesthetically pleasing tree. Different sizes might require more careful placement and gluing to maintain balance and structure.
Q: Are LED lights necessary, or can I use incandescent Christmas lights?
A: While incandescent lights can technically work, LED lights are highly recommended. They produce significantly less heat, which is safer when combined with plastic bottles, and they are much more energy-efficient. LED lights also tend to last longer, making them a more sustainable choice for your luminary.
Q: Is this luminary suitable for outdoor use?
A: The bottle structure itself is durable enough for outdoor use, but you must ensure that your string of Christmas lights is specifically rated for outdoor use. Additionally, consider placing your luminary in a sheltered spot, like under a porch or awning, to protect it from heavy rain and strong winds which could potentially dislodge the bottles or compromise the electrical components.
Q: How do I store the Water Bottle Christmas Tree Luminary after the holidays?
A: Due to its sturdy hot-glued construction, the entire tree structure can often be stored as one piece in a large, sturdy box. You can easily remove the lights for separate storage or use on other projects. If space is an issue, you might be able to carefully disassemble the tree (by gently breaking glue bonds) for flatter storage, though reassembly would be required next year.