
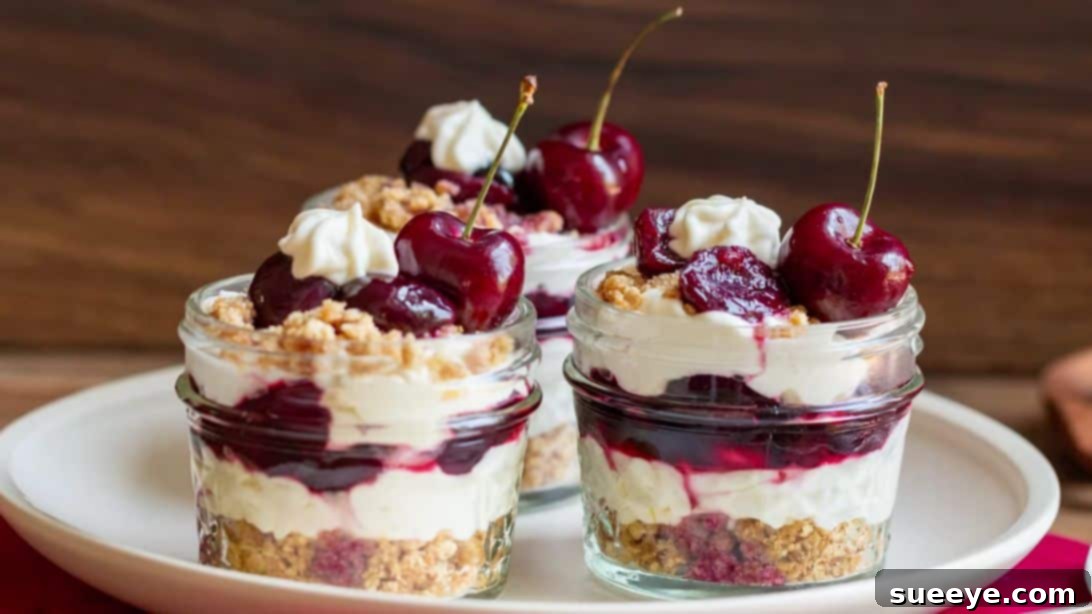
Super Easy No-Bake Boozy Cherry Cheesecake Jars Recipe
Indulge in the ultimate dessert experience with these delightful No-Bake Boozy Cherry Cheesecake Jars. A perfect blend of creamy, fruity, and slightly tangy flavors, these individual desserts are not only incredibly delicious but also remarkably easy to prepare. Whether you’re hosting a dinner party, planning a family gathering, or simply craving a sweet treat, these cheesecake jars are guaranteed to be a hit. They offer all the luxurious taste of a classic cheesecake without the fuss of baking, making them an ideal choice for both novice and experienced dessert makers.
What makes this recipe truly special is its presentation in charming small jars or cups. This individual serving style is not only visually appealing but also incredibly convenient, ensuring each guest gets their own perfect portion. Inspired by the culinary experts at Healthy World Cuisine (HWC) Magazine on YouTube, this recipe takes a beloved classic and transforms it into a portable, elegant, and irresistibly decadent dessert. Get ready to impress your family and friends with these show-stopping cherry cheesecake jars that are so good, they might just finish a whole serving in one sitting!
Why You’ll Love This No-Bake Cheesecake Recipe
- Effortlessly Delicious: Skip the oven! This recipe requires no baking, making it perfect for hot days or when you want a quick dessert fix.
- Individual Servings: Serving in jars or cups adds a touch of elegance and convenience, making portion control a breeze and presentation stunning.
- Rich & Creamy Texture: Experience the smooth, velvety texture of cheesecake mousse combined with the crunch of graham cracker crumble.
- Vibrant Cherry Flavor: The homemade boozy cherry compote bursts with fresh, sweet-tart cherry notes, perfectly complementing the creamy cheesecake.
- Customizable: Easily adjust the sweetness, alcohol content (or make it kid-friendly!), and even experiment with different fruits or extracts.
- Party Perfect: These jars are ideal for entertaining, offering a stress-free dessert option that can be prepared in advance.
Ingredients:
For the Boozy Cherry Compote
This vibrant cherry compote is the heart of our cheesecake jars, offering a delightful balance of sweetness and tartness, with a hint of warmth from the bourbon. Using fresh cherries ensures the best flavor and texture.
- 2 cups of sweet cherries, fresh, pitted and halved
- ½ cup of water
- 1½ tbsp of fresh lemon juice or juice of 1/3 lemon, for brightness and balance
- 2 tbsp of maple syrup or your preferred sweetener, adjust to taste
- 2-3 tbsp of bourbon or your alcohol of choice, to taste; for a kid-friendly version, substitute with ½ tsp of almond extract
- 1 tsp of cornstarch + 2 tsp of cold water (slurry), for thickening
For the Graham Cracker Crumble
A classic and satisfying base, this graham cracker crumble provides a buttery crunch that perfectly contrasts with the creamy mousse.
- 4 whole graham cracker sheets, finely crushed
- 3 tbsp of unsalted butter, melted
For the Cheesecake Mousse
The star of the show, this light and airy cheesecake mousse is incredibly smooth and creamy, with a refreshing zest of lemon and a hint of vanilla.
- 1 cup of heavy whipping cream, chilled
- 8 ounces of cream cheese, softened to room temperature
- 1 tsp of pure vanilla extract
- 1/3 cup of maple syrup or your preferred sweetener, adjust to taste
- 1 tbsp of fresh lemon zest or zest of 1 whole lemon
Directions:
Preparing the Boozy Cherry Compote
The compote is surprisingly simple to make and adds a gourmet touch to these cheesecake jars. Take your time to achieve the perfect texture and flavor.
- Prepare the Cherries: Begin by thoroughly washing your fresh sweet cherries. Pit them carefully, then cut each cherry in half. This helps them break down beautifully during cooking and ensures even distribution of flavor.
- Combine Ingredients: Place the halved cherries into a medium saucepan. Add the water, fresh lemon juice, maple syrup (or your chosen sweetener), and your preferred alcohol, such as bourbon. If you’re making a kid-friendly version, this is where you’d add the almond extract instead of bourbon.
- Simmer to Perfection: Bring the mixture to a gentle simmer over medium heat. Allow it to cook for approximately 5 to 10 minutes, stirring occasionally. You’ll notice the cherries softening, breaking down slightly, and releasing their beautiful juices, creating a luscious syrup.
- Create the Slurry: While the cherries simmer, prepare your cornstarch slurry. In a small bowl, whisk together the cornstarch and cold water until smooth and no lumps remain. This slurry is essential for thickening the compote to the desired consistency.
- Thicken the Compote: Once the cherries are tender and juicy, add half of the cornstarch slurry to the saucepan, stirring continuously. Continue to cook for another 1-2 minutes until the compote begins to thicken. If you prefer a thicker compote, add the remaining slurry a little at a time, allowing it to cook for another minute after each addition, until it reaches your desired consistency. Remember, it will thicken further as it cools.
- Cool Down: Remove the compote from the heat. Transfer it to a clean bowl and set it aside to cool completely to room temperature. Cooling is crucial before assembly to prevent it from melting the cheesecake mousse.
Crafting the Graham Cracker Crumble
A simple yet essential component, the graham cracker crumble forms the delightful base for our cheesecake jars, offering a textural contrast that elevates the entire dessert.
- Crush the Crackers: Take the 4 whole graham cracker sheets and place them into a sturdy Ziploc bag. Using a rolling pin, gently but firmly crush the crackers until they form fine, even crumbs. Alternatively, you can pulse them in a food processor for a quicker result.
- Combine with Butter: Transfer the graham cracker crumbs to a large mixing bowl. Pour in the melted butter. Stir thoroughly with a spoon or your hands until all the crumbs are evenly coated with butter. The mixture should resemble wet sand, clumping together slightly when pressed.
- Set Aside: Once well combined, set the graham cracker crumble aside. It’s now ready to be layered into your cheesecake jars.
Whipping Up the Cheesecake Mousse Filling
The cheesecake mousse is the creamy, dreamy core of this dessert. Achieving the right consistency is key for a light and airy texture.
- Whip the Cream: In a large, chilled mixing bowl, add the cold heavy whipping cream. Using an electric mixer (handheld or stand mixer with a whisk attachment), beat the cream on medium-high speed until stiff peaks form. Stiff peaks mean that when you lift the whisk, the cream holds its shape firmly. Be careful not to overbeat, as it can turn granular. Set the whipped cream aside.
- Prepare the Cream Cheese Mixture: In a separate, clean mixing bowl, add the softened cream cheese, vanilla extract, maple syrup (or your preferred sweetener), and fresh lemon zest. Ensure your cream cheese is at room temperature to prevent lumps and achieve a smooth consistency.
- Combine Until Smooth: Using the electric mixer (or a whisk), beat the cream cheese mixture on medium speed until it is completely smooth, creamy, and well combined. Taste and adjust the sweetness or lemon zest if desired.
- Fold in Whipped Cream: Gently add the whipped cream to the cream cheese mixture. Using a spatula, carefully fold the whipped cream into the cream cheese mixture until just combined. The key here is to fold gently to maintain the airy texture of the whipped cream; do not overmix, or the mousse will lose its lightness.
- Prepare for Piping: Transfer the cheesecake mousse filling into a piping bag. If you don’t have a piping bag, a sturdy Ziploc bag with a corner snipped off will work just as well. Set it aside for assembly.
Assembling Your No-Bake Cheesecake Jars
This is where all your delicious components come together to create a stunning, layered dessert. Creativity and precision in layering will make your jars extra appealing.
- Layer the Crumble Base: Grab your chosen jars or cups (small mason jars, dessert glasses, or even stemless wine glasses work beautifully). Add an even layer of graham cracker crumbs to the bottom of each jar, usually about 1.5 to 2 tablespoons. Gently press the crumbs down with the back of a spoon or your fingertips to create a firm base.
- Add Cheesecake Mousse: Next, pipe or spoon a generous layer of the cheesecake mousse on top of the graham cracker base. Fill about one-third of the jar with the mousse, creating a smooth, even layer.
- Drizzle with Compote: Drizzle 1 to 2 tablespoons of the cooled boozy cherry compote over the cheesecake mousse layer. You can spread it slightly or leave it as a distinct layer.
- Repeat Layers: Continue layering, starting with another layer of graham cracker crumbs, followed by more cheesecake mousse, and then another drizzle of cherry compote. Repeat this process until your jars are nearly full or you run out of ingredients. Aim for 2-3 layers of each component for a visually appealing dessert.
- Garnish and Serve: For an extra touch of elegance, top your cheesecake jars with a fresh cherry (or a few) as a garnish. You can also dollop a small amount of extra whipped cream on top, and if desired, sprinkle with some delicate chocolate shavings or a tiny mint sprig.
- Chill for Best Results: Serve immediately for a softer texture, or for firmer, more set cheesecake jars, chill them in the refrigerator for at least 2-4 hours before serving. Chilling allows the flavors to meld beautifully and the mousse to firm up slightly. Enjoy your exquisite homemade no-bake cherry cheesecake jars!
Tips for Success:
- Room Temperature Cream Cheese: This is crucial for a smooth, lump-free cheesecake mousse. Take your cream cheese out of the refrigerator at least 30 minutes to an hour before you start.
- Chilled Whipping Cream & Bowl: For the best results when whipping cream, ensure both the cream and your mixing bowl (and whisk attachment) are thoroughly chilled. You can even place the bowl and whisk in the freezer for 10-15 minutes before use.
- Adjust Sweetness: Taste the cherry compote and cheesecake mousse before final assembly and adjust the maple syrup (or other sweetener) to your preference.
- Kid-Friendly Option: Remember to use almond extract instead of bourbon in the compote if serving to children or those who prefer a non-alcoholic version. The almond extract adds a lovely depth of flavor.
- Storage: These cheesecake jars can be prepared a day in advance and stored covered in the refrigerator. They are best enjoyed within 2-3 days.
Variations to Explore:
- Fruit Options: Not a cherry fan? Experiment with other fruits like raspberries, blueberries, strawberries, or even peaches for the compote.
- Crust Alternatives: Instead of graham crackers, try crushed shortbread cookies, ginger snaps, or even Oreo cookies for a different flavor profile.
- Flavor Enhancements: Add a pinch of cinnamon or nutmeg to the graham cracker crumble. Incorporate a different extract (like orange or coconut) into the cheesecake mousse for a unique twist.
- Boozy Alternatives: Instead of bourbon, consider a cherry liqueur, brandy, or even a splash of dark rum for the compote.
These No-Bake Boozy Cherry Cheesecake Jars are more than just a dessert; they’re an experience. From the delightful process of creating each component to the moment you taste the perfect balance of creamy, crunchy, and fruity layers, every step is enjoyable. They are a testament to how simple ingredients can come together to form something truly spectacular, without the need for an oven. So go ahead, gather your ingredients, follow these easy steps, and treat yourself and your loved ones to this incredible dessert that’s sure to become a new favorite. Happy dessert making!
All images are credited to Healthy World Cuisine (HWC) Magazine via YouTube. We encourage you to visit their channel for more inspiring recipes and culinary insights!