
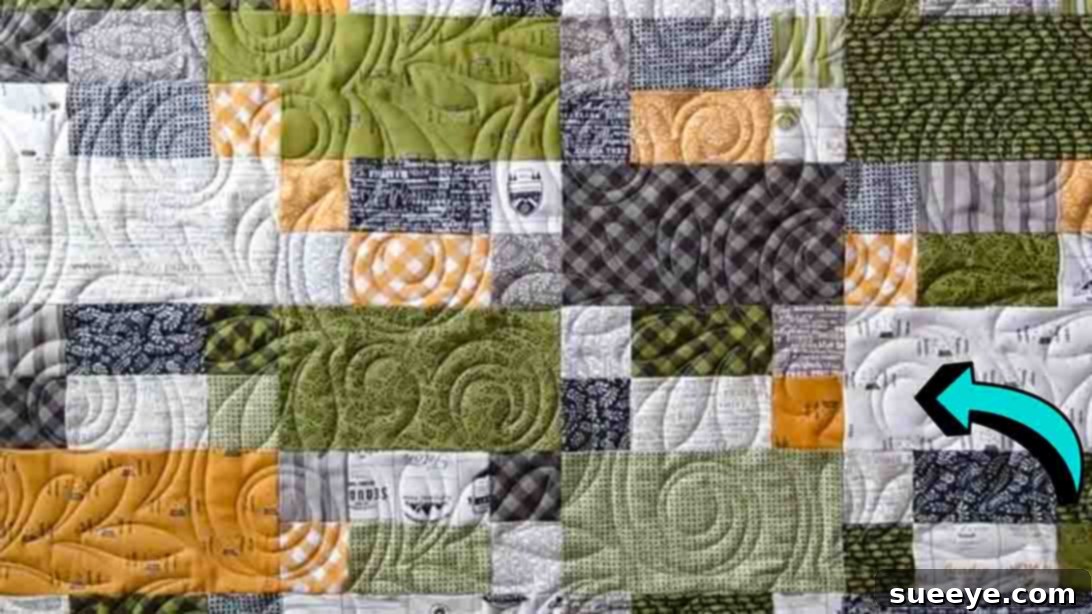
Rock Climb Layer Cake Quilt: Your Ultimate Beginner-Friendly Project
Are you searching for an exciting yet manageable quilting project that promises stunning results without the fuss? Look no further! The Rock Climb Layer Cake Quilt, inspired by the brilliant design from Moonkin Stitchery on YouTube, is precisely what you need. This captivating quilt pattern is incredibly beginner-friendly, utilizing just a single bundle of pre-cut fabric layer cake squares to bring a magnificent design to life. It’s not only quick and straightforward but also offers a deeply satisfying creative experience, making it the perfect choice whether you’re new to quilting or an experienced crafter seeking a rapid project.
Imagine transforming a beautiful stack of coordinated fabrics you’ve been saving into a cherished heirloom or a heartfelt gift. This comprehensive tutorial provides all the guidance you need, proving that creating an impressive quilt can be both simple and immensely rewarding. Dive into the world of quilting with a project that builds confidence and delivers a spectacular finish!
Why the Rock Climb Quilt is Your Next Must-Make Project
The “Rock Climb” name perfectly encapsulates the dynamic, interlocking appearance of this quilt design. Its unique block orientation creates a visually intriguing pattern that resembles a series of ascending steps or climbing holds, giving it a modern and sophisticated aesthetic. What makes this particular quilt stand out is its clever construction, which belies its underlying simplicity. You’ll be amazed at how easily a complex-looking design emerges from straightforward piecing techniques, making it an ideal choice for a weekend project or a quick handmade gift.
The Magic of Layer Cakes: Perfect for Quick & Easy Quilting
One of the greatest advantages of the Rock Climb Quilt pattern is its reliance on a fabric layer cake. For those new to quilting, a layer cake is a curated bundle of 42 pre-cut 10-inch by 10-inch fabric squares. These bundles are a dream come true for quilters because:
- Pre-Coordinated Fabrics: Each layer cake bundle features a collection of fabrics from the same line, ensuring all your prints and colors harmonize beautifully, eliminating the stress of fabric selection.
- Time-Saving: The pre-cut squares significantly reduce your cutting time, allowing you to jump straight into the fun part – sewing!
- Consistent Sizing: Factory-cut squares guarantee precise dimensions, which is crucial for accurate block piecing and a professional-looking finish.
- Beginner-Friendly: With less cutting and matching required, layer cakes simplify the initial steps, making quilting more accessible and enjoyable for novices.
If you’ve been holding onto a gorgeous layer cake, waiting for the ideal project, your wait is over. This Rock Climb Quilt is designed to showcase those beautiful prints while providing a truly satisfying quilting experience that you can often complete in a single day or over a relaxed weekend.
Gather Your Quilting Essentials: Materials for Your Rock Climb Quilt
Before you begin, gathering all your materials will ensure a smooth and enjoyable crafting session. Here’s a detailed look at what you’ll need to create your stunning Rock Climb Layer Cake Quilt:
- One Bundle of Layer Cake (Forty-Two 10″ Squares): This is the heart of your quilt. Choose a bundle with colors and patterns that inspire you. Remember, the prints will be cut and reassembled, so a variety of scales and values (lightness/darkness) within your layer cake will add depth and visual interest to your final design.
- Rotary Cutter: An essential tool for precise fabric cutting. Ensure your blade is sharp for clean, accurate cuts, which are fundamental to a well-pieced quilt. A dull blade can fray fabric and lead to imprecise measurements.
- Cutting Mat: A self-healing mat protects your work surface and provides a stable, gridded base for accurate rotary cutting. A large mat is especially helpful for handling 10-inch squares.
- Quilting Ruler (Acrylic): While not explicitly listed in the original, an acrylic quilting ruler (at least 6″ x 24″ is ideal) is indispensable for making accurate sub-cuts with your rotary cutter. Its clear design allows you to see your fabric beneath, ensuring perfect alignment.
- Sewing Machine: A reliable machine capable of a consistent straight stitch. Make sure it’s clean, oiled, and threaded properly. Understanding your machine’s 1/4-inch seam allowance is critical for quilting success; consider using a 1/4-inch foot if your machine has one.
- Good Quality Thread: Choose a neutral color (like a light grey or cream) that blends with most of your fabrics, or a color that complements your chosen layer cake. High-quality 100% cotton thread is generally preferred for quilting for its strength and durability.
- Iron and Ironing Board: Proper pressing at each stage is as important as accurate sewing. It helps blocks lie flat, seams nest perfectly, and contributes significantly to the overall professional appearance of your quilt.
- Fabric Pins or Clips: To hold fabric pieces together securely before sewing, ensuring they don’t shift. Wonder Clips are a popular alternative to pins, especially for bulkier seams.
- Seam Ripper: Every quilter needs one! Don’t be afraid to use it for “creative adjustments” – accuracy is key in quilting, and correcting a mistake early is far better than leaving it.
Having these tools ready and in good condition will streamline your process and make the journey to your finished quilt top much more enjoyable and successful.
Step-by-Step Guide: Crafting Your Rock Climb Layer Cake Quilt
This tutorial, brilliantly demonstrated by Moonkin Stitchery, breaks down the quilt-making process into easily digestible steps. Follow along carefully to achieve fantastic results for your Rock Climb Quilt.
Step 1: Precision Cutting and Individual Block Assembly
The foundation of a beautiful quilt lies in accurate cutting and precise piecing. For this quilt, each of your forty-two 10″ layer cake squares will be transformed into a unique quilt block through a series of precise cuts and strategic sewing. This method allows for incredible variety and movement within your final design, maximizing the beauty of each fabric print.
- Sub-cutting Each Layer Cake Square: Take each of your 10″ squares and carefully cut it into the following three distinct types of pieces. Consistency here is key to uniform blocks.
- One 4 1/2″ x 8 1/2″ rectangle
- Four 2 1/2″ squares
- Two 2 1/2″ x 4 1/2″ rectangles
Pro Tip for Cutting: Use your quilting ruler and rotary cutter with utmost care. Measure twice, cut once! For efficiency, you can often stack a few layer cake squares (typically 2-4, depending on your fabric thickness and cutter sharpness) and cut them simultaneously, ensuring they are perfectly aligned to maintain accuracy.
- Repeat for All Squares: Apply this exact cutting process to all forty-two of your 10″ layer cake squares. At the end of this stage, you will have a substantial pile of various sized pieces, ready for assembly. Keep your pieces organized to avoid mix-ups.
- Block Assembly – The Heart of the Design: Now comes the exciting part: reassembling these pieces to form your distinct 8 1/2″ square quilt blocks. The ingenious layout allows you to ‘scramble’ the prints while maintaining a consistent block structure, creating visual interest.
- First, the Corner Units: Take two of your 2 1/2″ squares and one 2 1/2″ x 4 1/2″ rectangle. Sew one 2 1/2″ square to each end of the 2 1/2″ x 4 1/2″ rectangle. Press your seams consistently (e.g., away from the center rectangle) to help them lay flat. This creates a small rectangular unit composed of three pieces.
- Building the Side Unit: Repeat the above step to create a second identical rectangular unit. You now have two identical pieced rectangles, each containing three fabric pieces.
- Joining the Units: Carefully sew these two pieced rectangular units together along their longer sides. Press this seam open or to one side, ensuring it’s flat and crisp. This forms the “scrappy” portion of your block.
- Attaching the Large Rectangle: Finally, take your large 4 1/2″ x 8 1/2″ rectangle and sew it to one side of the unit you just created. This completes your first Rock Climb Quilt Block.
Important: Your finished block should measure exactly 8 1/2″ square (including a 1/4″ seam allowance all around). Check your measurements after each block, or at least every few blocks, to ensure accuracy. If your blocks are off, adjust your seam allowance or cutting slightly. Precision here will make the final quilt top assembly much smoother and prevent wavy borders.
- Repeat for All Blocks: Continue this block assembly process until you have successfully created all forty-two quilt blocks. Take your time, enjoy seeing the unique combinations emerge with each block, and remember to press diligently after each seam for flat, professional-looking blocks.
Step 2: Assembling the Dynamic Quilt Top
With all forty-two unique quilt blocks expertly pieced and pressed, it’s time to bring the “Rock Climb” design to life by strategically arranging and sewing them together. This step is where the clever pattern truly begins to emerge and dazzle.
- Layout Your Blocks: Find a large, flat surface – your clean floor, a design wall, or a spacious table – and begin to lay out your quilt blocks. You’ll arrange them in a grid of 6 blocks wide by 7 blocks long (a 6 x 7 layout). This arrangement will effectively use all 42 blocks.
- Creating the “Rock Climb” Effect with Orientation: The key to the distinctive “Rock Climb” pattern lies in the precise orientation of your blocks within the grid. Pay close attention to this detail to achieve the intended visual flow:
- Odd Rows (Rows 1, 3, 5, 7): For these rows, position your blocks so that the larger 4 1/2″ x 8 1/2″ rectangle portion of the block is situated on the top edge of the block. All blocks in these rows should face the same way.
- Even Rows (Rows 2, 4, 6): For these rows, you will rotate each block 180 degrees. This means the larger 4 1/2″ x 8 1/2″ rectangle will now be on the bottom edge of the block, and the “scrappy” pieced portion will be on top.
Visual Check: Once your layout is complete, step back and observe your quilt top. You should start to see the alternating pattern of the larger rectangles creating a sense of movement and depth across the quilt. This unique arrangement is what gives the quilt its “rock climb” character. Take a photo of your layout with your phone before you start sewing, just in case blocks get jostled or you need to reference the design.
- Sewing Blocks into Rows: Once you are completely satisfied with your layout, carefully sew the blocks together, one row at a time. Work systematically from left to right for each row, using consistent 1/4-inch seam allowances.
Pressing Tip for Row Joins: For maximum neatness and to help seams “nest” (butt up against each other perfectly), consider pressing the seams of your odd-numbered rows in one direction (e.g., to the right) and the seams of your even-numbered rows in the opposite direction (e.g., to the left). This way, when you join the rows, the seams will naturally interlock, reducing bulk and helping your block corners match up beautifully.
- Joining the Rows: After all your individual rows are sewn and pressed, it’s time to join them together to form the complete quilt top. Pin your rows together carefully, paying special attention to matching up the seams where the blocks meet. Sew the rows together, again maintaining that consistent 1/4-inch seam allowance. Take your time to ensure your points and lines align.
- Final Pressing: Give your completed quilt top a thorough final press. This will flatten all the seams, remove any remaining wrinkles, and prepare it for the next crucial steps of quilting.
Beyond the Top: Completing Your Quilt
Once your beautiful Rock Climb quilt top is complete, you’re just a few steps away from a finished quilt! While this tutorial focuses specifically on the piecing of the quilt top, a fully completed quilt typically involves three more essential layers and processes:
- Batting: This is the cozy middle layer, usually made of cotton, polyester, or a blend, that provides warmth, loft, and helps give the quilt its distinctive texture.
- Backing Fabric: A single large piece of fabric (or several pieces sewn together) that forms the back of your quilt. This is often where you can choose a complementary solid or a fun, contrasting print.
- Quilting: The crucial process of stitching through all three layers (quilt top, batting, backing) to hold them securely together and add texture. This can be done with simple straight lines using your domestic machine, intricate free-motion designs, or by tying the quilt with yarn.
- Binding: The final step, where fabric strips are sewn around the raw edges of the quilt to enclose them and provide a neat, durable, and decorative finish.
Each of these steps offers additional creative opportunities and can be explored in more detail through various quilting resources, including Moonkin Stitchery’s other tutorials or dedicated quilting guides. Mastering these stages will transform your pieced top into a functional and stunning textile art piece.
Essential Tips for Quilting Success
To ensure your Rock Climb Layer Cake Quilt project is as smooth and enjoyable as possible, yielding professional-looking results, keep these expert tips in mind:
- Accuracy is Paramount: In quilting, a consistent 1/4-inch seam allowance is your best friend. Even a slight deviation can throw off your block sizes and make rows difficult to match, leading to an uneven quilt. Practice on scraps if needed to perfect your seam.
- Press, Don’t Iron: While you might use an iron, the technique is “pressing.” This means you place the iron down, hold it in place for a few seconds, and then lift it, rather than sliding it back and forth. This crucial distinction prevents stretching and distorting your fabric, especially on the bias.
- Chain Piecing for Efficiency: To save significant time, especially when sewing many identical units (like the smaller pieced rectangles in Step 1), utilize chain piecing. Sew one seam, then without lifting the presser foot or cutting the thread, feed the next unit directly under. Continue until all similar seams are sewn, then clip them apart.
- Stay Organized: With many small pieces, it’s easy to get mixed up. Keep your cut pieces organized by type or by the block they belong to. When laying out your quilt top, always take a picture with your phone before you start sewing – it’s a quick visual reference if pieces get out of order!
- Embrace Your Seam Ripper: Don’t view your seam ripper as a sign of failure, but as a valuable tool for perfection. Every quilter uses one! It’s always better to unpick a seam and resew it correctly than to let a mistake compromise the entire quilt’s appearance.
- Take Breaks and Enjoy the Process: Quilting is a journey, not just a race to the finish line. Step away if you’re feeling frustrated, listen to music, and revel in the satisfaction of creating something beautiful with your own hands. The joy of the craft is just as important as the finished product.
Start Your Quilting Adventure Today!
The Rock Climb Layer Cake Quilt is a truly rewarding project that combines the simplicity of pre-cut fabrics with a captivating, dynamic design. Whether you’re making it for yourself to add a touch of handmade warmth to your home, as a thoughtful and cherished gift for a loved one, or simply to hone your quilting skills, this pattern offers a fantastic and approachable experience.
Ready to get started and see this incredible quilt come to life? We highly recommend watching the comprehensive video tutorial by Moonkin Stitchery. Seeing every step in action can clarify any uncertainties and provide valuable visual cues. You’ll be amazed at how quickly and easily you can transform a simple layer cake bundle into a stunning quilt that will be admired for years to come!
RELATED: Looking for more quick quilt ideas that make a big impact? Check out the Stackabond Quilt In A Day Tutorial for another fantastic and beginner-friendly project!
Watch the Full Rock Climb Layer Cake Quilt Tutorial Here