
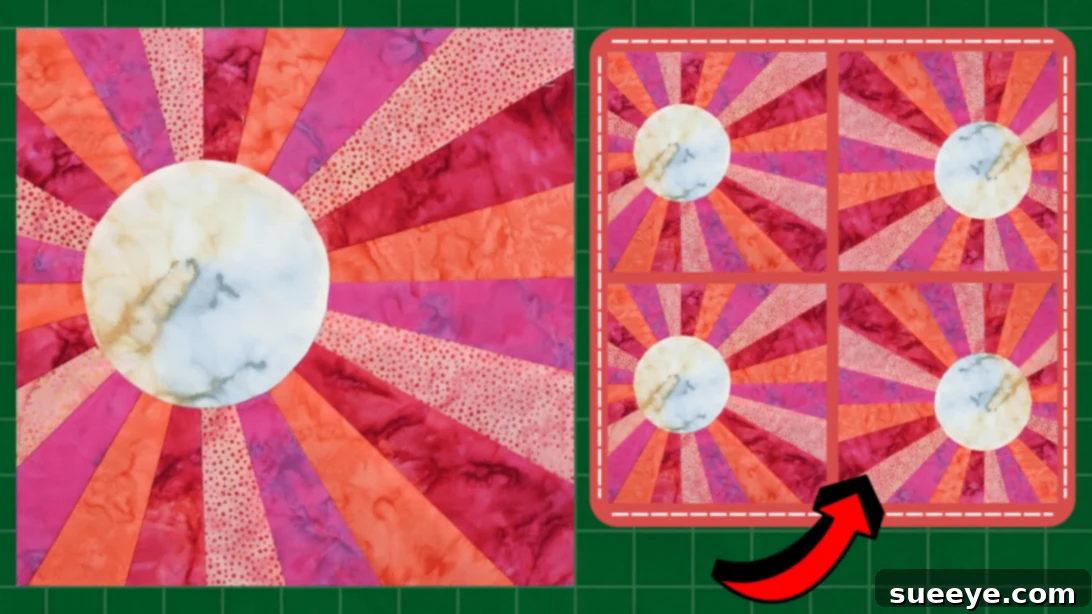
Master the Art of Paper Piecing: Crafting the Dazzling Offset Sun Quilt Block
Embark on a creative quilting journey with the captivating Offset Sun Quilt Block, a design that beautifully marries traditional techniques with a modern aesthetic. Whether you’re a seasoned quilter looking for your next engaging project or a beginner eager to dive into the world of paper piecing, this tutorial is crafted just for you. Brought to life by the expertise of Dclutter Quilting on YouTube, this project offers a rewarding experience, culminating in a stunning 12-inch finished block. The brilliance of this pattern lies in its accessibility; it’s straightforward enough for novices to grasp quickly, yet offers ample opportunity for experienced crafters to explore intricate fabric choices and color play.
Paper piecing, also known as foundation paper piecing (FPP), is a method that allows quilters to achieve incredibly precise points and complex designs with relative ease. By sewing fabric pieces directly onto a printed paper foundation, you ensure accuracy that can be challenging to achieve with traditional piecing methods alone. This Offset Sun Quilt Block is an excellent entry point into FPP, offering clear lines and manageable sections that build confidence with every stitch. Prepare to create a quilt block that radiates warmth and precision, and discover the joy of seeing your fabric vision come to life.
The beauty of this project extends beyond its structural elegance; it invites personal expression through fabric selection. Imagine a vibrant sun bursting with warm yellows and oranges, or a tranquil dawn breaking with soft blues and purples. The possibilities are endless! You can use a coordinated palette for a cohesive look or experiment with a riot of contrasting colors and prints for an incredibly fun and eclectic quilt. Each block can become a unique canvas, contributing to a larger masterpiece that reflects your personal style. Don’t forget to download the free pattern to get started right away.
RELATED: If you’re passionate about radiant designs, you might also enjoy our Easy Morning Sunshine Quilt Tutorial for more sun-inspired quilting fun!
Choosing Your Fabrics and Colors for the Offset Sun Quilt Block
The visual impact of your Offset Sun Quilt Block largely depends on your fabric choices. This is where your creativity truly shines! Consider the overall mood you wish to evoke. For a classic sun effect, gravitate towards warm colors like yellows, oranges, and deep reds. For a more modern or abstract interpretation, cool blues, greens, or even monochromatic schemes can create a striking block. Play with different fabric textures and patterns, too. Small prints can add subtle detail, while larger, bolder prints can create dynamic focal points within the design. Remember, the center square is your “sun,” so choosing a fabric that stands out will enhance the block’s namesake effect.
Think about contrast: having a good balance between light and dark fabrics will make your design pop. If your “sun” is a bright yellow, consider surrounding it with slightly darker or contrasting hues to create depth and definition. Don’t be afraid to pull out your fabric scraps – this project is an excellent opportunity to use up those smaller pieces you’ve been saving, turning them into a cohesive and beautiful block. Feel free to mix and match; there are no strict rules when it comes to personal expression in quilting. The most important thing is that you love the fabrics you choose!
Essential Materials for Your Offset Sun Quilt Block
Gathering your materials before you begin ensures a smooth and enjoyable crafting experience. Here’s everything you’ll need to create your stunning 12-inch Offset Sun Quilt Block:
- Fabric Strips: You’ll need 4 strips, each measuring approximately 3½ inches wide by WOF (Width of Fabric). These strips will form the “rays” of your sun and the outer sections of the block. Choosing coordinating or contrasting fabrics for these strips will dramatically impact your block’s appearance.
- Center Fabric: A single square, approximately 7 inches by 7 inches, will form the middle part or the “sun” of your quilt block. Select a fabric that you want to be the focal point.
- Interfacing Fabric: A piece of light to medium-weight fusible interfacing will provide stability to your center circle, ensuring it maintains its shape and appliqués smoothly.
- Fabric Glue Stick: A temporary fabric glue stick is invaluable for foundation paper piecing, helping to hold initial fabric pieces in place on your template before stitching.
- Marking Pen, Pencil, or Chalk: Essential for tracing the round template onto your center fabric and interfacing. Choose a marking tool that is easily removable or designed for fabric.
- Quilter’s Ruler: A clear acrylic quilter’s ruler is crucial for precise cutting and trimming, especially when working with paper piecing templates and squaring up your block.
- Fabric Scissors or Rotary Cutter and a Cutting Mat: For accurate and efficient cutting of your fabric pieces. A rotary cutter offers speed and precision, especially when used with a ruler.
- Fabric Pins or Clips: To secure fabric layers before sewing and to hold pieces of your template.
- Needle and Thread: For any hand-sewing or appliqué, if preferred, but primarily for machine sewing. Choose a good quality polyester or cotton thread that matches your fabric or is a neutral color.
- Iron and Ironing Board: Absolutely vital for pressing seams flat after each stitching step. Proper pressing makes a huge difference in the accuracy and professional finish of your quilt block.
- Sewing Machine: Your trusty sewing machine will be used for all the stitching, ensuring strong and even seams.
- Offset Sun Quilt Block Template: Don’t forget to download the free pattern! You can find the template here (Please note: the original link to a local file path `file:///C:/Users/user/Downloads/Offset-sun-Instructions-1.pdf` has been replaced with the general template download page as local paths are not accessible for public use).
Step-by-Step Guide: Crafting Your Offset Sun Quilt Block
Follow these detailed instructions to create your beautiful Offset Sun Quilt Block. Precision is key in paper piecing, so take your time with each step.
Step 1: Preparing Your Template and Piecing the “Rays”
- Download and Prepare the Template: Begin by downloading, printing, and carefully cutting out all pieces of the provided Offset Sun Quilt Block template. Ensure your printer settings are set to “actual size” or “100%” to maintain the correct dimensions.
- Fold and Layout: Carefully fold your paper template along the indicated lines. This helps in understanding the piecing order and seam allowances. Lay out the template on your work surface.
- Plan Your Fabric Placement: Before you start sewing, take a moment to decide which fabric strip you want for each section of the “rays.” This planning stage is crucial for achieving your desired visual effect. You might mark each section on the template lightly with a pencil.
- Initial Fabric Placement (Section 1): Take the first section of your paper template. Carefully fold it back along the first stitching line. Apply a small amount of fabric glue stick to the back of this folded section.
- Position First Fabric Strip: Place your first chosen fabric strip onto the glued section. Ensure the wrong side of the fabric is facing the glued side of the paper. Crucially, position the fabric so it extends beyond the stitching line by at least a ¼-inch seam allowance on all sides. This overlap is essential for accurate piecing.
- Stitch the First Seam: With the fabric secured by glue, unfold the template. Now, carefully stitch along the first designated stitching line on the paper. Use a slightly shorter stitch length (e.g., 1.5-2.0 mm) on your sewing machine; this makes it easier to remove the paper later.
- Press and Trim: Once stitched, press the fabric open with a warm iron, ensuring the seam is flat and the fabric fully covers its section. Trim any excess fabric beyond the seam allowance if necessary, maintaining a neat ¼-inch seam allowance.
- Continue Piecing: Repeat this process for the remaining fabric strips, adding one section at a time. Fold the next paper line, glue, position the next fabric strip (right sides together with the previous fabric piece), stitch, press, and trim. Continue until the entire template section is covered with fabric. Trim any excess fabric around the perimeter of the paper foundation.
Step 2: Crafting the Center Sun and Assembling the Block
- Prepare the Center Circle: Take your 7-inch center fabric square and lay it with its right side down on top of a piece of interfacing.
- Trace and Cut the Circle: Using your round template piece from the pattern, trace the circle shape onto the interfacing. Carefully cut out both the fabric and interfacing layers along this traced line.
- Stitch and Turn: Stitch around the traced circular shape, approximately ¼ inch from the edge. Carefully trim any excess fabric beyond this stitching line to reduce bulk. Make a small, careful cut or slit on the interfacing side only (not through the fabric). Gently turn the circular piece right side out through this opening. Press the circle flat, ensuring a smooth, even edge.
- Piece the Side Units: Following the instructions on your paper piecing template, carefully join the fabric-covered foundation paper piecing units together. Stitch them precisely along the marked lines, making sure to match points accurately. Press seams open or to one side as desired.
- Position and Appliqué the Center Sun: Locate the empty circular spot in the center of your pieced “rays.” Carefully position your prepared fabric circle onto this spot. Use a small amount of fabric glue to hold it temporarily in place.
- Appliqué the Circle: Stitch the circular “sun” piece onto the background using an appliqué method. You can choose a small zigzag stitch, a blanket stitch, or a straight stitch very close to the edge of the circle. This permanently secures the “sun” to your block.
- Trim and Square Up: Once all components are assembled, carefully trim and square up your entire quilt block to the final 12-inch dimension. Use your quilter’s ruler and rotary cutter to ensure all edges are straight and perpendicular, creating a perfectly square block ready for your next project. You’re done!
Tips for Paper Piecing Success
- Shorten Your Stitch Length: As mentioned, a shorter stitch length (around 1.5-2.0mm) perforates the paper more thoroughly, making it much easier to remove the paper foundation later without stressing your seams.
- Use a New Needle: A sharp needle prevents skipped stitches and ensures clean penetrations through both fabric and paper.
- Press After Every Seam: This cannot be stressed enough! Pressing each seam flat after stitching ensures accuracy, prevents bulk, and results in a crisper, more professional-looking block.
- Watch Your Seam Allowance: While the paper guides your stitching, always ensure your fabric extends at least a ¼-inch beyond the stitching line on all sides before trimming. This prevents “bald spots” where the fabric doesn’t quite cover the section.
- Chain Piecing: If you’re making multiple blocks, consider chain piecing segments to save time. Stitch one segment, then immediately feed the next without cutting the thread in between.
- Take Your Time: Paper piecing rewards patience. Don’t rush through the steps, especially when aligning fabrics and pressing. Enjoy the process!
Finishing Your Quilt Project
Once you’ve mastered the Offset Sun Quilt Block, you might be inspired to create several more to form a stunning quilt top. Repeat the process to make as many blocks as needed for your desired quilt size. After all your blocks are complete, carefully join them together, paying attention to matching points and creating straight seams. The next steps would typically involve adding batting for warmth and structure, a backing fabric, and then quilting these layers together. Finally, a binding is added around the edges to give your quilt a polished and durable finish. Imagine the joy of snuggling under a quilt you’ve created, each block radiating with your unique touch!
*All these amazing images and the inspiring tutorial are thanks to Dclutter Quilting via YouTube. We highly recommend visiting her channel to explore more fantastic quilting videos and projects!