
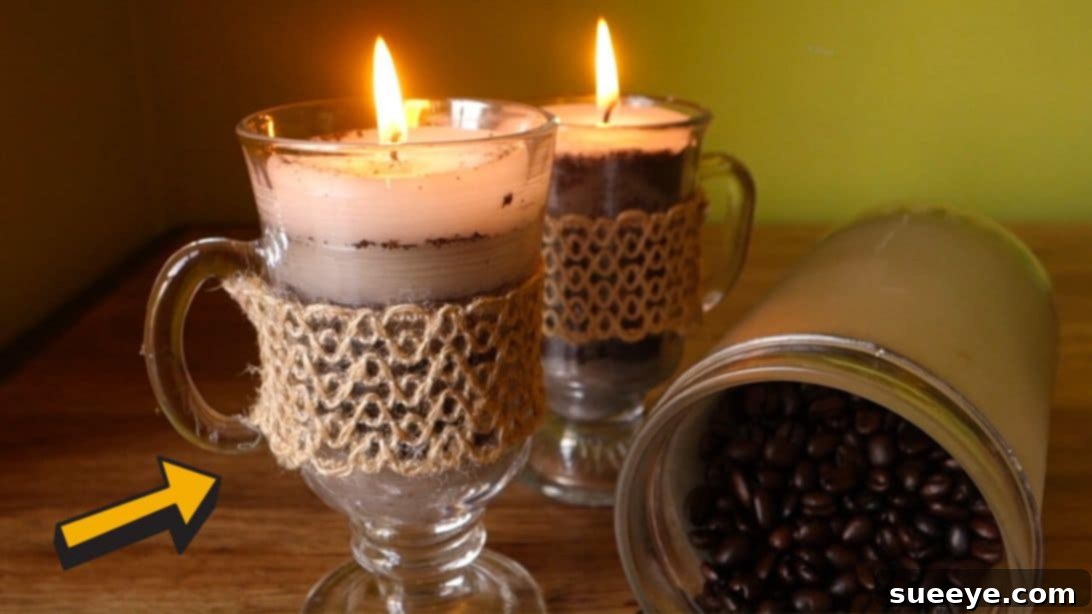
Do you often find yourself with unused white candles, wondering how to give them a new purpose? Or perhaps you simply adore the rich, invigorating aroma of freshly brewed coffee? If you’re a coffee enthusiast, imagine harnessing that comforting scent and infusing it into your living space. This DIY project allows you to craft your very own **coffee scented candles**, transforming ordinary wax into an extraordinary source of warmth and fragrance. Picture this: lighting a beautifully handmade coffee candle after a long day, letting the familiar, soothing scent waft through your home, instantly calming your senses and lifting your spirits. It’s an incredibly simple yet rewarding craft that promises to bring joy and a unique ambiance to any room.
RELATED: DIY Candle Image Transfer Tutorial: Personalize Your Candles
Creating these aromatic wonders is far easier than you might think, and it’s a fantastic way to practice sustainability by repurposing items you already have. Instead of discarding those half-used candles, give them a second life as charming coffee-infused creations. This quick and straightforward project can be completed in just a few minutes of active crafting time, offering immediate gratification. Not only will you save money on expensive store-bought candles, but you’ll also gain the satisfaction of crafting something truly unique and personal. Let’s dive into how you can easily make these delightful **homemade coffee candles** right in your own kitchen.
Why Make Your Own Coffee Scented Candles?
The appeal of a **DIY coffee candle** goes beyond just its captivating aroma. There are numerous reasons why this project is a must-try for crafters and coffee lovers alike:
- Unforgettable Aroma: Coffee’s scent is universally loved for its ability to energize and comfort. A coffee candle brings that beloved fragrance indoors, creating a cozy and inviting atmosphere. It’s perfect for mornings, study sessions, or winding down in the evening.
- Boost Your Mood: Studies suggest that the smell of coffee can help reduce stress and improve focus. Lighting a coffee candle can act as a natural mood enhancer, helping you relax, concentrate, or simply feel more at ease.
- Sustainable Crafting: This project offers an excellent opportunity to **reuse old candles** and wax scraps. Instead of contributing to landfill waste, you’re giving materials a beautiful new purpose, making it an eco-friendly choice.
- Cost-Effective: High-quality, artisanal scented candles can be quite expensive. Making your own allows you to enjoy premium aromas at a fraction of the cost, using materials that are often readily available or inexpensive to purchase.
- Personalized Decor and Gifts: Customize your candles to match your home decor or create thoughtful, handmade gifts for friends and family. A homemade coffee candle is a unique present that shows you’ve put care and effort into your gesture.
- Simple & Satisfying: Even if you’re new to DIY projects, making coffee candles is incredibly straightforward. The process is enjoyable, and the result is a beautiful, functional item that you created with your own hands.
Easy DIY Coffee Candle Materials: What You’ll Need
Gathering your materials is the first step to creating your perfect coffee candle. The beauty of this project lies in its simplicity and the accessibility of its components. You might already have most of these items at home!
- New or Old White Candles: These are your primary wax source. While white candles are a great starting point, feel free to use any color you have on hand. If you prefer a darker, more coffee-like appearance, brown candles can also be used, or you can add a small amount of candle dye later. Reusing old candles is highly encouraged for a sustainable approach.
- Water: Essential for the double-boiler method, ensuring your wax melts safely and evenly without scorching.
- Wick: The heart of your candle! Ensure you choose a wick size appropriate for your container’s diameter. Cotton wicks are common, but you can experiment with wooden wicks for a subtle crackling sound.
- Glass Cup: This will be your candle vessel. Choose a heat-safe glass cup, jar, or any container that can withstand heat and looks appealing. Mason jars, old teacups, or sturdy glass tumblers work wonderfully.
- Stick: A simple chopstick, pencil, or any slender stick will serve as a wick holder, keeping your wick centered while the wax sets.
- Instant Coffee: This is the secret ingredient for the delightful coffee aroma and subtle color. Instant coffee granules dissolve beautifully into the molten wax, infusing it with that signature scent. You can also use fine coffee grounds, but instant coffee provides a smoother result.
- Jute Ribbon: An optional decorative touch to give your finished candle a rustic and charming appearance. Feel free to substitute with other ribbons, twine, or decorative elements.
- Heat-Safe Container (for melting wax): A clean tin can, an old saucepan, or a heat-resistant glass measuring cup will work perfectly inside your larger pot of water.
- Large Pot: For creating your double boiler setup to safely melt the wax.
- Scissors: For trimming wicks and ribbon.
Having these materials ready will make your candle-making process smooth and enjoyable.
How to Make Coffee-Scented Candles: Step-by-Step Guide
Follow these simple steps to craft beautiful, fragrant coffee candles that will brighten any space.
Step 1: Safely Melt Your Wax
Begin by preparing your wax for melting. If you’re using old candles, carefully remove any remaining wicks or debris. Place your white candles or wax pieces into a smaller, heat-safe container. This container should fit comfortably inside a larger pot. Fill the larger pot with a few inches of water, ensuring that when the smaller container is placed inside, the water level doesn’t overflow. Place the large pot with the water and the smaller container with the candles over low heat. The goal is to melt the wax using a double-boiler method, which prevents it from burning or overheating. Stir occasionally with a stick or old spoon until the wax is completely liquid and smooth. Be patient and never leave melting wax unattended, as it can be a fire hazard.
Step 2: Prepare Your Candle Wick and Container
While your wax is melting, prepare your chosen glass cup or container. This step is crucial for an even burn and a well-formed candle. Take your wick and carefully center it at the bottom of the glass. You can secure it with a wick sticker if you have one, or simply press it firmly to the bottom with a drop of molten wax (which you can do after pouring the first thin layer). Then, place a stick (like a chopstick or pencil) across the top rim of the glass cup. Gently wrap the excess wick around this stick, making sure the wick remains taut and perfectly centered in the container. This setup will hold the wick firmly in place as the wax cools and sets, preventing it from shifting or sinking.
Step 3: Layer Wax and Coffee for Scent and Visual Appeal
Once your wax is fully melted, it’s time to infuse it with the wonderful coffee aroma. Pour a thin layer of molten wax, approximately 1/2-inch deep, into the bottom of your prepared glass cup. Before this layer fully hardens, sprinkle about 1 teaspoon of instant coffee onto the liquid wax. The coffee will mix slightly with the wax, creating a lovely speckled effect and releasing its fragrance. Allow this layer to cool and slightly set (it doesn’t need to be completely hard, just firm enough to support the next layer). Repeat this process – pouring a 1/2-inch layer of wax followed by 1 teaspoon of instant coffee – several times until you fill the entire cup. Make sure the very top layer is pure wax, giving your candle a clean, finished look. This layering technique helps distribute the coffee scent evenly throughout the candle and creates an attractive visual texture. Set the filled cup aside in a cool, undisturbed place to allow the candle to fully set and harden, which can take several hours, or even overnight, depending on the size.
Step 4: The Finishing Touch – Decorate and Enjoy!
Once your coffee candle has completely hardened and cured (this ensures a better burn and scent throw), carefully remove the stick that held the wick in place. Trim the wick to about 1/4 inch above the wax surface. This prevents excessive flickering and soot. For an added touch of rustic charm, take a piece of jute ribbon and wrap it around the glass cup. You can tie it in a simple knot or bow. Feel free to get creative with other decorative elements such as small coffee beans glued to the exterior, a personalized label, or a different type of twine. Your beautiful, **homemade coffee scented candle** is now complete and ready to light! Enjoy the warm glow and invigorating aroma it brings to your home.
Tips for the Perfect DIY Coffee Candle
To ensure your coffee candles are a success and burn beautifully, consider these expert tips:
- Wick Selection: Always choose a wick that is appropriate for the diameter of your candle container. Too thin, and your candle might “tunnel” (burn down the center, leaving wax on the sides). Too thick, and it might produce too much soot and burn too quickly.
- Curing Time: While your candle may appear solid after a few hours, it’s best to let it cure for at least 24-48 hours, or even a few days. This allows the wax molecules to fully bind with the coffee, resulting in a stronger scent throw when burned.
- Scent Strength: If you desire an even stronger coffee aroma, you can add a few drops of coffee essential oil or fragrance oil specifically designed for candles during the final wax pouring stage. However, instant coffee alone provides a lovely subtle scent.
- Preventing Sinking Coffee Grounds: The layering method helps, but if you notice coffee grounds sinking too much, allow each wax layer to cool slightly more before adding the coffee and pouring the next layer. The slightly thicker wax will suspend the grounds better.
- Even Surface: Sometimes, as wax cools, a small “sinkhole” might form around the wick. If this happens, simply reheat a small amount of wax and pour a thin top-up layer to create a smooth, even surface.
- Experiment with Containers: Don’t limit yourself to just glass cups! Explore old teacups, small ceramic bowls, or even repurposed food jars to create unique and charming coffee candles. Just ensure they are heat-safe.
- Safety First: Always place your burning candle on a heat-resistant surface, away from drafts, flammable materials, children, and pets. Never leave a burning candle unattended. When the wax reaches about 1/2 inch from the bottom of the container, it’s time to discontinue use to prevent glass breakage.
Unleash Your Creativity with Homemade Coffee Candles
Making your own **DIY coffee candles** is more than just a craft; it’s an opportunity to infuse your home with comfort, charm, and a touch of personal flair. From reusing old materials to customizing every detail, this project empowers you to create something truly special. Whether you’re seeking a unique gift, a sustainable way to refresh your decor, or simply a moment of aromatic bliss, these homemade treasures deliver. So, gather your materials, follow our easy guide, and get ready to enjoy the rich, inviting aroma of coffee candles that you made with love. Happy crafting!