
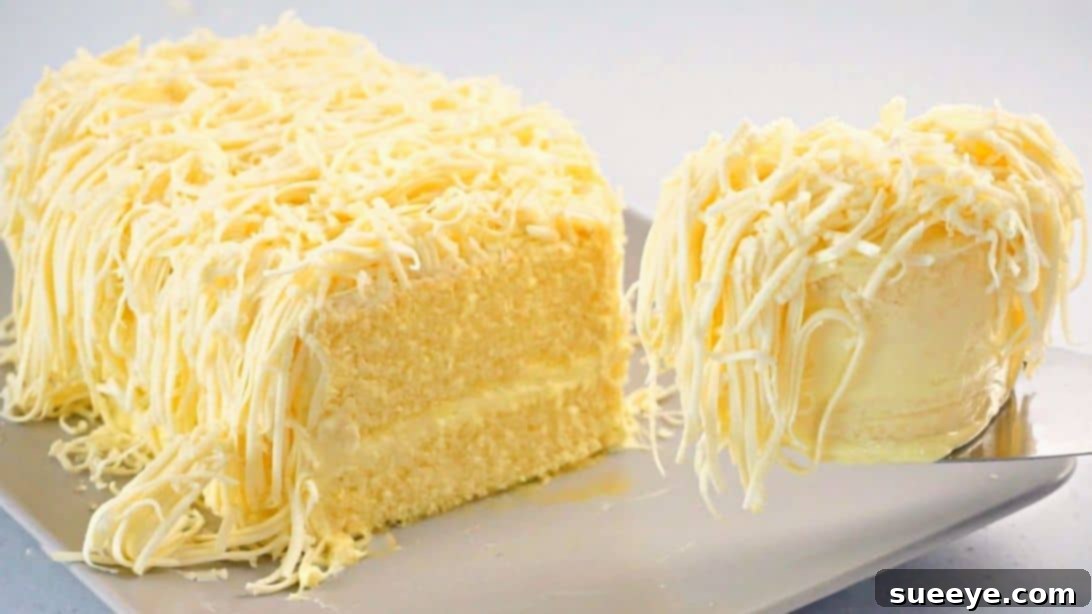
Indulge in the Ultimate Cotton Soft Snow Cheesecake: A Savor Easy Masterpiece
Prepare to be enchanted by a dessert that redefines the very essence of cheesecake: the Cotton Soft Snow Cheesecake, a delightful creation brought to us by the culinary artistry of Savor Easy on YouTube. This isn’t just any cheesecake; it’s an experience of pure, melt-in-your-mouth bliss that combines an incredibly soft, cloud-like texture with a rich, nuanced flavor profile. What sets this recipe apart is its ingenious cheese topping, elevating a classic dessert to extraordinary new heights of deliciousness.
Imagine a cake so tender it practically dissolves on your tongue, yet is robust enough to hold a lavish, creamy frosting and a generous layer of grated cheddar cheese. The contrast of the sweet, fluffy cake with the savory, tangy cheese topping is a symphony for the palate, promising a unique and unforgettable taste sensation. Whether you’re a seasoned baker or just starting your culinary journey, this fail-proof recipe will guide you to create a masterpiece that looks as impressive as it tastes. It’s the perfect treat to share with loved ones during a cozy weekend gathering, a special celebration, or simply when you desire a moment of pure, unadulterated indulgence.
Beyond its incredible flavor and texture, this Cotton Soft Snow Cheesecake is remarkably simple to prepare, thanks to Savor Easy’s clear and concise instructions. We’ve expanded upon these steps to ensure every detail is covered, providing you with all the insights and tips you need for guaranteed success. Get ready to impress your family and friends with a dessert that will undoubtedly become a cherished favorite, prompting requests for “just one more slice!”
Essential Ingredients for Your Cloud-Like Cheesecake
To embark on this delightful baking adventure, gather the following fresh and high-quality ingredients. Using room temperature ingredients, especially for the butter and cream cheese, is crucial for achieving the perfect consistency and texture in both your cake and frosting.
For the Cotton Soft Cake Batter:
- 4 large egg yolks
- ¼ cup (50g) granulated sugar
- ¼ cup (60ml) neutral oil (e.g., vegetable, canola, or grapeseed)
- 1/3 cup (80ml) whole milk
- 1 teaspoon pure vanilla extract
- 1 cup (120g) all-purpose flour, sifted
- ½ teaspoon fine salt
- 4 large egg whites
- ½ teaspoon cream of tartar (or a pinch of lemon juice/white vinegar)
- 1/3 cup (67g) granulated sugar
For the Creamy Frosting Perfection:
- ½ cup (113g) unsalted butter, softened to room temperature
- ½ cup (113g) cream cheese, softened to room temperature
- ¼ cup (60ml) sweetened condensed milk
- ¼ cup (60ml) heavy cream (cold)
- Cheddar cheese, finely grated, for the topping (adjust quantity to your preference, usually 1-2 cups)
Step-by-Step Directions to Bake Your Dream Cheesecake
Follow these detailed instructions carefully to ensure your Cotton Soft Snow Cheesecake turns out perfectly light, fluffy, and irresistibly delicious. Patience and gentle handling are key, especially when incorporating the egg whites.
Phase 1: Crafting the Silky Cake Batter
Step 1.1: Prepare the Egg Yolk Mixture
Begin by taking a large mixing bowl. Add the four egg yolks and the first portion of sugar (¼ cup). Using a whisk, gently break the yolks apart, then vigorously whisk them together. Continue whisking until the mixture transforms into a pale yellow, light, and fluffy consistency. This aeration is vital for the cake’s tender crumb. Next, pour in the oil, milk, and vanilla extract. Continue whisking until all these liquid ingredients are thoroughly combined and the mixture appears smooth and emulsified.
Step 1.2: Incorporate Dry Ingredients
Sift the all-purpose flour and salt directly over the egg yolk mixture. Sifting prevents lumps and ensures a smoother batter. With your whisk or a rubber spatula, gently fold and mix the dry ingredients into the wet until just combined. Be careful not to overmix at this stage; overmixing can develop the gluten in the flour, leading to a tougher cake. Stop mixing once no flour streaks are visible and the batter is smooth.
Step 1.3: Create the Fluffy Meringue
In a separate, impeccably clean mixing bowl, add the four egg whites. Ensure there’s no trace of fat or yolk, as this can prevent the whites from whipping properly. Add the cream of tartar (or lemon juice/vinegar), which helps stabilize the egg whites. Using a handheld electric mixer, begin beating the egg whites on medium speed until they become frothy. At this point, gradually add the remaining 1/3 cup of sugar, a spoonful at a time, while continuously beating. Increase the speed to high and continue beating until stiff, glossy peaks form. When you lift the beater, the peaks should hold their shape firmly and not droop.
Step 1.4: Gentle Folding for Airiness
Take a small dollop (about a third) of the stiff egg white mixture and add it to your egg yolk batter. Gently fold them together using a spatula. This step is crucial for loosening the thicker egg yolk mixture and making it easier to incorporate the remaining egg whites without deflating the meringue. Once partially combined, carefully pour the entire egg yolk mixture into the bowl with the remaining egg whites. Using a gentle folding motion with your spatula, combine the two mixtures. Work slowly and deliberately, cutting down through the middle and scooping up from the bottom, turning the bowl as you go. The goal is to incorporate everything without knocking out too much of the precious air from the egg whites, which gives the cake its signature cotton-soft texture. Continue folding until the batter is uniform and no white streaks remain.
Step 1.5: Prepare for Baking
Carefully pour the delicate cake batter into an 8x4x2 inch oval pan (or a similar sized round or rectangular pan if an oval isn’t available). Ensure the pan is lined with parchment paper, allowing some overhang on the sides for easy removal after baking. Gently tap the pan a few times on your countertop to release any large air bubbles.
Phase 2: Baking, Frosting, and Assembling Your Masterpiece
Step 2.1: Baking to Perfection
Preheat your oven to 160°C (320°F). Once heated, carefully place the cake pan into the oven and bake for approximately 35 to 40 minutes. Baking times can vary slightly depending on your oven, so keep an eye on it. The cake is done when a wooden skewer or toothpick inserted into the center comes out clean, and the top is golden brown and springs back lightly when touched. Once baked, remove the cake from the oven and allow it to cool completely in the pan before attempting to unmold it. Cooling thoroughly is essential for structural integrity and ease of handling. While the cake cools, you can begin preparing the sumptuous frosting.
Step 2.2: Crafting the Dreamy Frosting
In another large mixing bowl, add the softened butter. Beat it with your electric mixer on medium speed until it’s light, smooth, and fluffy. This usually takes a couple of minutes. Next, add the softened cream cheese and the sweetened condensed milk. Continue to beat these ingredients together until the mixture is completely smooth, creamy, and well combined, with no lumps of cream cheese remaining. Finally, pour in the cold heavy cream. Beat the mixture once more until it’s smooth and has a lovely, spreadable consistency. Give it a final fold with a spatula to ensure everything is evenly incorporated and air bubbles are minimized.
Step 2.3: Assembling Your Masterpiece
Once the cake has cooled completely, carefully unmold it from the pan and gently peel away the parchment paper. Place the cake on a clean cutting board. Using a long, serrated knife, carefully slice the cake horizontally into two even layers. Place one layer on your chosen serving plate. Scoop a generous dollop of the prepared frosting onto this bottom cake layer and spread it evenly to the edges. Carefully place the second cake layer on top, aligning it perfectly. Now, use the remaining frosting to completely cover the top and sides of the entire cake, creating a smooth and appealing finish. A spatula or offset knife works best for this step.
Step 2.4: The Signature Cheese Topping
With the cake fully frosted, it’s time for the unique and delicious cheese topping. Take your grated cheddar cheese and generously sprinkle it all over the top and sides of the cake. Ensure every part of the frosting is covered, creating a beautiful “snowy” effect with a savory twist. The abundance of cheese is what truly makes this “Snow Cheesecake” unique.
Step 2.5: Serve and Enjoy!
Your magnificent Cotton Soft Snow Cheesecake is now ready to be presented! Slice it carefully and serve immediately to fully appreciate its incredible texture and flavor. Watch as your family and friends marvel at this delightful creation.
Why This Cotton Soft Snow Cheesecake Will Be Your New Favorite
This isn’t just another dessert recipe; it’s an invitation to experience a truly unique culinary delight. The Cotton Soft Snow Cheesecake stands out for several compelling reasons:
- Unmatched Texture: Its “cotton soft” designation isn’t an exaggeration. The meticulous separation and whipping of egg whites result in an incredibly delicate, airy, and moist crumb that melts in your mouth, far lighter than traditional cheesecakes.
- Harmonious Flavor Profile: The delicate sweetness of the cake is perfectly balanced by the rich, tangy cream cheese frosting. The crowning glory, the grated cheddar cheese, introduces a delightful savory note that complements the sweetness without overpowering it, creating an exciting complexity that keeps you coming back for more.
- Visually Stunning: With its pristine white frosting and generous blanket of golden cheddar, this cake is as beautiful to behold as it is delicious to eat. It’s a showstopper that will undoubtedly garner compliments at any gathering.
- Surprisingly Simple to Master: Despite its sophisticated appearance and taste, the recipe is designed to be accessible. With clear, step-by-step instructions and a few key tips, even novice bakers can achieve spectacular results.
- Versatile for Any Occasion: Whether it’s a birthday, holiday, potluck, or just a treat for yourself, this cheesecake fits seamlessly into any event, promising to be a crowd-pleaser every time.
Expert Tips for Cotton Soft Perfection
To ensure your Cotton Soft Snow Cheesecake turns out absolutely perfect, keep these expert tips in mind:
- Room Temperature Ingredients: Always ensure your butter, cream cheese, and eggs are at room temperature. This is crucial for achieving smooth batters and frostings, preventing lumps, and ensuring proper emulsification.
- Clean Bowl for Egg Whites: When whipping egg whites, make sure your mixing bowl and beaters are impeccably clean and completely free of any grease or egg yolk. Even a tiny speck can prevent the whites from reaching stiff peaks.
- Do Not Overmix: Overmixing the cake batter after adding flour can develop gluten, leading to a tough cake. Mix only until just combined and no flour streaks remain. Similarly, gently fold the egg whites into the batter to preserve their airy volume.
- Gentle Folding Technique: When incorporating the meringue into the yolk mixture, use a gentle folding motion with a rubber spatula. This involves cutting down through the center, sweeping up the bottom, and gently turning the bowl. The goal is to combine thoroughly without deflating the egg whites.
- Preheat Oven Accurately: Ensure your oven is fully preheated to the specified temperature before placing the cake inside. Consistent oven temperature is key for even baking and proper rising.
- Cool Completely: Patience is a virtue when baking. Allow the cake to cool completely in its pan before attempting to unmold or frost it. A warm cake is fragile and will crumble or melt the frosting.
- Quality Cheese for Topping: While any cheddar will work, a good quality sharp or medium cheddar will provide the best flavor contrast for the topping. Grate it freshly for the best texture and taste.
Serving Suggestions and Storage Guidance
This Cotton Soft Snow Cheesecake is a star on its own, but here are some ideas to enhance the experience:
- Simple Elegance: Serve chilled slices on their own, allowing the unique combination of soft cake, creamy frosting, and savory cheese to shine.
- Fresh Fruit Medley: A light accompaniment of fresh berries (strawberries, blueberries, raspberries) or sliced kiwi can add a refreshing touch and a pop of color, cutting through the richness beautifully.
- Light Drizzle: For an extra layer of sweetness, a very light drizzle of honey or a thin caramel sauce could be added, though sparingly, to not overshadow the cheese topping.
- Coffee or Tea Pairing: This cheesecake pairs wonderfully with a cup of freshly brewed coffee, a robust espresso, or a delicate cup of herbal tea.
Storage: To keep your cheesecake fresh and delicious, store it covered in an airtight container in the refrigerator. It will maintain its exquisite flavor and texture for up to 3-4 days. For longer storage, individual slices can be wrapped tightly in plastic wrap and then aluminum foil, then frozen for up to one month. Thaw in the refrigerator overnight before serving.
We encourage you to try this truly special Cotton Soft Snow Cheesecake recipe this weekend. It’s more than just a dessert; it’s a delightful journey of flavors and textures that will undoubtedly become a cherished staple in your baking repertoire. Share it with your family and friends, and prepare for smiles, compliments, and requests for the recipe! Happy baking!
*All image credit belongs to Savor Easy via YouTube. Follow and subscribe to her channel for more incredible recipes!