
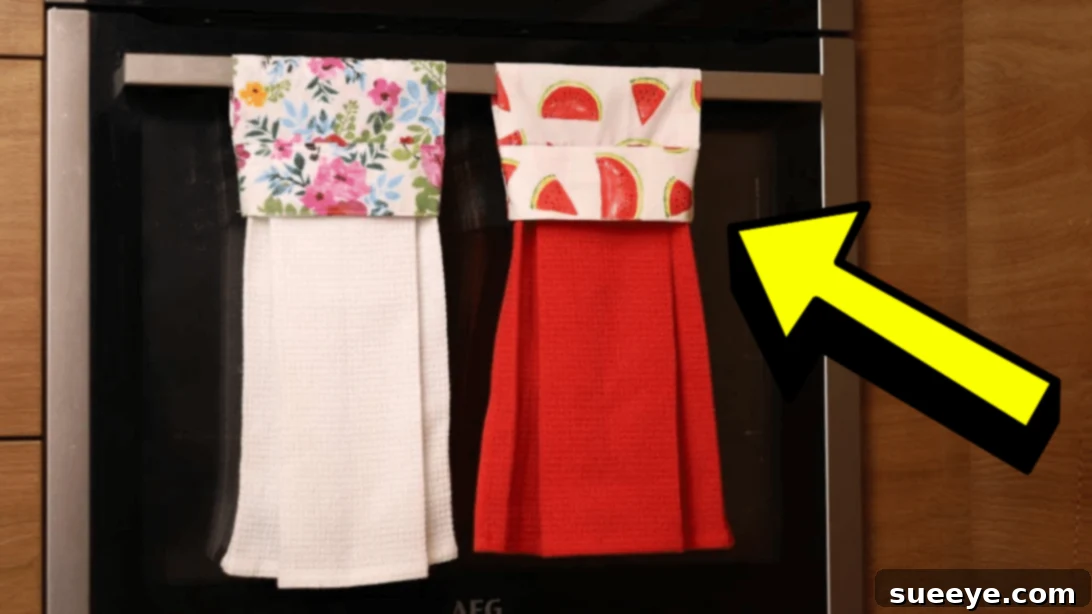
Transform Your Kitchen with Easy DIY Hanging Towels: A Beginner-Friendly Sewing Guide
There’s a unique satisfaction that comes with creating something beautiful and practical with your own hands. For me, that joy recently came from making a set of hanging towels. After acquiring some truly lovely fabric, the idea sparked: why not finally tackle this project? The quest for an accessible tutorial led me straight to Hello Sewing’s insightful YouTube guide, which promised a simple yet rewarding sewing experience. This project isn’t just about crafting; it’s about adding a touch of personalized elegance and functionality to your kitchen or bathroom, making everyday tasks a little more delightful.
RELATED: If you love simple sewing projects, explore How To Sew A Pretty Tie-On Tea Towel for another charming addition to your home decor.
Why Choose DIY Hanging Towels?
Hanging towels offer numerous advantages over traditional kitchen or hand towels. They stay securely in place, preventing them from falling onto the floor, which means less frequent washing and improved hygiene. Imagine no more towels slipping off the oven handle or counter! Beyond practicality, these handmade creations elevate your home’s aesthetic. They allow you to infuse your personal style into your living space, making it feel more inviting and thoughtfully decorated. This particular tutorial from Hello Sewing is exceptionally straightforward, making it an ideal entry point for anyone new to sewing. With clear, easy-to-follow instructions, even complete beginners can achieve professional-looking results. Moreover, these versatile towels make fantastic handmade gifts, adding a personal touch that store-bought items simply can’t match. You can further customize them with unique embellishments, monograms, or fabric labels, making them perfect for selling at craft fairs or online marketplaces.
Essential Materials for Your DIY Hanging Hand Towel Project
Before diving into the sewing process, gathering all your materials is crucial for a smooth and enjoyable crafting session. Here’s a detailed look at what you’ll need:
- High-Quality Cotton Fabric: Opt for a durable yet soft cotton fabric for the hanging loop. Quilting cottons are excellent choices due to their wide variety of patterns and ease of handling. Choose a print that complements your existing kitchen decor or adds a vibrant pop of color. You’ll need about a quarter yard or a fat quarter, depending on the desired size of your hanging strap.
- Absorbent Hand Towel or Tea Towel: Select a new or gently used hand towel that is clean and free of snags. Terry cloth, waffle weave, or linen blend towels work wonderfully for absorbency and durability. Make sure it’s a size that suits your needs, as you’ll be cutting it.
- Ruler or Measuring Tape: Accuracy is key in sewing. A clear acrylic ruler is ideal for cutting straight lines and precise measurements, especially when used with a rotary cutter.
- Marking Pen or Fabric Pencil: Choose a washable fabric marker or chalk pencil to transfer pattern markings onto your fabric without leaving permanent traces. Test it on a scrap piece first to ensure it disappears easily.
- Sharp Scissors or Rotary Cutter and Cutting Mat: A good pair of fabric scissors is indispensable for clean cuts. For even greater precision and speed, especially with longer cuts, a rotary cutter used with a self-healing cutting mat is highly recommended. This combination helps in achieving perfectly straight edges.
- Fabric Clips or Pins: These are essential for holding fabric layers together securely before stitching. Fabric clips are great for thicker fabrics or when you want to avoid pin marks, while sharp pins work well for most standard fabrics.
- Needle and Thread: All-purpose polyester thread is suitable for most sewing projects and comes in a vast array of colors to match your fabric. Ensure your sewing machine needle is appropriate for the fabric weight you are using (e.g., universal needle for cotton).
- Iron and Ironing Board: Pressing seams open or flat is a non-negotiable step in achieving a professional finish. An iron is vital for creating crisp folds and smooth, even edges throughout the project. Don’t skip this step!
- Sewing Machine: While it’s possible to hand-sew this project, a sewing machine will make the process much faster, stronger, and more consistent. Ensure your machine is threaded correctly and you have basic sewing machine knowledge.
Step-by-Step Guide: Crafting Your Own Hanging Hand Towel
Step 1: Preparing Your Towel Base
Begin by carefully removing any labels or hanging loops from your chosen tea towel. This ensures a clean slate for your new design. Next, lay the towel flat and fold it precisely in half lengthwise. Using your ruler and marking pen, identify and mark the exact midpoint along the folded edge. Cut the towel along this midpoint, effectively creating two halves. Now, take one of these halves, fold it in half again lengthwise, and mark the new midpoint. From this center point, measure and mark 4 inches outwards in both directions. Then, from those 4-inch marks, measure and mark an additional 3 inches outwards. Repeat this precise marking process on the other half of the towel if you plan to make two. These marks are crucial for shaping the towel into its unique hanging design, so accuracy here is key for a symmetrical finish.
Step 2: Shaping and Folding the Towel
With your towel marked, lay it flat on your work surface with the wrong side facing upwards. Locate the 4-inch marks you made in the previous step. Gently pinch the fabric at these marks and bring them towards the center of the towel, creating two neat folds that meet in the middle. The goal is to create a gathered or pleated effect that will form the top portion of your hanging towel. Once these central folds are in place, take the upper and bottom raw edges of the towel and fold them inward by approximately ½ inch. This creates a clean, finished edge and encases any raw fabric, preventing fraying. Use your fingers to press these folds firmly, preparing them for the next step.
Step 3: Securing Folds and Preparing the Fabric Strap
Once the folds are meticulously arranged, use fabric clips or pins to secure them firmly in place. This will prevent the fabric from shifting as you work. Take your iron and press all the folded edges and the gathered section crisply. Pressing is a secret weapon in sewing, as it sets seams and folds, giving your project a professional, neat appearance. After pressing, carefully flip the towel over so the right side is facing up. Measure the width of the top, gathered section. You will use this measurement, along with the desired length of your hanging strap, to cut your cotton fabric. The video tutorial provides specific dimensions, but generally, you’ll want a strip of cotton fabric that is twice the width of your gathered towel top (plus seam allowance) and long enough to create a substantial hanging loop. Stitch across the top of the towel with a ¼-inch seam allowance to permanently secure the gathered shape. This stitch should be strong, holding all the pinched and folded layers together.
Step 4: Assembling the Fabric Band and Towel
Now, let’s turn our attention to the cotton fabric band that will form the hanging portion. Take your cut cotton fabric strip and fold it in half lengthwise, marking the midpoint with your fabric pen. Also, mark the midpoint along its width. Next, take the prepared towel (with its top stitched) and align the midpoint of the cotton fabric band with the midpoint of the towel’s top edge. Ensure the right sides of the fabric band are facing inward. Stitch across both short ends of the cotton band, creating a continuous loop. Once stitched, fold the band in half lengthwise again, ensuring the right sides are facing out, and press it flat. This creates a clean, finished band. Carefully align the midpoints of the fabric band and the towel again, placing the towel’s gathered top edge inside the fabric band. Pin the towel securely to the fabric band, making sure all layers are aligned and ready for stitching.
Step 5: Final Assembly and Finishing Touches
This is where your hanging towel truly takes shape. Carefully roll up the main body of the towel and sandwich it inside the cotton fabric band. This technique prevents the towel from getting caught in your stitches as you sew the band closed. Stitch along the edges of the fabric band, ensuring you catch all layers securely. Use a sturdy stitch, backstitching at the beginning and end for reinforcement. Once the main seam is done, carefully push out the corners of the fabric band, using a point turner or a dull pencil to achieve sharp, crisp corners. Stitch these corners in place if needed for extra security or neatness. Now, turn the entire piece right side out, pulling the towel through the opening in the band. Tuck in any remaining raw edges of the fabric band, creating a neat fold. Finally, topstitch all around the cotton piece, close to the edge. Topstitching not only gives your hanging towel a professional, finished look but also adds extra durability and helps the fabric band maintain its shape. Trim any loose threads, and your beautiful, functional DIY hanging towel is complete!
Personalize Your Hanging Towels: Creative Customization Ideas
The beauty of DIY lies in the ability to infuse your unique style into every creation. Once you’ve mastered the basic hanging towel, the possibilities for customization are endless. Consider adding embroidered monograms or small decorative motifs to the towel itself or the fabric band. Appliques, using contrasting fabrics, can also add a charming touch. For a more rustic feel, incorporate decorative buttons or even a snap closure on the hanging loop for added versatility. Fabric choice plays a huge role; experiment with seasonal patterns for holidays or use different textures like linen for a spa-like feel in the bathroom. These personalized touches not only make your towels stand out but also increase their appeal as thoughtful, handmade gifts. Imagine a set of these, tailored to a friend’s kitchen colors, presented with care!
Making these DIY hanging towels is a rewarding project that combines practicality with personal expression. It’s an excellent way to use up fabric scraps, hone your sewing skills, and add a custom touch to your home. Whether you’re a seasoned sewist or just starting, this tutorial by Hello Sewing provides a clear path to success. The satisfaction of seeing your handmade towels gracefully hanging, ready for use, is truly incomparable. Get creative, have fun, and enjoy the process of making something wonderful!
*All image credit belongs to Hello Sewing via YouTube. Follow and subscribe to her channel for more fantastic sewing tutorials and creative inspiration!