
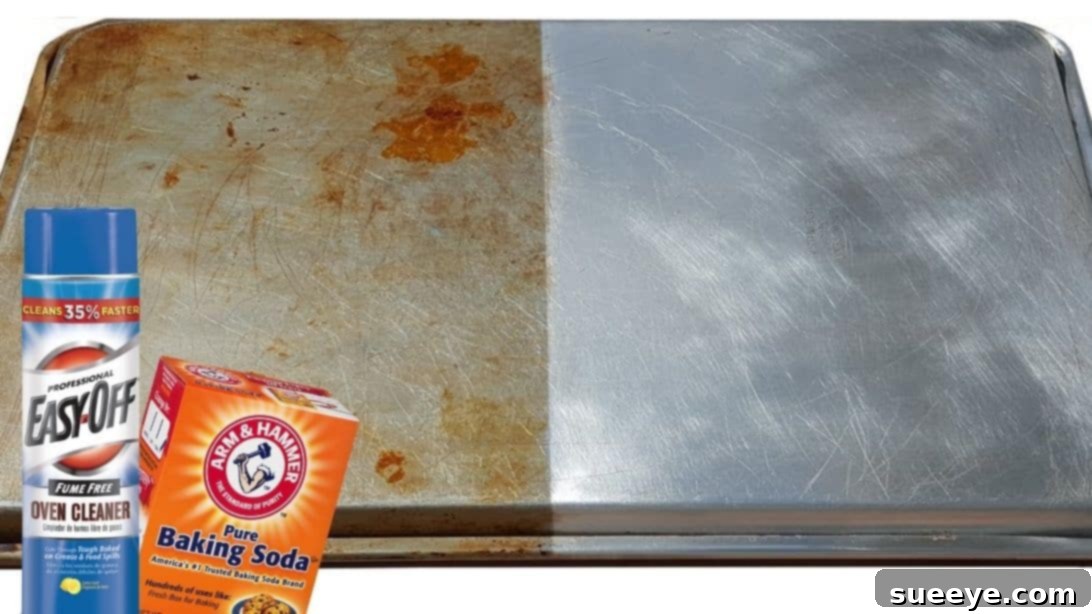
After a season filled with delightful baking, many of us find ourselves facing the daunting task of cleaning stubborn, baked-on grease and dark stains from our beloved sheet pans. While a regular wash might tackle surface grime, it often falls short when it comes to those persistent, carbonized marks that accumulate over time. The frustration of scrubbing tirelessly only to see the same unsightly stains can be disheartening, leaving your pans looking old and worn long before their time. But what if there was a highly effective method to restore your baking sheets to their former glory, making them shine like new?
Indeed, there is! We’ve uncovered a remarkably powerful and efficient technique that promises to tackle even the toughest sheet pan stains. This comprehensive guide will walk you through a proven method that we’ve personally relied on for years, guaranteeing impressive results. Say goodbye to dull, dirty pans and hello to sparkling, like-new bakeware ready for your next culinary adventure. Let’s dive into the simple yet transformative steps to bring your sheet pans back to life.
The Silent Saboteur: Why Sheet Pans Get So Stubbornly Dirty
Sheet pans are workhorses in any kitchen, enduring high temperatures and constant contact with oils, fats, and various food residues. Over time, this combination leads to the dreaded baked-on grease and carbonization that ordinary dish soap simply cannot conquer. When fats and sugars caramelize and burn onto the metal surface, they create a hard, dark layer that seems impervious to scrubbing. This isn’t just an aesthetic issue; accumulated grime can affect heat distribution, making your food cook unevenly, and can even transfer unwanted flavors to your dishes.
Understanding why these stains form is the first step to effectively removing them. Whether it’s residue from roasted vegetables, crispy bacon, or spilled dough, these organic materials undergo a chemical change when exposed to high heat for extended periods. They polymerize and bond fiercely to the pan’s surface, creating a protective shield that resists typical cleaning agents. Our method targets these tough bonds, breaking them down to reveal the clean metal underneath.
Your Ultimate Guide to Restoring Dirty Sheet Pans
This method combines the power of a strong degreaser with physical abrasion to deep clean your sheet pans effectively. Remember, always prioritize safety and work in a well-ventilated area.
Essential Materials for Sheet Pan Restoration
Before you begin, gather these items. Having everything within reach will make the cleaning process smoother and more efficient.
- Powerful Degreasing Cleaning Solution: A heavy-duty oven cleaner (like Easy-Off) is highly effective. These cleaners contain strong agents that break down polymerized grease and food residues. Important Note: While incredibly effective, strong oven cleaners are generally not recommended for use on aluminum pans as they can cause discoloration or damage. If you have aluminum pans, consider the alternative methods described later in this article, or proceed with extreme caution and test on an inconspicuous area first. Always follow the product’s instructions carefully.
- Baking Soda: An excellent natural abrasive and deodorizer. It works wonders when combined with scrubbing to lift stubborn grime.
- Abrasive Cleaning Pad: Options include steel wool pads (like SOS or Brillo pads), heavy-duty scrub sponges, or a stiff nylon brush. Choose one appropriate for your pan’s material – avoid overly aggressive pads on non-stick coatings.
- Hot Water: Essential for rinsing and helping to dissolve grease.
- Regular Dish Detergent: For the final wash to remove any chemical residues and leave your pan sparkling clean.
- Rubber Gloves: Crucial for protecting your hands from harsh chemicals and hot water.
- Eye Protection: Recommended when working with strong cleaning solutions to prevent accidental splashes.
Step-by-Step Directions for Deep Cleaning
Follow these instructions carefully to achieve the best results and safely restore your sheet pans.
Step 1: Prepare the Pan and Work Area
Begin by placing your dirty sheet pan in a sink or a utility tub. Give it a quick rinse under warm water to remove any loose food particles or debris. This initial rinse ensures that your cleaning solution can target the baked-on grime more effectively without interference from surface-level dirt. Ensure your work area is well-ventilated, opening windows if possible, especially when using strong chemical cleaners.
Step 2: Apply the Powerful Cleaning Solution
Don your rubber gloves and safety glasses. Carefully spray an even layer of your chosen degreasing solution (like Easy-Off) over the entire surface of the sheet pan, paying special attention to areas with heavy grease buildup and dark stains. Ensure good ventilation throughout this step. After application, allow the solution to work its magic. Let the pan sit undisturbed for approximately 15 to 20 minutes. This dwell time is crucial for the chemicals to penetrate and break down the stubborn, baked-on layers. While Easy-Off is potent, for most sheet pan materials, it does not penetrate the metal or remain on the surface after the recommended rinsing instructions are meticulously followed.
Step 3: The Intensive Scrubbing Phase
Once the cleaning solution has had ample time to loosen the grime, it’s time for the physical action. Take your abrasive cleaning pad (e.g., SOS pad, Brillo pad, or heavy-duty scrubber) and begin to scrub the surface of the sheet pan. You’ll notice the loosened grease and dark marks starting to lift away. For areas with particularly old or thick buildup, you may need to apply significant force and persistence. Don’t be afraid to scrub vigorously. If you find some areas are still very stubborn, you can create a paste with baking soda and a little water, apply it to those spots, and then scrub again. The baking soda acts as a mild abrasive that aids in lifting the remaining residue.
Step 4: Thorough Rinsing and Final Wash
After scrubbing, rinse the sheet pan thoroughly under hot running water. It’s imperative to remove all traces of the cleaning solution and loosened grime. You might need to rinse several times to ensure all residue is gone. Next, wash the pan as you normally would with regular dish detergent and warm water. This final wash is crucial to neutralize any remaining chemical residues and leave your pan hygienically clean. Rinse again thoroughly until the water runs clear and the pan feels smooth and free of any slippery film.
Step 5: Inspection and Admire Your Work
Inspect your sheet pan. You should see a remarkable difference, with most, if not all, of the dark marks and baked-on grease gone, revealing a much shinier surface. If any stubborn spots remain, you can repeat the process on those specific areas, focusing your scrubbing efforts. Once satisfied, dry the pan completely to prevent water spots.
Alternative and Natural Cleaning Methods for Sheet Pans
While powerful degreasers are effective, they might not be suitable for all pan types (especially aluminum) or for those who prefer more natural cleaning solutions. Here are some excellent alternatives:
The Baking Soda and Vinegar Method
This classic combination is a natural powerhouse for many cleaning tasks. Sprinkle a generous layer of baking soda over the entire surface of your dirty sheet pan. Then, spray or pour white vinegar over the baking soda. It will fizz and bubble, a sign that the chemical reaction is working to lift the grime. Let it sit for 30 minutes to an hour. After soaking, scrub the pan vigorously with an abrasive pad and hot water. Rinse thoroughly. This method is safe for aluminum pans.
Baking Soda and Hydrogen Peroxide Paste
For tough stains, create a paste using baking soda and a small amount of hydrogen peroxide. Spread this thick paste over the stained areas of your pan. Allow it to sit for several hours, or even overnight, to really penetrate the grime. The hydrogen peroxide helps to bleach and break down the stains, while the baking soda provides the abrasive power. After soaking, scrub the paste away with an abrasive sponge and hot water, then rinse well. This method is also suitable for aluminum pans.
Dishwasher Detergent Tablet Soak
For pans that can handle soaking, this is a surprisingly effective method. Fill your sink with hot water and drop in one dishwasher detergent tablet. Let it dissolve, then submerge your sheet pan in the solution. Allow it to soak for a few hours or overnight. The powerful enzymes in the dishwasher tablet will break down the baked-on grease. After soaking, the grime should be much easier to scrub away with a sponge, then rinse thoroughly.
Lemon and Salt (for lighter stains)
For less severe stains and general brightening, cut a lemon in half. Sprinkle a generous amount of coarse salt (like kosher salt) over the stained areas of the pan. Use the cut side of the lemon as a scrubber, squeezing it as you scrub to release the juice. The acidity of the lemon combined with the abrasive salt creates a natural scrubbing agent. This is a great, natural option for light discoloration and is safe for all pan types.
Pro Tips for Preventing Future Stains and Maintaining Pan Longevity
While deep cleaning can restore your pans, prevention is always easier than cure. Adopting these habits will keep your sheet pans cleaner for longer and extend their lifespan.
- Use Parchment Paper or Silicone Baking Mats: This is by far the most effective way to prevent food from sticking and burning onto your pan. These barriers catch drips and spills, keeping your pan pristine underneath.
- Clean Immediately After Use: Don’t let food residue sit and harden. The sooner you wash your pan after it cools, the easier it will be to remove any fresh grease or spills.
- Avoid High Heat Without Food: Heating an empty pan to very high temperatures can sometimes cause the metal to oxidize or discolor faster, especially with certain types of finishes.
- Choose the Right Pan for the Task: For very greasy foods, consider using a roasting pan with higher sides to contain splashes, or ensure your sheet pan is adequately lined.
- Hand Wash When Possible: While some sheet pans are dishwasher safe, hand washing often allows for more targeted cleaning and can be gentler on the pan’s finish, especially if it’s aluminum or has a non-stick coating.
- Proper Storage: Stack pans with a layer of paper towel or felt in between to prevent scratches and dings, which can create areas where food might stick more easily.
Important Safety Considerations When Cleaning Sheet Pans
Your safety should always be the top priority, especially when dealing with strong cleaning agents or abrasive tools.
- Ventilation is Key: Always ensure you are working in a well-ventilated area, especially when using oven cleaners or other chemical solutions. Open windows and use an exhaust fan if available.
- Personal Protective Equipment (PPE): Wear rubber gloves to protect your hands from chemicals and hot water. Eye protection is also highly recommended to guard against splashes.
- Never Mix Cleaning Products: Combining different cleaning agents, especially those containing ammonia and bleach, can create dangerous, toxic fumes. Stick to one method at a time.
- Read Product Labels: Always read and follow the instructions and warning labels on any cleaning product you use. They contain vital information about safe usage and precautions.
- Test in an Inconspicuous Area: If you’re unsure how a powerful cleaner might affect your specific pan material (especially with new products or older pans), test it on a small, hidden spot first.
Frequently Asked Questions About Cleaning Sheet Pans
Can I use oven cleaner on aluminum sheet pans?
Generally, it is not recommended to use strong lye-based oven cleaners (like many standard brands) on aluminum sheet pans. These chemicals can react with aluminum, causing discoloration, pitting, or even structural damage to the metal. For aluminum pans, it is much safer to use natural alternatives like baking soda and vinegar, baking soda and hydrogen peroxide, or cream of tartar methods. If you must use a commercial cleaner, look for one specifically labeled safe for aluminum, or test a very small, inconspicuous area first and proceed with extreme caution.
How often should I deep clean my sheet pans?
The frequency of deep cleaning depends on how often you use your sheet pans and what you cook on them. For pans used daily with high-grease foods, a deep clean might be necessary once a month or every few weeks. For less frequent use or lighter cooking, every few months might suffice. The key is to address significant buildup as soon as you notice it to prevent it from becoming too stubborn. Regular cleaning after each use will also extend the time between deep cleans.
Will scrubbing with abrasive pads damage my sheet pan?
It depends on the type of pan. For standard stainless steel or bare aluminum sheet pans, abrasive pads like steel wool (SOS/Brillo pads) are generally safe and effective for removing baked-on grime. However, if your pan has a non-stick coating, an anodized finish, or is made of a softer metal, aggressive scrubbing with steel wool can scratch or damage the surface, compromising its performance and appearance. For these types of pans, opt for nylon scrubbers or the gentler side of a scrub sponge with your cleaning solution.
My pan is still stained after cleaning, what now?
For extremely stubborn stains, one round of cleaning might not be enough. Don’t despair! You can repeat the deep cleaning process, allowing the cleaning solution a longer dwell time (up to several hours for very tough cases, if safe for the product and pan). Alternatively, try a different cleaning method. For instance, if you used a chemical cleaner, try the baking soda and hydrogen peroxide paste and let it sit overnight. Some deeply ingrained stains, especially on older, heavily used pans, might be permanent, but most can be significantly reduced or removed with persistence.
With these tried-and-true methods, you no longer have to live with unsightly, greasy sheet pans. By investing a little time and effort, you can easily restore your baking sheets, making them look almost as good as new. Not only will this improve the appearance of your kitchen, but it will also enhance your cooking experience by promoting even baking and preventing food from sticking. So grab your cleaning supplies, and get ready to transform your grimy bakeware into sparkling kitchen essentials!
Special thanks to Kitchen Tips Online via YouTube for providing the insightful original tutorial and images used in this guide. We highly recommend visiting their channel for more invaluable kitchen tips and tricks!