
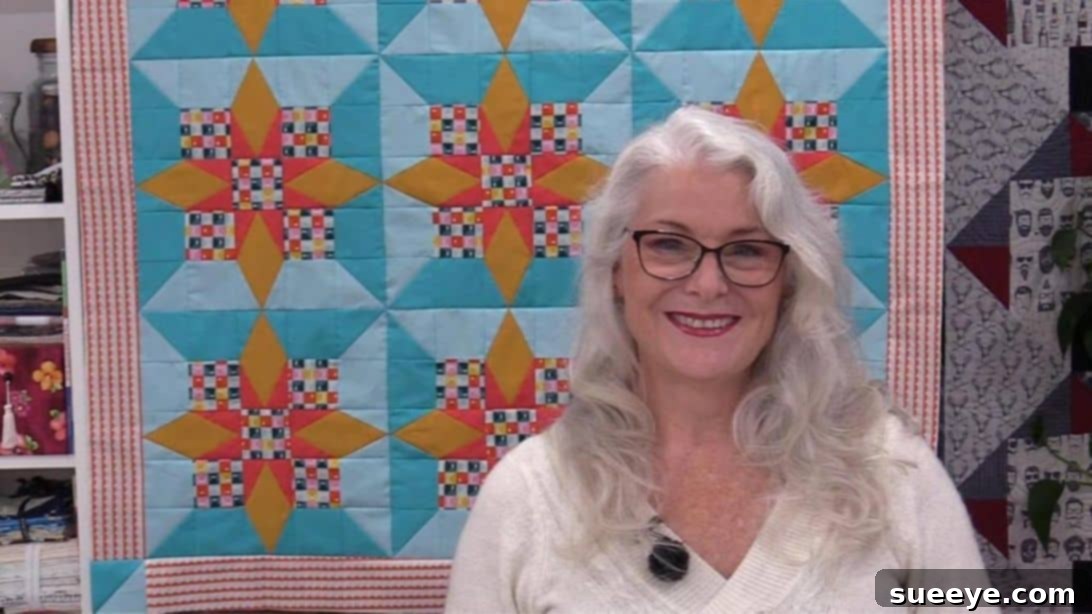
Embark on an exciting quilting journey this weekend with a project that promises both fun and a truly spectacular result: the mesmerizing Illusion Quilt. This ingenious design utilizes specially chosen “illusion fabrics” to create a stunning optical effect that appears far more complex than it actually is. Don’t let the captivating visual trickery intimidate you; with the expert guidance from SewVeryEasy on YouTube and a provided free pattern, you’ll be amazed at how smoothly this intricate-looking quilt comes together. If you’re eager to try something fresh, visually striking, and incredibly rewarding, then dive into this unique quilting project and prepare to unleash your inner fabric artist.
The beauty of the Illusion Quilt lies in its ability to play tricks on the eye, creating a sense of depth, movement, or a shifting pattern that changes with your perspective. This isn’t just another quilt; it’s a piece of fabric art that will undoubtedly become a conversation starter and a cherished item in your home. Thanks to the detailed video tutorial and the downloadable pattern, quilters of all levels can achieve this impressive look. Whether you’re an experienced sewer looking for a new challenge or an adventurous beginner ready to expand your skills, this tutorial provides everything you need to successfully construct a quilt that boasts a captivating 3D effect. Get ready to experience the magic of fabric manipulation and create a quilt that truly stands out.
What Makes an Illusion Quilt Special? Unveiling the Magic
An illusion quilt is more than just a cozy blanket; it’s a masterclass in visual deception, meticulously crafted with fabric to create a striking optical illusion. These quilts often feature geometric patterns, contrasting colors, and sometimes, specialized “illusion fabrics” that seem to shift and change right before your eyes. The result is a dynamic, often three-dimensional effect that adds immense depth and intrigue to any space. Making an illusion quilt is not only an opportunity to create a stunning piece of home decor but also a fantastic way to hone your precision cutting, accurate piecing, and overall quilting skills. The satisfaction of watching a flat piece of fabric transform into a dimensional work of art is truly unparalleled.
Beyond its aesthetic appeal, an illusion quilt can be a meaningful gift, a treasured family heirloom, or a vibrant centerpiece for your living room. The process of constructing such a quilt encourages careful planning and attention to detail, pushing your creative boundaries. Each seam sewn, each fabric placed, contributes to the overall grand design, culminating in a finished product that is both functional and a testament to your craftsmanship. If you’ve been searching for a quilting project that combines artistic flair with technical challenge, the illusion quilt is your perfect match. Prepare to be enchanted by the fabric-based magic you’re about to create.
Choosing Your Fabrics Wisely: The Heart of the Illusion
The success of an illusion quilt hinges significantly on your fabric choices. While the pattern provides the structure, the fabrics breathe life into the optical effect. For this project, you’ll need two distinct types of illusion fabric and four different solid-color fabrics. But what exactly is an “illusion fabric”? These are often fabrics with busy, intricate, or gradient patterns that, when cut and pieced in a specific way, contribute to the depth and movement of the design. They don’t necessarily need to be “3D fabrics” but rather prints that allow for a fluid or multi-directional appearance.
When selecting your illusion fabrics, consider prints that have a strong sense of movement or a subtle blend of colors. One might be darker or have a bolder pattern, while the other offers a lighter or more subdued contrast. For your four solid-color fabrics, think about how they will interact with the illusion prints and with each other. These solids will define the geometric shapes that frame and enhance the illusion. Aim for a palette that creates clear contrast, allowing the diamond and half-triangle square blocks to pop. For instance, a light, a medium, and two darker solids can create a fantastic sense of depth. Always consider the overall color scheme of the room where the quilt will reside to ensure harmony. Don’t be afraid to experiment with fabric swatches to visualize how they’ll play together before making your final cuts. The right combination will elevate your illusion quilt from beautiful to truly breathtaking.
Essential Materials for Your Illusion Quilt Project
Before you begin sewing, gathering all your materials is crucial for a smooth and enjoyable quilting experience. Having everything laid out and ready will help maintain your creative flow and ensure precision.
- 2 distinct illusion fabrics: Choose patterns that will enhance the optical effect.
- 4 different solid color fabrics: Select colors that provide good contrast and complement your illusion fabrics.
- Sharp scissors or a rotary cutter and a self-healing cutting mat: Precision cutting is paramount for an accurate illusion.
- A clear quilting ruler: Essential for straight cuts and accurate measurements.
- Needle and thread: Matching thread color to your fabrics is often recommended for a clean finish.
- Iron, for pressing: Pressing seams open or to the side is critical for flat blocks and accurate piecing.
- Sewing machine: A reliable machine with a good ¼-inch foot will be your best friend.
- Pattern (Click here to download and print the pattern): Your indispensable guide for fabric dimensions and block assembly.
Preparation: Laying the Foundation for Success
A successful quilting project begins with meticulous preparation. Even before you pick up your rotary cutter, take the time to review the entire pattern. Familiarize yourself with all the cutting dimensions and assembly steps. This foresight will prevent mistakes and ensure you have enough fabric. Consider pre-washing and drying your fabrics to prevent shrinkage and color bleeding after the quilt is finished. While some quilters skip this step, it’s a good practice, especially for fabrics of unknown quality or those with vibrant dyes.
Once your fabrics are prepared, the importance of accurate cutting cannot be overstated, particularly for an illusion quilt where small discrepancies can disrupt the optical effect. Use a sharp rotary cutter, a fresh blade, and a reliable quilting ruler for precise, straight cuts. Double-check all measurements before cutting to ensure every piece is exactly as the pattern specifies. Lay out your cut pieces according to the pattern to visualize the initial arrangement. This careful preparation phase will lay a solid foundation for your sewing and significantly contribute to the overall success and stunning appearance of your finished illusion quilt.
Step-by-Step Directions: Crafting Your Illusion Quilt
Now that your materials are ready and your fabrics are precisely cut, it’s time to bring your illusion quilt to life. Follow these detailed steps carefully, paying close attention to accuracy and pressing.
Phase 1: Constructing the Diamond Blocks and Initial Layout
Step 1: Fabric Cutting and Diamond Block Assembly
Begin by cutting all your fabric pieces to the exact dimensions specified in the free pattern. Precision here is paramount to ensure your illusion forms correctly. Next, print and carefully cut out the provided template. This template will guide the creation of your distinctive diamond or pointed triangle blocks. Place the template centrally on one of your chosen solid-color fabric pieces, which will form the “center” of your diamond. This central piece will serve as the core around which the illusion will build.
To start forming the diamond, fold one diagonal side of the paper template back. Then, using this fold as a guide, trim your fabric ¼ inch away from the fold line. This creates a precise edge for your first seam. Immediately, place another solid fabric piece underneath this trimmed edge, ensuring the edges are perfectly lined up. Using a ¼-inch seam allowance, sew these two pieces together. Once sewn, carefully press the seam open to reduce bulk and ensure the block lies flat. This critical step sets the stage for accurate subsequent seams. Repeat this process on all four sides of your central fabric piece, adding a new solid fabric strip and pressing each seam open after sewing. The continuous pressing ensures your block remains flat and square. After all four sides are attached, trim the excess fabric from the sides of your developing block to straighten the edges, creating a clean, defined square. Once the diamond blocks are completed, you will proceed to sew the remaining rectangle fabrics as per the pattern instructions, finishing the distinct diamond blocks that will form key elements of your illusion. Finally, divide your main illusion fabric into nine equal sections. Position one section at the very center of your quilt layout, and then place the remaining eight sections in the four corners surrounding this central piece, forming an initial 3×3 grid foundation.
Phase 2: Assembling the Quilt’s Core and Final Touches
Step 2: Half-Triangle Squares, Block Placement, and Final Assembly
With your initial layout established, turn your attention to the square fabric pieces designated for the corners. These will be transformed into Half-Triangle Squares (HTS), a fundamental quilting unit. Construct your HTS as per the pattern, ensuring crisp diagonal seams. Once created, divide these HTS into four sections and carefully place them on the four outer corners of your initial 3×3 layout. These HTS will contribute significantly to the dynamic edges of your illusion.
Next, take your completed diamond blocks. Divide these blocks into four sections and strategically place them on the top, bottom, and each side of the central illusion fabric section. As you position these, pay crucial attention to orientation: ensure that the same colors within the diamond blocks are consistently facing towards the center illusion section. This precise alignment is vital for the optical effect to materialize. Now comes a critical adjustment: carefully fine-tune the position of the half-triangle squares on the corners. The goal here is to ensure that the colors facing inward from the HTS perfectly match the corresponding colors of the central sections. This harmonious color alignment is where the magic of the illusion truly begins to take shape. Once all primary elements are positioned, fill in any remaining spaces with fabric squares of the same colors, completing the full visual grid of your quilt block.
Begin the sewing process by first joining the individual corner sets. This methodical approach ensures accuracy. After all corners are sewn, proceed to sew these smaller units into larger sections, following the pattern’s guidance. Once you’re done sewing all the sections of the entire block, arrange and sew them into three distinct horizontal rows. Finally, carefully sew these three rows together, ensuring all seams align perfectly, to complete your main illusion quilt block. The optical effect should now be clearly visible! The very last step to frame your masterpiece is to add the border, using the other illusion fabric. This border will not only provide a polished finish but also enhance the captivating depth of your quilt. Once the border is attached, your breathtaking illusion quilt top is complete, ready for batting, backing, quilting, and binding.
Finishing Touches: Borders and Beyond
With your main illusion quilt block beautifully pieced together, the next step is to add the border. The border, crafted from your second illusion fabric, serves several purposes: it frames your stunning optical creation, adds stability to the quilt top, and often enhances the overall visual effect. Carefully measure and cut your border strips, ensuring they are perfectly straight and consistent in width. Attach them methodically, starting with the side borders and then the top and bottom, or vice-versa, depending on your preference and the pattern’s recommendation. Press all border seams flat and true.
Once your quilt top is complete, you’ll proceed to the final stages of quilting: layering it with batting and a backing fabric, machine or hand quilting it to secure the layers, and finally, binding the edges for a professional and durable finish. These steps are crucial for transforming your pieced top into a functional and long-lasting quilt, ready to be displayed and cherished.
Pro Tips for a Flawless Illusion Quilt
Achieving a truly mesmerizing illusion quilt requires more than just following the steps; it demands attention to detail and a few seasoned quilter’s tricks. Here are some pro tips to ensure your project shines:
- Precision is Paramount: Every cut, every seam, matters. Use a fresh rotary cutter blade, an accurate ruler, and a ¼-inch seam allowance foot on your machine. Even slight inaccuracies can throw off the optical effect.
- Pressing is Your Friend: Do not underestimate the power of a good iron. Press seams after every step – not just at the end. This helps blocks lie flat, match up precisely, and contributes to the crispness of your finished design.
- Test Your Stitches: Before sewing your main blocks, do a few test seams on scraps of your chosen fabric. This helps you confirm your ¼-inch seam allowance is accurate and your tension is correct.
- Don’t Rush the Process: Quilting, especially intricate designs like illusion quilts, is a marathon, not a sprint. Take your time, enjoy the process, and step away if you feel frustrated. Mistakes are easier to fix when you’re calm.
- Utilize the Video Tutorial: The SewVeryEasy video is an invaluable resource. Watch sections multiple times, especially for tricky steps, to visualize the process before you sew.
- Fabric Choice Matters: We’ve discussed this, but it bears repeating. High-contrast solids and intriguing illusion prints are key. Lay them out and photograph them to see how they look together before committing.
- Stay Organized: Keep your cut pieces organized by step or color. Labeling them can prevent confusion, especially with numerous similar-looking parts.
Conclusion: Showcase Your Masterpiece!
Congratulations! You’ve navigated the captivating world of illusion quilting, transforming simple fabrics into a stunning work of art that delights the eye. This project, while challenging at times, offers immense satisfaction as you watch the intricate optical effect unfold with each carefully placed stitch. Your finished illusion quilt is not just a testament to your sewing skills but also a unique piece of home decor, showcasing creativity and precision.
We encourage you to share your beautiful creation with the quilting community! Remember, the original inspiration and detailed guidance for this project came from SewVeryEasy via YouTube. Be sure to visit and subscribe to her channel for more incredible tutorials and endless inspiration. Now, proudly display your mesmerizing Illusion Quilt and enjoy the endless compliments it’s sure to attract!
*All image credit belongs to SewVeryEasy via YouTube. Follow and subscribe to her channel for more amazing quilting content!